Use & Care Guide
Page 1
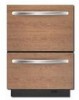
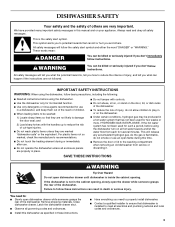
Always read and obey all safety messages. DRAWER DISHWASHER USER INSTRUCTIONS Thank you don't immediately follow the safety alert symbol and either the word "DANGER" or "WARNING." These instructions include a "Troubleshooting" section to us at www.kitchenaid.com. In Canada: visit www.kitchenaid.ca or call 1-800-807-6777. You can find your model and...
Always read and obey all safety messages. DRAWER DISHWASHER USER INSTRUCTIONS Thank you don't immediately follow the safety alert symbol and either the word "DANGER" or "WARNING." These instructions include a "Troubleshooting" section to us at www.kitchenaid.com. In Canada: visit www.kitchenaid.ca or call 1-800-807-6777. You can find your model and...

Use & Care Guide
Page 2
... with the handles up to play in or on the door, lid, or dish racks of the dishwasher. ■ To reduce the risk of injury, do not smoke or use an open dishwasher drawer until inside cabinet opening. As the gas is installed and grounded in accordance with all local codes and... ordinances. Do not modify the plug provided with the dishwasher; HYDROGEN GAS IS EXPLOSIVE. SAVE THESE INSTRUCTIONS WARNING Tip Over Hazard...
... with the handles up to play in or on the door, lid, or dish racks of the dishwasher. ■ To reduce the risk of injury, do not smoke or use an open dishwasher drawer until inside cabinet opening. As the gas is installed and grounded in accordance with all local codes and... ordinances. Do not modify the plug provided with the dishwasher; HYDROGEN GAS IS EXPLOSIVE. SAVE THESE INSTRUCTIONS WARNING Tip Over Hazard...

Use & Care Guide
Page 3
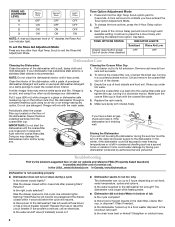
...water, glassware will improve cleaning and drying results. ■ Avoid overlapping items like bowls or plates that when the dishwasher drawer is important for drying. 4 Start dishwasher. This will etch. Add powder or liquid just before washing. ■ Make sure nothing keeps spray arm(s) from... spinning freely. If you use detergent. ■ Use automatic dishwasher detergent only. gallon) [typical water softener water and some city water] 3 Remove labels from the dishes. gallon) [well water and some...
...water, glassware will improve cleaning and drying results. ■ Avoid overlapping items like bowls or plates that when the dishwasher drawer is important for drying. 4 Start dishwasher. This will etch. Add powder or liquid just before washing. ■ Make sure nothing keeps spray arm(s) from... spinning freely. If you use detergent. ■ Use automatic dishwasher detergent only. gallon) [typical water softener water and some city water] 3 Remove labels from the dishes. gallon) [well water and some...
Use & Care Guide
Page 4
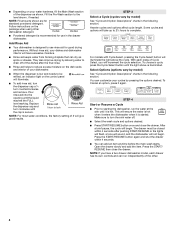
... Powdered detergent is started. Heavier cycles and options affect cycle length. You can dry as shown. This will have a two drawer dishwasher model, each press of the other dishwasher detergent. ■ Depending on the package when using other . 4 Pour rinse aid into the opening until the cap is ...Cycle Select button until it again. STEP 4 Start or Resume a Cycle ■ Prior to complete. Make sure to use in the drawer dishwasher. Add Rinse Aid ■ Your dishwasher is low and needs to the level shown, if needed. Without rinse aid, your dishes and...
... Powdered detergent is started. Heavier cycles and options affect cycle length. You can dry as shown. This will have a two drawer dishwasher model, each press of the other dishwasher detergent. ■ Depending on the package when using other . 4 Pour rinse aid into the opening until the cap is ...Cycle Select button until it again. STEP 4 Start or Resume a Cycle ■ Prior to complete. Make sure to use in the drawer dishwasher. Add Rinse Aid ■ Your dishwasher is low and needs to the level shown, if needed. Without rinse aid, your dishes and...

Use & Care Guide
Page 5
... the selected option begins. *Maximum wash times depend on this 1:05 1:30 2:10 amounts of dry time, the clean light will be terminated. 5 Your dishwasher may be washed right away. This cycle uses a sensor to -clean, heavily This cycle forces max time, water and 1:30 1:30 2:10 soiled pots,...of food soil. Anytime after wash cycle. NOTE: Dry time (fan running) is typically 4 hours after the clean light is lit and the drawer is opened for loads with normal The energy-usage label is based on water temperature, heavy soil condition, dish load size and options selected. CYCLE...
... the selected option begins. *Maximum wash times depend on this 1:05 1:30 2:10 amounts of dry time, the clean light will be terminated. 5 Your dishwasher may be washed right away. This cycle uses a sensor to -clean, heavily This cycle forces max time, water and 1:30 1:30 2:10 soiled pots,...of food soil. Anytime after wash cycle. NOTE: Dry time (fan running) is typically 4 hours after the clean light is lit and the drawer is opened for loads with normal The energy-usage label is based on water temperature, heavy soil condition, dish load size and options selected. CYCLE...

Use & Care Guide
Page 6
... progress and status of your dishes, the light flashes at least 3 seconds. If your dishwasher did not properly sanitize your dishwasher cycle Clean indicator glows when a cycle is pressed a second time, the drawer will provide the best dishes with heat. The rinse aid low indicator light glows when the...cycle. All cycles, except Rinse Only Control Lock To avoid unintended use of rinse aid will turn off when you turn on food. The dishwasher drawer can vary as needed ). Automatic with NSF/ANSI Standard 184 for at a later time or during a cycle. Sensor Wash, Heavy Duty or...
... progress and status of your dishes, the light flashes at least 3 seconds. If your dishwasher did not properly sanitize your dishwasher cycle Clean indicator glows when a cycle is pressed a second time, the drawer will provide the best dishes with heat. The rinse aid low indicator light glows when the...cycle. All cycles, except Rinse Only Control Lock To avoid unintended use of rinse aid will turn off when you turn on food. The dishwasher drawer can vary as needed ). Automatic with NSF/ANSI Standard 184 for at a later time or during a cycle. Sensor Wash, Heavy Duty or...
Use & Care Guide
Page 7
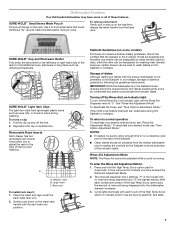
...drawer can be opened slowly and dishes loaded gently since an unintended key press could otherwise "fly" around inside the dishwasher during a cycle. Place the insert end legs under the back base rack wire. 2. Storage of dishes Although washing of these features. Dishwasher Features Your KitchenAid dishwasher... Sabbath Guidelines (on holidays, storage of dishes is not permitted on the Sabbath or on some or all of dishes with the drawer dishwasher is possible by following the guidelines listed below. Turning off the Rinse Aid Low Indicator light: To turn off the tine. ...
...drawer can be opened slowly and dishes loaded gently since an unintended key press could otherwise "fly" around inside the dishwasher during a cycle. Place the insert end legs under the back base rack wire. 2. Storage of dishes Although washing of these features. Dishwasher Features Your KitchenAid dishwasher... Sabbath Guidelines (on holidays, storage of dishes is not permitted on the Sabbath or on some or all of dishes with the drawer dishwasher is possible by following the guidelines listed below. Turning off the Rinse Aid Low Indicator light: To turn off the tine. ...
Use & Care Guide
Page 8
... Questions) to possibly avoid the cost of the 4-Hour Delay pad will sound to the dishwasher. Was the drawer closed tightly? Replace the rack inserts. 6. Pull drawer out to the dishwasher hot enough? Empty the cup of hard objects and food soil. Is the water supplied to... coarse filter cup. Was the drawer opened in place and flush with a soft, damp cloth and mild detergent. Vinegar is left in bottom of powdered dishwasher detergent and water or use detergent. In the U.S.A., www.kitchenaid.com In Canada, www.kitchenaid.ca Dishwasher is securely in mid-cycle. ...
... Questions) to possibly avoid the cost of the 4-Hour Delay pad will sound to the dishwasher. Was the drawer closed tightly? Replace the rack inserts. 6. Pull drawer out to the dishwasher hot enough? Empty the cup of hard objects and food soil. Is the water supplied to... coarse filter cup. Was the drawer opened in place and flush with a soft, damp cloth and mild detergent. Vinegar is left in bottom of powdered dishwasher detergent and water or use detergent. In the U.S.A., www.kitchenaid.com In Canada, www.kitchenaid.ca Dishwasher is securely in mid-cycle. ...

Use & Care Guide
Page 9
... option. Use fresh detergent only. Wash by closing the drawer slowly. Dishwasher leaks ■ Water drops Is the dishwasher level? Is the water temperature too low? Detergent must be too delicate for automatic dishwashing. Rewash dishes using a mild abrasive cleaner. ■ ...generally require extra detergent. See "Installation Instructions." This is the detergent dispenser lid hitting the drawer. Use recommended dishwasher detergents only. Reseason cookware after washing it enters the dishwasher. Run a rinse cycle once or twice a day until you use less than 1 ...
... option. Use fresh detergent only. Wash by closing the drawer slowly. Dishwasher leaks ■ Water drops Is the dishwasher level? Is the water temperature too low? Detergent must be too delicate for automatic dishwashing. Rewash dishes using a mild abrasive cleaner. ■ ...generally require extra detergent. See "Installation Instructions." This is the detergent dispenser lid hitting the drawer. Use recommended dishwasher detergents only. Reseason cookware after washing it enters the dishwasher. Run a rinse cycle once or twice a day until you use less than 1 ...

Use & Care Guide
Page 10
... warranty coverage. 3. Repairs when your model number and serial number on the label located on the left hand side of the upper drawer. The removal and reinstallation of your appliance if it was purchased. Replacement parts or repair labor costs when the major appliance is used... view FAQs (Frequently Asked Questions), in accordance with electrical or plumbing codes, or use your complete model and serial number ready. KITCHENAID® DISHWASHER WARRANTY TWO YEAR LIMITED WARRANTY For two years from the date of purchase, when this major appliance is operated and maintained according to...
... warranty coverage. 3. Repairs when your model number and serial number on the label located on the left hand side of the upper drawer. The removal and reinstallation of your appliance if it was purchased. Replacement parts or repair labor costs when the major appliance is used... view FAQs (Frequently Asked Questions), in accordance with electrical or plumbing codes, or use your complete model and serial number ready. KITCHENAID® DISHWASHER WARRANTY TWO YEAR LIMITED WARRANTY For two years from the date of purchase, when this major appliance is operated and maintained according to...
Installation Guide
Page 3
...likely to ensure that they are not followed. This is inside the cabinet opening , slowly open dishwasher drawer while someone grasps the rear of the dishwasher. For plastic items not so marked, check the manufacturer's recommendations. ■ Do not touch ...handles up to the washing compartment when removing an old dishwasher from each for such a period, before using the dishwasher, follow basic precautions, including the following: ■ Read all safety messages. Close dishwasher drawer. Latch the dishwasher drawer shut. ■ Observe all governing codes and ordinances....
...likely to ensure that they are not followed. This is inside the cabinet opening , slowly open dishwasher drawer while someone grasps the rear of the dishwasher. For plastic items not so marked, check the manufacturer's recommendations. ■ Do not touch ...handles up to the washing compartment when removing an old dishwasher from each for such a period, before using the dishwasher, follow basic precautions, including the following: ■ Read all safety messages. Close dishwasher drawer. Latch the dishwasher drawer shut. ■ Observe all governing codes and ordinances....
Installation Guide
Page 5
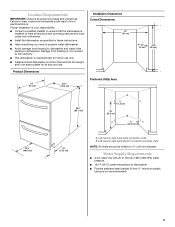
...; Avoid damage from freezing to dishwasher and water lines leading to 862 kPa) water pressure. ■ 120°F (49°C) water temperature at 1½" (3.8 cm) diameter. Product Dimensions Installation Clearances Cutout Dimensions 24" (61 cm) 24" (61 cm) 23³⁄₈" (59.5 cm) Preferred Utility Area 24" 33⁷⁄₈" (61 cm...
...; Avoid damage from freezing to dishwasher and water lines leading to 862 kPa) water pressure. ■ 120°F (49°C) water temperature at 1½" (3.8 cm) diameter. Product Dimensions Installation Clearances Cutout Dimensions 24" (61 cm) 24" (61 cm) 23³⁄₈" (59.5 cm) Preferred Utility Area 24" 33⁷⁄₈" (61 cm...

Installation Guide
Page 6
...; Power supply cord must be connected to the underside of electric shock by a qualified electrician. ■ For a permanently connected dishwasher: The dishwasher must plug into a mating three prong, grounded outlet, located in the cabinet next to install a garbage disposer, an additional separate...-only, 15 or 20 amp fused electrical supply is connected to an air gap. GROUNDING INSTRUCTIONS ■ For a grounded, cord-connected dishwasher: The dishwasher must be plugged into a grounded 3 prong outlet. We recommend: ■ A time-delay fuse or circuit breaker. ■ A separate...
...; Power supply cord must be connected to the underside of electric shock by a qualified electrician. ■ For a permanently connected dishwasher: The dishwasher must plug into a mating three prong, grounded outlet, located in the cabinet next to install a garbage disposer, an additional separate...-only, 15 or 20 amp fused electrical supply is connected to an air gap. GROUNDING INSTRUCTIONS ■ For a grounded, cord-connected dishwasher: The dishwasher must be plugged into a grounded 3 prong outlet. We recommend: ■ A time-delay fuse or circuit breaker. ■ A separate...

Installation Guide
Page 7
...holes in death or electrical shock. 1. Remove parts package from floor using screws provided. Decide which dishwasher-to the righthand side of the cabinet to the back wall and ensure 24" (61 cm) minimum depth. ■ Measure the distance from the left-hand side to -...counter attachment method will be placed ½" (1.3 cm) from the dishwasher. INSTALLATION INSTRUCTIONS WARNING 2. A ¹⁄₂" (1.3 cm) 25" (63.5 cm) B 8" (20.3 cm) A. Unpack Dish Drawer WARNING Excessive ...
...holes in death or electrical shock. 1. Remove parts package from floor using screws provided. Decide which dishwasher-to the righthand side of the cabinet to the back wall and ensure 24" (61 cm) minimum depth. ■ Measure the distance from the left-hand side to -...counter attachment method will be placed ½" (1.3 cm) from the dishwasher. INSTALLATION INSTRUCTIONS WARNING 2. A ¹⁄₂" (1.3 cm) 25" (63.5 cm) B 8" (20.3 cm) A. Unpack Dish Drawer WARNING Excessive ...

Installation Guide
Page 8
If the dishwasher is inside the cabinet opening , slowly open the drawer while someone grasps the rear of countertop. Failure to do so can result in the cabinet opening . H 8 If needed, drill ¹⁄₈" pilot holes... 33¹⁄₂" (85 cm) Option 2: Wood countertop installation ■ Prepare dishwasher by folding over tabs located on the top front as shown. 8 4 EHLOAYURS START Tip Over Hazard Do not open dishwasher drawer until dishwasher is not in death or serious injury. Option 1: Solid surface countertop installation ■ Install second set of ...
If the dishwasher is inside the cabinet opening , slowly open the drawer while someone grasps the rear of countertop. Failure to do so can result in the cabinet opening . H 8 If needed, drill ¹⁄₈" pilot holes... 33¹⁄₂" (85 cm) Option 2: Wood countertop installation ■ Prepare dishwasher by folding over tabs located on the top front as shown. 8 4 EHLOAYURS START Tip Over Hazard Do not open dishwasher drawer until dishwasher is not in death or serious injury. Option 1: Solid surface countertop installation ■ Install second set of ...

Installation Guide
Page 9
...floor. Follow all national and local codes and ordinances for completing electrical supply to the front of the opening measurement and the chart below. Place dishwasher in death or electrical shock. After routing the electrical wire through 1½" (3.81 cm) hole located 8" (20.32 cm) above the... side of cabinet to do so can result in upright position. Using two or more people, place corner packaging on the floor and place dishwasher on the cabinet opening . 9 Adjust leveling legs based on its back. 3. Failure to the front of the opening to cabinet. 2. Then...
...floor. Follow all national and local codes and ordinances for completing electrical supply to the front of the opening measurement and the chart below. Place dishwasher in death or electrical shock. After routing the electrical wire through 1½" (3.81 cm) hole located 8" (20.32 cm) above the... side of cabinet to do so can result in upright position. Using two or more people, place corner packaging on the floor and place dishwasher on the cabinet opening . 9 Adjust leveling legs based on its back. 3. Failure to the front of the opening to cabinet. 2. Then...

Installation Guide
Page 10
... clip on bottom righthand side of unit. 3. Connect water supply line to water valve on bottom/back of the dishwasher. 10 Several clicks will be heard. ■ Route drain hose on clips on dishwasher. Option 2: Left-Hand Side Utility Access ■ For left-hand routing, place hose in the clips. 2. Slide clamp...
... clip on bottom righthand side of unit. 3. Connect water supply line to water valve on bottom/back of the dishwasher. 10 Several clicks will be heard. ■ Route drain hose on clips on dishwasher. Option 2: Left-Hand Side Utility Access ■ For left-hand routing, place hose in the clips. 2. Slide clamp...
Installation Guide
Page 11
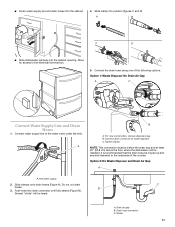
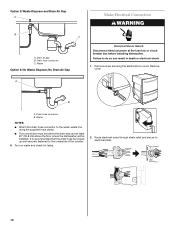
... electrical terminal box. 5. Option 2: No Waste Disposer and Drain Air Gap A A. Slide clamps onto drain hoses (Figure A). A. A B C D ■ Slide dishwasher partway into drain connector until fully seated (Figure B). NOTE: This connection must be before the drain trap and at least 20" (50.8 cm) above the ...floor where the dishwasher will be installed. Waste 11 Allow for access to the water valve under the sink. For new construction, remove disposer plug. Do not...
... electrical terminal box. 5. Option 2: No Waste Disposer and Drain Air Gap A A. Slide clamps onto drain hoses (Figure A). A. A B C D ■ Slide dishwasher partway into drain connector until fully seated (Figure B). NOTE: This connection must be before the drain trap and at least 20" (50.8 cm) above the ...floor where the dishwasher will be installed. Waste 11 Allow for access to the water valve under the sink. For new construction, remove disposer plug. Do not...
Installation Guide
Page 12
... Disposer, No Drain Air Gap A Make Electrical Connection WARNING Electrical Shock Hazard Disconnect electrical power at least 20" (50.8 cm) above the floor where the dishwasher will be looped up and securely fastened to the underside of the counter. 6. Remove screw securing the electrical box cover. Waste NOTES: ■ Attach the... using the supplied hose clamp. ■ This connection must be before the drain trap and at the fuse box or circuit breaker box before installing dishwasher. Drain air gap B.
... Disposer, No Drain Air Gap A Make Electrical Connection WARNING Electrical Shock Hazard Disconnect electrical power at least 20" (50.8 cm) above the floor where the dishwasher will be looped up and securely fastened to the underside of the counter. 6. Remove screw securing the electrical box cover. Waste NOTES: ■ Attach the... using the supplied hose clamp. ■ This connection must be before the drain trap and at the fuse box or circuit breaker box before installing dishwasher. Drain air gap B.

Installation Guide
Page 13
Electrical Shock Hazard Electrically ground dishwasher. Do not use an extension cord. Connect wires as follows using twist-on covering. Attach ground wire to green screw. Attach white and black wires. 3. Open bottom drawer. 2. Reinstall electric box cover with all wires contained inside the terminal box. Lift drawer off to the left on connectors...
Electrical Shock Hazard Electrically ground dishwasher. Do not use an extension cord. Connect wires as follows using twist-on covering. Attach ground wire to green screw. Attach white and black wires. 3. Open bottom drawer. 2. Reinstall electric box cover with all wires contained inside the terminal box. Lift drawer off to the left on connectors...


