Use & Care Guide
Page 3
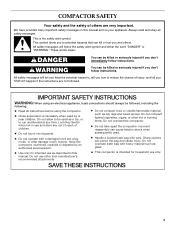
...or to reduce the chance of injury, and tell you what can kill or hurt you don't immediately follow instructions. Do not overload trash bag with heavy material such as oily rags and insect sprays. Do not use only. All safety messages will tell you to be...your appliance. This is necessary when used . s Close supervision is the safety alert symbol. COMPACTOR SAFETY Your safety and the safety of others . Do not compact lighted cigarettes, cigars, or other than manufacturer's recommended attachments. These words mean: You can pierce the bag and cause injury.
...or to reduce the chance of injury, and tell you what can kill or hurt you don't immediately follow instructions. Do not overload trash bag with heavy material such as oily rags and insect sprays. Do not use only. All safety messages will tell you to be...your appliance. This is necessary when used . s Close supervision is the safety alert symbol. COMPACTOR SAFETY Your safety and the safety of others . Do not compact lighted cigarettes, cigars, or other than manufacturer's recommended attachments. These words mean: You can pierce the bag and cause injury.
Use & Care Guide
Page 4
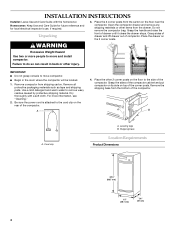
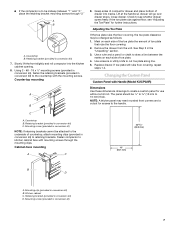
...base Location Requirements Product Dimensions 34¹⁄₈" (86.7 cm) 15" (38.1 cm) 24" (61 cm) 4 Unpacking 3. Do not remove the compactor bag. Dry thoroughly with the homeowner. A 4. Grasp the handle and raise the front of compactor. Use a mild detergent and warm water to the cord clip on ... on the rear of the compactor cabinet and put compactor on its side on the floor to move compactor. IMPORTANT: s Do not grasp console to do so can result in the room where the compactor will be located. 1. Be sure the power cord is attached to remove waxy residue caused...
...base Location Requirements Product Dimensions 34¹⁄₈" (86.7 cm) 15" (38.1 cm) 24" (61 cm) 4 Unpacking 3. Do not remove the compactor bag. Dry thoroughly with the homeowner. A 4. Grasp the handle and raise the front of compactor. Use a mild detergent and warm water to the cord clip on ... on the rear of the compactor cabinet and put compactor on its side on the floor to move compactor. IMPORTANT: s Do not grasp console to do so can result in the room where the compactor will be located. 1. Be sure the power cord is attached to remove waxy residue caused...
Use & Care Guide
Page 6
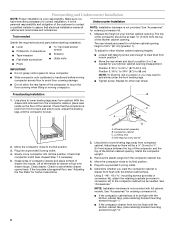
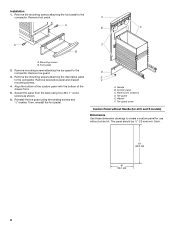
... pliers to lower leveling legs away from front to back and side to side. Adjust legs so there will go over drawer stops. Stand the compactor upright. 3. s Level s Phillips No. 2 screwdriver s Tape measure s Flat-blade screwdriver s hex-head socket wrench s Scissors s Utility knife...opening . Using 2 - #8 - 18 x mounting screws (provided in conversion kit), attach the retaining brackets (provided in position 3, you may need to add shims under the front leveling legs. s If the compactor cabinet face is your kitchen cabinet opening . s Tighten screw. With the drawer still...
... pliers to lower leveling legs away from front to back and side to side. Adjust legs so there will go over drawer stops. Stand the compactor upright. 3. s Level s Phillips No. 2 screwdriver s Tape measure s Flat-blade screwdriver s hex-head socket wrench s Scissors s Utility knife...opening . Using 2 - #8 - 18 x mounting screws (provided in conversion kit), attach the retaining brackets (provided in position 3, you may need to add shims under the front leveling legs. s If the compactor cabinet face is your kitchen cabinet opening . s Tighten screw. With the drawer still...
Use & Care Guide
Page 7
...to draw a line between "1" and "3," place the retaining bracket mounting screws through the mounting clips. Countertop B. Cabinet-face mounting A C 23 60.5 mm) 15" (38.1 mm) B D A. Kitchen cabinet C. Adjusting the Toe Plate If the toe plate rubs the floor covering, the toe plate clearance may need ...B. NOTE: A thicker panel may be ¹⁄₂" to 13 mm to 16 mm) thick. s If the compactor is to be attached to the underside of countertop, attach mounting clips (provided in conversion kit) to retaining brackets. Lift at the handle so drawer will go over drawer stops. ...
...to draw a line between "1" and "3," place the retaining bracket mounting screws through the mounting clips. Countertop B. Cabinet-face mounting A C 23 60.5 mm) 15" (38.1 mm) B D A. Kitchen cabinet C. Adjusting the Toe Plate If the toe plate rubs the floor covering, the toe plate clearance may need ...B. NOTE: A thicker panel may be ¹⁄₂" to 13 mm to 16 mm) thick. s If the compactor is to be attached to the underside of countertop, attach mounting clips (provided in conversion kit) to retaining brackets. Lift at the handle so drawer will go over drawer stops. ...
Use & Care Guide
Page 8
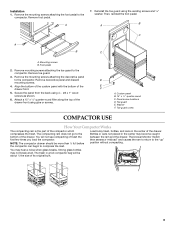
... (13 mm) min. Remove toe guard. 3. Remove the mounting screws attaching the decorative panel to create a custom panel for use without a trim kit... all C and S models) Dimensions Use these dimension drawings to the compactor. Remove the mounting screws attaching the foot pedal to the compactor. Mounting screws B. Secure the panel from the back using the existing ... B A. Washer F. Foot pedal 2. Remove foot pedal. Toe guard E. Remove mounting screws attaching the toe guard to the compactor. D E F A. Installation 1. Reinstall the toe guard using four #8 x 1" wood screws as shown...
... (13 mm) min. Remove toe guard. 3. Remove the mounting screws attaching the decorative panel to create a custom panel for use without a trim kit... all C and S models) Dimensions Use these dimension drawings to the compactor. Remove the mounting screws attaching the foot pedal to the compactor. Mounting screws B. Secure the panel from the back using the existing ... B A. Washer F. Foot pedal 2. Remove foot pedal. Toe guard E. Remove mounting screws attaching the toe guard to the compactor. D E F A. Installation 1. Reinstall the toe guard using four #8 x 1" wood screws as shown...
Use & Care Guide
Page 9
... panel with the bottom of the drawer front using glue or screws. Remove toe guard. 3. The trash in the center of trash the first few times you load the compactor. Strong glass bottles may not break at all. Attach a 15" x ¹⁄₂" quarter-round filler along the top of the drawer front. 5. Remove the...
... panel with the bottom of the drawer front using glue or screws. Remove toe guard. 3. The trash in the center of trash the first few times you load the compactor. Strong glass bottles may not break at all. Attach a 15" x ¹⁄₂" quarter-round filler along the top of the drawer front. 5. Remove the...

Use & Care Guide
Page 16
... Model number Serial number Purchase date 9872216 © 2005. Service must provide proof of purchase, when the compactor is operated and maintained according to instructions attached to or furnished with the product, KitchenAid or KitchenAid Canada (hereafter "KitchenAid") will need it is installed in an inaccessible location or is not installed in accordance with published...
... Model number Serial number Purchase date 9872216 © 2005. Service must provide proof of purchase, when the compactor is operated and maintained according to instructions attached to or furnished with the product, KitchenAid or KitchenAid Canada (hereafter "KitchenAid") will need it is installed in an inaccessible location or is not installed in accordance with published...
Warranty Information
Page 1
...CHARCOAL FILTER AND AIR FRESHENER For thirty days from the date of purchase, when the compactor is installed, operated and maintained according to instructions attached to or furnished with the product, KitchenAid will provide a replacement filter or air freshener if the original filter or air freshener fails... YOU SPECIFIC LEGAL RIGHTS AND YOU MAY ALSO HAVE OTHER RIGHTS, WHICH VARY FROM STATE TO STATE OR PROVINCE TO PROVINCE. KITCHENAID® COMPACTOR WARRANTY ONE YEAR LIMITED WARRANTY For one year from the date of purchase, when this major appliance is operated and maintained according...
...CHARCOAL FILTER AND AIR FRESHENER For thirty days from the date of purchase, when the compactor is installed, operated and maintained according to instructions attached to or furnished with the product, KitchenAid will provide a replacement filter or air freshener if the original filter or air freshener fails... YOU SPECIFIC LEGAL RIGHTS AND YOU MAY ALSO HAVE OTHER RIGHTS, WHICH VARY FROM STATE TO STATE OR PROVINCE TO PROVINCE. KITCHENAID® COMPACTOR WARRANTY ONE YEAR LIMITED WARRANTY For one year from the date of purchase, when this major appliance is operated and maintained according...