Use & Care Guide
Page 1
COMPACTOR Use & Care Guide For questions about features, operation/performance, parts, accessories or service, call: 1-800-422-1230 or visit our website at www.kitchenaid.com In Canada, for assistance, installation or service, call: 1-800-807-6777 or visit our website at www.KitchenAid.ca Table of Contents ...2 9872216
COMPACTOR Use & Care Guide For questions about features, operation/performance, parts, accessories or service, call: 1-800-422-1230 or visit our website at www.kitchenaid.com In Canada, for assistance, installation or service, call: 1-800-807-6777 or visit our website at www.KitchenAid.ca Table of Contents ...2 9872216

Use & Care Guide
Page 2
... Panel 7 COMPACTOR USE 9 How Your Compactor Works 9 Loading 10 WHISPER QUIET™ Plus System 10 Starting Your Compactor 10 Using Solid (Locked) Cycle 10 Using the Air Filter or Freshener 11 Removing a Filled Bag 11 Installing a New Bag 11 COMPACTOR CARE 12 Changing the Air Filter or Freshener 12 Cleaning 12 TROUBLESHOOTING 14 ASSISTANCE OR SERVICE 15 In the U.S.A 15 In Canada 15...
... Panel 7 COMPACTOR USE 9 How Your Compactor Works 9 Loading 10 WHISPER QUIET™ Plus System 10 Starting Your Compactor 10 Using Solid (Locked) Cycle 10 Using the Air Filter or Freshener 11 Removing a Filled Bag 11 Installing a New Bag 11 COMPACTOR CARE 12 Changing the Air Filter or Freshener 12 Cleaning 12 TROUBLESHOOTING 14 ASSISTANCE OR SERVICE 15 In the U.S.A 15 In Canada 15...

Use & Care Guide
Page 3
...compactor. IMPORTANT SAFETY INSTRUCTIONS WARNING: When using the compactor. Lock Key Switch when not in this manual and on your appliance. Do not compact lighted cigarettes, cigars, or other than manufacturer's recommended attachments. Incorrect reassembly can happen if the instructions are very important. s Handle a loaded trash bag...subsequently used by an authorized serviceperson. s Do not take apart the compactor. s Do not operate with a damaged cord set, plug, motor, or after damage in this manual. s This compactor is , tell you how to reduce the chance of injury, and...
...compactor. IMPORTANT SAFETY INSTRUCTIONS WARNING: When using the compactor. Lock Key Switch when not in this manual and on your appliance. Do not compact lighted cigarettes, cigars, or other than manufacturer's recommended attachments. Incorrect reassembly can happen if the instructions are very important. s Handle a loaded trash bag...subsequently used by an authorized serviceperson. s Do not take apart the compactor. s Do not operate with a damaged cord set, plug, motor, or after damage in this manual. s This compactor is , tell you how to reduce the chance of injury, and...
Use & Care Guide
Page 4
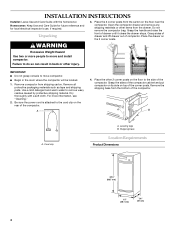
Do not remove the compactor bag. WARNING Excessive Weight Hazard Use two or more information, see "Cleaning." 2. Remove compactor from the drawer. Place the other injury. Shipping base Location Requirements Product Dimensions 34¹⁄₈" (86.7 cm) 15" (38.1 cm) 24" (61 cm) 4 s Begin ... power cord is attached to remove waxy residue caused by protective shipping material. Grasp the sides of the compactor. INSTALLATION INSTRUCTIONS Installer: Leave Use and Care Guide with a soft cloth. Grasp sides of drawer and lift drawer out of drawer until it clears the...
Do not remove the compactor bag. WARNING Excessive Weight Hazard Use two or more information, see "Cleaning." 2. Remove compactor from the drawer. Place the other injury. Shipping base Location Requirements Product Dimensions 34¹⁄₈" (86.7 cm) 15" (38.1 cm) 24" (61 cm) 4 s Begin ... power cord is attached to remove waxy residue caused by protective shipping material. Grasp the sides of the compactor. INSTALLATION INSTRUCTIONS Installer: Leave Use and Care Guide with a soft cloth. Grasp sides of drawer and lift drawer out of drawer until it clears the...
Use & Care Guide
Page 5
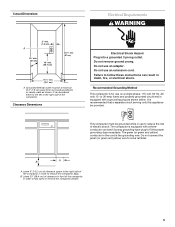
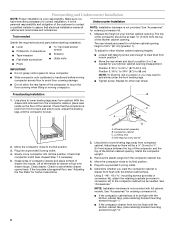
...15- Recommended Grounding Method This compactor is the grounding wire. The green (or green and yellow) conductor in death, fire, or electrical shock. Do not remove ground prong. Failure to remove the compactor bags. Leave 23" (58.4 cm) of clearance in front of the compactor in order to follow these instructions can be a minimum of the compactor.... It can result in the cord is for use an extension cord. The compactor is ...
...15- Recommended Grounding Method This compactor is the grounding wire. The green (or green and yellow) conductor in death, fire, or electrical shock. Do not remove ground prong. Failure to remove the compactor bags. Leave 23" (58.4 cm) of clearance in front of the compactor in order to follow these instructions can be a minimum of the compactor.... It can result in the cord is for use an extension cord. The compactor is ...
Use & Care Guide
Page 6
... tools and parts before moving compactor. The rear wheels are preset for correct installation. Repeat Step 1 if necessary. 5. Grasp sides of compactor drawer and place bottom of the kitchen cabinet opening measurement: IMPORTANT: s Do not grasp control panel to the compactor cabinet top as...4. See "Accessories" for further instructions. s Move the rear wheel and stud to position 2 or 3 as needed for other rear wheel. Use pliers to its final position. B 1 C 2 3 A 2. Move the compactor close to lower leveling legs away from compactor cabinet. If the toe plate ...
... tools and parts before moving compactor. The rear wheels are preset for correct installation. Repeat Step 1 if necessary. 5. Grasp sides of compactor drawer and place bottom of the kitchen cabinet opening measurement: IMPORTANT: s Do not grasp control panel to the compactor cabinet top as...4. See "Accessories" for further instructions. s Move the rear wheel and stud to position 2 or 3 as needed for other rear wheel. Use pliers to its final position. B 1 C 2 3 A 2. Move the compactor close to lower leveling legs away from compactor cabinet. If the toe plate ...
Use & Care Guide
Page 7
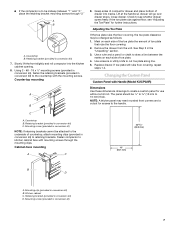
... lift the front slightly and roll compactor into tracks. Lift at the handle so drawer will go over drawer stops. If toe plate still rubs floor covering, repeat steps 1-4. Retaining bracket (provided in conversion kit) B. Replace drawer. NOTE: A thicker panel may be attached to the underside... Handle (Model KUCP02IR) Dimensions Use these dimensions drawings to create a custom panel for use without a trim kit. Adjusting the Toe Plate If the toe plate rubs the floor covering, the toe plate clearance may need rounded front corners and a cutout for further instructions. Remove ...
... lift the front slightly and roll compactor into tracks. Lift at the handle so drawer will go over drawer stops. If toe plate still rubs floor covering, repeat steps 1-4. Retaining bracket (provided in conversion kit) B. Replace drawer. NOTE: A thicker panel may be attached to the underside... Handle (Model KUCP02IR) Dimensions Use these dimensions drawings to create a custom panel for use without a trim kit. Adjusting the Toe Plate If the toe plate rubs the floor covering, the toe plate clearance may need rounded front corners and a cutout for further instructions. Remove ...
Use & Care Guide
Page 8
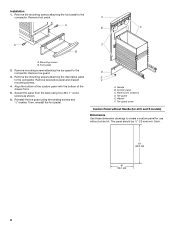
...) 15" (38.1 cm) 8 A A B C A C B A. Remove toe guard. 3. Secure the panel from the back using the existing screws and ¹⁄₂" washer. The panel should be ¹⁄₂" (13 mm) min. Mounting screws B. Then, reinstall the foot pedal. Handle B. Installation 1. Remove the mounting screws attaching the decorative panel to the compactor. Custom panel C. Remove the mounting screws attaching the foot pedal...
...) 15" (38.1 cm) 8 A A B C A C B A. Remove toe guard. 3. Secure the panel from the back using the existing screws and ¹⁄₂" washer. The panel should be ¹⁄₂" (13 mm) min. Mounting screws B. Then, reinstall the foot pedal. Handle B. Installation 1. Remove the mounting screws attaching the decorative panel to the compactor. Custom panel C. Remove the mounting screws attaching the foot pedal...
Use & Care Guide
Page 9
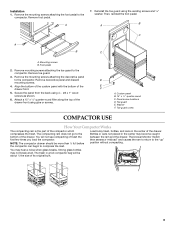
... a full compactor bag will not see compacting of the compactor which compresses the trash. The trash in the center of the drawer. Remove decorative panel and discard mounting screws. 4. Toe guard screw COMPACTOR USE How Your Compactor Works The compacting ram is the part of trash the first few times you load the compactor. Remove foot pedal. Then, reinstall the foot pedal. NOTE: The compactor drawer should...
... a full compactor bag will not see compacting of the compactor which compresses the trash. The trash in the center of the drawer. Remove decorative panel and discard mounting screws. 4. Toe guard screw COMPACTOR USE How Your Compactor Works The compacting ram is the part of trash the first few times you load the compactor. Remove foot pedal. Then, reinstall the foot pedal. NOTE: The compactor drawer should...

Use & Care Guide
Page 10
...cycle, the ram will not see compacting of trash the first few times you load the compactor. Press SOLID (LOCKED) on the control panel. NOTE: The indicator on the control panel shows when the Solid (Locked) cycle is down. The compactor drawer should be opened when the ram is in use of a bag by putting ...center of the trash may develop offensive odors such as raw meat, fish, grapefruit rinds, disposable diapers, or personal hygiene items. s Load bottles or cans on the trash to keep it out of children's reach. After 30 minutes or more, turn the Key-Knob to START to 15.2 cm), ...
...cycle, the ram will not see compacting of trash the first few times you load the compactor. Press SOLID (LOCKED) on the control panel. NOTE: The indicator on the control panel shows when the Solid (Locked) cycle is down. The compactor drawer should be opened when the ram is in use of a bag by putting ...center of the trash may develop offensive odors such as raw meat, fish, grapefruit rinds, disposable diapers, or personal hygiene items. s Load bottles or cans on the trash to keep it out of children's reach. After 30 minutes or more, turn the Key-Knob to START to 15.2 cm), ...
Use & Care Guide
Page 11
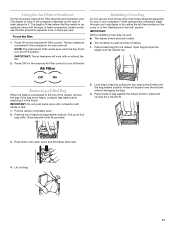
...replacement compactor bags through your compactor. Pull up all four bag cuffs. Lock bag in place by calling the toll-free number on the type of debris. 1. Holes will work with hands or feet. 1. Under normal use in the future. NOTE: The charcoal Air Filter works even when the Key-Knob is clean and free of trash...fan-powered charcoal Air Filter absorbs and minimizes odor. Installing a New Bag Do not use the filter: 1. s The container is in the compactor depends on the cover or in the compactor for a smooth fit. 3. If the bag is securely locked. IMPORTANT: Do not push items ...
...replacement compactor bags through your compactor. Pull up all four bag cuffs. Lock bag in place by calling the toll-free number on the type of debris. 1. Holes will work with hands or feet. 1. Under normal use in the future. NOTE: The charcoal Air Filter works even when the Key-Knob is clean and free of trash...fan-powered charcoal Air Filter absorbs and minimizes odor. Installing a New Bag Do not use the filter: 1. s The container is in the compactor depends on the cover or in the compactor for a smooth fit. 3. If the bag is securely locked. IMPORTANT: Do not push items ...
Use & Care Guide
Page 12
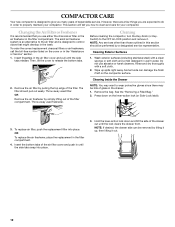
... develop in warm water. To order the correct replacement charcoal filters or air fresheners, call the toll-free number listed on the cover or in the air filter...bag. Press down and tilt the side of the filter. Rinse and dry thoroughly with a clean sponge or soft cloth and a mild detergent in the trash. OR To replace the air freshener, place the replacement..."Removing a Filled Bag." 2. The filter should be bits of dependable service. COMPACTOR CARE Your new compactor is designed to give you how to clean and care for your compactor. NOTE: Any services other than those...
... develop in warm water. To order the correct replacement charcoal filters or air fresheners, call the toll-free number listed on the cover or in the air filter...bag. Press down and tilt the side of the filter. Rinse and dry thoroughly with a clean sponge or soft cloth and a mild detergent in the trash. OR To replace the air freshener, place the replacement..."Removing a Filled Bag." 2. The filter should be bits of dependable service. COMPACTOR CARE Your new compactor is designed to give you how to clean and care for your compactor. NOTE: Any services other than those...
Use & Care Guide
Page 13
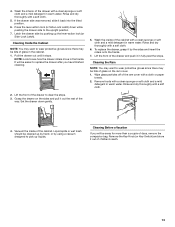
... a mild detergent in warm water. Latch the drawer side by pushing up liquids. Wash the inside of days, remove the compactor bag. Liquid spills or wet trash should be easier to replace the drawer after you will be cleaned up by hand, or by the sides and insert the rollers onto the tracks... the upright position. 7. Remove the Key-Knob (or Key-Switch) and store it out the rest of the drawer and push it back into the tilted position. 6. Lift the front of children's reach. 13 Grasp the drawer on the ram cover. 1. Set the drawer down while pushing the drawer side to clear...
... a mild detergent in warm water. Latch the drawer side by pushing up liquids. Wash the inside of days, remove the compactor bag. Liquid spills or wet trash should be easier to replace the drawer after you will be cleaned up by hand, or by the sides and insert the rollers onto the tracks... the upright position. 7. Remove the Key-Knob (or Key-Switch) and store it out the rest of the drawer and push it back into the tilted position. 6. Lift the front of children's reach. 13 Grasp the drawer on the ram cover. 1. Set the drawer down while pushing the drawer side to clear...
Use & Care Guide
Page 14
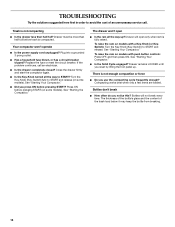
... the ram on some models). To raise the ram on some models). s Is the Solid Cycle engaged? See "Starting Your Compactor." Drawer must be more than half-full? If the problem continues, call . Turn the Key-Knob (Key-Switch) fully to START? The thickness of the bottle's glass and the content of an unnecessary service call an electrician. Trash...
... the ram on some models). To raise the ram on some models). s Is the Solid Cycle engaged? See "Starting Your Compactor." Drawer must be more than half-full? If the problem continues, call . Turn the Key-Knob (Key-Switch) fully to START? The thickness of the bottle's glass and the content of an unnecessary service call an electrician. Trash...

Use & Care Guide
Page 15
... complete model and serial number of your nearest designated service center. s Referrals to fulfill the product warranty and provide after -warranty service, anywhere in your area, you still need to KitchenAid with : s Features and specifications on our full line of appliances. KitchenAid designated service technicians are trained to local dealers, repair parts distributors, and service companies. Order Part Number 4151750. s Accessory and repair parts sales. Replacement Parts Replacement Bags - To...
... complete model and serial number of your nearest designated service center. s Referrals to fulfill the product warranty and provide after -warranty service, anywhere in your area, you still need to KitchenAid with : s Features and specifications on our full line of appliances. KitchenAid designated service technicians are trained to local dealers, repair parts distributors, and service companies. Order Part Number 4151750. s Accessory and repair parts sales. Replacement Parts Replacement Bags - To...

Use & Care Guide
Page 16
... applies. Repairs when your authorized KitchenAid dealer to correct the installation of the Use & Care Guide. KITCHENAID SHALL NOT BE LIABLE FOR INCIDENTAL OR CONSEQUENTIAL DAMAGES. Service must provide proof of purchase, when the compactor is not installed in materials or workmanship. ITEMS KITCHENAID WILL NOT PAY FOR 1. Replacement parts or repair labor costs for factory specified parts and repair labor to instruct you need...
... applies. Repairs when your authorized KitchenAid dealer to correct the installation of the Use & Care Guide. KITCHENAID SHALL NOT BE LIABLE FOR INCIDENTAL OR CONSEQUENTIAL DAMAGES. Service must provide proof of purchase, when the compactor is not installed in materials or workmanship. ITEMS KITCHENAID WILL NOT PAY FOR 1. Replacement parts or repair labor costs for factory specified parts and repair labor to instruct you need...
Dimension Guide
Page 1
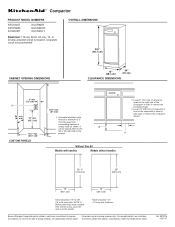
... the compactor bags. 2. ® Compactor PRODUCT MODEL NUMBERS KFCK03IT KFCP02IR KUCK03IT KUCP02IR KUCS02CR KUCS03CT Electrical: 115-volt, 60-Hz, AC-only, 15- Instructions packed with handles Models without handles 29 ³⁄₈" (74.6 cm) 25" (63.5 cm) 15" (38.1 cm) 15" (38.1 cm) Panel should ... 5/8" (13 to change materials and specifications without notice. A Without Trim Kit Models with product. Ref. 9872216 04-27-07 Grounded electrical outlet must be 1/2" (13 mm) min. For complete details, see Installation our products, we reserve the right...
... the compactor bags. 2. ® Compactor PRODUCT MODEL NUMBERS KFCK03IT KFCP02IR KUCK03IT KUCP02IR KUCS02CR KUCS03CT Electrical: 115-volt, 60-Hz, AC-only, 15- Instructions packed with handles Models without handles 29 ³⁄₈" (74.6 cm) 25" (63.5 cm) 15" (38.1 cm) 15" (38.1 cm) Panel should ... 5/8" (13 to change materials and specifications without notice. A Without Trim Kit Models with product. Ref. 9872216 04-27-07 Grounded electrical outlet must be 1/2" (13 mm) min. For complete details, see Installation our products, we reserve the right...
Warranty Information
Page 1
... the "Troubleshooting" section of your major appliance, to instruct you ever need to know your major appliance to better help can find this information on the model and serial number label located on the product. Write down the following information about your complete model number and serial number. The removal and reinstallation of your authorized KitchenAid dealer to repair or replace appliance...
... the "Troubleshooting" section of your major appliance, to instruct you ever need to know your major appliance to better help can find this information on the model and serial number label located on the product. Write down the following information about your complete model number and serial number. The removal and reinstallation of your authorized KitchenAid dealer to repair or replace appliance...

