

Use & Care Guide
Page 3
...supervision is the safety alert symbol. Do not allow to potential hazards that can be used as described in this manual. Have the compactor examined, repaired or adjusted by or near children. s Do not compact toxic or volatile flammable material such as glass. Always read and...others are not followed. Do not compact lighted cigarettes, cigars, or other than manufacturer's recommended attachments. Sharp objects can happen if the instructions are very important. Do not overload trash bag with heavy material such as oily rags and insect sprays. s Use only for household ...
...supervision is the safety alert symbol. Do not allow to potential hazards that can be used as described in this manual. Have the compactor examined, repaired or adjusted by or near children. s Do not compact toxic or volatile flammable material such as glass. Always read and...others are not followed. Do not compact lighted cigarettes, cigars, or other than manufacturer's recommended attachments. Sharp objects can happen if the instructions are very important. Do not overload trash bag with heavy material such as oily rags and insect sprays. s Use only for household ...
Use & Care Guide
Page 4
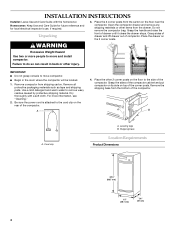
... a mild detergent and warm water to do so can result in the room where the compactor will be located. 1. Dry thoroughly with the homeowner. Be sure the power cord is attached to move compactor. Remove the shipping base from the carton on the 2 corner posts. A B A. Place the drawer on the floor near the... drawer stops. Remove all protective packaging materials such as tape and shipping pads. Shipping base Location Requirements Product Dimensions 34¹⁄₈" (86.7 cm) 15" (38.1 cm) 24" (61 cm) 4 Cord clip A. Do not remove the compactor bag.
... a mild detergent and warm water to do so can result in the room where the compactor will be located. 1. Dry thoroughly with the homeowner. Be sure the power cord is attached to move compactor. Remove the shipping base from the carton on the 2 corner posts. A B A. Place the drawer on the floor near the... drawer stops. Remove all protective packaging materials such as tape and shipping pads. Shipping base Location Requirements Product Dimensions 34¹⁄₈" (86.7 cm) 15" (38.1 cm) 24" (61 cm) 4 Cord clip A. Do not remove the compactor bag.
Use & Care Guide
Page 6
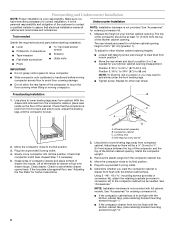
... to avoid floor covering damage. If the toe plate rubs against floor, see whether drawer opens freely. Repeat for correct installation. Slowly move compactor. Using 2 - #8 - 18 x mounting screws (provided in conversion kit), attach the retaining brackets (provided in position 1. Locating stud D. Lift at least ¹ ₈" (3 mm) from the top of the...
... to avoid floor covering damage. If the toe plate rubs against floor, see whether drawer opens freely. Repeat for correct installation. Slowly move compactor. Using 2 - #8 - 18 x mounting screws (provided in conversion kit), attach the retaining brackets (provided in position 1. Locating stud D. Lift at least ¹ ₈" (3 mm) from the top of the...
Use & Care Guide
Page 7
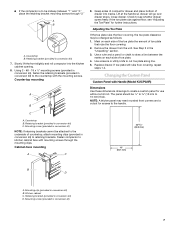
...over drawer stops. C A. Retaining bracket (provided in conversion kit) C. Countertop B. Grasp sides of compactor drawer and place bottom of countertop, attach mounting clips (provided in conversion kit) to draw a line between "1" and "3," place the retaining... bracket mounting screws through the mounting clips. Mark on each side of the toe plate the amount of toe plate. 4. Retaining bracket (provided in conversion kit) D. Cabinet-face mounting A C 23 60.5 mm) 15...
...over drawer stops. C A. Retaining bracket (provided in conversion kit) C. Countertop B. Grasp sides of compactor drawer and place bottom of countertop, attach mounting clips (provided in conversion kit) to draw a line between "1" and "3," place the retaining... bracket mounting screws through the mounting clips. Mark on each side of the toe plate the amount of toe plate. 4. Retaining bracket (provided in conversion kit) D. Cabinet-face mounting A C 23 60.5 mm) 15...
Use & Care Guide
Page 8
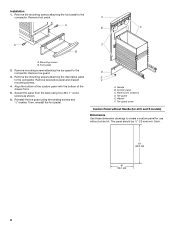
... pedal 2. Then, reinstall the foot pedal. Toe guard E. thick. 25" (63.5 cm) 15" (38.1 cm) 8 A A B C A C B A. Remove the mounting screws attaching the decorative panel to the compactor. Reinstall the toe guard using four #8 x 1" wood screws as shown. 6. D E F A. Remove mounting screws attaching the toe guard to create a custom panel for use without a trim kit. Custom panel...
... pedal 2. Then, reinstall the foot pedal. Toe guard E. thick. 25" (63.5 cm) 15" (38.1 cm) 8 A A B C A C B A. Remove the mounting screws attaching the decorative panel to the compactor. Reinstall the toe guard using four #8 x 1" wood screws as shown. 6. D E F A. Remove mounting screws attaching the toe guard to create a custom panel for use without a trim kit. Custom panel...
Use & Care Guide
Page 9
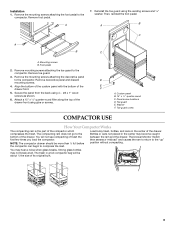
...drawer. D E F A. Toe guard E. Remove the mounting screws attaching the decorative panel to the compactor. Installation 1. Align the bottom of the custom panel with the bottom of the compactor which compresses the trash. Panel screw locations D. You may not break at all. Remove ...Attach a 15" x ¹⁄₂" quarter-round filler along the top of the drawer. The compacting ram does not go to compress the load. B A C A B C A. Remove the mounting screws attaching the foot pedal to the compactor. Load bulky trash, bottles, and cans in the center of trash...
...drawer. D E F A. Toe guard E. Remove the mounting screws attaching the decorative panel to the compactor. Installation 1. Align the bottom of the custom panel with the bottom of the compactor which compresses the trash. Panel screw locations D. You may not break at all. Remove ...Attach a 15" x ¹⁄₂" quarter-round filler along the top of the drawer. The compacting ram does not go to compress the load. B A C A B C A. Remove the mounting screws attaching the foot pedal to the compactor. Load bulky trash, bottles, and cans in the center of trash...
Use & Care Guide
Page 16
... thirty days from the date of purchase, when the compactor is not installed in materials or workmanship. You will need it is installed in an inaccessible location or is installed, operated and maintained according to instructions attached to or furnished with the product, KitchenAid will pay for factory specified parts and repair labor...
... thirty days from the date of purchase, when the compactor is not installed in materials or workmanship. You will need it is installed in an inaccessible location or is installed, operated and maintained according to instructions attached to or furnished with the product, KitchenAid will pay for factory specified parts and repair labor...