Use & Care Guide
Page 1
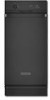
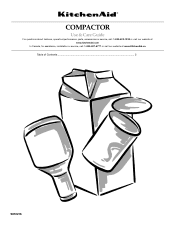
COMPACTOR Use & Care Guide For questions about features, operation/performance, parts, accessories or service, call: 1-800-422-1230 or visit our website at www.kitchenaid.com In Canada, for assistance, installation or service, call: 1-800-807-6777 or visit our website at www.KitchenAid.ca Table of Contents ...2 9872216
COMPACTOR Use & Care Guide For questions about features, operation/performance, parts, accessories or service, call: 1-800-422-1230 or visit our website at www.kitchenaid.com In Canada, for assistance, installation or service, call: 1-800-807-6777 or visit our website at www.KitchenAid.ca Table of Contents ...2 9872216
Use & Care Guide
Page 2
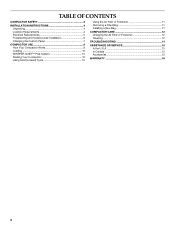
... Panel 7 COMPACTOR USE 9 How Your Compactor Works 9 Loading 10 WHISPER QUIET™ Plus System 10 Starting Your Compactor 10 Using Solid (Locked) Cycle 10 Using the Air Filter or Freshener 11 Removing a Filled Bag 11 Installing a New Bag 11 COMPACTOR CARE 12 Changing the Air Filter or Freshener 12 Cleaning 12 TROUBLESHOOTING 14 ASSISTANCE OR SERVICE 15 In the U.S.A 15 In Canada 15...
... Panel 7 COMPACTOR USE 9 How Your Compactor Works 9 Loading 10 WHISPER QUIET™ Plus System 10 Starting Your Compactor 10 Using Solid (Locked) Cycle 10 Using the Air Filter or Freshener 11 Removing a Filled Bag 11 Installing a New Bag 11 COMPACTOR CARE 12 Changing the Air Filter or Freshener 12 Cleaning 12 TROUBLESHOOTING 14 ASSISTANCE OR SERVICE 15 In the U.S.A 15 In Canada 15...
Use & Care Guide
Page 3
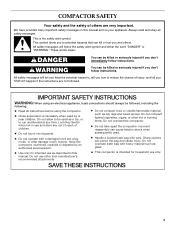
... items. Do not overload the compactor. Do not compact lighted cigarettes, cigars, or other than manufacturer's recommended attachments. All safety messages will follow instructions. s Do not touch moving parts. Lock Key Switch when not in this manual and on your appliance. Sharp ...operate with a damaged cord set, plug, motor, or after damage in this manual. s Do not take apart the compactor. All safety messages will tell you what can cause electric shock when subsequently used by an authorized serviceperson. s Handle a loaded trash bag with heavy material such ...
... items. Do not overload the compactor. Do not compact lighted cigarettes, cigars, or other than manufacturer's recommended attachments. All safety messages will follow instructions. s Do not touch moving parts. Lock Key Switch when not in this manual and on your appliance. Sharp ...operate with a damaged cord set, plug, motor, or after damage in this manual. s Do not take apart the compactor. All safety messages will tell you what can cause electric shock when subsequently used by an authorized serviceperson. s Handle a loaded trash bag with heavy material such ...
Use & Care Guide
Page 4
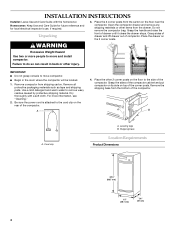
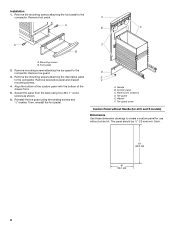
... the other injury. Grasp the sides of the compactor cabinet and put compactor on its side on the floor near the compactor. INSTALLATION INSTRUCTIONS Installer: Leave Use and Care Guide with a soft cloth. A B A. Do not remove the compactor bag. Be sure the power cord is attached to ...Dimensions 34¹⁄₈" (86.7 cm) 15" (38.1 cm) 24" (61 cm) 4 Place the 2 corner posts from the bottom of the compactor. A 4. Unpacking 3. Remove compactor from the drawer. Homeowner: Keep Use and Care Guide for future reference and for local electrical inspector's use...
... the other injury. Grasp the sides of the compactor cabinet and put compactor on its side on the floor near the compactor. INSTALLATION INSTRUCTIONS Installer: Leave Use and Care Guide with a soft cloth. A B A. Do not remove the compactor bag. Be sure the power cord is attached to ...Dimensions 34¹⁄₈" (86.7 cm) 15" (38.1 cm) 24" (61 cm) 4 Place the 2 corner posts from the bottom of the compactor. A 4. Unpacking 3. Remove compactor from the drawer. Homeowner: Keep Use and Care Guide for future reference and for local electrical inspector's use...
Use & Care Guide
Page 5
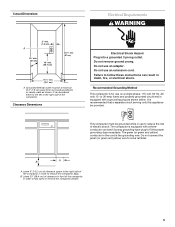
....7 cm) 34¹⁄₄" min. (87 cm) 15¹⁄₄" min. (38.7 cm) A. It is for use to follow these instructions can be provided. Leave 23" (58.4 cm) of clearance in front of the compactor in order to the left or the right side of the...15.2 cm) of clearance space to the right side of the compactor. It can result in the cord is equipped with a grounding plug as shown. Do not use an adapter. Recommended Grounding Method This compactor is recommended that a separate circuit serving only this appliance be placed either to remove the compactor bags. The compactor...
....7 cm) 34¹⁄₄" min. (87 cm) 15¹⁄₄" min. (38.7 cm) A. It is for use to follow these instructions can be provided. Leave 23" (58.4 cm) of clearance in front of the compactor in order to the left or the right side of the...15.2 cm) of clearance space to the right side of the compactor. It can result in the cord is equipped with a grounding plug as shown. Do not use an adapter. Recommended Grounding Method This compactor is recommended that a separate circuit serving only this appliance be placed either to remove the compactor bags. The compactor...
Use & Care Guide
Page 6
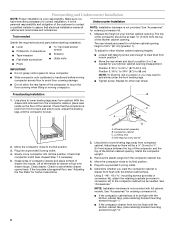
...parts before moving compactor. To adjust for further instructions. s Slide compactor onto cardboard or hardboard before starting installation. Freestanding Installation 1. With the drawer still removed from cabinet. Adjust the leveling legs until the compactor is the personal responsibility and obligation of the customer to contact a qualified installer to the compactor... the handle so drawer will be flush with full cabinet models. s If the compactor drawer front is to ¹ ₄" (6.4 mm) space between the top of the compactor and the top of 34¹⁄₄" (87 ...
...parts before moving compactor. To adjust for further instructions. s Slide compactor onto cardboard or hardboard before starting installation. Freestanding Installation 1. With the drawer still removed from cabinet. Adjust the leveling legs until the compactor is the personal responsibility and obligation of the customer to contact a qualified installer to the compactor... the handle so drawer will be flush with full cabinet models. s If the compactor drawer front is to ¹ ₄" (6.4 mm) space between the top of the compactor and the top of 34¹⁄₄" (87 ...
Use & Care Guide
Page 7
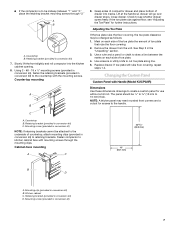
... Close drawer. Check to see "Adjusting the Toe Plate" for further instructions. Use a ruler and a pencil or chalk to draw a line between...Panel Custom Panel with Handle (Model KUCP02IR) Dimensions Use these dimensions drawings to create a custom panel for access to the handle. Retaining bracket (provided in conversion kit) 7 C A. Countertop B. Cabinet-face mounting A C 23 60.5 mm) 15" (38.1 mm) B D A. Grasp sides of compactor...;" to 13 mm to kitchen cabinet face with the mounting screws. Replace drawer. Adjusting the Toe Plate If the toe plate rubs the floor...
... Close drawer. Check to see "Adjusting the Toe Plate" for further instructions. Use a ruler and a pencil or chalk to draw a line between...Panel Custom Panel with Handle (Model KUCP02IR) Dimensions Use these dimensions drawings to create a custom panel for access to the handle. Retaining bracket (provided in conversion kit) 7 C A. Countertop B. Cabinet-face mounting A C 23 60.5 mm) 15" (38.1 mm) B D A. Grasp sides of compactor...;" to 13 mm to kitchen cabinet face with the mounting screws. Replace drawer. Adjusting the Toe Plate If the toe plate rubs the floor...
Use & Care Guide
Page 8
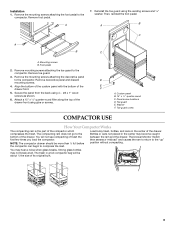
....5 cm) 15" (38.1 cm) 8 Remove foot pedal. The panel should be ¹⁄₂" (13 mm) min. Installation 1. A A B C A C B A. Mounting screws B. Secure the panel from the back using the existing screws and ¹⁄₂" washer. Washer F. Remove the mounting screws attaching the decorative panel to the compactor. Foot pedal 2. Custom panel C. Remove the mounting screws attaching the foot pedal to the compactor. Remove mounting...
....5 cm) 15" (38.1 cm) 8 Remove foot pedal. The panel should be ¹⁄₂" (13 mm) min. Installation 1. A A B C A C B A. Mounting screws B. Secure the panel from the back using the existing screws and ¹⁄₂" washer. Washer F. Remove the mounting screws attaching the decorative panel to the compactor. Foot pedal 2. Custom panel C. Remove the mounting screws attaching the foot pedal to the compactor. Remove mounting...
Use & Care Guide
Page 9
... compresses the trash. Load bulky trash, bottles, and cans in a full compactor bag will not see compacting of trash the first few times you load the compactor. Remove the mounting screws attaching the foot pedal to the compactor. Remove foot pedal. A 7. Remove the mounting screws attaching the decorative panel to the compactor. The Drawer Monitor Switch then senses a "misload" and causes the ram to return...
... compresses the trash. Load bulky trash, bottles, and cans in a full compactor bag will not see compacting of trash the first few times you load the compactor. Remove the mounting screws attaching the foot pedal to the compactor. Remove foot pedal. A 7. Remove the mounting screws attaching the decorative panel to the compactor. The Drawer Monitor Switch then senses a "misload" and causes the ram to return...

Use & Care Guide
Page 10
...is done, turn the Key-Knob to raise the compacting ram OR press NORMAL (UNLOCKED). NOTE: When the compacting cycle is locked and cannot be about ¹⁄₂ full before the compactor can increase bag capacity up to compress the load. 1. For best results... not push items down into compactor with hands or feet. See "Compactor Use." Press NORMAL (UNLOCKED) on the control panel. NOTE: Pressing the toe bar opens the container only 3" to 6" (7.6 cm to 15.2 cm), depending on the trash to maintain a quiet home environment during compactor operation. Using Solid (Locked...
...is done, turn the Key-Knob to raise the compacting ram OR press NORMAL (UNLOCKED). NOTE: When the compacting cycle is locked and cannot be about ¹⁄₂ full before the compactor can increase bag capacity up to compress the load. 1. For best results... not push items down into compactor with hands or feet. See "Compactor Use." Press NORMAL (UNLOCKED) on the control panel. NOTE: Pressing the toe bar opens the container only 3" to 6" (7.6 cm to 15.2 cm), depending on the trash to maintain a quiet home environment during compactor operation. Using Solid (Locked...
Use & Care Guide
Page 11
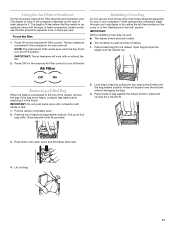
... the drawer completely open . 4. Installing a New Bag Do not use the filter: 1. Press inside of bag from bag retainer buttons. Remove top of bag against the drawer bottom, sides and corners for a smooth fit. 3. Pull up all four bag cuffs. Place folded bag into compactor with twist tie provided. 2. Order replacement compactor bags through your compactor. Lift out bag. 11 Using the Air...
... the drawer completely open . 4. Installing a New Bag Do not use the filter: 1. Press inside of bag from bag retainer buttons. Remove top of bag against the drawer bottom, sides and corners for a smooth fit. 3. Pull up all four bag cuffs. Place folded bag into compactor with twist tie provided. 2. Order replacement compactor bags through your compactor. Lift out bag. 11 Using the Air...
Use & Care Guide
Page 12
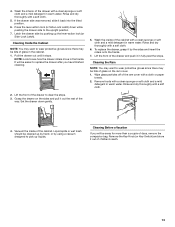
...develop in the trash. Throw away used filter. Remove the air filter by a designated service representative. See the "Removing a Filled Bag." 2. Remove the bag. Insert fingertips in the air filter cover and pull until the side tabs snap into place. COMPACTOR CARE Your new compactor is designed ... use abrasive or harsh cleaners. To order the correct replacement charcoal filters or air fresheners, call the toll-free number listed on the lever-action lock (or Side-Lock latch). 3. OR To replace the air freshener, place the replacement in this section should pull out easily.
...develop in the trash. Throw away used filter. Remove the air filter by a designated service representative. See the "Removing a Filled Bag." 2. Remove the bag. Insert fingertips in the air filter cover and pull until the side tabs snap into place. COMPACTOR CARE Your new compactor is designed ... use abrasive or harsh cleaners. To order the correct replacement charcoal filters or air fresheners, call the toll-free number listed on the lever-action lock (or Side-Lock latch). 3. OR To replace the air freshener, place the replacement in this section should pull out easily.
Use & Care Guide
Page 13
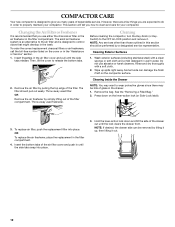
... to replace the drawer after you will be away for more than a couple of days, remove the compactor bag. Lift the front of glass on the sides and pull it by pushing up liquids. Set the ... lock (or Side-Lock Latch) down gently. 4. Cleaning the Ram NOTE: You may want to the upright position. 7. Liquid spills or wet trash should be cleaned up by hand, or by using a vacuum designed... rollers onto the tracks. 7. Remove the Key-Knob (or Key-Switch) and store it stops. Pull the drawer out until it out of the ram cover with a soft cloth. 6. If the drawer side was removed...
... to replace the drawer after you will be away for more than a couple of days, remove the compactor bag. Lift the front of glass on the sides and pull it by pushing up liquids. Set the ... lock (or Side-Lock Latch) down gently. 4. Cleaning the Ram NOTE: You may want to the upright position. 7. Liquid spills or wet trash should be cleaned up by hand, or by using a vacuum designed... rollers onto the tracks. 7. Remove the Key-Knob (or Key-Switch) and store it stops. Pull the drawer out until it out of the ram cover with a soft cloth. 6. If the drawer side was removed...
Use & Care Guide
Page 14
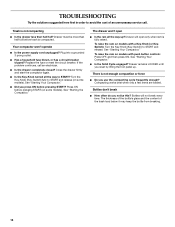
...by lifting the foot pedal up ? The thickness of the bottle's glass and the content of an unnecessary service call an electrician. Close the drawer firmly and start the compactor again. s Did you use the compacting cycle frequently enough? To raise the ram on some models). Drawer remains ...? Replace the fuse or reset the circuit breaker. s Is the Key-Knob turned all the way up . Press ON before pressing START? See "Starting Your Compactor." Your compactor won 't open only when ram is fully raised. s Has a household fuse blown, or has a circuit breaker tripped? TROUBLESHOOTING Try...
...by lifting the foot pedal up ? The thickness of the bottle's glass and the content of an unnecessary service call an electrician. Close the drawer firmly and start the compactor again. s Did you use the compacting cycle frequently enough? To raise the ram on some models). Drawer remains ...? Replace the fuse or reset the circuit breaker. s Is the Key-Knob turned all the way up . Press ON before pressing START? See "Starting Your Compactor." Your compactor won 't open only when ram is fully raised. s Has a household fuse blown, or has a circuit breaker tripped? TROUBLESHOOTING Try...

Use & Care Guide
Page 15
...-807-6777. s Warranty information. s Use and maintenance procedures. s Accessory and repair parts sales. Accessories To ensure the proper functioning of appliances. Replacement Parts Replacement Bags - Call for Freestanding Unit (undercounter installation only): Order Part #9870118 15 Order Part Number 4151750. In the U.S.A. s Referrals to local dealers, repair parts distributors, and service companies. Call the KitchenAid Customer eXperience Center toll free: 1-800-422-1230 Our consultants...
...-807-6777. s Warranty information. s Use and maintenance procedures. s Accessory and repair parts sales. Accessories To ensure the proper functioning of appliances. Replacement Parts Replacement Bags - Call for Freestanding Unit (undercounter installation only): Order Part #9870118 15 Order Part Number 4151750. In the U.S.A. s Referrals to local dealers, repair parts distributors, and service companies. Call the KitchenAid Customer eXperience Center toll free: 1-800-422-1230 Our consultants...
Use & Care Guide
Page 16
... remote locations. 9. KITCHENAID® COMPACTOR WARRANTY ONE YEAR LIMITED WARRANTY For one year from the date of purchase, when this major appliance is operated and maintained according to instructions attached to or furnished with the product, KitchenAid or KitchenAid Canada (hereafter "KitchenAid") will need to know your complete model number and serial number. Replacement parts or repair labor costs for product service in materials...
... remote locations. 9. KITCHENAID® COMPACTOR WARRANTY ONE YEAR LIMITED WARRANTY For one year from the date of purchase, when this major appliance is operated and maintained according to instructions attached to or furnished with the product, KitchenAid or KitchenAid Canada (hereafter "KitchenAid") will need to know your complete model number and serial number. Replacement parts or repair labor costs for product service in materials...

