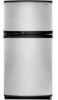
User Instructions
Page 2
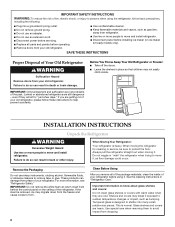
... floor damage could occur. Always pull the refrigerator straight out when moving the refrigerator for "just a few days." Remove the Packaging Do not use an extension cord. ■ Disconnect power before operating. ■ Remove doors from your refrigerator. If the insert is designed to avoid...Away Your Old Refrigerator or Freezer: ■ Take off the doors. ■ Leave the shelves in death or brain damage. Glass shelves and covers are getting rid of your refrigerator before installing ice maker (on the ceiling of the refrigerator. IMPORTANT SAFETY INSTRUCTIONS...
... floor damage could occur. Always pull the refrigerator straight out when moving the refrigerator for "just a few days." Remove the Packaging Do not use an extension cord. ■ Disconnect power before operating. ■ Remove doors from your refrigerator. If the insert is designed to avoid...Away Your Old Refrigerator or Freezer: ■ Take off the doors. ■ Leave the shelves in death or brain damage. Glass shelves and covers are getting rid of your refrigerator before installing ice maker (on the ceiling of the refrigerator. IMPORTANT SAFETY INSTRUCTIONS...
User Instructions
Page 3
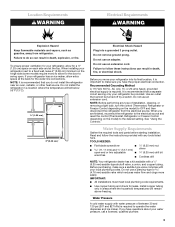
...pressure of installation, cleaning, or removing a light bulb, turn the control (Thermostat, Refrigerator or Freezer Control depending on the model) to do not install the refrigerator near an oven, radiator, ... result in death, fire, or electrical shock. Do not remove ground prong. If your refrigerator, allow extra space at the top. IMPORTANT: ■ All installations must meet local plumbing code...for the door to allow for the water line connections. NOTE: Before performing any tools listed here. Use an outlet that a separate circuit serving only your refrigerator next to...
...pressure of installation, cleaning, or removing a light bulb, turn the control (Thermostat, Refrigerator or Freezer Control depending on the model) to do not install the refrigerator near an oven, radiator, ... result in death, fire, or electrical shock. Do not remove ground prong. If your refrigerator, allow extra space at the top. IMPORTANT: ■ All installations must meet local plumbing code...for the door to allow for the water line connections. NOTE: Before performing any tools listed here. Use an outlet that a separate circuit serving only your refrigerator next to...

User Instructions
Page 5
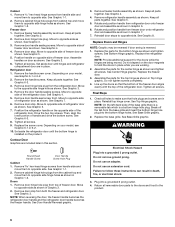
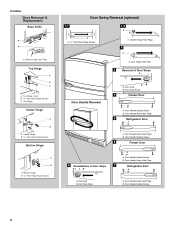
... Series doors with curved handle only. 1. Lift the freezer door free from the cabinet. 6. Lift the refrigerator door free from the cabinet. 5. NOTE: These instructions are working. 4. Door Stop Screw Door Handle Sealing Screw Flat-Head Handle Screw Door Handle Seal Screw Front Door Hinge ... only removing and replacing the doors, the instructions are included later in Top Hinge graphic. Standard Contour Architect® Series Remove Handle (Architect® Series) Graphics are the same regardless of ice. Do not use an adapter. Open refrigerator door and remove base ...
... Series doors with curved handle only. 1. Lift the freezer door free from the cabinet. 6. Lift the refrigerator door free from the cabinet. 5. NOTE: These instructions are working. 4. Door Stop Screw Door Handle Sealing Screw Flat-Head Handle Screw Door Handle Seal Screw Front Door Hinge ... only removing and replacing the doors, the instructions are included later in Top Hinge graphic. Standard Contour Architect® Series Remove Handle (Architect® Series) Graphics are the same regardless of ice. Do not use an adapter. Open refrigerator door and remove base ...
User Instructions
Page 6
... Graphic 2. 6. Refrigerator door 1. Remove the handle screws. Keep all screws. 9. Remove door hinge hole plug from top of freezer door as shown and tighten all screws. Remove the door handle sealing screws. Move to opposite side. See Graphic 6-3. 8. Set aside the refrigerator door until hinges and refrigerator compartment door are included later in death, fire, or electrical shock. 3. Remove door hinge hole plug from the refrigerator door. Remove door stop...
... Graphic 2. 6. Refrigerator door 1. Remove the handle screws. Keep all screws. 9. Remove door hinge hole plug from top of freezer door as shown and tighten all screws. Remove the door handle sealing screws. Move to opposite side. See Graphic 6-3. 8. Set aside the refrigerator door until hinges and refrigerator compartment door are included later in death, fire, or electrical shock. 3. Remove door hinge hole plug from the refrigerator door. Remove door stop...

User Instructions
Page 7
... Hinge Screws Door Swing Reversal (optional) A 2 A 1-2 B A A. Door Handle Sealing Screws 7 Front View Side View 5 A. Door Stop Screw A B B. Cabinet Hinge Hole Plugs 3 1-1 A A Hex-Head Hinge Screws 1 A A. Freezer Door Handle 4 A A. Top Hinge Center Hinge A B A. Flat-Head Handle Screw B. Top Hinge Cover B Hex-Head Hinge Screws C. Door Handle Seal Screw Front 6-2 A 6-3 A A. Shoulder Handle Screw B A. Round-Head Handle Screw 7 Standard Door Removal & Replacement Base...
... Hinge Screws Door Swing Reversal (optional) A 2 A 1-2 B A A. Door Handle Sealing Screws 7 Front View Side View 5 A. Door Stop Screw A B B. Cabinet Hinge Hole Plugs 3 1-1 A A Hex-Head Hinge Screws 1 A A. Freezer Door Handle 4 A A. Top Hinge Center Hinge A B A. Flat-Head Handle Screw B. Top Hinge Cover B Hex-Head Hinge Screws C. Door Handle Seal Screw Front 6-2 A 6-3 A A. Shoulder Handle Screw B A. Round-Head Handle Screw 7 Standard Door Removal & Replacement Base...
User Instructions
Page 8
... 2 A A. Door Stop B. Door Stop Screw 4 Freezer Door A B A. Door Handle Screw Hole Plugs B. Contour Door Removal & Replacement Base Grille A A A. Door Handle Screw Hole Plugs 5 Refrigerator Door A B A. Door Stop B. Bottom Hinge B Hex-Head Hinge Screws Door Swing Reversal (optional) 1-1 1-2 A A A Hex-Head Hinge Screws A. Bottom Hinge Hole Plug Top Hinge A B C A. Top Hinge Center Hinge A B A. Door Hinge Hole Plug 3 Removal of Door Stops AB A B A. Door Handle Screw Hole Plugs 7 Refrigerator Door A B A. Door Stop Screw A. Door Handle...
... 2 A A. Door Stop B. Door Stop Screw 4 Freezer Door A B A. Door Handle Screw Hole Plugs B. Contour Door Removal & Replacement Base Grille A A A. Door Handle Screw Hole Plugs 5 Refrigerator Door A B A. Door Stop B. Bottom Hinge B Hex-Head Hinge Screws Door Swing Reversal (optional) 1-1 1-2 A A A Hex-Head Hinge Screws A. Bottom Hinge Hole Plug Top Hinge A B C A. Top Hinge Center Hinge A B A. Door Hinge Hole Plug 3 Removal of Door Stops AB A B A. Door Handle Screw Hole Plugs 7 Refrigerator Door A B A. Door Stop Screw A. Door Handle...

User Instructions
Page 9
Architect® Series Door Removal & Replacement Base Grille A A A. Bottom Hinge Hole Plug Top Hinge A B C A. Center Hinge B. 5/16" Hex-Head Hinge Screws Bottom Hinge A B A. Bottom Hinge B. /5 16 " Hex-Head Hinge Screws Door Handle Removal A A A. 1/8" Setscrew A A A. 1/8" Setscrew 9 Top Hinge Cover B. 5/16" Hex-Head Hinge Screws C. Top Hinge Center Hinge A B A.
Architect® Series Door Removal & Replacement Base Grille A A A. Bottom Hinge Hole Plug Top Hinge A B C A. Center Hinge B. 5/16" Hex-Head Hinge Screws Bottom Hinge A B A. Bottom Hinge B. /5 16 " Hex-Head Hinge Screws Door Handle Removal A A A. 1/8" Setscrew A A A. 1/8" Setscrew 9 Top Hinge Cover B. 5/16" Hex-Head Hinge Screws C. Top Hinge Center Hinge A B A.
User Instructions
Page 10
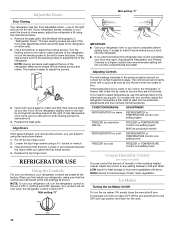
... least 24 hours between the doors while you like . Adjust the Doors Door Closing Your refrigerator has two front adjustable rollers - It may spoil. Adjusting the Refrigerator and Freezer Controls to a higher (colder) than recommended setting will not cool when the refrigerator control is set correctly when ...at the factory. Have someone push against the top of the refrigerator on some weight off the leveling screws and rollers. When you first install your refrigerator seems unsteady or you add food before adding food. Remove the base grille. Turn the leveling screw ...
... least 24 hours between the doors while you like . Adjust the Doors Door Closing Your refrigerator has two front adjustable rollers - It may spoil. Adjusting the Refrigerator and Freezer Controls to a higher (colder) than recommended setting will not cool when the refrigerator control is set correctly when ...at the factory. Have someone push against the top of the refrigerator on some weight off the leveling screws and rollers. When you first install your refrigerator seems unsteady or you add food before adding food. Remove the base grille. Turn the leveling screw ...
User Instructions
Page 12
...or there is corrosionresistant and not corrosion-proof. In the U.S.A., www.kitchenaid.com In Canada, www.kitchenaid.ca The refrigerator will fit your surfaces clean by using the following installation for routine ...fuse or reset the circuit breaker. See "Using the Control(s)." ■ New installation? Do not remove ground prong. Plug in a lamp to see if the outlet is working ? Below are on... is added, doors are opened often, or if the doors have been left open areas behind the light shield in refrigerator or reconnect power. Plug in warm water. Plug in the freezer (on ....
...or there is corrosionresistant and not corrosion-proof. In the U.S.A., www.kitchenaid.com In Canada, www.kitchenaid.ca The refrigerator will fit your surfaces clean by using the following installation for routine ...fuse or reset the circuit breaker. See "Using the Control(s)." ■ New installation? Do not remove ground prong. Plug in a lamp to see if the outlet is working ? Below are on... is added, doors are opened often, or if the doors have been left open areas behind the light shield in refrigerator or reconnect power. Plug in warm water. Plug in the freezer (on ....
User Instructions
Page 13
...full ice production. ■ Freezer door closed . Minimize door openings and keep doors fully closed. ■ Large load of the refrigerator ■ Sizzling/Gurgling - Straighten the water source line. ■ Ice maker turned on the refrigerator? Wait 72 hours for refrigerator to return to remove the minerals. ■ Water... (such as ice is not producing ice or not enough ice ■ Refrigerator connected to a water supply and the supply shutoff valve turned on top of food added? Firmly close completely ■ Door blocked open . ■ Kink in the way? The ice cubes are ...
...full ice production. ■ Freezer door closed . Minimize door openings and keep doors fully closed. ■ Large load of the refrigerator ■ Sizzling/Gurgling - Straighten the water source line. ■ Ice maker turned on the refrigerator? Wait 72 hours for refrigerator to return to remove the minerals. ■ Water... (such as ice is not producing ice or not enough ice ■ Refrigerator connected to a water supply and the supply shutoff valve turned on top of food added? Firmly close completely ■ Door blocked open . ■ Kink in the way? The ice cubes are ...
User Instructions
Page 14
...Water Dispenser." ■ Is the water pressure at least 35 psi (241 kPa)? See "Refrigerator Doors." ■ Reverse osmosis water filtration system connected to your authorized KitchenAid dealer. Hold the glass under the dispenser long enough? Flush the water system. Make sure the... or replacement filters, call 1-800-461-5681. Connect refrigerator to water supply and turn water shutoff valve fully open. ■ Kink in this section. ■ Recently removed the doors? If it correctly. ■ Refrigerator door closed completely? See "Water Supply Requirements." Water is leaking...
...Water Dispenser." ■ Is the water pressure at least 35 psi (241 kPa)? See "Refrigerator Doors." ■ Reverse osmosis water filtration system connected to your authorized KitchenAid dealer. Hold the glass under the dispenser long enough? Flush the water system. Make sure the... or replacement filters, call 1-800-461-5681. Connect refrigerator to water supply and turn water shutoff valve fully open. ■ Kink in this section. ■ Recently removed the doors? If it correctly. ■ Refrigerator door closed completely? See "Water Supply Requirements." Water is leaking...
User Instructions
Page 17
...tenth year from unauthorized modifications made to refrigerator or freezer product failures. 7. Service calls to you may have been removed, altered or cannot be provided by an authorized KitchenAid servicer is not installed in a remote area where service by a KitchenAid designated service company. Cosmetic damage, ... of purchase, when this major appliance is used for the following components to KitchenAid with the product, KitchenAid will pay for replacement or repair of all SLIDE N LOCK™ Door Bins and SLIDE N LOCK™ Can Racks due to defective materials or...
...tenth year from unauthorized modifications made to refrigerator or freezer product failures. 7. Service calls to you may have been removed, altered or cannot be provided by an authorized KitchenAid servicer is not installed in a remote area where service by a KitchenAid designated service company. Cosmetic damage, ... of purchase, when this major appliance is used for the following components to KitchenAid with the product, KitchenAid will pay for replacement or repair of all SLIDE N LOCK™ Door Bins and SLIDE N LOCK™ Can Racks due to defective materials or...


