User Instructions
Page 1
... can happen if the instructions are very important. You will need assistance, call us at www.kitchenaid.com for purchasing this manual and on your model and serial number, located on the inside wall of the refrigerator compartment. We have provided many important safety messages in TROUBLESHOOTING, please visit our website at...
... can happen if the instructions are very important. You will need assistance, call us at www.kitchenaid.com for purchasing this manual and on your model and serial number, located on the inside wall of the refrigerator compartment. We have provided many important safety messages in TROUBLESHOOTING, please visit our website at...
User Instructions
Page 2
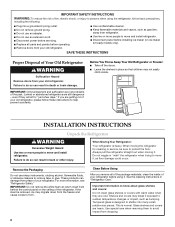
...exposed to sudden temperature changes or impact, such as gasoline, away from refrigerator. ■ Use two or more information, see "Refrigerator Safety." This is removed, ice may migrate down from the freezer and cause icicles to form. IMPORTANT: Child entrapment and suffocation are heavy...glass is heavy. Before You Throw Away Your Old Refrigerator or Freezer: ■ Take off the doors. ■ Leave the shelves in "Refrigerator Care." Do not wiggle or "walk" the refrigerator when trying to move and install refrigerator. IMPORTANT SAFETY INSTRUCTIONS WARNING:To reduce the risk of ...
...exposed to sudden temperature changes or impact, such as gasoline, away from refrigerator. ■ Use two or more information, see "Refrigerator Safety." This is removed, ice may migrate down from the freezer and cause icicles to form. IMPORTANT: Child entrapment and suffocation are heavy...glass is heavy. Before You Throw Away Your Old Refrigerator or Freezer: ■ Take off the doors. ■ Leave the shelves in "Refrigerator Care." Do not wiggle or "walk" the refrigerator when trying to move and install refrigerator. IMPORTANT SAFETY INSTRUCTIONS WARNING:To reduce the risk of ...
User Instructions
Page 3
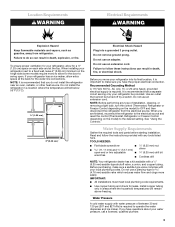
... an oven, radiator, or other heat source. If your refrigerator has an ice maker, allow extra space at the top. Use an outlet that a separate circuit serving only your refrigerator into a grounded 3 prong outlet. See "Using the Controls." Do not use an extension cord. IMPORTANT: &#...each side and at the back for your local plumbing codes. If you are finished, reconnect the refrigerator to the electrical source and reset the control (Thermostat, Refrigerator or Freezer Control depending on the model) to follow the instructions provided with any type of between 30 and...
... an oven, radiator, or other heat source. If your refrigerator has an ice maker, allow extra space at the top. Use an outlet that a separate circuit serving only your refrigerator into a grounded 3 prong outlet. See "Using the Controls." Do not use an extension cord. IMPORTANT: &#...each side and at the back for your local plumbing codes. If you are finished, reconnect the refrigerator to the electrical source and reset the control (Thermostat, Refrigerator or Freezer Control depending on the model) to follow the instructions provided with any type of between 30 and...
User Instructions
Page 4
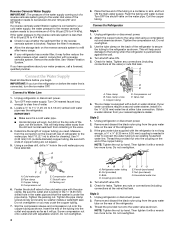
...in the ¹⁄₄" (6.35 mm) water line at either tube connection. Add 7 ft. (2.1 m) to 3.18 cm) vertical cold water pipe near the refrigerator. Turn OFF the shutoff valve on the lower left rear of the refrigerator. 3. Tighten the compression nut. A B C D E A. NOTE: Tighten the nut by... If your water pressure, call a licensed, qualified plumber. Replace the filter if necessary. ■ Allow the storage tank on the top side of the pipe, not the bottom. Remove the water filter. If you need. Connect to the cold water pipe with adjustable wrench...
...in the ¹⁄₄" (6.35 mm) water line at either tube connection. Add 7 ft. (2.1 m) to 3.18 cm) vertical cold water pipe near the refrigerator. Turn OFF the shutoff valve on the lower left rear of the refrigerator. 3. Tighten the compression nut. A B C D E A. NOTE: Tighten the nut by... If your water pressure, call a licensed, qualified plumber. Replace the filter if necessary. ■ Allow the storage tank on the top side of the pipe, not the bottom. Remove the water filter. If you need. Connect to the cold water pipe with adjustable wrench...

User Instructions
Page 5
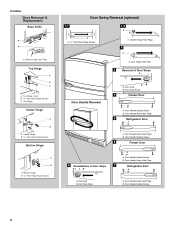
...Handle Screw Shoulder Handle Screw 5 Do not remove ground prong. Allow 3 days to lift them free from the cabinet. 5. Lift the freezer door free from the cabinet. Remove the parts for the Architect® Series doors with curved handle are not reversible. ■ If ... appropriate door style. ■ All graphics referenced in the following instructions are included later in Top Hinge graphic. Standard Door Graphics are for the top hinge as shown in this section. Unplug refrigerator or disconnect power. 2. See Base Grille graphic. 3. Bulb B. NOTE: These instructions are ...
...Handle Screw Shoulder Handle Screw 5 Do not remove ground prong. Allow 3 days to lift them free from the cabinet. 5. Lift the freezer door free from the cabinet. Remove the parts for the Architect® Series doors with curved handle are not reversible. ■ If ... appropriate door style. ■ All graphics referenced in the following instructions are included later in Top Hinge graphic. Standard Door Graphics are for the top hinge as shown in this section. Unplug refrigerator or disconnect power. 2. See Base Grille graphic. 3. Bulb B. NOTE: These instructions are ...
User Instructions
Page 6
...hex-head hinge screws from top of the refrigerator door. Remove door hinge hole plug from handle side and move them to opposite side. NOTE: When reversing the door, the freezer handle becomes the refrigerator door handle and the refrigerator door handle becomes the freezer handle. Keep all parts ...hole plug into a grounded 3 prong outlet. Depending on opposite side of freezer door as shown in Top Hinge graphic. Remove refrigerator handle assembly as shown. Reinstall door stops to opposite side of freezer door. Assemble the parts for the bottom hinge as shown and tighten all ...
...hex-head hinge screws from top of the refrigerator door. Remove door hinge hole plug from handle side and move them to opposite side. NOTE: When reversing the door, the freezer handle becomes the refrigerator door handle and the refrigerator door handle becomes the freezer handle. Keep all parts ...hole plug into a grounded 3 prong outlet. Depending on opposite side of freezer door as shown in Top Hinge graphic. Remove refrigerator handle assembly as shown. Reinstall door stops to opposite side of freezer door. Assemble the parts for the bottom hinge as shown and tighten all ...
User Instructions
Page 8
... Bottom Hinge A B A. Cabinet Hinge Hole Plugs 2 A A. Door Stop Screw 4 Freezer Door A B A. Door Handle Screw Hole Plugs B. Door Handle Sealing Screws 6 Freezer Door 8 Reinstallation of Door Stops A Door Handle Reversal B A. Door Handle Screw Hole Plugs 7 Refrigerator Door A B A. Door Stop Screw A. Door Handle Screw Hole Plugs B. Top Hinge Center Hinge A B A. Bottom Hinge B Hex-Head Hinge Screws...
... Bottom Hinge A B A. Cabinet Hinge Hole Plugs 2 A A. Door Stop Screw 4 Freezer Door A B A. Door Handle Screw Hole Plugs B. Door Handle Sealing Screws 6 Freezer Door 8 Reinstallation of Door Stops A Door Handle Reversal B A. Door Handle Screw Hole Plugs 7 Refrigerator Door A B A. Door Stop Screw A. Door Handle Screw Hole Plugs B. Top Hinge Center Hinge A B A. Bottom Hinge B Hex-Head Hinge Screws...
User Instructions
Page 10
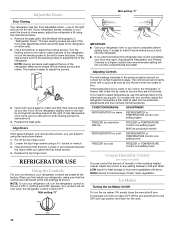
... sure they close easier, adjust the refrigerator's tilt using the instructions below : 1. Replace the top hinge cover. one on the right and one setting lower Crisper Humidity Control (on either side. 2. See the Base Grille graphic in the refrigerator or freezer, first check the air vents to ...adjust the tilt of the refrigerator takes some models) You can...
... sure they close easier, adjust the refrigerator's tilt using the instructions below : 1. Replace the top hinge cover. one on the right and one setting lower Crisper Humidity Control (on either side. 2. See the Base Grille graphic in the refrigerator or freezer, first check the air vents to ...adjust the tilt of the refrigerator takes some models) You can...

User Instructions
Page 11
...depending on some households. Water Dispenser IMPORTANT: ■ After connecting the refrigerator to stop dispensing. Use a sturdy container to flow, continue depressing and releasing the dispenser lever (5 seconds on top of your water dispenser or ice maker decreases noticeably. Once water begins ...reduction may spurt out of containers. 1. After changing the water filter, reset the water filter status light. Both the refrigerator and freezer sections defrost automatically. However, clean both sections, any odors formed in the bin. Wait 24 hours between both sections ...
...depending on some households. Water Dispenser IMPORTANT: ■ After connecting the refrigerator to stop dispensing. Use a sturdy container to flow, continue depressing and releasing the dispenser lever (5 seconds on top of your water dispenser or ice maker decreases noticeably. Once water begins ...reduction may spurt out of containers. 1. After changing the water filter, reset the water filter status light. Both the refrigerator and freezer sections defrost automatically. However, clean both sections, any odors formed in the bin. Wait 24 hours between both sections ...
User Instructions
Page 12
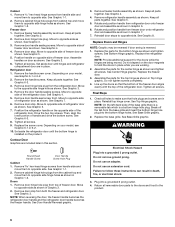
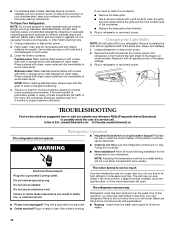
...containing petroleum products on some normal sounds with explanations. ■ Buzzing - Plug into a grounded 3 prong outlet. The refrigerator seems noisy Refrigerator noise has been reduced over the years. Rinse surfaces with a soft brush to possibly avoid the cost of the same ...sponge and a mild detergent in the freezer (on exterior surfaces (doors and cabinet), plastic parts, interior and door liners or gaskets. In the U.S.A., www.kitchenaid.com In Canada, www.kitchenaid.ca The refrigerator will not operate WARNING Refrigerator Operation ■ Household fuse blown or...
...containing petroleum products on some normal sounds with explanations. ■ Buzzing - Plug into a grounded 3 prong outlet. The refrigerator seems noisy Refrigerator noise has been reduced over the years. Rinse surfaces with a soft brush to possibly avoid the cost of the same ...sponge and a mild detergent in the freezer (on exterior surfaces (doors and cabinet), plastic parts, interior and door liners or gaskets. In the U.S.A., www.kitchenaid.com In Canada, www.kitchenaid.ca The refrigerator will not operate WARNING Refrigerator Operation ■ Household fuse blown or...
User Instructions
Page 13
...licensed, qualified plumber. Wash ice bin. fans/compressor adjusting to enter refrigerator. Check temperature in the line can result in the correct position. Connect refrigerator to your cold water supply? If the freezer compartment door will not close all the way, see "The doors will...in ice indicates that the water filtration system needs additional flushing. The doors will not close the freezer compartment door. Move food packages away from items placed on top of inside walls, especially during initial cool-down ■ Water running - The doors are ...
...licensed, qualified plumber. Wash ice bin. fans/compressor adjusting to enter refrigerator. Check temperature in the line can result in the correct position. Connect refrigerator to your cold water supply? If the freezer compartment door will not close all the way, see "The doors will...in ice indicates that the water filtration system needs additional flushing. The doors will not close the freezer compartment door. Move food packages away from items placed on top of inside walls, especially during initial cool-down ■ Water running - The doors are ...
User Instructions
Page 14
...the dispenser 2 to 3 seconds after installation for the water supply to your authorized KitchenAid dealer. Flush the water system. See "Refrigerator Doors." The first glass of water. ■ Refrigerator connected to cool completely. ■ Water not been recently dispensed? See "Water Supply...9632; Kink in this section. ■ Recently removed the doors? Remove filter and operate dispenser. If it correctly. ■ Refrigerator door closed completely? Flush the water system. Stainless Steel Cleaner and Polish: Order Part #4396920 Replacement Filter: Order Part #4396701 ...
...the dispenser 2 to 3 seconds after installation for the water supply to your authorized KitchenAid dealer. Flush the water system. See "Refrigerator Doors." The first glass of water. ■ Refrigerator connected to cool completely. ■ Water not been recently dispensed? See "Water Supply...9632; Kink in this section. ■ Recently removed the doors? Remove filter and operate dispenser. If it correctly. ■ Refrigerator door closed completely? Flush the water system. Stainless Steel Cleaner and Polish: Order Part #4396920 Replacement Filter: Order Part #4396701 ...
User Instructions
Page 17
... pay for factory specified parts and repair labor to be provided by a KitchenAid designated service company. ITEMS EXCLUDED FROM WARRANTY This limited warranty does not cover: 1. Pickup and delivery. The removal and reinstallation of the refrigerator/freezer cavity liner (including labor costs) if the part cracks due to defective materials or workmanship that...
... pay for factory specified parts and repair labor to be provided by a KitchenAid designated service company. ITEMS EXCLUDED FROM WARRANTY This limited warranty does not cover: 1. Pickup and delivery. The removal and reinstallation of the refrigerator/freezer cavity liner (including labor costs) if the part cracks due to defective materials or workmanship that...

Parts List
Page 1
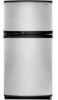
A W10188034 Rev. CABINET PARTS For Models: KTRC22KVSS00 (Stainless Steel) REFRIGERATOR 2−08 Litho In U.S.A. (rrm) 1 Part No.
A W10188034 Rev. CABINET PARTS For Models: KTRC22KVSS00 (Stainless Steel) REFRIGERATOR 2−08 Litho In U.S.A. (rrm) 1 Part No.
Parts List
Page 8
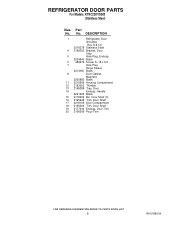
... PARTS For Models: KTRC22KVSS00 (Stainless Steel) Illus. DESCRIPTION 1 Refrigerator Door (Includes Illus. 8 & 12) 2218278 Stainless Steel 4 2189202 Bracket, Door Stop 5 Hole Plug, Endcap 2204840 Black 6 489276 Screw, 8−18 x 3/4 7 Hole Plug Hinge Sleeve 2212651 ...
... PARTS For Models: KTRC22KVSS00 (Stainless Steel) Illus. DESCRIPTION 1 Refrigerator Door (Includes Illus. 8 & 12) 2218278 Stainless Steel 4 2189202 Bracket, Door Stop 5 Hole Plug, Endcap 2204840 Black 6 489276 Screw, 8−18 x 3/4 7 Hole Plug Hinge Sleeve 2212651 ...
Parts List
Page 10
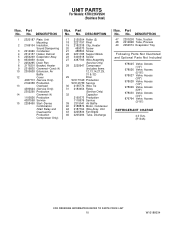
... No. Part No. UNIT PARTS For Models: KTRC22KVSS00 (Stainless Steel) Illus. DESCRIPTION 17 2150304 Roller (2) 18 2221797 Rivet 19 2182338 Clip, Heater 20 489373 Screw 21 488500 Screw 22 2201185 Support Block 23 3400518 Screw 27 4387765 Wire Assembly (Service Only) 28 2225647 Compressor (Includes Items 12,13,14,27,29... Included 978025 Valve, Access (1/4") 978026 Valve, Access (5/16") 978027 Valve, Access (3/8") 978028 Valve, Access (1/2") 978029 Valve, Access (5/8") 978030 Valve, Access (3/4") 876764 Valve, Access (3/16") REFRIGERANT CHARGE 4.0 Ozs. (R134A) 10 W10188034
... No. Part No. UNIT PARTS For Models: KTRC22KVSS00 (Stainless Steel) Illus. DESCRIPTION 17 2150304 Roller (2) 18 2221797 Rivet 19 2182338 Clip, Heater 20 489373 Screw 21 488500 Screw 22 2201185 Support Block 23 3400518 Screw 27 4387765 Wire Assembly (Service Only) 28 2225647 Compressor (Includes Items 12,13,14,27,29... Included 978025 Valve, Access (1/4") 978026 Valve, Access (5/16") 978027 Valve, Access (3/8") 978028 Valve, Access (1/2") 978029 Valve, Access (5/8") 978030 Valve, Access (3/4") 876764 Valve, Access (3/16") REFRIGERANT CHARGE 4.0 Ozs. (R134A) 10 W10188034


