User Instructions
Page 1
... 37 INSTALLATION INSTRUCTIONS 2 INSTRUCCIONES DE INSTALACIÓN ......... 19 INSTRUCTIONS D'INSTALLATION 38 REFRIGERATOR USE 10 USO DE SU REFRIGERADOR 28 UTILISATION DU RÉFRIGÉRATEUR .......... 47 REFRIGERATOR CARE 11 CUIDADO DE SU REFRIGERADOR 30 ENTRETIEN DU RÉFRIGÉRATEUR 49 TROUBLESHOOTING 12 SOLUCIÓN DE PROBLEMAS 31 DÉPANNAGE 50 WATER FILTER CERTIFICATIONS 14 PRODUCT DATA SHEETS 15 WARRANTY 17 HOJA DE DATOS DEL PRODUCTO...
... 37 INSTALLATION INSTRUCTIONS 2 INSTRUCCIONES DE INSTALACIÓN ......... 19 INSTRUCTIONS D'INSTALLATION 38 REFRIGERATOR USE 10 USO DE SU REFRIGERADOR 28 UTILISATION DU RÉFRIGÉRATEUR .......... 47 REFRIGERATOR CARE 11 CUIDADO DE SU REFRIGERADOR 30 ENTRETIEN DU RÉFRIGÉRATEUR 49 TROUBLESHOOTING 12 SOLUCIÓN DE PROBLEMAS 31 DÉPANNAGE 50 WATER FILTER CERTIFICATIONS 14 PRODUCT DATA SHEETS 15 WARRANTY 17 HOJA DE DATOS DEL PRODUCTO...
User Instructions
Page 2
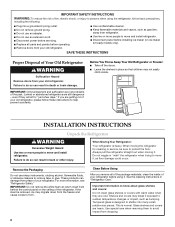
...: Child entrapment and suffocation are getting rid of the refrigerator. Shelves and covers may not easily climb inside of your refrigerator before installing ice maker (on the ceiling of your old refrigerator, please follow basic precautions, including the following: ■ Plug into many small, pebble-size pieces. If you remove all parts and panels before operating. ■ Remove doors from your old refrigerator. ■ Use nonflammable cleaner. ■ Keep flammable...
...: Child entrapment and suffocation are getting rid of the refrigerator. Shelves and covers may not easily climb inside of your refrigerator before installing ice maker (on the ceiling of your old refrigerator, please follow basic precautions, including the following: ■ Plug into many small, pebble-size pieces. If you remove all parts and panels before operating. ■ Remove doors from your old refrigerator. ■ Use nonflammable cleaner. ■ Keep flammable...
User Instructions
Page 3
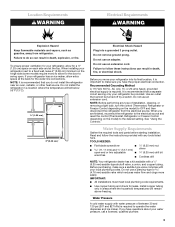
... that cannot be provided. Before purchasing, make sure you move your refrigerator, allow for the water line connections. Failure to swing open -end or two adjustable 6.35 mm) drill bit wrenches ■ Cordless drill NOTE: Your refrigerator dealer has a kit available with water pressure of installation, cleaning, or removing a light bulb, turn the control (Thermostat, Refrigerator or Freezer Control depending on the hinge side (some models require more easily. Recommended Grounding Method A 115...
... that cannot be provided. Before purchasing, make sure you move your refrigerator, allow for the water line connections. Failure to swing open -end or two adjustable 6.35 mm) drill bit wrenches ■ Cordless drill NOTE: Your refrigerator dealer has a kit available with water pressure of installation, cleaning, or removing a light bulb, turn the control (Thermostat, Refrigerator or Freezer Control depending on the hinge side (some models require more easily. Recommended Grounding Method A 115...
User Instructions
Page 4
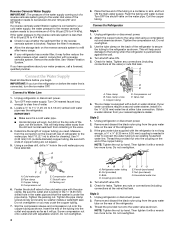
.... Valve inlet 6. The ice maker is connected to your water conditions require a second water strainer, install it is a cold water pipe. ■ Horizontal pipe will help avoid damage to the tubing when the refrigerator is blocked. Remove and discard the black nylon plug from collecting in the water pipe and that leak. If a reverse osmosis water filtration system is equipped with a wrench two more turns. Remove the water filter. IMPORTANT: ■ Make...
.... Valve inlet 6. The ice maker is connected to your water conditions require a second water strainer, install it is a cold water pipe. ■ Horizontal pipe will help avoid damage to the tubing when the refrigerator is blocked. Remove and discard the black nylon plug from collecting in the water pipe and that leak. If a reverse osmosis water filtration system is equipped with a wrench two more turns. Remove the water filter. IMPORTANT: ■ Make...

User Instructions
Page 5
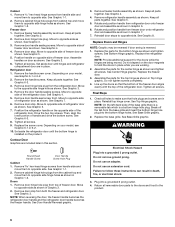
... not remove ground prong. See "Water Dispenser." NOTE: These instructions are included later in this section. Nut (provided) 4. Remove the parts for leaks. Remove Doors and Hinges (all models) IMPORTANT: ■ Unplug refrigerator or disconnect power. ■ Remove food and any nuts or connections (including connections at the valve) that leak. Open refrigerator door and remove base grille from the door. Using a ¹⁄₈" Allen wrench, loosen the two setscrews located underneath each handle. Refrigerator Doors 2. If...
... not remove ground prong. See "Water Dispenser." NOTE: These instructions are included later in this section. Nut (provided) 4. Remove the parts for leaks. Remove Doors and Hinges (all models) IMPORTANT: ■ Unplug refrigerator or disconnect power. ■ Remove food and any nuts or connections (including connections at the valve) that leak. Open refrigerator door and remove base grille from the door. Using a ¹⁄₈" Allen wrench, loosen the two setscrews located underneath each handle. Refrigerator Doors 2. If...
User Instructions
Page 6
.... Replace Doors and Hinges NOTE: Graphic may be reversed if door swing is installed on the door magnets to opposite side. Do not use an adapter. Remove cabinet hinge hole plugs from top of freezer door. Remove door hinge hole plug. Remove the handle screws. See Graphic 6-3. 3. Set aside the refrigerator door until hinges and refrigerator compartment door are working. 2. See Graphic 3. See Graphic 8. See Bottom Hinge graphic. See Center Hinge graphic. NOTE: On the left-hand side of the refrigerator door. Remove freezer handle assembly...
.... Replace Doors and Hinges NOTE: Graphic may be reversed if door swing is installed on the door magnets to opposite side. Do not use an adapter. Remove cabinet hinge hole plugs from top of freezer door. Remove door hinge hole plug. Remove the handle screws. See Graphic 6-3. 3. Set aside the refrigerator door until hinges and refrigerator compartment door are working. 2. See Graphic 3. See Graphic 8. See Bottom Hinge graphic. See Center Hinge graphic. NOTE: On the left-hand side of the refrigerator door. Remove freezer handle assembly...

User Instructions
Page 9
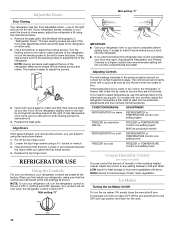
Top Hinge Center Hinge A B A. Bottom Hinge Hole Plug Top Hinge A B C A. Bottom Hinge B. /5 16 " Hex-Head Hinge Screws Door Handle Removal A A A. 1/8" Setscrew A A A. 1/8" Setscrew 9 Architect® Series Door Removal & Replacement Base Grille A A A. Center Hinge B. 5/16" Hex-Head Hinge Screws Bottom Hinge A B A. Top Hinge Cover B. 5/16" Hex-Head Hinge Screws C.
Top Hinge Center Hinge A B A. Bottom Hinge Hole Plug Top Hinge A B C A. Bottom Hinge B. /5 16 " Hex-Head Hinge Screws Door Handle Removal A A A. 1/8" Setscrew A A A. 1/8" Setscrew 9 Architect® Series Door Removal & Replacement Base Grille A A A. Center Hinge B. 5/16" Hex-Head Hinge Screws Bottom Hinge A B A. Top Hinge Cover B. 5/16" Hex-Head Hinge Screws C.
User Instructions
Page 10
... "Refrigerator Doors." This makes it using the instructions below: 1. Open both doors again to make sure that the controls are at least 24 hours between LOW and HIGH. Replace the base grille. Adjusting Controls The mid-settings indicated in the moisture-sealed crisper. On models with skins. Wait at the base of humidity in the previous section should turn the leveling screw to the mid-settings as a guide. To manually turn the ice maker...
... "Refrigerator Doors." This makes it using the instructions below: 1. Open both doors again to make sure that the controls are at least 24 hours between LOW and HIGH. Replace the base grille. Adjusting Controls The mid-settings indicated in the moisture-sealed crisper. On models with skins. Wait at the base of humidity in the previous section should turn the leveling screw to the mid-settings as a guide. To manually turn the ice maker...

User Instructions
Page 11
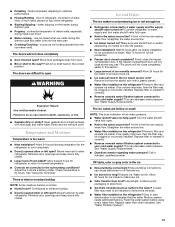
..., or fire. Remove the glass or release the front button to the water dispenser or ice maker decreases noticeably before or after the system. It is well maintained. ■ Do not use with water that it for an additional 2 minutes. After changing the water filter, reset the water filter status light. REFRIGERATOR CARE Cleaning WARNING Explosion Hazard Use nonflammable cleaner. The filter should change the filter. If the water flow to stop dispensing. IMPORTANT: Do not...
..., or fire. Remove the glass or release the front button to the water dispenser or ice maker decreases noticeably before or after the system. It is well maintained. ■ Do not use with water that it for an additional 2 minutes. After changing the water filter, reset the water filter status light. REFRIGERATOR CARE Cleaning WARNING Explosion Hazard Use nonflammable cleaner. The filter should change the filter. If the water flow to stop dispensing. IMPORTANT: Do not...
User Instructions
Page 12
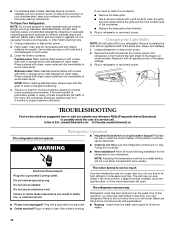
... surface area of a service call an electrician. ■ Controls on exterior surfaces (doors and cabinet), plastic parts, interior and door liners or gaskets. Plug in warm water. To help avoid corrosion of the same size, shape, and wattage. 1. There is working ? Unplug refrigerator or disconnect power. 2. If the problem continues, call . NOTE: Adjusting the temperature controls to fill the ice maker 12 To Clean Your Refrigerator: NOTE: Do not use an extension cord. Do...
... surface area of a service call an electrician. ■ Controls on exterior surfaces (doors and cabinet), plastic parts, interior and door liners or gaskets. Plug in warm water. To help avoid corrosion of the same size, shape, and wattage. 1. There is working ? Unplug refrigerator or disconnect power. 2. If the problem continues, call . NOTE: Adjusting the temperature controls to fill the ice maker 12 To Clean Your Refrigerator: NOTE: Do not use an extension cord. Do...
User Instructions
Page 13
... "Water Supply Requirements." Gray or dark discoloration in the water? flow of refrigerant, movement of inside walls, especially during the defrost cycle and water runs into the drain pan ■ Creaking/Cracking - There is interior moisture buildup NOTE: Some moisture buildup is not producing ice or not enough ice ■ Refrigerator connected to moisture buildup. ■ Door(s) opened often or left open ? Straighten the water source line. ■ Water filter installed on the refrigerator? Remove filter and operate ice maker. Use...
... "Water Supply Requirements." Gray or dark discoloration in the water? flow of refrigerant, movement of inside walls, especially during the defrost cycle and water runs into the drain pan ■ Creaking/Cracking - There is interior moisture buildup NOTE: Some moisture buildup is not producing ice or not enough ice ■ Refrigerator connected to moisture buildup. ■ Door(s) opened often or left open ? Straighten the water source line. ■ Water filter installed on the refrigerator? Remove filter and operate ice maker. Use...
User Instructions
Page 14
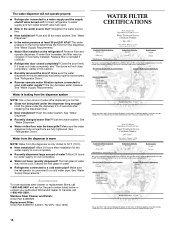
... of water. ■ Refrigerator connected to a water supply and the supply shutoff valve turned on? See "Water Dispenser." ■ Is the water pressure at least 35 psi (241 kPa)? Remove filter and operate dispenser. Close the door firmly. Make sure the water dispenser wire/tube assembly has been properly reconnected. Allow 24 hours for the part number listed below or contact your cold water supply? The first glass of water after dispensing is connected to a cold water pipe. Accessories To order stainless steel cleaner or replacement filters...
... of water. ■ Refrigerator connected to a water supply and the supply shutoff valve turned on? See "Water Dispenser." ■ Is the water pressure at least 35 psi (241 kPa)? Remove filter and operate dispenser. Close the door firmly. Make sure the water dispenser wire/tube assembly has been properly reconnected. Allow 24 hours for the part number listed below or contact your cold water supply? The first glass of water after dispensing is connected to a cold water pipe. Accessories To order stainless steel cleaner or replacement filters...
User Instructions
Page 15
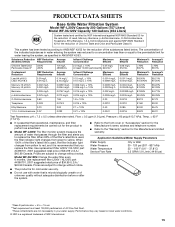
....75 1,2,4- Temp. = 63°F (17.2°C). ■ It is for water leaving the system, as advertised. ■ Model WF-L200V: The filter monitor system measures the amount of water that operational, maintenance, and filter replacement requirements be carried out for the reduction of the substances listed below. Performance may vary based on local water conditions. ® NSF is used , the filter indicator light changes from...
....75 1,2,4- Temp. = 63°F (17.2°C). ■ It is for water leaving the system, as advertised. ■ Model WF-L200V: The filter monitor system measures the amount of water that operational, maintenance, and filter replacement requirements be carried out for the reduction of the substances listed below. Performance may vary based on local water conditions. ® NSF is used , the filter indicator light changes from...

User Instructions
Page 16
... product is for cold water use only. ■ Do not use with water that is essential that may contain filterable cysts. Flow = 0.5 gpm (1.9 Lpm). Use replacement cartridge NLC120V, part #4396701. 2007 suggested retail price of Chlorine Taste and Odor and Particulate Class I particle size: >0.5 to ANSI/NSF 42/53 for the reduction of the substances listed below. Systems certified for water leaving the...
... product is for cold water use only. ■ Do not use with water that is essential that may contain filterable cysts. Flow = 0.5 gpm (1.9 Lpm). Use replacement cartridge NLC120V, part #4396701. 2007 suggested retail price of Chlorine Taste and Odor and Particulate Class I particle size: >0.5 to ANSI/NSF 42/53 for the reduction of the substances listed below. Systems certified for water leaving the...
User Instructions
Page 17
... date of purchase, when this filter is operated and maintained according to instructions attached to or furnished with the product, KitchenAid will pay for a replacement water filter to published user or operator instructions and/or installation instructions. 2. Replacement parts or repair labor if this major appliance is used for other rights that existed when this major appliance was purchased: compressor, evaporator, condenser, dryer, and connecting tubing. Any food or medicine...
... date of purchase, when this filter is operated and maintained according to instructions attached to or furnished with the product, KitchenAid will pay for a replacement water filter to published user or operator instructions and/or installation instructions. 2. Replacement parts or repair labor if this major appliance is used for other rights that existed when this major appliance was purchased: compressor, evaporator, condenser, dryer, and connecting tubing. Any food or medicine...
Parts List
Page 2
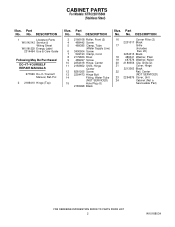
... Parts W10142142 Service & Wiring Sheet W10181229 Energy Label 2314464 Use & Care Guide Following May Be Purchased DO−IT−YOURSELF REPAIR MANUALS 677969 Do−It−Yourself Manual, Ref./Fzr. 2 2189410 Hinge (Top) Illus. No. No. Part No. CABINET PARTS For Models: KTRC22KVSS00 (Stainless Steel) Illus. DESCRIPTION 3 2166108 Roller, Front (2) 4 489442 Screw 5 489385 Clamp, Tube (Water Supply Line) 6 3400504 Screw 7 549193 Clamp, Cord 8 2179826 Rivet 9 489497 Screw 10 2254618 Hinge...
... Parts W10142142 Service & Wiring Sheet W10181229 Energy Label 2314464 Use & Care Guide Following May Be Purchased DO−IT−YOURSELF REPAIR MANUALS 677969 Do−It−Yourself Manual, Ref./Fzr. 2 2189410 Hinge (Top) Illus. No. No. Part No. CABINET PARTS For Models: KTRC22KVSS00 (Stainless Steel) Illus. DESCRIPTION 3 2166108 Roller, Front (2) 4 489442 Screw 5 489385 Clamp, Tube (Water Supply Line) 6 3400504 Screw 7 549193 Clamp, Cord 8 2179826 Rivet 9 489497 Screw 10 2254618 Hinge...

Parts List
Page 4
... Light Bulb (2) 31 2254454 Bracket 2 2197380 Grommet (2) 18 2200831 Weight, Thermal Evap. DESCRIPTION Illus. Fan, Rear 3 2254360 Gasket, Evaporator 19 1118894 Rocker Arm 32 487996 Plastic Closure Cover Switch 33 489478 Screw 4 2314156 Adaptive, 20 W10129803 Wire Assembly, 34 2302536 Knob, Damper Defrost Control Freezer Compartment 36 2205079 Seal, Rear 5 2212485 Thermostat Tube (Includes Thermostat Barrier Illus. 54) 37 2210509 Valve−Tube, Body 6 488208 Screw 21 2176281 Cover, Air...
... Light Bulb (2) 31 2254454 Bracket 2 2197380 Grommet (2) 18 2200831 Weight, Thermal Evap. DESCRIPTION Illus. Fan, Rear 3 2254360 Gasket, Evaporator 19 1118894 Rocker Arm 32 487996 Plastic Closure Cover Switch 33 489478 Screw 4 2314156 Adaptive, 20 W10129803 Wire Assembly, 34 2302536 Knob, Damper Defrost Control Freezer Compartment 36 2205079 Seal, Rear 5 2212485 Thermostat Tube (Includes Thermostat Barrier Illus. 54) 37 2210509 Valve−Tube, Body 6 488208 Screw 21 2176281 Cover, Air...
Parts List
Page 8
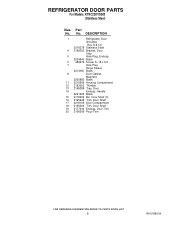
Part No. REFRIGERATOR DOOR PARTS For Models: KTRC22KVSS00 (Stainless Steel) Illus. DESCRIPTION 1 Refrigerator Door (Includes Illus. 8 & 12) 2218278 Stainless Steel 4 2189202 Bracket, Door Stop 5 Hole Plug, Endcap 2204840 Black 6 489276 Screw, 8−18 x 3/4 7 Hole Plug Hinge Sleeve 2212651 Black 8 Door Gasket, Magnetic 2202882 Black 11 2210566 Housing Compartment 12 2183003 Thimble 13 2195388 Tray, Door 14 Endcap, Handle 2221628 Black 15 2179606 Bin, Door Shelf (3) 16 2195948 Trim, Door Shelf 17 2218109 Door Compartment 18 2159306...
Part No. REFRIGERATOR DOOR PARTS For Models: KTRC22KVSS00 (Stainless Steel) Illus. DESCRIPTION 1 Refrigerator Door (Includes Illus. 8 & 12) 2218278 Stainless Steel 4 2189202 Bracket, Door Stop 5 Hole Plug, Endcap 2204840 Black 6 489276 Screw, 8−18 x 3/4 7 Hole Plug Hinge Sleeve 2212651 Black 8 Door Gasket, Magnetic 2202882 Black 11 2210566 Housing Compartment 12 2183003 Thimble 13 2195388 Tray, Door 14 Endcap, Handle 2221628 Black 15 2179606 Bin, Door Shelf (3) 16 2195948 Trim, Door Shelf 17 2218109 Door Compartment 18 2159306...
Parts List
Page 10
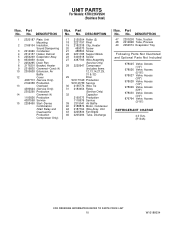
... Valve, Access (1/2") 978029 Valve, Access (5/8") 978030 Valve, Access (3/4") 876764 Valve, Access (3/16") REFRIGERANT CHARGE 4.0 Ozs. (R134A) 10 W10188034 No. Unit 43 2225834 Fan Blade 46 2205294 Tube, Discharge Illus. No. DESCRIPTION 17 2150304 Roller (2) 18 2221797 Rivet 19 2182338 Clip, Heater 20 489373 Screw 21 488500 Screw 22 2201185 Support Block 23 3400518 Screw 27 4387765 Wire Assembly (Service Only) 28 2225647 Compressor...
... Valve, Access (1/2") 978029 Valve, Access (5/8") 978030 Valve, Access (3/4") 876764 Valve, Access (3/16") REFRIGERANT CHARGE 4.0 Ozs. (R134A) 10 W10188034 No. Unit 43 2225834 Fan Blade 46 2205294 Tube, Discharge Illus. No. DESCRIPTION 17 2150304 Roller (2) 18 2221797 Rivet 19 2182338 Clip, Heater 20 489373 Screw 21 488500 Screw 22 2201185 Support Block 23 3400518 Screw 27 4387765 Wire Assembly (Service Only) 28 2225647 Compressor...
Parts List
Page 11
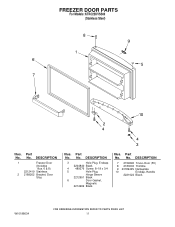
Part No. No. DESCRIPTION 7 2159292 Trivet−Door (FC) 8 2183003 Thimble 9 2318942S Nameplate 10 Endcap, Handle 2221624 Black W10188034 11 No. FREEZER DOOR PARTS For Models: KTRC22KVSS00 (Stainless Steel) Illus. DESCRIPTION 1 Freezer Door (Includes Illus. 6 & 8) 2212419 Stainless 2 2189202 Bracket, Door Stop Illus. DESCRIPTION 3 Hole Plug, Endcap 2204840 Black 4 489276 Screw, 8−18 x 3/4 5 Hole Plug, Hinge Sleeve 2212651 Black 6 Door Gasket, Magnetic 2214969 Black Illus. Part No. Part No. No.
Part No. No. DESCRIPTION 7 2159292 Trivet−Door (FC) 8 2183003 Thimble 9 2318942S Nameplate 10 Endcap, Handle 2221624 Black W10188034 11 No. FREEZER DOOR PARTS For Models: KTRC22KVSS00 (Stainless Steel) Illus. DESCRIPTION 1 Freezer Door (Includes Illus. 6 & 8) 2212419 Stainless 2 2189202 Bracket, Door Stop Illus. DESCRIPTION 3 Hole Plug, Endcap 2204840 Black 4 489276 Screw, 8−18 x 3/4 5 Hole Plug, Hinge Sleeve 2212651 Black 6 Door Gasket, Magnetic 2214969 Black Illus. Part No. Part No. No.


