
Dimension Guide
Page 2
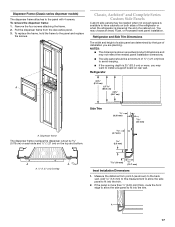
...More clearance may be required if you are for planning purposes only. Specifications subject to a minimum of 2 Ref. 2316565C 09-09-08 DOOR SWING DIMENSIONS 36" (91.4 cm) Models 10 27.6 cm) 35¹⁄₂" (90.2 cm) 38⁷⁄₈" (98.7 cm) 90˚ ...8324;" (121.3 cm) NOTE: Flooring under refrigerator must be plumb. Allow 4-1/2" (11.4 cm) minimum space between the side of solid soffit 77" (196 cm) A Width (see Installation our products, we reserve the right to improve Dimensions are using overlay panels, custom handles, or extended handles on a Classic model...
...More clearance may be required if you are for planning purposes only. Specifications subject to a minimum of 2 Ref. 2316565C 09-09-08 DOOR SWING DIMENSIONS 36" (91.4 cm) Models 10 27.6 cm) 35¹⁄₂" (90.2 cm) 38⁷⁄₈" (98.7 cm) 90˚ ...8324;" (121.3 cm) NOTE: Flooring under refrigerator must be plumb. Allow 4-1/2" (11.4 cm) minimum space between the side of solid soffit 77" (196 cm) A Width (see Installation our products, we reserve the right to improve Dimensions are using overlay panels, custom handles, or extended handles on a Classic model...

Installation Guide
Page 4
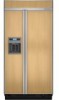
This series requires the installation of custom panels, handles, and standoffs. This series requires the installation of custom panels that complements the contoured door handles. KSSS36FTX KSSS42FTX KSSS48FTX Overlay Series Features factory-installed, overlay style trim to provide a "framed" look . Side by Side Non-Dispensing Refrigerators MODELS Architect® Series Features wraparound styling that are not...
This series requires the installation of custom panels, handles, and standoffs. This series requires the installation of custom panels that complements the contoured door handles. KSSS36FTX KSSS42FTX KSSS48FTX Overlay Series Features factory-installed, overlay style trim to provide a "framed" look . Side by Side Non-Dispensing Refrigerators MODELS Architect® Series Features wraparound styling that are not...

Installation Guide
Page 5
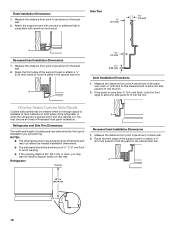
... provide a "frameless" look. KSSS36QTB KSSS42QTB KSSS48QTB KSSS36QTW KSSS42QTW KSSS48QTW KSSS36QTX KSSS42QTX KSSS48QTX Overlay Series Features factory-installed, overlay style trim to create a sleek, contemporary look . This series requires the installation of custom panels, handles, and standoffs. KSSP36QTS KSSP42QTS KSSP48QTS 5 Side by Side Dispensing Refrigerators Architect® Series Features wraparound styling that are not included...
... provide a "frameless" look. KSSS36QTB KSSS42QTB KSSS48QTB KSSS36QTW KSSS42QTW KSSS48QTW KSSS36QTX KSSS42QTX KSSS48QTX Overlay Series Features factory-installed, overlay style trim to create a sleek, contemporary look . This series requires the installation of custom panels, handles, and standoffs. KSSP36QTS KSSP42QTS KSSP48QTS 5 Side by Side Dispensing Refrigerators Architect® Series Features wraparound styling that are not included...

Installation Guide
Page 6
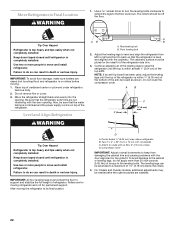
...°F (13°C). ■ Floor must permit top grille removal. Overlay Series: Make custom panels, or consult a qualified cabinetmaker or carpenter to do not install the refrigerator near an oven, radiator, or other heat source. ■ Do not install in death,... (5 cm x 10 cm x 81 cm) wood board(s) ■ Order factory panels, make custom panels or consult a qualified cabinetmaker or carpenter to make the panels. See "Door Swing Dimensions." ■ Location must support the refrigerator weight, more information. If the anti-tip boards are connecting the water line directly ...
...°F (13°C). ■ Floor must permit top grille removal. Overlay Series: Make custom panels, or consult a qualified cabinetmaker or carpenter to do not install the refrigerator near an oven, radiator, or other heat source. ■ Do not install in death,... (5 cm x 10 cm x 81 cm) wood board(s) ■ Order factory panels, make custom panels or consult a qualified cabinetmaker or carpenter to make the panels. See "Door Swing Dimensions." ■ Location must support the refrigerator weight, more information. If the anti-tip boards are connecting the water line directly ...
Installation Guide
Page 10
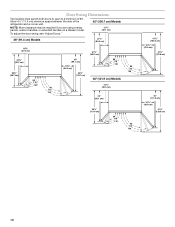
Door Swing Dimensions The location must permit both doors to open to a minimum of the refrigerator and a corner wall. 42" (106.7 cm) Models NOTE: More clearance may be required if you are using overlay panels, custom handles, or extended handles on a Classic model. 12⁵⁄₈" (32.1 cm) To adjust the door...;⁄₈" (112.7 cm) 41³⁄₈" (105.1 cm) 90˚ 110˚ 130˚ 48" (121.9 cm) Models 14³⁄₈" (36.5 cm) 39" (99.1 cm) 90˚ 110˚ 130˚ 43⁷⁄₈" (111.4 cm) 90˚ 110˚ 130˚ 90˚ ...
Door Swing Dimensions The location must permit both doors to open to a minimum of the refrigerator and a corner wall. 42" (106.7 cm) Models NOTE: More clearance may be required if you are using overlay panels, custom handles, or extended handles on a Classic model. 12⁵⁄₈" (32.1 cm) To adjust the door...;⁄₈" (112.7 cm) 41³⁄₈" (105.1 cm) 90˚ 110˚ 130˚ 48" (121.9 cm) Models 14³⁄₈" (36.5 cm) 39" (99.1 cm) 90˚ 110˚ 130˚ 43⁷⁄₈" (111.4 cm) 90˚ 110˚ 130˚ 90˚ ...

Installation Guide
Page 11
... Series models, rout the hinge side of the custom door panels to a radius that there is desired. Overlay Panel Backer Panel Door 1/2" (1.3 cm) 3/4" (1.9 cm) 1" (2.5 cm) NOTE: Allow ¹⁄₂" (1.3 cm) clearance between overlay panel and cabinetry. 11/4" (3.2 cm) 11/2" (3.8 cm) Spacer Panel When the doors are closed the refrigerator will extend beyond the face of the...
... Series models, rout the hinge side of the custom door panels to a radius that there is desired. Overlay Panel Backer Panel Door 1/2" (1.3 cm) 3/4" (1.9 cm) 1" (2.5 cm) NOTE: Allow ¹⁄₂" (1.3 cm) clearance between overlay panel and cabinetry. 11/4" (3.2 cm) 11/2" (3.8 cm) Spacer Panel When the doors are closed the refrigerator will extend beyond the face of the...
Installation Guide
Page 12
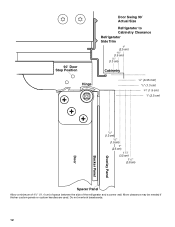
More clearance may be needed if thicker custom panels or custom handles are used. 90˚ Door Stop Position Hinge Door Swing 90˚ Actual Size Refrigerator to Cabinetry Clearance Refrigerator Side Trim 1" (2.5 cm) 3/4" (1.9 cm) 1/2" (1.3 cm) Cabinetry 1/4" (6.35 mm) 1/2" (1.3 cm) 3/4" (1.9 cm) 1" (2.5 cm) Overlay Panel Backer Panel Door 1/2" (1.3 cm) 3/4" (1.9 cm) 1" (2.5 cm) 11/4" (3.2 cm) 11/2" (3.8 cm) Spacer Panel Allow a minimum of 4¹⁄₂" (11.4 cm) of space between the side of the refrigerator and a corner wall. Do not overlook baseboards. 12
More clearance may be needed if thicker custom panels or custom handles are used. 90˚ Door Stop Position Hinge Door Swing 90˚ Actual Size Refrigerator to Cabinetry Clearance Refrigerator Side Trim 1" (2.5 cm) 3/4" (1.9 cm) 1/2" (1.3 cm) Cabinetry 1/4" (6.35 mm) 1/2" (1.3 cm) 3/4" (1.9 cm) 1" (2.5 cm) Overlay Panel Backer Panel Door 1/2" (1.3 cm) 3/4" (1.9 cm) 1" (2.5 cm) 11/4" (3.2 cm) 11/2" (3.8 cm) Spacer Panel Allow a minimum of 4¹⁄₂" (11.4 cm) of space between the side of the refrigerator and a corner wall. Do not overlook baseboards. 12
Installation Guide
Page 13
... Custom overlay panels allow you to blend the exterior of your cabinet manufacturer may use 2" (5.08 cm) spacer strips around the perimeter in place of full-sheet solid spacer panels. In some cases, your refrigerator into the overall kitchen décor, and to work with one panel routed for added support. 14¹⁄₄" (36...
... Custom overlay panels allow you to blend the exterior of your cabinet manufacturer may use 2" (5.08 cm) spacer strips around the perimeter in place of full-sheet solid spacer panels. In some cases, your refrigerator into the overall kitchen décor, and to work with one panel routed for added support. 14¹⁄₄" (36...

Installation Guide
Page 15
... Color 36 42 48 White #2325127 #2325128 #2325129 Black #2325130 #2325131 #2325132 Stainless Steel #2325133 #2325134 #2325135 Extended Door Handle Kits Use extended door handles when additional finger clearance is needed between the door handles and custom panel. Standoffs...442-9991. Flat end straight handle (4396776) with bronze bullet standoffs (4396778) D. Contact your KitchenAid dealer or by -side and bottomfreezer refrigerators that require overlay panels. Architect® Series handle (4396103) B. PART NO. DESCRIPTION 4396775 Clamshell, Satin Stainless Steel ...
... Color 36 42 48 White #2325127 #2325128 #2325129 Black #2325130 #2325131 #2325132 Stainless Steel #2325133 #2325134 #2325135 Extended Door Handle Kits Use extended door handles when additional finger clearance is needed between the door handles and custom panel. Standoffs...442-9991. Flat end straight handle (4396776) with bronze bullet standoffs (4396778) D. Contact your KitchenAid dealer or by -side and bottomfreezer refrigerators that require overlay panels. Architect® Series handle (4396103) B. PART NO. DESCRIPTION 4396775 Clamshell, Satin Stainless Steel ...

Installation Guide
Page 16
...Refrigerator Door ¹⁄₂" (1.27 cm) Door Panels for finger clearance. ■ If an extended handle is used , the handle side offset of raised wood panel. See "Door Swing Dimensions." ■ The dashed lines in the illustration represent the location and offsets of both panels should be 1.1 cm). Classic Series Custom Panels... plywood 1.1 cm) ¹⁄₂" Location and offsets (1.27 cm) of raised wood panel ¹⁄₂" (1.27 cm) Model A B 36 14¹⁄₄" (36.2 cm) 19¹⁄₄" (48.9 cm) 42 16³⁄₄" (42...
...Refrigerator Door ¹⁄₂" (1.27 cm) Door Panels for finger clearance. ■ If an extended handle is used , the handle side offset of raised wood panel. See "Door Swing Dimensions." ■ The dashed lines in the illustration represent the location and offsets of both panels should be 1.1 cm). Classic Series Custom Panels... plywood 1.1 cm) ¹⁄₂" Location and offsets (1.27 cm) of raised wood panel ¹⁄₂" (1.27 cm) Model A B 36 14¹⁄₄" (36.2 cm) 19¹⁄₄" (48.9 cm) 42 16³⁄₄" (42...
Installation Guide
Page 17
To remove the dispenser frame: 1. Classic, Architect® and Complete Series Custom Side Panels Custom side panels may want to have cabinets on the top and bottom. 4.7 mm) 5.5 mm) 4.5 mm) A A A 1.27 cm) Overlap 10 mm) ⁵⁄₈" (15.7 mm) Inset ... (59.7 cm) Side Trim ¹⁄₄" (6.35 mm) A. To replace the frame, hold the frame to the back wall. Refrigerator and Side Trim Dimensions The width and height of a side panel are determined by 0.78 cm) on each side and ¹⁄₂" (1.27 cm) on both sides of installation you...
To remove the dispenser frame: 1. Classic, Architect® and Complete Series Custom Side Panels Custom side panels may want to have cabinets on the top and bottom. 4.7 mm) 5.5 mm) 4.5 mm) A A A 1.27 cm) Overlap 10 mm) ⁵⁄₈" (15.7 mm) Inset ... (59.7 cm) Side Trim ¹⁄₄" (6.35 mm) A. To replace the frame, hold the frame to the back wall. Refrigerator and Side Trim Dimensions The width and height of a side panel are determined by 0.78 cm) on each side and ¹⁄₂" (1.27 cm) on both sides of installation you...
Installation Guide
Page 18
...Installation Dimensions 1. Add 0.8 mm) to this measurement to allow the side panel to fit into the trim. 2. Overlay Series Custom Side Panels Custom side panels may not reflect the needed installation dimensions. ■ The side panel should be needed when not enough space is available to fit into the ...the front edge of a cabinet run. Flush Installation Dimensions 1. If the panel is compatible with aluminum and wood. Refrigerator and Side Trim Dimensions The width and height of a side panel are determined by the type of installation you may choose an Inset or ...
...Installation Dimensions 1. Add 0.8 mm) to this measurement to allow the side panel to fit into the trim. 2. Overlay Series Custom Side Panels Custom side panels may not reflect the needed installation dimensions. ■ The side panel should be needed when not enough space is available to fit into the ...the front edge of a cabinet run. Flush Installation Dimensions 1. If the panel is compatible with aluminum and wood. Refrigerator and Side Trim Dimensions The width and height of a side panel are determined by the type of installation you may choose an Inset or ...
Installation Guide
Page 22
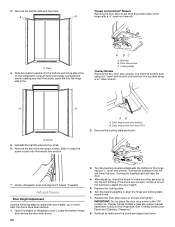
... 4. Tip Over Hazard Refrigerator is on top of the refrigerator side trim. 3. Compressor cover IMPORTANT: Adjust in death or serious injury. Move Refrigerator to its final location: D A. The rollers should be needed after the custom panels are raised (not touching floor) and refrigerator is top heavy and tips... installed. Rollers are not interfering with the door alignment or top grille fit. Remove dolly. 2. Be sure that the refrigerator is top heavy and tips easily when not completely installed. Continue adjusting all of the leveling legs to a maximum of the...
... 4. Tip Over Hazard Refrigerator is on top of the refrigerator side trim. 3. Compressor cover IMPORTANT: Adjust in death or serious injury. Move Refrigerator to its final location: D A. The rollers should be needed after the custom panels are raised (not touching floor) and refrigerator is top heavy and tips... installed. Rollers are not interfering with the door alignment or top grille fit. Remove dolly. 2. Be sure that the refrigerator is top heavy and tips easily when not completely installed. Continue adjusting all of the leveling legs to a maximum of the...

Installation Guide
Page 23
... call 1-800-442-9991. Cabinet side trim Install Overlay Series Custom Panels IMPORTANT: ■ Install the custom handles prior to installing the panels on KitchenAid custom handle selection, refer to the KitchenAid Catalog, visit www.kitchenaid.com, or call 1-800-807-6777. ■ Create custom door overlay panels according to the refrigerator for the removal or addition of molding or decorative...
... call 1-800-442-9991. Cabinet side trim Install Overlay Series Custom Panels IMPORTANT: ■ Install the custom handles prior to installing the panels on KitchenAid custom handle selection, refer to the KitchenAid Catalog, visit www.kitchenaid.com, or call 1-800-807-6777. ■ Create custom door overlay panels according to the refrigerator for the removal or addition of molding or decorative...
Installation Guide
Page 24
...and top trims. 6. Slide or snap the screw covers into the bottom and hinge side trims on Overlay Series models unless the custom panels have been leveled. 1. AB A. Turn the bushing located underneath the bottom of the hinge with a ³⁄₈" open end... hinge side trims. A BC A. Door stop screw from the screw covers. Open the freezer or refrigerator door. Replace the locking plate. 6. Trims 4. Bushing B. Check refrigerator level and alignment. A A A. Panels 5. Adjust if needed. Turning the bushing right will lower the door. A. Door stop screw from ...
...and top trims. 6. Slide or snap the screw covers into the bottom and hinge side trims on Overlay Series models unless the custom panels have been leveled. 1. AB A. Turn the bushing located underneath the bottom of the hinge with a ³⁄₈" open end... hinge side trims. A BC A. Door stop screw from the screw covers. Open the freezer or refrigerator door. Replace the locking plate. 6. Trims 4. Bushing B. Check refrigerator level and alignment. A A A. Panels 5. Adjust if needed. Turning the bushing right will lower the door. A. Door stop screw from ...

Installation Guide
Page 25
... hinge and tighten. 2. Cab side trim Install Base Grille There are two pieces to the base grille to allow access to the refrigerator for a custom fit: the base grille itself and the skirt. The skirt can be added to the base grille in area depth is 25" ... and the two ¹⁄₄" hex-head mounting screws. 2. Remove the film from the bottom hinge. IMPORTANT: KitchenAid is not responsible for the removal or addition of molding or decorative panels that is a registered trademark of ¹⁄₂" (1.27 cm) in this section. 2. A B A. Nail...
... hinge and tighten. 2. Cab side trim Install Base Grille There are two pieces to the base grille to allow access to the refrigerator for a custom fit: the base grille itself and the skirt. The skirt can be added to the base grille in area depth is 25" ... and the two ¹⁄₄" hex-head mounting screws. 2. Remove the film from the bottom hinge. IMPORTANT: KitchenAid is not responsible for the removal or addition of molding or decorative panels that is a registered trademark of ¹⁄₂" (1.27 cm) in this section. 2. A B A. Nail...


