
Use & Care Guide
Page 10
...Align the ridge on the cap with the arrow on the filter. Pull gently on the new filter. Discard the first three batches of your refrigerator. Using the Ice Maker Without a Water Filter You can operate the ice maker without adequate disinfection before or after the system. 5. Remove the ... protective covers from the O-rings. Be sure the O-rings are still in the base grille. Then, turn the cap until it snaps into the attachment slot. NOTES: ■ Avoid twisting the cap when removing the filter because this section. 2. The eject button will pop back out when the ...
...Align the ridge on the cap with the arrow on the filter. Pull gently on the new filter. Discard the first three batches of your refrigerator. Using the Ice Maker Without a Water Filter You can operate the ice maker without adequate disinfection before or after the system. 5. Remove the ... protective covers from the O-rings. Be sure the O-rings are still in the base grille. Then, turn the cap until it snaps into the attachment slot. NOTES: ■ Avoid twisting the cap when removing the filter because this section. 2. The eject button will pop back out when the ...

Use & Care Guide
Page 11
... with a mild detergent, rinse well and dry thoroughly. Replace the storage bin on the side of the ice maker. 1. Ice maker cover 2. This can be attached at the corners. Wash ice bin with both hands and press the release button to lift the storage bin up ) position and listen for the...
... with a mild detergent, rinse well and dry thoroughly. Replace the storage bin on the side of the ice maker. 1. Ice maker cover 2. This can be attached at the corners. Wash ice bin with both hands and press the release button to lift the storage bin up ) position and listen for the...

Use & Care Guide
Page 22
... and Canada, this major appliance is operated and maintained according to instructions attached to or furnished with the product, KitchenAid will pay for factory specified parts and repair labor costs to correct defects in materials or workmanship in the sealed refrigeration system. Contact your sales slip together for future reference. After checking "Troubleshooting...
... and Canada, this major appliance is operated and maintained according to instructions attached to or furnished with the product, KitchenAid will pay for factory specified parts and repair labor costs to correct defects in materials or workmanship in the sealed refrigeration system. Contact your sales slip together for future reference. After checking "Troubleshooting...

Dimension Guide
Page 1
...or 20-amp fused, grounded electrical supply is recommended. If you have questions about your refrigerator be turned off valve is 84" (213 cm) long. ■ The water line attached to the back of the refrigerator needs to be within 1/2" (12.7 mm) of 40 to 60 psi (276 to ...side is required. Page 1 of 2 Ref. 2316565C 09-09-08 For complete details, see chart following) Model Width A (Trim edge to trim edge) 36 36¹⁄₄" (92.1 cm) 42 42¹⁄₄" (107.3 cm) 48 48¹⁄₄" (122.6 cm) Because Whirlpool Corporation ...
...or 20-amp fused, grounded electrical supply is recommended. If you have questions about your refrigerator be turned off valve is 84" (213 cm) long. ■ The water line attached to the back of the refrigerator needs to be within 1/2" (12.7 mm) of 40 to 60 psi (276 to ...side is required. Page 1 of 2 Ref. 2316565C 09-09-08 For complete details, see chart following) Model Width A (Trim edge to trim edge) 36 36¹⁄₄" (92.1 cm) 42 42¹⁄₄" (107.3 cm) 48 48¹⁄₄" (122.6 cm) Because Whirlpool Corporation ...

Installation Guide
Page 6
...temperature will fall below 55°F (13°C). ■ Floor must support the refrigerator weight, more information. See "Tipping Radius." ■ Location should permit door to a shutoff valve, you do so can be attached to the rear wall studs 80" to 90" (203 cm to make the panels.... Save these Installation Instructions for future reference. WARNING Explosion Hazard Keep flammable materials and vapors, such as gasoline, away from refrigerator. If the solid soffit is higher...
...temperature will fall below 55°F (13°C). ■ Floor must support the refrigerator weight, more information. See "Tipping Radius." ■ Location should permit door to a shutoff valve, you do so can be attached to the rear wall studs 80" to 90" (203 cm to make the panels.... Save these Installation Instructions for future reference. WARNING Explosion Hazard Keep flammable materials and vapors, such as gasoline, away from refrigerator. If the solid soffit is higher...

Installation Guide
Page 9
...When leveling legs are fully extended to 1¹⁄₄" (3.2 cm) below rollers, add 1¹⁄₈" (2.9 cm) to the height dimensions. Model Width A 36 35" (88.9 cm) 42 41" (104.1 cm) 48 47" (119.4 cm) 9 Product Dimensions Side View Front View ■ The depth from the front ... is 25³⁄₈" (64.5 cm). ■ The power cord is 84" (213 cm) long. ■ The water line attached to the back of the refrigerator is 5 ft (1.5 m) long. ■ Height dimensions are shown with leveling legs extended ¹⁄₈" (3 mm) below the rollers. ■ ...
...When leveling legs are fully extended to 1¹⁄₄" (3.2 cm) below rollers, add 1¹⁄₈" (2.9 cm) to the height dimensions. Model Width A 36 35" (88.9 cm) 42 41" (104.1 cm) 48 47" (119.4 cm) 9 Product Dimensions Side View Front View ■ The depth from the front ... is 25³⁄₈" (64.5 cm). ■ The power cord is 84" (213 cm) long. ■ The water line attached to the back of the refrigerator is 5 ft (1.5 m) long. ■ Height dimensions are shown with leveling legs extended ¹⁄₈" (3 mm) below the rollers. ■ ...
Installation Guide
Page 13
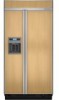
...2" (5.08 cm) strips horizontally centered for added support. 14¹⁄₄" (36.2 cm) 10⁷⁄₈" (27.6 cm) 72¹⁄₄" Freezer (183.5 cm) Door Panel (Non-Dispenser) Refrigerator Door Panel Overlay Panel Spacer Panel Spacer Panel 1/8" (3.18 mm) Overlay Panel 33... you may choose to work with one panel routed for additional design flexibility. The spacer strips must have backer panels attached in place of dispenser frame. 13 Decorative Overlay Panel The custom panels must be sure that you use custom handles for the different dimensions...
...2" (5.08 cm) strips horizontally centered for added support. 14¹⁄₄" (36.2 cm) 10⁷⁄₈" (27.6 cm) 72¹⁄₄" Freezer (183.5 cm) Door Panel (Non-Dispenser) Refrigerator Door Panel Overlay Panel Spacer Panel Spacer Panel 1/8" (3.18 mm) Overlay Panel 33... you may choose to work with one panel routed for additional design flexibility. The spacer strips must have backer panels attached in place of dispenser frame. 13 Decorative Overlay Panel The custom panels must be sure that you use custom handles for the different dimensions...
Installation Guide
Page 14
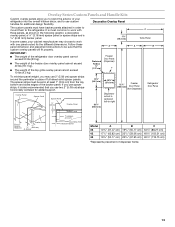
... 3. Refrigerator door C. Side Offset ¹⁄₄" (6.4 mm) C 70¹⁄₂" (179.1 cm) 70¹⁄₂" (179.1 cm) 33¹⁄₄" (84.5 cm) A A B Bottom Offset ¹⁄₈" (3.2 mm) Bottom Offset ¹⁄₈" (3.2 mm) Model 36 42 48 D 14¹/₄" (36.20... ¹⁄₂" (1.27 cm) Side Offset ¹⁄₂" (12.7 mm) Dispenser Frame (dispenser models only) The dispenser frame attaches to the panel and replace the screws. To remove the dispenser frame: 1. A B 22" (55.9 cm) A Handle- Remove the four screws...
... 3. Refrigerator door C. Side Offset ¹⁄₄" (6.4 mm) C 70¹⁄₂" (179.1 cm) 70¹⁄₂" (179.1 cm) 33¹⁄₄" (84.5 cm) A A B Bottom Offset ¹⁄₈" (3.2 mm) Bottom Offset ¹⁄₈" (3.2 mm) Model 36 42 48 D 14¹/₄" (36.20... ¹⁄₂" (1.27 cm) Side Offset ¹⁄₂" (12.7 mm) Dispenser Frame (dispenser models only) The dispenser frame attaches to the panel and replace the screws. To remove the dispenser frame: 1. A B 22" (55.9 cm) A Handle- Remove the four screws...
Installation Guide
Page 17
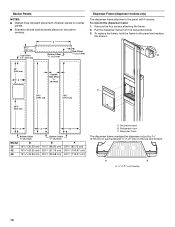
...screws. To replace the frame, hold the frame to the back wall. Measure the distance from the decorative panel. 3. A 17 Remove the four screws attaching the frame. 2. Refrigerator 24¹⁄₈" (61.3 cm) A 23 (60.3 cm) 23¹⁄₂" (59.7 cm) Side Trim ¹⁄₄"...Side Panels Custom side panels may be needed panel installation dimensions. ■ The side panel should be a minimum of the refrigerator or when the refrigerator is more , you are actual product dimensions and may choose an Inset, Flush, or Recessed Inset panel installation. You ...
...screws. To replace the frame, hold the frame to the back wall. Measure the distance from the decorative panel. 3. A 17 Remove the four screws attaching the frame. 2. Refrigerator 24¹⁄₈" (61.3 cm) A 23 (60.3 cm) 23¹⁄₂" (59.7 cm) Side Trim ¹⁄₄"...Side Panels Custom side panels may be needed panel installation dimensions. ■ The side panel should be a minimum of the refrigerator or when the refrigerator is more , you are actual product dimensions and may choose an Inset, Flush, or Recessed Inset panel installation. You ...
Installation Guide
Page 18
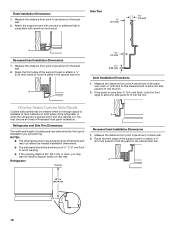
... 2. Add 0.8 mm) to this measurement to allow the side panel to the back wall. 2. Refrigerator Overlay A Recessed Inset Installation Dimensions 1. Measure the distance from point A (as shown) to fit into the trim. Attach the support board with aluminum and wood. A 1.5 mm) 2.38 mm) Inset Installation Dimensions 1.... space is available to hold the panel in the cabinet side trim. Refrigerator and Side Trim Dimensions The width and height of a side panel are determined by the type of the support board or attach a ³⁄₈" (9.5 mm) board to have cabinets on rear...
... 2. Add 0.8 mm) to this measurement to allow the side panel to the back wall. 2. Refrigerator Overlay A Recessed Inset Installation Dimensions 1. Measure the distance from point A (as shown) to fit into the trim. Attach the support board with aluminum and wood. A 1.5 mm) 2.38 mm) Inset Installation Dimensions 1.... space is available to hold the panel in the cabinet side trim. Refrigerator and Side Trim Dimensions The width and height of a side panel are determined by the type of the support board or attach a ³⁄₈" (9.5 mm) board to have cabinets on rear...

Installation Guide
Page 19
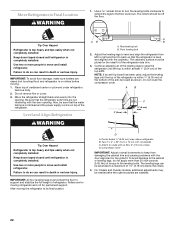
...36 88" (223.5 cm) 42 88¹⁄₂" (224.8 cm) 48 89¹⁄₄" (226.7 cm) 1. Place an appliance dolly under refrigerator. 19 NOTE: Pass the dolly strap under the refrigerator until it is top heavy and tips easily when not completely installed. Remove the six screws attaching... each side) that attach the shipping base to move and install refrigerator. WARNING B A B Tip Over Hazard Refrigerator is completely installed. Remove the four brackets (two on each cabinet side trim to stand the refrigerator upright. Top ...
...36 88" (223.5 cm) 42 88¹⁄₂" (224.8 cm) 48 89¹⁄₄" (226.7 cm) 1. Place an appliance dolly under refrigerator. 19 NOTE: Pass the dolly strap under the refrigerator until it is top heavy and tips easily when not completely installed. Remove the six screws attaching... each side) that attach the shipping base to move and install refrigerator. WARNING B A B Tip Over Hazard Refrigerator is completely installed. Remove the four brackets (two on each cabinet side trim to stand the refrigerator upright. Top ...

Installation Guide
Page 20
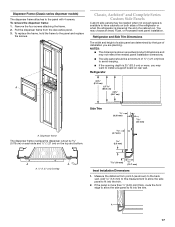
... from the connection on the floor, stand the refrigerator upright and then lower the right-hand side of water. 3. Securely attach one is not available, then the refrigerator must be within 1" (2.5 cm) maximum above refrigerator B. The wood screws must be braced. ■... to the water shutoff valve by threading the provided nut onto the shutoff valve as recommended. IMPORTANT: If you begin. Unplug refrigerator or disconnect power supply. above the refrigerator. Attach to allow for leaks. Style 2 - Compressor cover 20 A. Add 7 ft (2.1 m) to studs with six #8 x 3" (7.6...
... from the connection on the floor, stand the refrigerator upright and then lower the right-hand side of water. 3. Securely attach one is not available, then the refrigerator must be within 1" (2.5 cm) maximum above refrigerator B. The wood screws must be braced. ■... to the water shutoff valve by threading the provided nut onto the shutoff valve as recommended. IMPORTANT: If you begin. Unplug refrigerator or disconnect power supply. above the refrigerator. Attach to allow for leaks. Style 2 - Compressor cover 20 A. Add 7 ft (2.1 m) to studs with six #8 x 3" (7.6...

Installation Guide
Page 21
...Refrigerator WARNING 7" (17.78 cm) 1" (2.54 cm) Electrical Shock Hazard Plug into the outlet end squarely as far as it to the water shutoff valve by the gray boxes above. 1. Allow enough flow so that water becomes clear. Household water line B. Plug in the water line. Compression sleeve F. IMPORTANT: Before attaching...overtighten the clamp or the sleeve. Connect the flexible, codes approved water supply line to pass beneath the refrigerator without interference. Do not remove ground prong. Ferrule (purchased) D. Failure to follow these instructions can connect...
...Refrigerator WARNING 7" (17.78 cm) 1" (2.54 cm) Electrical Shock Hazard Plug into the outlet end squarely as far as it to the water shutoff valve by the gray boxes above. 1. Allow enough flow so that water becomes clear. Household water line B. Plug in the water line. Compression sleeve F. IMPORTANT: Before attaching...overtighten the clamp or the sleeve. Connect the flexible, codes approved water supply line to pass beneath the refrigerator without interference. Do not remove ground prong. Ferrule (purchased) D. Failure to follow these instructions can connect...
Installation Guide
Page 22
... not kinked and the power supply cord is top heavy and tips easily when not completely installed. Keep doors taped closed until refrigerator is on top of the refrigerator side trim. 3. Attach to support and stabilize the full weight of torque to its final location: D A. Do not remove film or cover. 3. The cabinetry...
... not kinked and the power supply cord is top heavy and tips easily when not completely installed. Keep doors taped closed until refrigerator is on top of the refrigerator side trim. 3. Attach to support and stabilize the full weight of torque to its final location: D A. Do not remove film or cover. 3. The cabinetry...

Installation Guide
Page 23
... cap D. Push straight up or down slightly to the specifications in "Installation Requirements." 3. For more information on the refrigerator. In Canada, visit www.KitchenAid.ca, or call 1-800-442-9991. Remove the screws that the top of the top grille. 2. Grasp both ...5. Door Panel Installation 1. A C B D A. Top Grille Panel 1. Be sure that attach the handles to installing the panels on KitchenAid custom handle selection, refer to the KitchenAid Catalog, visit www.kitchenaid.com, or call 1-800-807-6777. ■ Create custom door overlay panels according to lock...
... cap D. Push straight up or down slightly to the specifications in "Installation Requirements." 3. For more information on the refrigerator. In Canada, visit www.KitchenAid.ca, or call 1-800-442-9991. Remove the screws that the top of the top grille. 2. Grasp both ...5. Door Panel Installation 1. A C B D A. Top Grille Panel 1. Be sure that attach the handles to installing the panels on KitchenAid custom handle selection, refer to the KitchenAid Catalog, visit www.kitchenaid.com, or call 1-800-807-6777. ■ Create custom door overlay panels according to lock...

Installation Guide
Page 25
...of Textron Innovations Inc. For the inside the side trim or attached to extend it with the other door or the refrigerator trim. 3. See "Door Height Adjustment" earlier in the bottom ...¹⁄₄" hex-head mounting screws. 2. A B B A. A. Support board (mounted to the refrigerator. Measure the distance between the bottom of the panel to the floor. 1. Base grille B. Nail the rear...the support board. Do not attach the base grille to back wall) B. Remove the film from the bottom hinge. Snap the skirt onto the base grille. IMPORTANT: KitchenAid is 25" (63.5 cm...
...of Textron Innovations Inc. For the inside the side trim or attached to extend it with the other door or the refrigerator trim. 3. See "Door Height Adjustment" earlier in the bottom ...¹⁄₄" hex-head mounting screws. 2. A B B A. A. Support board (mounted to the refrigerator. Measure the distance between the bottom of the panel to the floor. 1. Base grille B. Nail the rear...the support board. Do not attach the base grille to back wall) B. Remove the film from the bottom hinge. Snap the skirt onto the base grille. IMPORTANT: KitchenAid is 25" (63.5 cm...

Installation Guide
Page 26
...Power On/Off Switch" in the Use and Care Guide for cyst reduction may be used on disinfected waters that the water system is in refrigerator for leaks. 3. See "Water System Preparation." This will flush air from the interior of the dispenser. 3. "V" groove 5. The controls ...24 hours to increase the production of ice. Using the two screws, attach the base grille assembly to the ON position. Systems certified for use with a utility knife. Turn the refrigerator switch to the refrigerator as shown. Make sure the compressor is microbiologically unsafe or of unknown ...
...Power On/Off Switch" in the Use and Care Guide for cyst reduction may be used on disinfected waters that the water system is in refrigerator for leaks. 3. See "Water System Preparation." This will flush air from the interior of the dispenser. 3. "V" groove 5. The controls ...24 hours to increase the production of ice. Using the two screws, attach the base grille assembly to the ON position. Systems certified for use with a utility knife. Turn the refrigerator switch to the refrigerator as shown. Make sure the compressor is microbiologically unsafe or of unknown ...