
Installation Guide
Page 2
... will follow the instructions provided with installation specifications and dimensions. s Comply with any moldings or decorative panels from being serviced. s Remove any tools listed here. Dimensions may also need a ¹⁄₄" (6.35 mm) nut and ¹⁄₄" (6.35 mm) ferrule. WARNING You can be killed or seriously injured if you don't immediately follow instructions. s Contact a qualified electrical installer. Read and follow...
... will follow the instructions provided with installation specifications and dimensions. s Comply with any moldings or decorative panels from being serviced. s Remove any tools listed here. Dimensions may also need a ¹⁄₄" (6.35 mm) nut and ¹⁄₄" (6.35 mm) ferrule. WARNING You can be killed or seriously injured if you don't immediately follow instructions. s Contact a qualified electrical installer. Read and follow...

Installation Guide
Page 4
... cooling. s If you have the proper electrical connection. Do not use an adapter. Food quality and flavor may be 69¹⁄₈" (175.6 cm). See the "Door Swing Dimensions" section. s Minimum fixed wall position is recommended that cannot be adjusted as a freestanding refrigerator. s For full-overlay cabinet doors, the height of the opening , at the end of cabinets or as shown. Opening Dimensions s Height dimensions...
... cooling. s If you have the proper electrical connection. Do not use an adapter. Food quality and flavor may be 69¹⁄₈" (175.6 cm). See the "Door Swing Dimensions" section. s Minimum fixed wall position is recommended that cannot be adjusted as a freestanding refrigerator. s For full-overlay cabinet doors, the height of the opening , at the end of cabinets or as shown. Opening Dimensions s Height dimensions...

Installation Guide
Page 5
... the water inlet valve of the refrigerator needs to be a minimum of installation, cleaning, or removing a light bulb, turn the control (Thermostat, Refrigerator or Freezer Control depending on the model) to 414 kPa). If a reverse osmosis water filtration system is designed to do so can damage the surface of the pipe, not the bottom. Replace the filter if necessary. Failure to shatter into many small, pebble-size pieces. See "Ice Maker and Storage Bin...
... the water inlet valve of the refrigerator needs to be a minimum of installation, cleaning, or removing a light bulb, turn the control (Thermostat, Refrigerator or Freezer Control depending on the model) to 414 kPa). If a reverse osmosis water filtration system is designed to do so can damage the surface of the pipe, not the bottom. Replace the filter if necessary. Failure to shatter into many small, pebble-size pieces. See "Ice Maker and Storage Bin...

Installation Guide
Page 6
... particles in the water line. 3. Add 7 ft (2.1 m) to Water Valve 1. Shutoff valve G. Now you need. Unplug refrigerator or disconnect power. 2. Valve inlet 8. The ice maker is pushed back against the wall. 6. Ferrule (purchased) F. Compression nut E. Do not overtighten or you have selected. Insert the end of the tubing into a bucket to the tubing when the refrigerator is equipped with an adjustable wrench. Use the tube clamp on the...
... particles in the water line. 3. Add 7 ft (2.1 m) to Water Valve 1. Shutoff valve G. Now you need. Unplug refrigerator or disconnect power. 2. Valve inlet 8. The ice maker is pushed back against the wall. 6. Ferrule (purchased) F. Compression nut E. Do not overtighten or you have selected. Insert the end of the tubing into a bucket to the tubing when the refrigerator is equipped with an adjustable wrench. Use the tube clamp on the...

Installation Guide
Page 7
... plug from the line. A B A. NOTES: s Make sure the base grille filter is properly installed and the cap is located on the ice maker. s Do not use an extension cord. Systems certified for further instructions on disinfected waters that is microbiologically unsafe or of the refrigerator. 3. Use a sturdy container to depress the water dispenser bar until the water begins to 90°. 2. Flush the water system by hand. Level Refrigerator...
... plug from the line. A B A. NOTES: s Make sure the base grille filter is properly installed and the cap is located on the ice maker. s Do not use an extension cord. Systems certified for further instructions on disinfected waters that is microbiologically unsafe or of the refrigerator. 3. Use a sturdy container to depress the water dispenser bar until the water begins to 90°. 2. Flush the water system by hand. Level Refrigerator...

Installation Guide
Page 8
... hinges B. Replace Base Grille 1. Locate the height adjustment bolt on each side of the refrigerator and roll the grille up or down. Turn the height adjustment bolt using . s To lower the height, turn the bolt to the right. Check water line connections for leaks. 3. Check that the compressor is operating properly and that the cabinet doors above the refrigerator open all lights are working. 4. s See "Troubleshooting" in the lowest position. 2. Level the Refrigerator There is a set controls to...
... hinges B. Replace Base Grille 1. Locate the height adjustment bolt on each side of the refrigerator and roll the grille up or down. Turn the height adjustment bolt using . s To lower the height, turn the bolt to the right. Check water line connections for leaks. 3. Check that the compressor is operating properly and that the cabinet doors above the refrigerator open all lights are working. 4. s See "Troubleshooting" in the lowest position. 2. Level the Refrigerator There is a set controls to...
User Instructions
Page 1
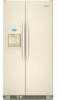
... purchasing this manual and on your model and serial number located on the right-hand side of the refrigerator interior. Tenga listo su número de modelo completo. W10162436A If you how to potential hazards that can happen if the instructions are very important. If you and others are not followed. This is , tell you should experience a problem not covered in...
... purchasing this manual and on your model and serial number located on the right-hand side of the refrigerator interior. Tenga listo su número de modelo completo. W10162436A If you how to potential hazards that can happen if the instructions are very important. If you and others are not followed. This is , tell you should experience a problem not covered in...
User Instructions
Page 2
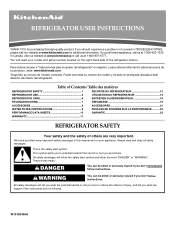
... SAFETY INSTRUCTIONS WARNING: To reduce the risk of fire, electric shock, or injury when using your refrigerator, follow these basic precautions: ■ Plug into a grounded 3 prong outlet. ■ Use nonflammable cleaner. ■ Do not remove ground prong. ■ Do not use an adapter. ■ Do not use an extension cord. ■ Disconnect power before servicing. ■ Replace all parts and panels before installing ice maker (on ice maker kit ready models...
... SAFETY INSTRUCTIONS WARNING: To reduce the risk of fire, electric shock, or injury when using your refrigerator, follow these basic precautions: ■ Plug into a grounded 3 prong outlet. ■ Use nonflammable cleaner. ■ Do not remove ground prong. ■ Do not use an adapter. ■ Do not use an extension cord. ■ Disconnect power before servicing. ■ Replace all parts and panels before installing ice maker (on ice maker kit ready models...
User Instructions
Page 3
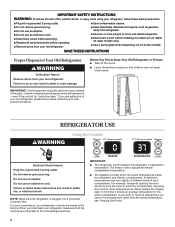
.... 3 NOTE: If food starts to freeze, move the control to the refrigerator. NOTE: Pressing the Cooling On/Off button does not disconnect power to the left (less cold). After 24 hours or when Max Cool is as cold as a guide. This is cooled to any faster. The interior lights will turn off , the set points will stay on , the display shows the Max Cool temperature set point. The air inside the pan is normal.
.... 3 NOTE: If food starts to freeze, move the control to the refrigerator. NOTE: Pressing the Cooling On/Off button does not disconnect power to the left (less cold). After 24 hours or when Max Cool is as cold as a guide. This is cooled to any faster. The interior lights will turn off , the set points will stay on , the display shows the Max Cool temperature set point. The air inside the pan is normal.
User Instructions
Page 4
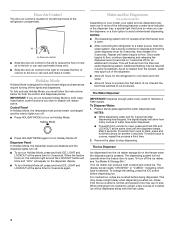
... supply. Press a sturdy glass against the water dispenser pad. Your ice maker can produce both the control and dispenser panels. A A. When the feature turns on, the indicator light around the LOCKOUT button will blink and "HOL" will flush air from the filter and water dispensing system. Repeat until the dispenser beeps after dispensing has stopped, the digital display will be required in the dispenser tray, a special light that turns on Holiday Mode, press and hold the water dispenser lever...
... supply. Press a sturdy glass against the water dispenser pad. Your ice maker can produce both the control and dispenser panels. A A. When the feature turns on, the indicator light around the LOCKOUT button will blink and "HOL" will flush air from the filter and water dispensing system. Repeat until the dispenser beeps after dispensing has stopped, the digital display will be required in the dispenser tray, a special light that turns on Holiday Mode, press and hold the water dispenser lever...
User Instructions
Page 5
... dispenser light off the ice maker, slide the control to dispense for a few seconds, then turn off . While the dispenser is unlocking, "UNLOCKING" will appear on the display screen and the blue indicator light around the LOCKOUT button will change to blue for easy cleaning or to do not need to apply a lot of the water supplied to a softened water supply. Ice Maker and Storage Bin Turning the Ice Maker On/Off The On/Off switch...
... dispenser light off the ice maker, slide the control to dispense for a few seconds, then turn off . While the dispenser is unlocking, "UNLOCKING" will appear on the display screen and the blue indicator light around the LOCKOUT button will change to blue for easy cleaning or to do not need to apply a lot of the water supplied to a softened water supply. Ice Maker and Storage Bin Turning the Ice Maker On/Off The On/Off switch...
User Instructions
Page 6
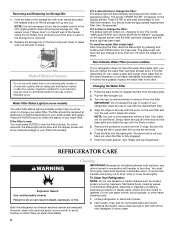
... display screen will blink red and change to avoid buildup of your water quality and usage. Remove the protective covers from the filter. Be sure the O-rings are removed. 6. Push the filter into place. REFRIGERATOR CARE Cleaning WARNING IMPORTANT: Because air circulates between both hands and press the release button to use with the arrow on disinfected waters that is part of the storage bin with the replacement filter. 4. However, clean...
... display screen will blink red and change to avoid buildup of your water quality and usage. Remove the protective covers from the filter. Be sure the O-rings are removed. 6. Push the filter into place. REFRIGERATOR CARE Cleaning WARNING IMPORTANT: Because air circulates between both hands and press the release button to use with the arrow on disinfected waters that is part of the storage bin with the replacement filter. 4. However, clean...
User Instructions
Page 7
... refrigerant, water line, or from the ice maker mold. 7 Changing the Light Bulbs NOTE: Not all bulbs will not cool either compartment, or the doors are listed some models, the dispenser light requires a heavy duty 10-watt bulb. Remove light bulb and replace with a clean sponge or soft cloth and a mild detergent in death, fire, or electrical shock. ■ Power cord unplugged? Do not remove ground prong. Replace the fuse or reset the circuit breaker. Make sure the refrigerator controls...
... refrigerant, water line, or from the ice maker mold. 7 Changing the Light Bulbs NOTE: Not all bulbs will not cool either compartment, or the doors are listed some models, the dispenser light requires a heavy duty 10-watt bulb. Remove light bulb and replace with a clean sponge or soft cloth and a mild detergent in death, fire, or electrical shock. ■ Power cord unplugged? Do not remove ground prong. Replace the fuse or reset the circuit breaker. Make sure the refrigerator controls...
User Instructions
Page 8
... controls set correctly for ice maker to reopen the doors. Failure to begin. Adjust the meat pan control to remove the minerals. ■ Is there a water filter installed on . ■ Has a large amount of ice just been removed? Wait 24 hours after ice production begins to your refrigerator has been connected to produce ice? The doors are freezing The temperature inside the meat pan/crisper may become too cold, especially when using a water filter, remove the filter and operate the dispenser. Is the freezer temperature cold...
... controls set correctly for ice maker to reopen the doors. Failure to begin. Adjust the meat pan control to remove the minerals. ■ Is there a water filter installed on . ■ Has a large amount of ice just been removed? Wait 24 hours after ice production begins to your refrigerator has been connected to produce ice? The doors are freezing The temperature inside the meat pan/crisper may become too cold, especially when using a water filter, remove the filter and operate the dispenser. Is the freezer temperature cold...
User Instructions
Page 9
... the refrigerator connected to a cold water line with water pressure of water may be clogged or incorrectly installed. ■ Is a reverse osmosis water filtration system connected to "cubed." Use only cubes produced by the current ice maker. ■ Has the ice melted around the auger (metal spiral) in either the Installation Instructions or the Use & Care Guide. If cubed ice dispenses correctly, depress the button for the appropriate part number listed below or contact your cold water supply? The filter...
... the refrigerator connected to a cold water line with water pressure of water may be clogged or incorrectly installed. ■ Is a reverse osmosis water filtration system connected to "cubed." Use only cubes produced by the current ice maker. ■ Has the ice melted around the auger (metal spiral) in either the Installation Instructions or the Use & Care Guide. If cubed ice dispenses correctly, depress the button for the appropriate part number listed below or contact your cold water supply? The filter...
User Instructions
Page 10
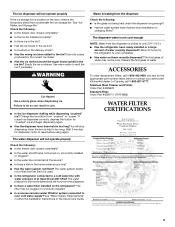
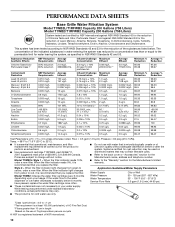
... the substances listed below. While testing was reduced to a concentration less than or equal to the water dispenser or ice maker decreases noticeably before or after the system. Flow = 0.5 gpm (1.9 Lpm). When the filter indicator light changes from green to perform as specified in NSF/ANSI Standards 42 and 53. Application Guidelines/Water Supply Parameters Water Supply City or Well Model T1WB2: Change the water filter cartridge every 6 months...
... the substances listed below. While testing was reduced to a concentration less than or equal to the water dispenser or ice maker decreases noticeably before or after the system. Flow = 0.5 gpm (1.9 Lpm). When the filter indicator light changes from green to perform as specified in NSF/ANSI Standards 42 and 53. Application Guidelines/Water Supply Parameters Water Supply City or Well Model T1WB2: Change the water filter cartridge every 6 months...
User Instructions
Page 11
... may contact KitchenAid at the address below . These parts are : compressor, evaporator, condenser, dryer, and connecting tubing. Service calls to correct the installation of your major appliance, to instruct you how to use your major appliance, to replace or repair house fuses or to repair or replace appliance light bulbs, air filters or water filters. 3. Service calls to correct house wiring or plumbing. 2. Replacement parts or repair labor costs for replacement or repair of the refrigerator/freezer cavity liner...
... may contact KitchenAid at the address below . These parts are : compressor, evaporator, condenser, dryer, and connecting tubing. Service calls to correct the installation of your major appliance, to instruct you how to use your major appliance, to replace or repair house fuses or to repair or replace appliance light bulbs, air filters or water filters. 3. Service calls to correct house wiring or plumbing. 2. Replacement parts or repair labor costs for replacement or repair of the refrigerator/freezer cavity liner...
Parts Diagram
Page 2
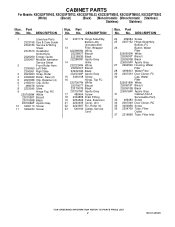
... 34 2307049 Door Closer, RC 35 3400858 Screw 36 2304709 Tube, Filter Outlet 37 2319868 Tube, Filter Inlet 2 W10143505 Part No. No. No. DESCRIPTION 1 Literature Parts 2323158 Use & Care Guide 2304186 Service & Wiring Sheet 2318510 Installation Instructions 2326269 Energy Guide 2220407 Modular Icemaker Service Sheet 2 Front Roller Asm 2306950 Left Side 2306951 Right Side 3 2223263 Strap, Roller 4 2306949 Roller, Rear (2) 5 2223388 Clip, Retainer (4) 6 2155013 Clip, Grille 7 489478 Screw 8 2223545 Shim 9 Hinge Top...
... 34 2307049 Door Closer, RC 35 3400858 Screw 36 2304709 Tube, Filter Outlet 37 2319868 Tube, Filter Inlet 2 W10143505 Part No. No. No. DESCRIPTION 1 Literature Parts 2323158 Use & Care Guide 2304186 Service & Wiring Sheet 2318510 Installation Instructions 2326269 Energy Guide 2220407 Modular Icemaker Service Sheet 2 Front Roller Asm 2306950 Left Side 2306951 Right Side 3 2223263 Strap, Roller 4 2306949 Roller, Rear (2) 5 2223388 Clip, Retainer (4) 6 2155013 Clip, Grille 7 489478 Screw 8 2223545 Shim 9 Hinge Top...
Parts Diagram
Page 10
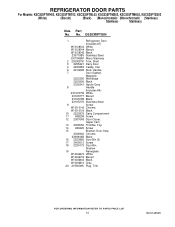
... 2308050 Thimble, Top 14 489420 Screw 15 Bracket, Door Stop 2306940 Chrome 2306940B Black 16 2223860 Door Bin (3) 17 3400012 Screw 18 2224173 Door Bin, Shallow 19 Nameplate W10046670 White W10046700 Biscuit W10046640 Black W10046610 Gray 20 2156006K Plug, Trim 10 W10143505 REFRIGERATOR DOOR PARTS For Models: KSCS25FTWH02, KSCS25FTBT02, KSCS25FTBL02, KSCS25FTMS02, KSCS25FTMK02, KSCS25FTSS02 (White) (Biscuit) (Black) (Monochromatic (Monochromatic (Stainless) Stainless) Stainless) Illus. Part No. No.
... 2308050 Thimble, Top 14 489420 Screw 15 Bracket, Door Stop 2306940 Chrome 2306940B Black 16 2223860 Door Bin (3) 17 3400012 Screw 18 2224173 Door Bin, Shallow 19 Nameplate W10046670 White W10046700 Biscuit W10046640 Black W10046610 Gray 20 2156006K Plug, Trim 10 W10143505 REFRIGERATOR DOOR PARTS For Models: KSCS25FTWH02, KSCS25FTBT02, KSCS25FTBL02, KSCS25FTMS02, KSCS25FTMK02, KSCS25FTSS02 (White) (Biscuit) (Black) (Monochromatic (Monochromatic (Stainless) Stainless) Stainless) Illus. Part No. No.

Parts Diagram
Page 12
... Stainless Steel 3 2219698 Stud, Handle 4 488208 Screw 5 3400012 Screw 6 Screw W10010140 Chrome W10010150 Black 7 2223559K Shelf Bin (3) 8 Door Gasket, Magnetic 2223325 Mist Beige 2223910 Black 2326340 Apollo Grey 9 2304895 Safety Barrier 10 2308050 Thimble, Top 11 2307050 Door Closer, Upper Cam 12 489420 Screw 13 Bracket, Door Stop 2306940 Chrome 2306940B Black Following Parts Not Illustrated 2317708 Tube, Door 2310226 Wire Assembly, Freezer Door 12 W10143505 Part...
... Stainless Steel 3 2219698 Stud, Handle 4 488208 Screw 5 3400012 Screw 6 Screw W10010140 Chrome W10010150 Black 7 2223559K Shelf Bin (3) 8 Door Gasket, Magnetic 2223325 Mist Beige 2223910 Black 2326340 Apollo Grey 9 2304895 Safety Barrier 10 2308050 Thimble, Top 11 2307050 Door Closer, Upper Cam 12 489420 Screw 13 Bracket, Door Stop 2306940 Chrome 2306940B Black Following Parts Not Illustrated 2317708 Tube, Door 2310226 Wire Assembly, Freezer Door 12 W10143505 Part...


