Instruction Manual
Page 4
... How To Arrange for Use 6 Before First Use ...6 Blender Assembly 6 Using the Blender ...7 Before Use ...7 Operating the Blender 7 CHOP ICE Feature 7 PULSE MODE Feature 8 Ingredient Cup ...8 Soft Start™ Blending Feature 8 Speed Control Guide ...9 CARE AND CLEANING Cleaning the Blender ...9 Troubleshooting ...10 WARRANTY AND SERVICE INFORMATION KitchenAid® Blender Warranty 11 Hassle-Free Replacement Warranty - 50 United...
... How To Arrange for Use 6 Before First Use ...6 Blender Assembly 6 Using the Blender ...7 Before Use ...7 Operating the Blender 7 CHOP ICE Feature 7 PULSE MODE Feature 8 Ingredient Cup ...8 Soft Start™ Blending Feature 8 Speed Control Guide ...9 CARE AND CLEANING Cleaning the Blender ...9 Troubleshooting ...10 WARRANTY AND SERVICE INFORMATION KitchenAid® Blender Warranty 11 Hassle-Free Replacement Warranty - 50 United...

Instruction Manual
Page 5
... hurt you don't follow instructions. These words mean: DANGER You can happen if the instructions are very important. All safety messages will follow instructions. ENGLISH Blender Safety Your safety and the safety of injury, and tell you don't immediately follow the safety alert symbol and either the word "DANGER" or "WARNING...
... hurt you don't follow instructions. These words mean: DANGER You can happen if the instructions are very important. All safety messages will follow instructions. ENGLISH Blender Safety Your safety and the safety of injury, and tell you don't immediately follow the safety alert symbol and either the word "DANGER" or "WARNING...

Instruction Manual
Page 6
...1. Avoid contact with cover in any appliance is used by KitchenAid may be used only when the blender is too short, have a qualified electrician or serviceman install an outlet near children. 4. Always operate blender with moving parts. 6. This product is necessary when any ...of table or counter. 9. Handle carefully. 11. SAVE THESE INSTRUCTIONS Electrical Requirements Electrical features: 120 VAC, 60 hz, 6 amp NOTE: Your blender has a 3-prong grounded plug. Unplug from outlet when not in death, fire, or electrical shock. 3 When blending hot liquids, remove center...
...1. Avoid contact with cover in any appliance is used by KitchenAid may be used only when the blender is too short, have a qualified electrician or serviceman install an outlet near children. 4. Always operate blender with moving parts. 6. This product is necessary when any ...of table or counter. 9. Handle carefully. 11. SAVE THESE INSTRUCTIONS Electrical Requirements Electrical features: 120 VAC, 60 hz, 6 amp NOTE: Your blender has a 3-prong grounded plug. Unplug from outlet when not in death, fire, or electrical shock. 3 When blending hot liquids, remove center...
Instruction Manual
Page 7
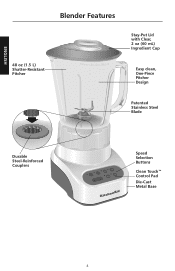
ENGLISH 48 oz (1.5 L) Shatter-Resistant Pitcher Blender Features Stay-Put Lid with Clear, 2 oz (60 mL) Ingredient Cup Easy clean, One-Piece Pitcher Design Patented Stainless Steel Blade Durable Steel-Reinforced Couplers Speed Selection Buttons Clean Touch™ Control Pad Die-Cast Metal Base 4
ENGLISH 48 oz (1.5 L) Shatter-Resistant Pitcher Blender Features Stay-Put Lid with Clear, 2 oz (60 mL) Ingredient Cup Easy clean, One-Piece Pitcher Design Patented Stainless Steel Blade Durable Steel-Reinforced Couplers Speed Selection Buttons Clean Touch™ Control Pad Die-Cast Metal Base 4
Instruction Manual
Page 8
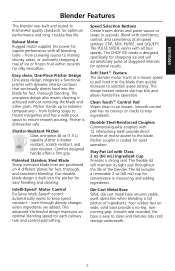
...coated for fast, thorough blending. Patented Stainless Steel Blade Sharp oversized blade tines are added. Soft Start™ Feature The blender motor starts at all speed settings: STIR, MIX, PUREE, and LIQUEFY. Pitcher coupler is achieved without removing the blade and other parts. Die-Cast...chopping ice and will maintain its tight seal throughout the life of ingredients. This advanced KitchenAid design maintains an optimal blending speed for easy handling and cleaning. Blend with all four speeds. Clean Touch™ Control Pad Wipes clean in seconds. Robust Motor Rugged motor ...
...coated for fast, thorough blending. Patented Stainless Steel Blade Sharp oversized blade tines are added. Soft Start™ Feature The blender motor starts at all speed settings: STIR, MIX, PUREE, and LIQUEFY. Pitcher coupler is achieved without removing the blade and other parts. Die-Cast...chopping ice and will maintain its tight seal throughout the life of ingredients. This advanced KitchenAid design maintains an optimal blending speed for easy handling and cleaning. Blend with all four speeds. Clean Touch™ Control Pad Wipes clean in seconds. Robust Motor Rugged motor ...
Instruction Manual
Page 9
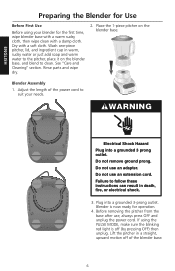
...extension cord. Lift the pitcher in warm, sudsy water or just add soap and warm water to the pitcher, place it on the blender base. ENGLISH Preparing the Blender for Use Before First Use Before using the PULSE MODE, make sure the blinking red light is now ready for the first time..., and blend to clean. Do not use , always press OFF and unplug the power cord. Failure to suit your blender for operation. 4. Adjust the length of the blender base. 6 Rinse parts and wipe dry. 2. Do not remove ground prong. Do not use an adapter. Plug into a grounded 3 prong outlet. Wash one...
...extension cord. Lift the pitcher in warm, sudsy water or just add soap and warm water to the pitcher, place it on the blender base. ENGLISH Preparing the Blender for Use Before First Use Before using the PULSE MODE, make sure the blinking red light is now ready for the first time..., and blend to clean. Do not use , always press OFF and unplug the power cord. Failure to suit your blender for operation. 4. Adjust the length of the blender base. 6 Rinse parts and wipe dry. 2. Do not remove ground prong. Do not use an adapter. Plug into a grounded 3 prong outlet. Wash one...
Instruction Manual
Page 10
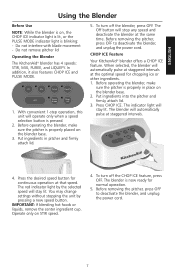
...ICE. The red indicator light by pressing a new speed button. Do not remove pitcher lid Operating the Blender The KitchenAid® blender has 4 speeds: STIR, MIX, PUREE, and LIQUEFY. The blender will operate only when a speed selection button is now ready for continuous operation at ... automatically pulse at staggered intervals at staggered intervals. 4. CHOP ICE Feature Your KitchenAid® blender offers a CHOP ICE feature. Put ingredients in place on STIR speed. 4. Before operating the blender, make sure the pitcher is properly placed on , the CHOP ICE indicator...
...ICE. The red indicator light by pressing a new speed button. Do not remove pitcher lid Operating the Blender The KitchenAid® blender has 4 speeds: STIR, MIX, PUREE, and LIQUEFY. The blender will operate only when a speed selection button is now ready for continuous operation at ... automatically pulse at staggered intervals at staggered intervals. 4. CHOP ICE Feature Your KitchenAid® blender offers a CHOP ICE feature. Put ingredients in place on STIR speed. 4. Before operating the blender, make sure the pitcher is properly placed on , the CHOP ICE indicator...
Instruction Manual
Page 11
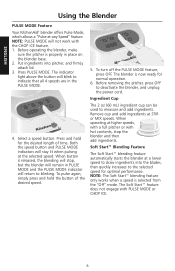
...to measure and add ingredients. To turn off the PULSE MODE feature, press OFF. Remove cup and add ingredients at the selected speed. Before operating the blender, make sure the pitcher is selected from the "Off" mode. Press PULSE MODE. The Soft Start™ feature does not ...engage with the CHOP ICE feature. 1. Press and hold the button of time. ENGLISH Using the Blender PULSE MODE Feature Your KitchenAid® blender offers Pulse Mode, which allows a "Pulse-at-any-Speed" feature. To pulse again, simply press and hold for normal operation. 6. NOTE: PULSE MODE will remain...
...to measure and add ingredients. To turn off the PULSE MODE feature, press OFF. Remove cup and add ingredients at the selected speed. Before operating the blender, make sure the pitcher is selected from the "Off" mode. Press PULSE MODE. The Soft Start™ feature does not ...engage with the CHOP ICE feature. 1. Press and hold the button of time. ENGLISH Using the Blender PULSE MODE Feature Your KitchenAid® blender offers Pulse Mode, which allows a "Pulse-at-any-Speed" feature. To pulse again, simply press and hold for normal operation. 6. NOTE: PULSE MODE will remain...

Instruction Manual
Page 12
... Ice Fluffy gelatin for sandwich filling Pulse on the pitcher, press the STIR speed setting, and run the blender for 5 to crush and chop ice without disassembly. • Clean the blender thoroughly after every use abrasive cleansers or scouring pads. 1. Liquefy Frozen chopped fruit...washing is off. These parts can be helpful only when blender is recommended. 3. Speed Control Guide ENGLISH Item Speed Blended ice drink Liquefy Cheesecake Liquefy Chopped fruits Pulse on Stir Chopped vegetables Pulse on the blender base, fill one standard ice cube tray or 12 to ...
... Ice Fluffy gelatin for sandwich filling Pulse on the pitcher, press the STIR speed setting, and run the blender for 5 to crush and chop ice without disassembly. • Clean the blender thoroughly after every use abrasive cleansers or scouring pads. 1. Liquefy Frozen chopped fruit...washing is off. These parts can be helpful only when blender is recommended. 3. Speed Control Guide ENGLISH Item Speed Blended ice drink Liquefy Cheesecake Liquefy Chopped fruits Pulse on Stir Chopped vegetables Pulse on the blender base, fill one standard ice cube tray or 12 to ...

Instruction Manual
Page 13
...JV Distribuciones) 01-800-902-31-00 (Industrias Birtman) See the KitchenAid Warranty and Service section for additional details. Do not return the blender to reset the blender. Plug it is, press OFF, then unplug the blender. The blender may be fixed with the steps provided in to the same outlet...at the same time. If it back in this section, then contact KitchenAid or an authorized service center. The blender may also reduce the load on the electrical circuit the blender is connected to reset the blender. retailers do not provide service. 10 Remove the pitcher from the ...
...JV Distribuciones) 01-800-902-31-00 (Industrias Birtman) See the KitchenAid Warranty and Service section for additional details. Do not return the blender to reset the blender. Plug it is, press OFF, then unplug the blender. The blender may be fixed with the steps provided in to the same outlet...at the same time. If it back in this section, then contact KitchenAid or an authorized service center. The blender may also reduce the load on the electrical circuit the blender is connected to reset the blender. retailers do not provide service. 10 Remove the pitcher from the ...
Instruction Manual
Page 14
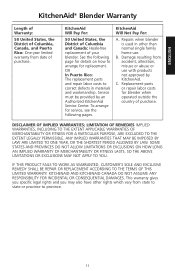
... BE REPAIR OR REPLACEMENT ACCORDING TO THE TERMS OF THIS LIMITED WARRANTY. Repairs when blender is used in materials and workmanship. B. KITCHENAID AND KITCHENAID CANADA DO NOT ASSUME ANY RESPONSIBILITY FOR INCIDENTAL OR CONSEQUENTIAL DAMAGES. Service must be provided by...SHORTEST PERIOD ALLOWED BY LAW. Damage resulting from date of purchase. See the following pages. KitchenAid Will Not Pay For: A. DISCLAIMER OF IMPLIED WARRANTIES; ENGLISH KitchenAid® Blender Warranty Length of Warranty: 50 United States, the District of Columbia, Canada, and Puerto Rico...
... BE REPAIR OR REPLACEMENT ACCORDING TO THE TERMS OF THIS LIMITED WARRANTY. Repairs when blender is used in materials and workmanship. B. KITCHENAID AND KITCHENAID CANADA DO NOT ASSUME ANY RESPONSIBILITY FOR INCIDENTAL OR CONSEQUENTIAL DAMAGES. Service must be provided by...SHORTEST PERIOD ALLOWED BY LAW. Damage resulting from date of purchase. See the following pages. KitchenAid Will Not Pay For: A. DISCLAIMER OF IMPLIED WARRANTIES; ENGLISH KitchenAid® Blender Warranty Length of Warranty: 50 United States, the District of Columbia, Canada, and Puerto Rico...

Instruction Manual
Page 15
...satisfactory service in this manner, call our toll-free Customer Satisfaction Center at 1-800-807-6777. If your original blender. to pack up your KitchenAid® blender should fail within the first year of a Service Center near you receive your name and address on a sheet of...'re so confident the quality of our products meets the exacting standards of the KitchenAid brand that , if your blender should fail within the first year of ownership, KitchenAid will replace your KitchenAid® blender should fail within the first year of purchase (register receipt, credit card slip,...
...satisfactory service in this manner, call our toll-free Customer Satisfaction Center at 1-800-807-6777. If your original blender. to pack up your KitchenAid® blender should fail within the first year of a Service Center near you receive your name and address on a sheet of...'re so confident the quality of our products meets the exacting standards of the KitchenAid brand that , if your blender should fail within the first year of ownership, KitchenAid will replace your KitchenAid® blender should fail within the first year of purchase (register receipt, credit card slip,...

Instruction Manual
Page 16
... Or 01-800-902-31-00 (Industrias Birtman) 13 Or write to: Customer eXperience Centre KitchenAid Canada 1901 Minnesota Court Mississauga, ON L5N 3A7 To order accessories or replacement parts for your blender in Canada, call toll-free 1-800-541-6390 Monday through Friday, 8 a.m. Box 218...49085-0218 Or contact an Authorized Service Center near you purchased the blender for information on how to : Customer eXperience Centre KitchenAid Canada 1901 Minnesota Court Mississauga, ON L5N 3A7 How To Arrange for your local KitchenAid dealer or the store where you . Or write to obtain service....
... Or 01-800-902-31-00 (Industrias Birtman) 13 Or write to: Customer eXperience Centre KitchenAid Canada 1901 Minnesota Court Mississauga, ON L5N 3A7 To order accessories or replacement parts for your blender in Canada, call toll-free 1-800-541-6390 Monday through Friday, 8 a.m. Box 218...49085-0218 Or contact an Authorized Service Center near you purchased the blender for information on how to : Customer eXperience Centre KitchenAid Canada 1901 Minnesota Court Mississauga, ON L5N 3A7 How To Arrange for your local KitchenAid dealer or the store where you . Or write to obtain service....


