Instruction Manual
Page 4
... Registration Inside Front Cover Blender Safety ...2 Important Safeguards ...3 Electrical Requirements 3 FEATURES AND OPERATION Blender Features ...4 Preparing the Blender for Use 6 Before First Use ...6 Blender Assembly 6 Using the Blender ...7 Before Use ...7 Operating the Blender 7 CHOP ICE Feature 7 PULSE MODE Feature 8 Ingredient Cup ...8 Soft Start™ Blending Feature 8 Speed Control Guide ...9 CARE AND CLEANING Cleaning the Blender ...9 Troubleshooting ...10 WARRANTY AND SERVICE INFORMATION KitchenAid® Blender Warranty 11 Hassle-Free Replacement Warranty - 50 United...
... Registration Inside Front Cover Blender Safety ...2 Important Safeguards ...3 Electrical Requirements 3 FEATURES AND OPERATION Blender Features ...4 Preparing the Blender for Use 6 Before First Use ...6 Blender Assembly 6 Using the Blender ...7 Before Use ...7 Operating the Blender 7 CHOP ICE Feature 7 PULSE MODE Feature 8 Ingredient Cup ...8 Soft Start™ Blending Feature 8 Speed Control Guide ...9 CARE AND CLEANING Cleaning the Blender ...9 Troubleshooting ...10 WARRANTY AND SERVICE INFORMATION KitchenAid® Blender Warranty 11 Hassle-Free Replacement Warranty - 50 United...
Instruction Manual
Page 5
ENGLISH Blender Safety Your safety and the safety of injury, and tell you what the potential hazard is the safety alert symbol. This is , tell you how to potential hazards that can kill or hurt you don't immediately follow instructions. This symbol alerts you to reduce the chance of ... messages will follow the safety alert symbol and either the word "DANGER" or "WARNING." All safety messages will tell you don't follow instructions. We have provided many important safety messages in this manual and on your appliance. Always read and obey all safety messages.
ENGLISH Blender Safety Your safety and the safety of injury, and tell you what the potential hazard is the safety alert symbol. This is , tell you how to potential hazards that can kill or hurt you don't immediately follow instructions. This symbol alerts you to reduce the chance of ... messages will follow the safety alert symbol and either the word "DANGER" or "WARNING." All safety messages will tell you don't follow instructions. We have provided many important safety messages in this manual and on your appliance. Always read and obey all safety messages.

Instruction Manual
Page 6
... not use an extension cord. Keep hands and utensils out of container while blending to reduce the risk of severe injury to persons or damage to the nearest Authorized Service Center for household use only. Blades are using electrical appliances, basic safety precautions should always be used only when the blender is not running. 10. Always operate blender with moving parts. 6. If the power supply cord is...
... not use an extension cord. Keep hands and utensils out of container while blending to reduce the risk of severe injury to persons or damage to the nearest Authorized Service Center for household use only. Blades are using electrical appliances, basic safety precautions should always be used only when the blender is not running. 10. Always operate blender with moving parts. 6. If the power supply cord is...
Instruction Manual
Page 7
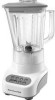
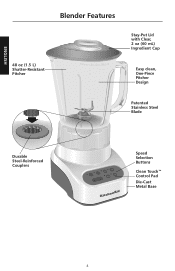
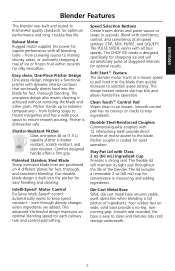
ENGLISH 48 oz (1.5 L) Shatter-Resistant Pitcher Blender Features Stay-Put Lid with Clear, 2 oz (60 mL) Ingredient Cup Easy clean, One-Piece Pitcher Design Patented Stainless Steel Blade Durable Steel-Reinforced Couplers Speed Selection Buttons Clean Touch™ Control Pad Die-Cast Metal Base 4
ENGLISH 48 oz (1.5 L) Shatter-Resistant Pitcher Blender Features Stay-Put Lid with Clear, 2 oz (60 mL) Ingredient Cup Easy clean, One-Piece Pitcher Design Patented Stainless Steel Blade Durable Steel-Reinforced Couplers Speed Selection Buttons Clean Touch™ Control Pad Die-Cast Metal Base 4
Instruction Manual
Page 8
... cleaning. Easy clean, One-Piece Pitcher Design One-piece design integrates a functional pitcher with all speed settings: STIR, MIX, PUREE, and LIQUEFY. The CHOP ICE mode is shatter resistant, scratch resistant, and stain resistant. Robust Motor Rugged motor supplies the power for superb performance with dynamic interior contours that continually directs food into the pitcher for optimum performance and long, trouble-free life. Pitcher stands up kick and allows hands-free operation. Pitcher coupler...
... cleaning. Easy clean, One-Piece Pitcher Design One-piece design integrates a functional pitcher with all speed settings: STIR, MIX, PUREE, and LIQUEFY. The CHOP ICE mode is shatter resistant, scratch resistant, and stain resistant. Robust Motor Rugged motor supplies the power for superb performance with dynamic interior contours that continually directs food into the pitcher for optimum performance and long, trouble-free life. Pitcher stands up kick and allows hands-free operation. Pitcher coupler...
Instruction Manual
Page 9
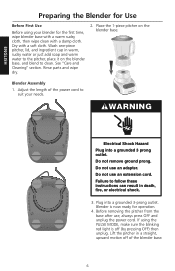
... on the blender base. Place the 1-piece pitcher on the blender base, and blend to suit your blender for operation. 4. Dry with a damp cloth. If using your needs. WARNING Electrical Shock Hazard Plug into a grounded 3-prong outlet. Before removing the pitcher from the base after use, always press OFF and unplug the power cord. ENGLISH Preparing the Blender for Use Before First Use Before using the PULSE MODE, make sure the blinking red light is...
... on the blender base. Place the 1-piece pitcher on the blender base, and blend to suit your blender for operation. 4. Dry with a damp cloth. If using your needs. WARNING Electrical Shock Hazard Plug into a grounded 3-prong outlet. Before removing the pitcher from the base after use, always press OFF and unplug the power cord. ENGLISH Preparing the Blender for Use Before First Use Before using the PULSE MODE, make sure the blinking red light is...
Instruction Manual
Page 10
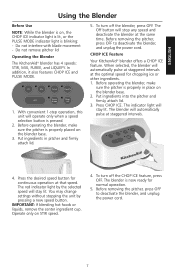
... power cord. 7 The red indicator light by pressing a new speed button. When selected, the blender will stop any speed and deactivate the blender at that speed. Before removing the pitcher, press OFF to deactivate the blender, and unplug the power cord. The indicator light will automatically pulse at the optimal speed for normal operation. 5. To turn off the CHOP ICE feature, press OFF. Do not interfere with blade movement - Do not remove pitcher lid Operating the Blender The KitchenAid® blender has 4 speeds...
... power cord. 7 The red indicator light by pressing a new speed button. When selected, the blender will stop any speed and deactivate the blender at that speed. Before removing the pitcher, press OFF to deactivate the blender, and unplug the power cord. The indicator light will automatically pulse at the optimal speed for normal operation. 5. To turn off the CHOP ICE feature, press OFF. Do not interfere with blade movement - Do not remove pitcher lid Operating the Blender The KitchenAid® blender has 4 speeds...
Instruction Manual
Page 11
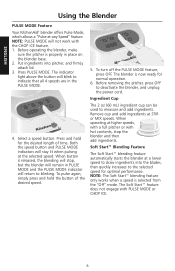
... firmLy attach lid. 3. The blender is released, the blending will stop the blender and then add ingredients. Press PULSE MODE. Ingredient Cup The 2 oz (60 mL) ingredient cup can be used to deactivate the blender, and unplug the power cord. Select a speed button. To turn off the PULSE MODE feature, press OFF. Soft Start™ Blending Feature The Soft Start™ blending feature automatically starts the blender at a lower speed to blinking...
... firmLy attach lid. 3. The blender is released, the blending will stop the blender and then add ingredients. Press PULSE MODE. Ingredient Cup The 2 oz (60 mL) ingredient cup can be used to deactivate the blender, and unplug the power cord. Select a speed button. To turn off the PULSE MODE feature, press OFF. Soft Start™ Blending Feature The Soft Start™ blending feature automatically starts the blender at a lower speed to blinking...

Instruction Manual
Page 12
... batter Mix White sauce Stir Tip - Care and Cleaning The blender pitcher and blade can also be easily cleaned without adding any liquid ingredients. Place the lid on Stir Cream cheese-based spread Stir Cream soup Stir Crushed/Chopped Ice Chop Ice Dip Stir Finely chopped fresh fruits . . . . . Speed Control Guide ENGLISH Item Speed Blended ice drink Liquefy Cheesecake Liquefy Chopped fruits Pulse on Stir Chopped vegetables Pulse on the pitcher, press the STIR speed setting, and run...
... batter Mix White sauce Stir Tip - Care and Cleaning The blender pitcher and blade can also be easily cleaned without adding any liquid ingredients. Place the lid on Stir Cream cheese-based spread Stir Cream soup Stir Crushed/Chopped Ice Chop Ice Dip Stir Finely chopped fresh fruits . . . . . Speed Control Guide ENGLISH Item Speed Blended ice drink Liquefy Cheesecake Liquefy Chopped fruits Pulse on Stir Chopped vegetables Pulse on the pitcher, press the STIR speed setting, and run...

Instruction Manual
Page 13
... the motor. Remove the pitcher from the base and free the blades by breaking up or removing the contents at the same time. Adding liquid to the pitcher may also reduce the load on the electrical circuit the blender is connected to reset the blender. ENGLISH Troubleshooting The blender does not operate when a setting is selected: Stir Mix Puree Liquefy OFF Pulse Mode Chop Ice No indicator lights are flashing...
... the motor. Remove the pitcher from the base and free the blades by breaking up or removing the contents at the same time. Adding liquid to the pitcher may also reduce the load on the electrical circuit the blender is connected to reset the blender. ENGLISH Troubleshooting The blender does not operate when a setting is selected: Stir Mix Puree Liquefy OFF Pulse Mode Chop Ice No indicator lights are flashing...
Instruction Manual
Page 14
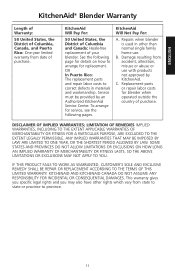
... warranty gives you specific legal rights and you may also have other than normal single family home use with products not approved by an Authorized KitchenAid Service Center. KitchenAid Will Pay For: 50 United States, the District of Columbia and Canada: Hassle-free replacement of purchase. To arrange for service, see the following page for replacement. OR In Puerto Rico: The replacement parts and repair...
... warranty gives you specific legal rights and you may also have other than normal single family home use with products not approved by an Authorized KitchenAid Service Center. KitchenAid Will Pay For: 50 United States, the District of Columbia and Canada: Hassle-free replacement of purchase. To arrange for service, see the following page for replacement. OR In Puerto Rico: The replacement parts and repair...

Instruction Manual
Page 15
... the first year of ownership, KitchenAid will pay for replacement parts and labor costs to obtain satisfactory service in this manner, call our toll-free Customer Satisfaction Center at : Customer eXperience Centre KitchenAid Canada 1901 Minnesota Court Mississauga, ON L5N 3A7 How To Arrange for Warranty Service in Puerto Rico Your KitchenAid® blender is covered by our one year limited warranty. In the carton include...
... the first year of ownership, KitchenAid will pay for replacement parts and labor costs to obtain satisfactory service in this manner, call our toll-free Customer Satisfaction Center at : Customer eXperience Centre KitchenAid Canada 1901 Minnesota Court Mississauga, ON L5N 3A7 How To Arrange for Warranty Service in Puerto Rico Your KitchenAid® blender is covered by our one year limited warranty. In the carton include...

Instruction Manual
Page 16
... 49085-0218 To order accessories or replacement parts for your blender in the 50 United States, District of Columbia, and Puerto Rico, call toll-free 1-800-807-6777. Box 218 St. For service information in Mexico, call toll-free 1-800-807-6777. to : Customer Satisfaction Center KitchenAid Portable Appliances P.O. ENGLISH How To Arrange for service, please review the "Troubleshooting" section. Or write...
... 49085-0218 To order accessories or replacement parts for your blender in the 50 United States, District of Columbia, and Puerto Rico, call toll-free 1-800-807-6777. Box 218 St. For service information in Mexico, call toll-free 1-800-807-6777. to : Customer Satisfaction Center KitchenAid Portable Appliances P.O. ENGLISH How To Arrange for service, please review the "Troubleshooting" section. Or write...


