Instruction Manual
Page 3
...INTRODUCTION Proof of Purchase & Product Registration Card Inside Front Cover Blender Safety...3 Important Safeguards ...4 Electrical Requirements 5 FEATURES AND OPERATION Blender Features ...6 Preparing the Blender for Use 8 Before First Use ...8 Blender Assembly ...8 Using the Blender ...10 Before Use...10 Operating the Blender with the Pitcher or Accessory Jar 10 CRUSh ICE...10 ...Feature 11 Speed Control Guide...12 CARE AND CLEANING To Clean Individual Components 13 To Clean Without Disassembly 13 Troubleshooting ...14 BLENDER TIPS Quick Tips ...15 how To...15 Continued on next page 1
...INTRODUCTION Proof of Purchase & Product Registration Card Inside Front Cover Blender Safety...3 Important Safeguards ...4 Electrical Requirements 5 FEATURES AND OPERATION Blender Features ...6 Preparing the Blender for Use 8 Before First Use ...8 Blender Assembly ...8 Using the Blender ...10 Before Use...10 Operating the Blender with the Pitcher or Accessory Jar 10 CRUSh ICE...10 ...Feature 11 Speed Control Guide...12 CARE AND CLEANING To Clean Individual Components 13 To Clean Without Disassembly 13 Troubleshooting ...14 BLENDER TIPS Quick Tips ...15 how To...15 Continued on next page 1

Instruction Manual
Page 4
ENGLIsH table of contents WARRANTY AND SERVICE INFORMATION KitchenAid® Blender Warranty 17 hassle-Free Replacement Warranty - 50 United States and District of Columbia ...........18 hassle-Free Replacement Warranty - Canada 18 how to Arrange for Service ... 18 how to Order Accessories and Replacement Parts 19 NotE: DUE TO ThE UNIQUE CONTAINER AND BLADE DESIGN, READ ThESE INSTRUCTIONS BEFORE USING YOUR NEW KITChENAID® BLENDER TO AChIEVE MAxIMUM PERFORMANCE RESULTS. 2
ENGLIsH table of contents WARRANTY AND SERVICE INFORMATION KitchenAid® Blender Warranty 17 hassle-Free Replacement Warranty - 50 United States and District of Columbia ...........18 hassle-Free Replacement Warranty - Canada 18 how to Arrange for Service ... 18 how to Order Accessories and Replacement Parts 19 NotE: DUE TO ThE UNIQUE CONTAINER AND BLADE DESIGN, READ ThESE INSTRUCTIONS BEFORE USING YOUR NEW KITChENAID® BLENDER TO AChIEVE MAxIMUM PERFORMANCE RESULTS. 2
Instruction Manual
Page 5
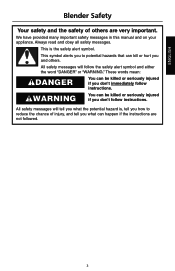
ENGLIsH Blender safety Your safety and the safety of injury, and tell you what the potential hazard is the safety alert symbol. These words mean: DANGER You ...
ENGLIsH Blender safety Your safety and the safety of injury, and tell you what the potential hazard is the safety alert symbol. These words mean: DANGER You ...
Instruction Manual
Page 6
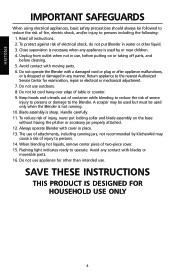
ENGLIsH IMPoRtANt sAfEGuARDs When using electrical appliances, basic safety precautions should always be used by KitchenAid may be used but must be followed to reduce the risk of injury to operate. Unplug from outlet when not in any manner. handle ... attached. 12. Close supervision is necessary when any contact with a damaged cord or plug or after appliance malfunctions, or is sharp. Return appliance to the Blender. A scraper may cause a risk of fire, electric shock, and/or injury to persons including the following: 1. When blending hot liquids, remove center piece ...
ENGLIsH IMPoRtANt sAfEGuARDs When using electrical appliances, basic safety precautions should always be used by KitchenAid may be used but must be followed to reduce the risk of injury to operate. Unplug from outlet when not in any manner. handle ... attached. 12. Close supervision is necessary when any contact with a damaged cord or plug or after appliance malfunctions, or is sharp. Return appliance to the Blender. A scraper may cause a risk of fire, electric shock, and/or injury to persons including the following: 1. When blending hot liquids, remove center piece ...

Instruction Manual
Page 7
... can result in the outlet, contact a qualified electrician. Do not use an extension cord. ENGLIsH Electrical Requirements Volts: 120 Volts A.C. hertz: 60 hz NotE: Your Blender has a 3-prong grounded plug. WARNING Electrical Shock Hazard Plug into a grounded 3 prong outlet. If the power supply cord is too short, have a qualified electrician or...
... can result in the outlet, contact a qualified electrician. Do not use an extension cord. ENGLIsH Electrical Requirements Volts: 120 Volts A.C. hertz: 60 hz NotE: Your Blender has a 3-prong grounded plug. WARNING Electrical Shock Hazard Plug into a grounded 3 prong outlet. If the power supply cord is too short, have a qualified electrician or...

Instruction Manual
Page 8
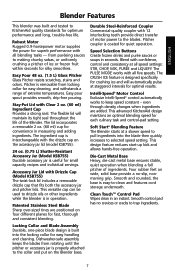
ENGLIsH Blender features stay-Put Lid with clear, 2 oz. (60 ml) Ingredient cup Easy Pour 48 oz. (1.5 L) Glass Pitcher Patented stainless steel Blade Locking collar and Blade Assembly 24 oz. (0.75 L) Accessory Jar* Accessory Jar Lid with Drizzle cap* Durable steel-Reinforced coupler Die-cast Metal Base * Model KSB755 only 6 speed selection Buttons clean touch™ control Pad
ENGLIsH Blender features stay-Put Lid with clear, 2 oz. (60 ml) Ingredient cup Easy Pour 48 oz. (1.5 L) Glass Pitcher Patented stainless steel Blade Locking collar and Blade Assembly 24 oz. (0.75 L) Accessory Jar* Accessory Jar Lid with Drizzle cap* Durable steel-Reinforced coupler Die-cast Metal Base * Model KSB755 only 6 speed selection Buttons clean touch™ control Pad
Instruction Manual
Page 9
... properly attached to the collar and put on wide, solid base provide a no crevices or cracks to selected speed setting. ENGLIsH Blender features This blender was built and tested to KitchenAid quality standards for fast, thorough and consistent blending. from rotating until the pitcher or accessory jar is easy-to keep speed constant...
... properly attached to the collar and put on wide, solid base provide a no crevices or cracks to selected speed setting. ENGLIsH Blender features This blender was built and tested to KitchenAid quality standards for fast, thorough and consistent blending. from rotating until the pitcher or accessory jar is easy-to keep speed constant...
Instruction Manual
Page 10
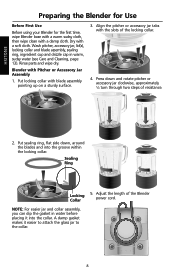
... the glass jar to the collar. 8 Adjust the length of the locking collar. 4. Blender with a damp cloth. ENGLIsH Preparing the Blender for use Before first use Before using your Blender for the first time, wipe Blender base with a warm sudsy cloth, then wipe clean with Pitcher or Accessory Jar Assembly 1.... a soft cloth. Rinse parts and wipe dry. sealing Ring Locking collar 5. Align the pitcher or accessory jar tabs with the slots of the Blender power cord. Press down , around the blades and into the collar. NotE: For easier jar and collar assembly, you can dip the gasket ...
... the glass jar to the collar. 8 Adjust the length of the locking collar. 4. Blender with a damp cloth. ENGLIsH Preparing the Blender for use Before first use Before using your Blender for the first time, wipe Blender base with a warm sudsy cloth, then wipe clean with Pitcher or Accessory Jar Assembly 1.... a soft cloth. Rinse parts and wipe dry. sealing Ring Locking collar 5. Align the pitcher or accessory jar tabs with the slots of the Blender power cord. Press down , around the blades and into the collar. NotE: For easier jar and collar assembly, you can dip the gasket ...

Instruction Manual
Page 11
...Hazard Plug into a grounded 3 prong outlet. Put pitcher or accessory jar assembly onto the Blender base. 7. WARNING NotE: When properly positioned, pitcher or accessory jar assembly will rest completely on Blender base. Before removing the pitcher or accessory jar from the base, always press OFF and... unplug the power cord. 9 Do not use an extension cord. Do not use an adapter. Blender is now ready for use 6. If not, repeat steps 3 and 4. ENGLIsH Preparing the Blender for operation. 9. To attach the accessory jar lid, twist to follow these instructions can result in...
...Hazard Plug into a grounded 3 prong outlet. Put pitcher or accessory jar assembly onto the Blender base. 7. WARNING NotE: When properly positioned, pitcher or accessory jar assembly will rest completely on Blender base. Before removing the pitcher or accessory jar from the base, always press OFF and... unplug the power cord. 9 Do not use an extension cord. Do not use an adapter. Blender is now ready for use 6. If not, repeat steps 3 and 4. ENGLIsH Preparing the Blender for operation. 9. To attach the accessory jar lid, twist to follow these instructions can result in...
Instruction Manual
Page 12
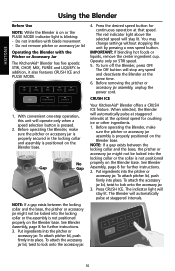
... speed. Put ingredients into the pitcher or accessory jar. Do not interfere with the Pitcher or Accessory Jar The KitchenAid® Blender has five speeds: STIR, ChOP, MIx, PURÉE and LIQUEFY. Put ingredients into the pitcher or accessory jar. Before operating...for continuous operation at the optimal speed for crushing ice or other ingredients. 1. Operate only on the Blender base. See Blender Assembly, page 8 for further instructions. 2. cRusH IcE Your KitchenAid® Blender offers a CRUSh ICE feature. Press CRUSh ICE. You may change settings without stopping the unit by ...
... speed. Put ingredients into the pitcher or accessory jar. Do not interfere with the Pitcher or Accessory Jar The KitchenAid® Blender has five speeds: STIR, ChOP, MIx, PURÉE and LIQUEFY. Put ingredients into the pitcher or accessory jar. Before operating...for continuous operation at the optimal speed for crushing ice or other ingredients. 1. Operate only on the Blender base. See Blender Assembly, page 8 for further instructions. 2. cRusH IcE Your KitchenAid® Blender offers a CRUSh ICE feature. Press CRUSh ICE. You may change settings without stopping the unit by ...
Instruction Manual
Page 13
...Your KitchenAid® Blender offers PULSE MODE, which allows a "Pulse-at higher speeds, with a full pitcher or with hot contents, stop , but the Blender will remain in PULSE MODE and the PULSE MODE indicator will return to selected speed setting for further instructions. 2. Before operating the Blender, ... mayonnaise, salsa or pesto, and just the right size for continuous operation. 6. Put ingredients into place. The indicator light on the Blender base. Accessory Jar (Model KsB755) The accessory jar is properly positioned on the button will not work with the CRUSh ICE feature. ...
...Your KitchenAid® Blender offers PULSE MODE, which allows a "Pulse-at higher speeds, with a full pitcher or with hot contents, stop , but the Blender will remain in PULSE MODE and the PULSE MODE indicator will return to selected speed setting for further instructions. 2. Before operating the Blender, ... mayonnaise, salsa or pesto, and just the right size for continuous operation. 6. Put ingredients into place. The indicator light on the Blender base. Accessory Jar (Model KsB755) The accessory jar is properly positioned on the button will not work with the CRUSh ICE feature. ...

Instruction Manual
Page 14
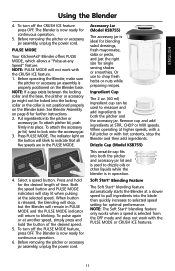
... fruits . . . . . Crush Ice Finely chopped fresh vegetables Liquefy Frozen chopped fruit (defrost slightly until it can be probed with a spatula will be helpful only when Blender is off. Process up to one at a time. ENGLIsH speed control Guide Item speed Blended ice drink Liquefy Cheesecake Liquefy Chopped fruits Pulse on Stir...
... fruits . . . . . Crush Ice Finely chopped fresh vegetables Liquefy Frozen chopped fruit (defrost slightly until it can be probed with a spatula will be helpful only when Blender is off. Process up to one at a time. ENGLIsH speed control Guide Item speed Blended ice drink Liquefy Cheesecake Liquefy Chopped fruits Pulse on Stir...
Instruction Manual
Page 15
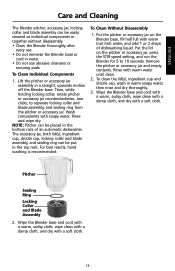
...clean the lid(s), ingredient cup and drizzle cap, wash in the top rack. For best results, hand washing is recommended. Put the lid on the Blender base, fill half full with warm (not hot) water, and add 1 or 2 drops of an automatic dishwasher. wipe clean with a damp cloth,... locking collar and blade assembly can be easily cleaned as individual components or together without disassembly. • Clean the Blender thoroughly after every use • Do not immerse the Blender base or cord in water • Do not use abrasive cleansers or scouring pads to clean Without Disassembly 1. Wash...
...clean the lid(s), ingredient cup and drizzle cap, wash in the top rack. For best results, hand washing is recommended. Put the lid on the Blender base, fill half full with warm (not hot) water, and add 1 or 2 drops of an automatic dishwasher. wipe clean with a damp cloth,... locking collar and blade assembly can be easily cleaned as individual components or together without disassembly. • Clean the Blender thoroughly after every use • Do not immerse the Blender base or cord in water • Do not use abrasive cleansers or scouring pads to clean Without Disassembly 1. Wash...
Instruction Manual
Page 16
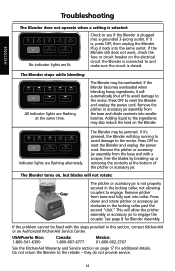
...1-800-541-6390 canada: 1-800-807-6777 Mexico: 01-800-002-2767 See the KitchenAid Warranty and Service section on the Blender. The Blender may also reduce the load on page 17 for Blender Assembly. Remove the pitcher or accessory jar assembly from the base and divide contents into... from the base and with the steps provided in this section, contact KitchenAid or an Authorized KitchenAid Service Center. ENGLIsH troubleshooting the Blender does not operate when a setting is , press OFF, then unplug the Blender. This will stop running to avoid damage to the motor. Press OFF...
...1-800-541-6390 canada: 1-800-807-6777 Mexico: 01-800-002-2767 See the KitchenAid Warranty and Service section on the Blender. The Blender may also reduce the load on page 17 for Blender Assembly. Remove the pitcher or accessory jar assembly from the base and divide contents into... from the base and with the steps provided in this section, contact KitchenAid or an Authorized KitchenAid Service Center. ENGLIsH troubleshooting the Blender does not operate when a setting is , press OFF, then unplug the Blender. This will stop running to avoid damage to the motor. Press OFF...

Instruction Manual
Page 17
... hot liquids. • Stop and check the consistency of water in the pitcher. Follow procedure for cookies. To avoid damaging the utensil or blender blades, do not use accessory jar for smaller portions. • For many ingredient mixtures, start the blending process at higher speeds with a ...blending. • If desired, remove center ingredient cup or drizzle cap of the pitcher or accessory jar lid to mix ingredients only when the Blender is dissolved, about 1½ inches (3.75 cm) in pitcher or accessory jar. How to 30 seconds. Dissolve flavored gelatin: Pour boiling water...
... hot liquids. • Stop and check the consistency of water in the pitcher. Follow procedure for cookies. To avoid damaging the utensil or blender blades, do not use accessory jar for smaller portions. • For many ingredient mixtures, start the blending process at higher speeds with a ...blending. • If desired, remove center ingredient cup or drizzle cap of the pitcher or accessory jar lid to mix ingredients only when the Blender is dissolved, about 1½ inches (3.75 cm) in pitcher or accessory jar. How to 30 seconds. Dissolve flavored gelatin: Pour boiling water...
Instruction Manual
Page 18
...seconds. Pour into ½ to 1 inch (1.25 to 10 seconds. Grate cheese: Cut very cold cheese into saucepan and cook as usual. Rinse your Blender jar: Fill pitcher or accessory jar, half full with warm water. For complete cleaning, pitcher, accessory jar, lid(s), ingredient cup, drizzle cap, and .... take lumps out of the pitcher or accessory jar as needed . Cover and blend on LIQUEFY about 5 to 1.5 cm) cubes. Stop the Blender and scrape sides of gravy: If sauce or gravy becomes lumpy, place in pitcher or accessory jar. Cover and blend on MIx until smooth, about...
...seconds. Pour into ½ to 1 inch (1.25 to 10 seconds. Grate cheese: Cut very cold cheese into saucepan and cook as usual. Rinse your Blender jar: Fill pitcher or accessory jar, half full with warm water. For complete cleaning, pitcher, accessory jar, lid(s), ingredient cup, drizzle cap, and .... take lumps out of the pitcher or accessory jar as needed . Cover and blend on LIQUEFY about 5 to 1.5 cm) cubes. Stop the Blender and scrape sides of gravy: If sauce or gravy becomes lumpy, place in pitcher or accessory jar. Cover and blend on MIx until smooth, about...
Instruction Manual
Page 19
...single family home use with products not approved by an Authorized KitchenAid Service Center. C. KITChENAID AND KITChENAID CANADA DO NOT ASSUME ANY RESPONSIBILITY FOR INCIDENTAL OR CONSEQUENTIAL DAMAGES. Repairs when Blender is used in materials and workmanship. LIMItAtIoN of IMPLIED WARRANtIEs... A PARTICULAR PURPOSE, ARE ExCLUDED TO ThE ExTENT LEGALLY PERMISSIBLE. Service must be provided by KitchenAid. Damage resulting from date of purchase. ENGLIsH KitchenAid® Blender Warranty Length of Warranty: 50 united states, the District of columbia, canada, and Puerto ...
...single family home use with products not approved by an Authorized KitchenAid Service Center. C. KITChENAID AND KITChENAID CANADA DO NOT ASSUME ANY RESPONSIBILITY FOR INCIDENTAL OR CONSEQUENTIAL DAMAGES. Repairs when Blender is used in materials and workmanship. LIMItAtIoN of IMPLIED WARRANtIEs... A PARTICULAR PURPOSE, ARE ExCLUDED TO ThE ExTENT LEGALLY PERMISSIBLE. Service must be provided by KitchenAid. Damage resulting from date of purchase. ENGLIsH KitchenAid® Blender Warranty Length of Warranty: 50 united states, the District of columbia, canada, and Puerto ...

Instruction Manual
Page 20
... address on a sheet of paper along with an identical or comparable replacement. Your replacement Blender will also be covered by an Authorized KitchenAid Service Center. Or write to us . Take the Blender or ship prepaid and insured to learn the location of a Service Center near you are... of columbia We're so confident the quality of our products meets the exacting standards of KitchenAid that , if your Blender should fail within the first year of ownership, KitchenAid Canada will replace your Blender with a copy of the proof of purchase (register receipt, credit card slip, etc.)....
... address on a sheet of paper along with an identical or comparable replacement. Your replacement Blender will also be covered by an Authorized KitchenAid Service Center. Or write to us . Take the Blender or ship prepaid and insured to learn the location of a Service Center near you are... of columbia We're so confident the quality of our products meets the exacting standards of KitchenAid that , if your Blender should fail within the first year of ownership, KitchenAid Canada will replace your Blender with a copy of the proof of purchase (register receipt, credit card slip, etc.)....
Instruction Manual
Page 21
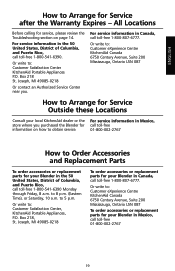
... 6750 Century Avenue, Suite 200 Mississauga, Ontario L5N 0B7 How to Arrange for service outside these Locations Consult your local KitchenAid dealer or the for your Blender in Mexico, store where you . Or write to 8 p.m. (Eastern Time), or Saturday, 10 a.m. Joseph, MI 49085-0218 to order ... call toll-free 01-800-002-2767 19 Or write to: Customer experience Centre KitchenAid Canada 6750 Century Avenue, Suite 200 Mississauga, Ontario L5N 0B7 to order accessories or replacement parts for your Blender in the 50 united states, District of columbia, and Puerto Rico, call toll-...
... 6750 Century Avenue, Suite 200 Mississauga, Ontario L5N 0B7 How to Arrange for service outside these Locations Consult your local KitchenAid dealer or the for your Blender in Mexico, store where you . Or write to 8 p.m. (Eastern Time), or Saturday, 10 a.m. Joseph, MI 49085-0218 to order ... call toll-free 01-800-002-2767 19 Or write to: Customer experience Centre KitchenAid Canada 6750 Century Avenue, Suite 200 Mississauga, Ontario L5N 0B7 to order accessories or replacement parts for your Blender in the 50 united states, District of columbia, and Puerto Rico, call toll-...


