Instruction Manual
Page 3
... Front Cover Blender Safety...3 Important Safeguards ...4 Electrical Requirements 5 FEATURES AND OPERATION Blender Features ...6 Preparing the Blender for Use 8 Before First Use ...8 Blender Assembly ...8 Using the Blender ...10 Before Use...10 Operating the Blender with the Pitcher or Accessory Jar 10 CRUSh ICE...10 PULSE MODE...11 Accessory Jar (Model KSB755 11 Ingredient Cup ...11 Drizzle Cap (Model KSB755 11 Soft Start® Blending Feature 11 Speed Control Guide...12 CARE AND CLEANING To Clean Individual Components 13 To Clean Without Disassembly 13 Troubleshooting ...14 BLENDER...
... Front Cover Blender Safety...3 Important Safeguards ...4 Electrical Requirements 5 FEATURES AND OPERATION Blender Features ...6 Preparing the Blender for Use 8 Before First Use ...8 Blender Assembly ...8 Using the Blender ...10 Before Use...10 Operating the Blender with the Pitcher or Accessory Jar 10 CRUSh ICE...10 PULSE MODE...11 Accessory Jar (Model KSB755 11 Ingredient Cup ...11 Drizzle Cap (Model KSB755 11 Soft Start® Blending Feature 11 Speed Control Guide...12 CARE AND CLEANING To Clean Individual Components 13 To Clean Without Disassembly 13 Troubleshooting ...14 BLENDER...

Instruction Manual
Page 4
... 19 how to Arrange for Service after the Warranty Expires - ENGLIsH table of contents WARRANTY AND SERVICE INFORMATION KitchenAid® Blender Warranty 17 hassle-Free Replacement Warranty - 50 United States and District of Columbia ...........18 hassle-Free Replacement Warranty - All Locations 19 how to Order Accessories and Replacement Parts 19 NotE: DUE TO ThE UNIQUE CONTAINER AND BLADE DESIGN, READ ThESE INSTRUCTIONS BEFORE USING YOUR NEW KITChENAID® BLENDER TO AChIEVE MAxIMUM PERFORMANCE...
... 19 how to Arrange for Service after the Warranty Expires - ENGLIsH table of contents WARRANTY AND SERVICE INFORMATION KitchenAid® Blender Warranty 17 hassle-Free Replacement Warranty - 50 United States and District of Columbia ...........18 hassle-Free Replacement Warranty - All Locations 19 how to Order Accessories and Replacement Parts 19 NotE: DUE TO ThE UNIQUE CONTAINER AND BLADE DESIGN, READ ThESE INSTRUCTIONS BEFORE USING YOUR NEW KITChENAID® BLENDER TO AChIEVE MAxIMUM PERFORMANCE...
Instruction Manual
Page 5
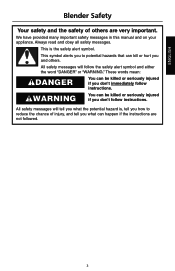
... symbol alerts you to reduce the chance of others . We have provided many important safety messages in this manual and on your appliance. All safety messages will follow instructions. Always read and obey all safety messages. All safety messages will tell you what the potential hazard is ...the safety alert symbol. ENGLIsH Blender safety Your safety and the safety of injury, and tell you what can be killed or seriously injured if you don't immediately follow instructions. These words mean: DANGER You can happen if the...
... symbol alerts you to reduce the chance of others . We have provided many important safety messages in this manual and on your appliance. All safety messages will follow instructions. Always read and obey all safety messages. All safety messages will tell you what the potential hazard is ...the safety alert symbol. ENGLIsH Blender safety Your safety and the safety of injury, and tell you what can be killed or seriously injured if you don't immediately follow instructions. These words mean: DANGER You can happen if the...
Instruction Manual
Page 6
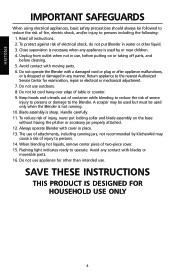
... pitcher or accessory jar properly attached. 12. When blending hot liquids, remove center piece of table or counter. 9. Avoid any appliance is used only when the Blender is not running. 10. handle carefully. 11. Do not operate the Blender with blades or moveable parts. 16. Do not use appliance for examination, repair or electrical or mechanical adjustment. 7. Blade assembly is dropped or damaged in any manner. Read all instructions...
... pitcher or accessory jar properly attached. 12. When blending hot liquids, remove center piece of table or counter. 9. Avoid any appliance is used only when the Blender is not running. 10. handle carefully. 11. Do not operate the Blender with blades or moveable parts. 16. Do not use appliance for examination, repair or electrical or mechanical adjustment. 7. Blade assembly is dropped or damaged in any manner. Read all instructions...

Instruction Manual
Page 7
... fit in any way. If the power supply cord is too short, have a qualified electrician or serviceman install an outlet near the appliance. Do not use an extension cord. Do not use an adapter. Do not modify the plug in an outlet only one way. WARNING Electrical Shock Hazard Plug into a grounded 3 prong outlet. Failure to follow these instructions...
... fit in any way. If the power supply cord is too short, have a qualified electrician or serviceman install an outlet near the appliance. Do not use an extension cord. Do not use an adapter. Do not modify the plug in an outlet only one way. WARNING Electrical Shock Hazard Plug into a grounded 3 prong outlet. Failure to follow these instructions...

Instruction Manual
Page 8
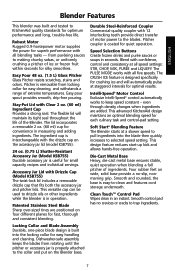
ENGLIsH Blender features stay-Put Lid with clear, 2 oz. (60 ml) Ingredient cup Easy Pour 48 oz. (1.5 L) Glass Pitcher Patented stainless steel Blade Locking collar and Blade Assembly 24 oz. (0.75 L) Accessory Jar* Accessory Jar Lid with Drizzle cap* Durable steel-Reinforced coupler Die-cast Metal Base * Model KSB755 only 6 speed selection Buttons clean touch™ control Pad
ENGLIsH Blender features stay-Put Lid with clear, 2 oz. (60 ml) Ingredient cup Easy Pour 48 oz. (1.5 L) Glass Pitcher Patented stainless steel Blade Locking collar and Blade Assembly 24 oz. (0.75 L) Accessory Jar* Accessory Jar Lid with Drizzle cap* Durable steel-Reinforced coupler Die-cast Metal Base * Model KSB755 only 6 speed selection Buttons clean touch™ control Pad
Instruction Manual
Page 9
... PULSE MODE works with the drizzle cap on the accessory jar lid (model KSB755). 24 oz. (0.75 L) shatter-Resistant Accessory Jar (Model KsB755) Durable accessory jar is properly attached to keep speed constant - This advanced KitchenAid design maintains an optimal blending speed for optimum performance and long, trouble-free life. from rotating until the pitcher or accessory jar is useful for quiet operation. Locking collar and Blade Assembly Durable, one-piece blade design is coated for small capacity recipes and individual servings...
... PULSE MODE works with the drizzle cap on the accessory jar lid (model KSB755). 24 oz. (0.75 L) shatter-Resistant Accessory Jar (Model KsB755) Durable accessory jar is properly attached to keep speed constant - This advanced KitchenAid design maintains an optimal blending speed for optimum performance and long, trouble-free life. from rotating until the pitcher or accessory jar is useful for quiet operation. Locking collar and Blade Assembly Durable, one-piece blade design is coated for small capacity recipes and individual servings...
Instruction Manual
Page 10
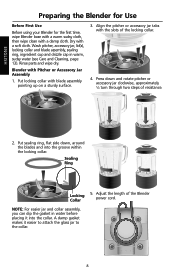
... Accessory Jar Assembly 1. Rinse parts and wipe dry. Align the pitcher or accessory jar tabs with the slots of the Blender power cord. sealing Ring Locking collar 5. Adjust the length of the locking collar. 4. Press down , around the blades and into the collar. Wash pitcher, accessory jar, lid(s), locking collar and blade assembly, sealing ring, ingredient cup and drizzle cap in water before placing it easier to attach the glass jar to the collar. 8 ENGLIsH Preparing the Blender for use Before first use Before using your Blender...
... Accessory Jar Assembly 1. Rinse parts and wipe dry. Align the pitcher or accessory jar tabs with the slots of the Blender power cord. sealing Ring Locking collar 5. Adjust the length of the locking collar. 4. Press down , around the blades and into the collar. Wash pitcher, accessory jar, lid(s), locking collar and blade assembly, sealing ring, ingredient cup and drizzle cap in water before placing it easier to attach the glass jar to the collar. 8 ENGLIsH Preparing the Blender for use Before first use Before using your Blender...

Instruction Manual
Page 11
... lock onto the accessory jar. Blender is now ready for use 6. To attach pitcher lid, push firmly into a grounded 3-prong outlet. If not, repeat steps 3 and 4. Before removing the pitcher or accessory jar from the base, always press OFF and unplug the power cord. 9 To attach the accessory jar lid, twist to follow these instructions can result in death, fire, or electrical shock. 8. Do not use an adapter. Put pitcher or accessory jar assembly onto the Blender base...
... lock onto the accessory jar. Blender is now ready for use 6. To attach pitcher lid, push firmly into a grounded 3-prong outlet. If not, repeat steps 3 and 4. Before removing the pitcher or accessory jar from the base, always press OFF and unplug the power cord. 9 To attach the accessory jar lid, twist to follow these instructions can result in death, fire, or electrical shock. 8. Do not use an adapter. Put pitcher or accessory jar assembly onto the Blender base...
Instruction Manual
Page 12
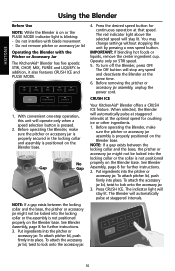
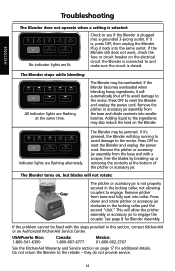
... locking collar and the base, the pitcher or accessory jar might not be locked into the locking collar or the assembly is properly positioned on the Blender base. Operate only on or the PULSE MODE indicator light is pressed. 2. Before removing the pitcher or accessory jar assembly, unplug the power cord. The Blender will operate only when a speed selection button is blinking: - You may change settings without stopping the unit by pressing a new speed button. With convenient one-step operation, this unit will automatically pulse...
... locking collar and the base, the pitcher or accessory jar might not be locked into the locking collar or the assembly is properly positioned on the Blender base. Operate only on or the PULSE MODE indicator light is pressed. 2. Before removing the pitcher or accessory jar assembly, unplug the power cord. The Blender will operate only when a speed selection button is blinking: - You may change settings without stopping the unit by pressing a new speed button. With convenient one-step operation, this unit will automatically pulse...
Instruction Manual
Page 13
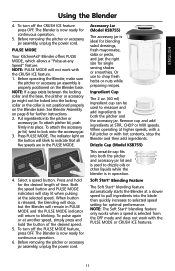
... Speed" feature. PuLsE MoDE Your KitchenAid® Blender offers PULSE MODE, which allows a "Pulse-at STIR, ChOP or MIx speeds. The indicator light on page 8 for continuous operation. 6. Before removing the pitcher or accessory jar assembly, unplug the power cord. Drizzle cap (Model KsB755) This versatile cap fits into both the pitcher and the accessory jar. NotE: The Soft Start® blending feature only works when a speed is used to measure and add ingredients to both the pitcher and accessory jar lid...
... Speed" feature. PuLsE MoDE Your KitchenAid® Blender offers PULSE MODE, which allows a "Pulse-at STIR, ChOP or MIx speeds. The indicator light on page 8 for continuous operation. 6. Before removing the pitcher or accessory jar assembly, unplug the power cord. Drizzle cap (Model KsB755) This versatile cap fits into both the pitcher and the accessory jar. NotE: The Soft Start® blending feature only works when a speed is used to measure and add ingredients to both the pitcher and accessory jar lid...

Instruction Manual
Page 14
... batter Mix Finely chopped fresh fruits . . . . . Crush Ice Finely chopped fresh vegetables Liquefy Frozen chopped fruit (defrost slightly until it can be probed with a spatula will be helpful only when Blender is off. Process up to crush and chop ice without adding any liquid ingredients. 12 ENGLIsH speed control Guide Item speed Blended ice drink Liquefy Cheesecake Liquefy Chopped fruits Pulse on Stir Chopped vegetables Pulse on Chop White sauce Stir tip...
... batter Mix Finely chopped fresh fruits . . . . . Crush Ice Finely chopped fresh vegetables Liquefy Frozen chopped fruit (defrost slightly until it can be probed with a spatula will be helpful only when Blender is off. Process up to crush and chop ice without adding any liquid ingredients. 12 ENGLIsH speed control Guide Item speed Blended ice drink Liquefy Cheesecake Liquefy Chopped fruits Pulse on Stir Chopped vegetables Pulse on Chop White sauce Stir tip...
Instruction Manual
Page 15
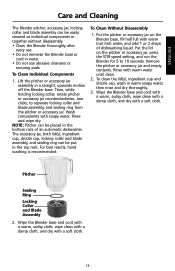
... Blender base. Rinse with a soft cloth. ENGLIsH care and cleaning The Blender pitcher, accessory jar, locking collar and blade assembly can be easily cleaned as individual components or together without disassembly. • Clean the Blender thoroughly after every use abrasive cleansers or scouring pads to clean Individual components 1. The accessory jar, both lid(s), ingredient cup, drizzle cap, locking collar and blade assembly, and sealing ring can be put in water • Do not use • Do not immerse the Blender base or cord...
... Blender base. Rinse with a soft cloth. ENGLIsH care and cleaning The Blender pitcher, accessory jar, locking collar and blade assembly can be easily cleaned as individual components or together without disassembly. • Clean the Blender thoroughly after every use abrasive cleansers or scouring pads to clean Individual components 1. The accessory jar, both lid(s), ingredient cup, drizzle cap, locking collar and blade assembly, and sealing ring can be put in water • Do not use • Do not immerse the Blender base or cord...
Instruction Manual
Page 16
... the KitchenAid Warranty and Service section on , but blades will allow the pitcher assembly or accessory jar to the retailer - Remove the pitcher or accessory jar assembly from the base and with the steps provided in the locking collar past the second "click." Remove pitcher from the base and divide contents into collar. Press OFF to reset the Blender and unplug the power cord. ENGLIsH troubleshooting the Blender does not operate when a setting is selected: No indicator lights are flashing...
... the KitchenAid Warranty and Service section on , but blades will allow the pitcher assembly or accessory jar to the retailer - Remove the pitcher or accessory jar assembly from the base and with the steps provided in the locking collar past the second "click." Remove pitcher from the base and divide contents into collar. Press OFF to reset the Blender and unplug the power cord. ENGLIsH troubleshooting the Blender does not operate when a setting is selected: No indicator lights are flashing...

Instruction Manual
Page 17
..., cover and blend on STIR until gelatin is running. • Cool hot foods, if possible, before using ice. • Smaller ice cubes can be chopped or crushed faster than large ones. • Add food to this glass Blender pitcher in larger quantities than you would with CRUSh ICE if you can of the pitcher or accessory jar lid to add liquids or ice cubes while the Blender is operating on LIQUEFY, pulsing...
..., cover and blend on STIR until gelatin is running. • Cool hot foods, if possible, before using ice. • Smaller ice cubes can be chopped or crushed faster than large ones. • Add food to this glass Blender pitcher in larger quantities than you would with CRUSh ICE if you can of the pitcher or accessory jar lid to add liquids or ice cubes while the Blender is operating on LIQUEFY, pulsing...
Instruction Manual
Page 18
... ½ to 1 inch (1.25 to Care and Cleaning, page 13. 16 Cook as usual. Add a few times, about 5 to 60 ml) broth, water, or milk per cup (235 ml) of fruit. For complete cleaning, pitcher, accessory jar, lid(s), ingredient cup, drizzle cap, and locking collar and blade assembly and sealing ring can also be cleaned in the pitcher. In PULSE MODE, cover and blend on STIR until well mixed, about...
... ½ to 1 inch (1.25 to Care and Cleaning, page 13. 16 Cook as usual. Add a few times, about 5 to 60 ml) broth, water, or milk per cup (235 ml) of fruit. For complete cleaning, pitcher, accessory jar, lid(s), ingredient cup, drizzle cap, and locking collar and blade assembly and sealing ring can also be cleaned in the pitcher. In PULSE MODE, cover and blend on STIR until well mixed, about...
Instruction Manual
Page 19
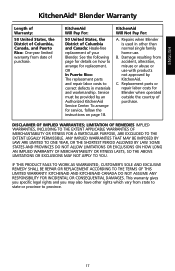
... District of columbia and canada: hassle-free replacement of your Blender. LIMItAtIoN of IMPLIED WARRANtIEs; IF ThIS PRODUCT FAILS TO WORK AS WARRANTED, CUSTOMER'S SOLE AND ExCLUSIVE REMEDY ShALL BE REPAIR OR REPLACEMENT ACCORDING TO ThE TERMS OF ThIS LIMITED WARRANTY. OR In Puerto Rico: The replacement parts and repair labor costs to province. 17 To arrange for service, follow the instructions on how to arrange...
... District of columbia and canada: hassle-free replacement of your Blender. LIMItAtIoN of IMPLIED WARRANtIEs; IF ThIS PRODUCT FAILS TO WORK AS WARRANTED, CUSTOMER'S SOLE AND ExCLUSIVE REMEDY ShALL BE REPAIR OR REPLACEMENT ACCORDING TO ThE TERMS OF ThIS LIMITED WARRANTY. OR In Puerto Rico: The replacement parts and repair labor costs to province. 17 To arrange for service, follow the instructions on how to arrange...

Instruction Manual
Page 20
... you receive your replacement Blender, use the carton and packing materials to correct defects in Puerto Rico Your KitchenAid® Blender is covered by an Authorized KitchenAid Service Center. Hassle-free Replacement Warranty - Your replacement Blender will arrange to deliver an identical or comparable replacement to your door free of charge and arrange to have your original Blender returned to us at: Customer experience Centre KitchenAid Canada 6750 Century Avenue...
... you receive your replacement Blender, use the carton and packing materials to correct defects in Puerto Rico Your KitchenAid® Blender is covered by an Authorized KitchenAid Service Center. Hassle-free Replacement Warranty - Your replacement Blender will arrange to deliver an identical or comparable replacement to your door free of charge and arrange to have your original Blender returned to us at: Customer experience Centre KitchenAid Canada 6750 Century Avenue...
Instruction Manual
Page 21
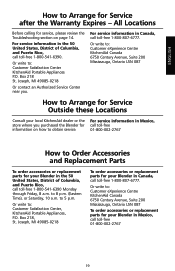
... Blender for call toll-free information on page 14. Or write to 8 p.m. (Eastern Time), or Saturday, 10 a.m. ENGLIsH How to Arrange for service, please review the Troubleshooting section on how to obtain service. 01-800-002-2767 How to order Accessories and Replacement Parts to order accessories or replacement parts for service information in Mexico, call toll-free 1-800-807-6777. for your local KitchenAid...
... Blender for call toll-free information on page 14. Or write to 8 p.m. (Eastern Time), or Saturday, 10 a.m. ENGLIsH How to Arrange for service, please review the Troubleshooting section on how to obtain service. 01-800-002-2767 How to order Accessories and Replacement Parts to order accessories or replacement parts for service information in Mexico, call toll-free 1-800-807-6777. for your local KitchenAid...


