Owners Manual
Page 3
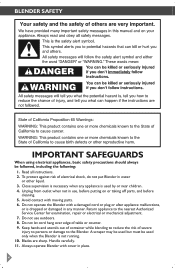
...in use the appliance outdoors. 8. Blades are closely supervised and instructed concerning the use of experience and knowledge, unless they do not put Blender in any appliance is not running. 10. This appliance is dropped or damaged in water or other liquid. 3. Avoid contact with the appliance.... 4. A scraper may be used but must be used only when the Blender is used by a person responsible for information on examination, repair, or adjustment. 7. To unplug, grasp the plug and pull from the outlet...
...in use the appliance outdoors. 8. Blades are closely supervised and instructed concerning the use of experience and knowledge, unless they do not put Blender in any appliance is not running. 10. This appliance is dropped or damaged in water or other liquid. 3. Avoid contact with the appliance.... 4. A scraper may be used but must be used only when the Blender is used by a person responsible for information on examination, repair, or adjustment. 7. To unplug, grasp the plug and pull from the outlet...
Owners Manual
Page 4
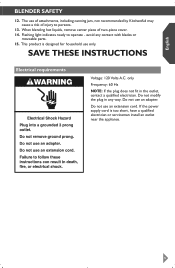
The use of attachments, including canning jars, not recommended by KitchenAid may cause a risk of injury to operate - avoid any contact...) motor reference reflects the horsepower output of motors. SAVE THESE INSTRUCTIONS This product is designed for the Blender motor was measured using a dynamometer, a machine that laboratories routinely use an extension cord. Do not... an extension cord. When blending hot liquids, remove center piece of the motor itself and not the Blender's horsepower output in death, fire, or electrical shock. Failure to measure the mechanical power of the ...
The use of attachments, including canning jars, not recommended by KitchenAid may cause a risk of injury to operate - avoid any contact...) motor reference reflects the horsepower output of motors. SAVE THESE INSTRUCTIONS This product is designed for the Blender motor was measured using a dynamometer, a machine that laboratories routinely use an extension cord. Do not... an extension cord. When blending hot liquids, remove center piece of the motor itself and not the Blender's horsepower output in death, fire, or electrical shock. Failure to measure the mechanical power of the ...

Owners Manual
Page 5
...Puree Pureed vegetables/Baby food vegetables 4 Puree Salad dressing 3 Mix Savory crumb topping . . . The Soft Start blending feature automatically starts the Blender at a lower speed to draw ingredients into the blades, then quickly increases to measure and add ingredients. Crush Ice, 5 Liquify Cheesecake 5 Liquify...the Pulse mode or Crush Ice features. Remove cup and add ingredients at higher speeds with a full pitcher or with hot contents, stop the Blender and then add ingredients. Pulse, 2 Chop Cream cheese-based spread . . . . . 1 Stir Cream soup 1 Stir Crushed/chopped ice...
...Puree Pureed vegetables/Baby food vegetables 4 Puree Salad dressing 3 Mix Savory crumb topping . . . The Soft Start blending feature automatically starts the Blender at a lower speed to draw ingredients into the blades, then quickly increases to measure and add ingredients. Crush Ice, 5 Liquify Cheesecake 5 Liquify...the Pulse mode or Crush Ice features. Remove cup and add ingredients at higher speeds with a full pitcher or with hot contents, stop the Blender and then add ingredients. Pulse, 2 Chop Cream cheese-based spread . . . . . 1 Stir Cream soup 1 Stir Crushed/chopped ice...
Owners Manual
Page 6
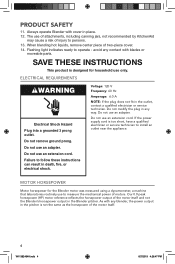
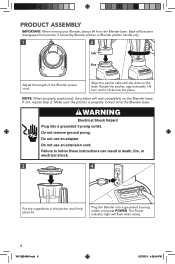
.... NOTE: When properly positioned, the pitcher will rest completely on the base. Do not remove ground prong. Plug the Blender into a grounded 3 prong outlet. If not, repeat step 2. WARNING Electrical Shock Hazard Plug into a grounded 3-prong outlet, and press POWER....the ingredients in the pitcher and firmly place lid. PRODUCT ASSEMBLY IMPORTANT: When moving your Blender, always lift from pitcher if carried by Blender pitcher or Blender pitcher handle only. 1 2 Tab Slot Adjust the length of the Blender power cord. Base will flash when ready. 6 W11382494A.indb 6 8/7/2019 4:26:48 ...
.... NOTE: When properly positioned, the pitcher will rest completely on the base. Do not remove ground prong. Plug the Blender into a grounded 3 prong outlet. If not, repeat step 2. WARNING Electrical Shock Hazard Plug into a grounded 3-prong outlet, and press POWER....the ingredients in the pitcher and firmly place lid. PRODUCT ASSEMBLY IMPORTANT: When moving your Blender, always lift from pitcher if carried by Blender pitcher or Blender pitcher handle only. 1 2 Tab Slot Adjust the length of the Blender power cord. Base will flash when ready. 6 W11382494A.indb 6 8/7/2019 4:26:48 ...

Owners Manual
Page 7
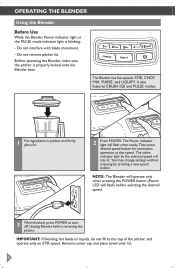
When finished, press POWER to the top of the pitcher, and operate only on 1 Stir speed. While the Blender Power indicator light or the Pulse mode indicator light is blinking: • Do not interfere with blade movement. • Do not remove pitcher lid. W11382494A.... stay lit. Remove center cap and place towel over lid. IMPORTANT: If blending hot foods or liquids, do not fill to turn off. Unplug the Blender before removing the pitcher. ENGLISH PRODUCT ASSEMBLY 5 6 Press desired speed (1 to 5) button for continuous operation at that speed.
When finished, press POWER to the top of the pitcher, and operate only on 1 Stir speed. While the Blender Power indicator light or the Pulse mode indicator light is blinking: • Do not interfere with blade movement. • Do not remove pitcher lid. W11382494A.... stay lit. Remove center cap and place towel over lid. IMPORTANT: If blending hot foods or liquids, do not fill to turn off. Unplug the Blender before removing the pitcher. ENGLISH PRODUCT ASSEMBLY 5 6 Press desired speed (1 to 5) button for continuous operation at that speed.

Owners Manual
Page 8
...speed for the desired amount of cubed ice. USING PULSE MODE 1 2 Put ingredients in pitcher and firmly place lid. When selected, the Blender will stay lit. The indicator light will automatically pulse for 30 seconds at staggered intervals at a time. Press POWER, then press and ... button for crushing ice or other ingredients. 1 2 Put ice cubes into the pitcher and firmly place lid. PRODUCT USAGE USING THE CRUSH ICE FUNCTION Blender offers a CRUSH ICE feature. When finished, press the Power to stop . 8 W11382494A.indb 8 8/7/2019 4:26:49 PM Release the button to ...
...speed for the desired amount of cubed ice. USING PULSE MODE 1 2 Put ingredients in pitcher and firmly place lid. When selected, the Blender will stay lit. The indicator light will automatically pulse for 30 seconds at staggered intervals at a time. Press POWER, then press and ... button for crushing ice or other ingredients. 1 2 Put ice cubes into the pitcher and firmly place lid. PRODUCT USAGE USING THE CRUSH ICE FUNCTION Blender offers a CRUSH ICE feature. When finished, press the Power to stop . 8 W11382494A.indb 8 8/7/2019 4:26:49 PM Release the button to ...
Owners Manual
Page 9
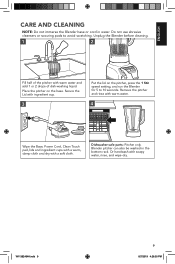
... or cord in the bottom rack. Place the pitcher on the pitcher, press the 1 Stir speed setting, and run the Blender for 5 to avoid scratching. Blender pitcher can also be washed in water. W11382494A.indb 9 9 8/7/2019 4:26:50 PM Secure the Lid with a soft cloth. Dishwasher-safe parts: Pitcher only. Do ...
... or cord in the bottom rack. Place the pitcher on the pitcher, press the 1 Stir speed setting, and run the Blender for 5 to avoid scratching. Blender pitcher can also be washed in water. W11382494A.indb 9 9 8/7/2019 4:26:50 PM Secure the Lid with a soft cloth. Dishwasher-safe parts: Pitcher only. Do ...

Owners Manual
Page 10
... key. Retailers do not provide service. 10 W11382494A.indb 10 8/7/2019 4:26:50 PM Do not use an adapter. Press POWER; then unplug the Blender. Remove the pitcher from all indicator lights are stuck or not blending: Solution Check to one light is closed. If the... Blender still does not work, check the fuse or circuit breaker on the electrical circuit the Blender is plugged in death, fire, or electrical shock. Press POWER to turn off to follow these instructions...
... key. Retailers do not provide service. 10 W11382494A.indb 10 8/7/2019 4:26:50 PM Do not use an adapter. Press POWER; then unplug the Blender. Remove the pitcher from all indicator lights are stuck or not blending: Solution Check to one light is closed. If the... Blender still does not work, check the fuse or circuit breaker on the electrical circuit the Blender is plugged in death, fire, or electrical shock. Press POWER to turn off to follow these instructions...
Owners Manual
Page 11
...IMPOSED BY LAW ARE LIMITED TO ONE YEAR, OR THE SHORTEST PERIOD ALLOWED BY LAW. KITCHENAID AND KITCHENAID CANADA DO NOT ASSUME ANY RESPONSIBILITY FOR INCIDENTAL OR CONSEQUENTIAL DAMAGES. Repairs when Blender is used in other rights which vary from state to state or province to province. C.... gives you specific legal rights and you may also have other than normal single family home use. D. ENGLISH WARRANTY AND SERVICE KITCHENAID® BLENDER WARRANTY FOR THE 50 UNITED STATES, THE DISTRICT OF COLUMBIA, PUERTO RICO, AND CANADA This warranty extends to the purchaser and any...
...IMPOSED BY LAW ARE LIMITED TO ONE YEAR, OR THE SHORTEST PERIOD ALLOWED BY LAW. KITCHENAID AND KITCHENAID CANADA DO NOT ASSUME ANY RESPONSIBILITY FOR INCIDENTAL OR CONSEQUENTIAL DAMAGES. Repairs when Blender is used in other rights which vary from state to state or province to province. C.... gives you specific legal rights and you may also have other than normal single family home use. D. ENGLISH WARRANTY AND SERVICE KITCHENAID® BLENDER WARRANTY FOR THE 50 UNITED STATES, THE DISTRICT OF COLUMBIA, PUERTO RICO, AND CANADA This warranty extends to the purchaser and any...
Owners Manual
Page 12
...re so confident the quality of our products meets the exacting standards of KitchenAid that , if your Blender should fail within the first year of ownership, take the Blender or ship collect to an Authorized KitchenAid Service Centre. Your replacement unit will also be covered by our one year..., MI 49085-0218 Outside the United States and Puerto Rico: Consult your local KitchenAid dealer or the store where you receive your replacement Blender, use the carton and packing materials to pack up your Blender should fail within the first year of purchase (register receipt, credit card slip,...
...re so confident the quality of our products meets the exacting standards of KitchenAid that , if your Blender should fail within the first year of ownership, take the Blender or ship collect to an Authorized KitchenAid Service Centre. Your replacement unit will also be covered by our one year..., MI 49085-0218 Outside the United States and Puerto Rico: Consult your local KitchenAid dealer or the store where you receive your replacement Blender, use the carton and packing materials to pack up your Blender should fail within the first year of purchase (register receipt, credit card slip,...
Owners Manual 1
Page 3
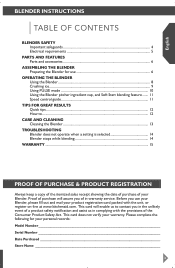
...when a setting is selected 14 Blender stops while blending 14 WARRANTY...15 Proof of Purchase & Product Registration Always keep a copy of the itemized sales receipt showing the date of purchase of in complying with the unit, or register on-line at www.kitchenaid.com. Please complete the following... for great results Quick tips...12 How to contact you in the unlikely event of a product safety notification and assist us in -warranty service. Before you of your Blender. This card will assure you use 6...
...when a setting is selected 14 Blender stops while blending 14 WARRANTY...15 Proof of Purchase & Product Registration Always keep a copy of the itemized sales receipt showing the date of purchase of in complying with the unit, or register on-line at www.kitchenaid.com. Please complete the following... for great results Quick tips...12 How to contact you in the unlikely event of a product safety notification and assist us in -warranty service. Before you of your Blender. This card will assure you use 6...
Owners Manual 1
Page 4
Avoid contact with cover in water or other liquid. 3. Do not let cord hang over edge of electrical shock, do not put Blender in place. 4 Do not operate the Blender with a damaged cord or plug or after appliance malfunctions, or is dropped or damaged in use outdoors. 8. Do not use , ...before putting on or taking off parts, and before cleaning. 5. Always operate Blender with moving parts. 6. Unplug from outlet when not in any appliance is used by or near children. 4. Keep hands and utensils out of container while...
Avoid contact with cover in water or other liquid. 3. Do not let cord hang over edge of electrical shock, do not put Blender in place. 4 Do not operate the Blender with a damaged cord or plug or after appliance malfunctions, or is dropped or damaged in use outdoors. 8. Do not use , ...before putting on or taking off parts, and before cleaning. 5. Always operate Blender with moving parts. 6. Unplug from outlet when not in any appliance is used by or near children. 4. Keep hands and utensils out of container while...
Owners Manual 1
Page 5
... too short, have a qualified electrician or serviceman install an outlet near the appliance. 5 When blending hot liquids, remove center piece of injury to operate - English Blender Safety 12. The use only. If the power supply cord is designed for household use of attachments, including canning jars, not recommended by...
... too short, have a qualified electrician or serviceman install an outlet near the appliance. 5 When blending hot liquids, remove center piece of injury to operate - English Blender Safety 12. The use only. If the power supply cord is designed for household use of attachments, including canning jars, not recommended by...
Owners Manual 1
Page 6
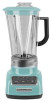
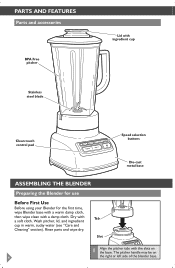
...(see "Care and Cleaning" section). Tab Slot 1 Align the pitcher tabs with the slots on 6 the right or left side of the blender base. Dry with a damp cloth. Parts and Features Parts and accessories BPA Free pitcher Stainless steel blade Lid with ingredient cup Clean touch control... pad Speed selection buttons Die-cast metal base Assembling the blender Preparing the Blender for use Before First Use Before using your Blender for the first time, wipe Blender base with a warm damp cloth, then wipe clean with a soft cloth.
...(see "Care and Cleaning" section). Tab Slot 1 Align the pitcher tabs with the slots on 6 the right or left side of the blender base. Dry with a damp cloth. Parts and Features Parts and accessories BPA Free pitcher Stainless steel blade Lid with ingredient cup Clean touch control... pad Speed selection buttons Die-cast metal base Assembling the blender Preparing the Blender for use Before First Use Before using your Blender for the first time, wipe Blender base with a warm damp cloth, then wipe clean with a soft cloth.
Owners Manual 1
Page 7
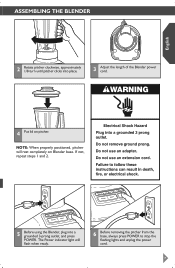
The Power indicator light will rest completely on pitcher. If not, repeat steps 1 and 2. 5 Before using the Blender, plug into place. 3 Adjust the length of the Blender power cord. 4 Put lid on Blender base. NOTE: When properly positioned, pitcher will flash when ready. 6 Before removing the pitcher from the base, always press POWER to stop the flashing lights and unplug the power cord. 7 English Assembling the blender 2 Rotate pitcher clockwise, approximately 1/8 turn until pitcher clicks into a grounded 3-prong outlet, and press POWER.
The Power indicator light will rest completely on pitcher. If not, repeat steps 1 and 2. 5 Before using the Blender, plug into place. 3 Adjust the length of the Blender power cord. 4 Put lid on Blender base. NOTE: When properly positioned, pitcher will flash when ready. 6 Before removing the pitcher from the base, always press POWER to stop the flashing lights and unplug the power cord. 7 English Assembling the blender 2 Rotate pitcher clockwise, approximately 1/8 turn until pitcher clicks into a grounded 3-prong outlet, and press POWER.
Owners Manual 1
Page 8
...not remove pitcher lid. It also features CRUSH ICE and PULSE modes. 1 Put ingredients in pitcher and firmly place lid. 2 Press POWER. Unplug Blender before selecting the desired speed. 3 When finished, press POWER to the top of the pitcher, and operate only on STIR speed. Do not interfere... to turn off. Remove center cap and place towel over lid. 8 The Power indicator light will flash) before removing the pitcher. NOTE: The Blender will operate only when pressing the POWER button (Power LED will flash when ready. The white indicator light by pressing a new speed button. Before ...
...not remove pitcher lid. It also features CRUSH ICE and PULSE modes. 1 Put ingredients in pitcher and firmly place lid. 2 Press POWER. Unplug Blender before selecting the desired speed. 3 When finished, press POWER to the top of the pitcher, and operate only on STIR speed. Do not interfere... to turn off. Remove center cap and place towel over lid. 8 The Power indicator light will flash) before removing the pitcher. NOTE: The Blender will operate only when pressing the POWER button (Power LED will flash when ready. The white indicator light by pressing a new speed button. Before ...

Owners Manual 1
Page 9
... timed function is properly positioned on the base. 2 Put ingredients into the pitcher and firmly place lid. Unplug Blender before removing the pitcher. When selected, the Blender will automatically pulse for 30 seconds at staggered intervals at a time. Occasional stirring with a spatula will stop. The...7 standard ice cubes at the optimal speed for crushing ice or other ingredients. 1 Before operating the Blender, make sure the pitcher is finished, Blender will be helpful only when Blender is off . TIP: Process up to crush and chop ice without adding any liquid ingredients. 9 ...
... timed function is properly positioned on the base. 2 Put ingredients into the pitcher and firmly place lid. Unplug Blender before removing the pitcher. When selected, the Blender will automatically pulse for 30 seconds at staggered intervals at a time. Occasional stirring with a spatula will stop. The...7 standard ice cubes at the optimal speed for crushing ice or other ingredients. 1 Before operating the Blender, make sure the pitcher is finished, Blender will be helpful only when Blender is off . TIP: Process up to crush and chop ice without adding any liquid ingredients. 9 ...

Owners Manual 1
Page 10
... sure the pitcher is released and the Pulse indicator will resume blinking. Unplug Blender before removing the pitcher. 10 Blending will stop when Pulse button is properly positioned on the base. The indicator lights above the Pulse button and ... and hold the desired speed button. 5 When finished, press POWER to indicate that all five speeds will stay lit when pulsing. operating THE blender Using PULSE mode Your Blender offers a PULSE mode, which allows a "Pulse-at another speed, just press and hold a speed button for the desired length of time. Both the...
... sure the pitcher is released and the Pulse indicator will resume blinking. Unplug Blender before removing the pitcher. 10 Blending will stop when Pulse button is properly positioned on the base. The indicator lights above the Pulse button and ... and hold the desired speed button. 5 When finished, press POWER to indicate that all five speeds will stay lit when pulsing. operating THE blender Using PULSE mode Your Blender offers a PULSE mode, which allows a "Pulse-at another speed, just press and hold a speed button for the desired length of time. Both the...

Owners Manual 1
Page 11
...-based drink (thin). . The Soft Start blending feature only works when a speed is selected and does not work with hot contents, stop the Blender and then add ingredients. When operating at higher speeds with a full pitcher or with the PULSE mode or CRUSH ICE features. Crush Ice, 5 ... (defrost slightly until it can be probed with the CRUSH ICE feature, or for hot liquids. • The Soft Start blending feature automatically starts the Blender at STIR, CHOP, or MIX speeds. Crush Ice, 5 Liquify Fruit-based drink (thick). . . . Speed control guide Item Speed Blended ice drink ...
...-based drink (thin). . The Soft Start blending feature only works when a speed is selected and does not work with hot contents, stop the Blender and then add ingredients. When operating at higher speeds with a full pitcher or with the PULSE mode or CRUSH ICE features. Crush Ice, 5 ... (defrost slightly until it can be probed with the CRUSH ICE feature, or for hot liquids. • The Soft Start blending feature automatically starts the Blender at STIR, CHOP, or MIX speeds. Crush Ice, 5 Liquify Fruit-based drink (thick). . . . Speed control guide Item Speed Blended ice drink ...

Owners Manual 1
Page 12
... about 4 cm in diameter. Begin blending warm foods at a time, if necessary. • When blending hot foods or liquids, do not fill the blender pitcher to 10 seconds. add gelatin. Make cookie, cracker, or bread crumbs: Break cookies, crackers, or bread into pieces about 5 to the top. ...Quick tips • If you're making beverages using utensils in pitcher. Operate only on top. Use a rubber spatula to mix ingredients only when the Blender is running. • Cool hot foods, if possible, before using ice, start with CRUSH ICE, then finish with Speed 5 LIQUIFY in order to...
... about 4 cm in diameter. Begin blending warm foods at a time, if necessary. • When blending hot foods or liquids, do not fill the blender pitcher to 10 seconds. add gelatin. Make cookie, cracker, or bread crumbs: Break cookies, crackers, or bread into pieces about 5 to the top. ...Quick tips • If you're making beverages using utensils in pitcher. Operate only on top. Use a rubber spatula to mix ingredients only when the Blender is running. • Cool hot foods, if possible, before using ice, start with CRUSH ICE, then finish with Speed 5 LIQUIFY in order to...


