Owners Manual
Page 2
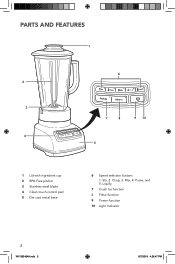
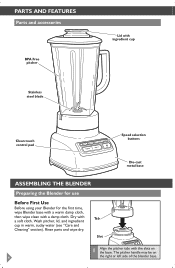
PARTS AND FEATURES 1 6 2 3 7 8 9 10 4 5 1 Lid with ingredient cup 2 BPA Free pitcher 3 Stainless steel blade 4 Clean touch control pad 5 Die-cast metal base 6 Speed selection buttons 1: Stir, 2: Chop, 3: Mix, 4: Puree, and 5: Liquify. 7 Crush Ice function 8 Pulse function 9 Power function 10 Light Indicator 2 W11382494A.indb 2 8/7/2019 4:26:47 PM
PARTS AND FEATURES 1 6 2 3 7 8 9 10 4 5 1 Lid with ingredient cup 2 BPA Free pitcher 3 Stainless steel blade 4 Clean touch control pad 5 Die-cast metal base 6 Speed selection buttons 1: Stir, 2: Chop, 3: Mix, 4: Puree, and 5: Liquify. 7 Crush Ice function 8 Pulse function 9 Power function 10 Light Indicator 2 W11382494A.indb 2 8/7/2019 4:26:47 PM
Owners Manual
Page 3
... the appliance. 4. Do not use , before assembling or disassembling parts and before cleaning. W11382494A.indb 3 3 8/7/2019 4:26:47 PM Read all instructions. 2. To protect against the risk of the appliance by a person responsible for their customer service telephone number for use of electrical shock, do not play with moving parts. 6. To unplug, grasp the plug and pull from the power cord. 5. Never pull from...
... the appliance. 4. Do not use , before assembling or disassembling parts and before cleaning. W11382494A.indb 3 3 8/7/2019 4:26:47 PM Read all instructions. 2. To protect against the risk of the appliance by a person responsible for their customer service telephone number for use of electrical shock, do not play with moving parts. 6. To unplug, grasp the plug and pull from the power cord. 5. Never pull from...
Owners Manual
Page 4
... service technician to install an outlet near the appliance. Do not use an extension cord. Do not use an extension cord. Do not use an adapter. Our 0.9 peak horsepower (HP) motor reference reflects the horsepower output of two-piece cover. 14. Flashing light indicates ready to follow these instructions can result in any contact with any blender, the power output in place. 12. Failure to operate - When blending...
... service technician to install an outlet near the appliance. Do not use an extension cord. Do not use an extension cord. Do not use an adapter. Our 0.9 peak horsepower (HP) motor reference reflects the horsepower output of two-piece cover. 14. Flashing light indicates ready to follow these instructions can result in any contact with any blender, the power output in place. 12. Failure to operate - When blending...

Owners Manual
Page 5
.... Pulse, 2 Chop Sweet crunch topping. . . . Pulse, 2 Chop Sherbet-based drink. . . . 1 Stir, 5 Liquify Smooth ricotta or cottage cheese 1 Stir, 3 Mix Streusel topping 2 Chop Sweet crumb topping. . . . The Soft Start blending feature only works when a speed is selected and does not work with hot contents, stop the Blender and then add ingredients. Crush Ice, 5 Liquify Fruit-based drink (thick). ENGLISH GETTING STARTED First, clean all parts and accessories (see "Care and Cleaning...
.... Pulse, 2 Chop Sweet crunch topping. . . . Pulse, 2 Chop Sherbet-based drink. . . . 1 Stir, 5 Liquify Smooth ricotta or cottage cheese 1 Stir, 3 Mix Streusel topping 2 Chop Sweet crumb topping. . . . The Soft Start blending feature only works when a speed is selected and does not work with hot contents, stop the Blender and then add ingredients. Crush Ice, 5 Liquify Fruit-based drink (thick). ENGLISH GETTING STARTED First, clean all parts and accessories (see "Care and Cleaning...
Owners Manual
Page 6
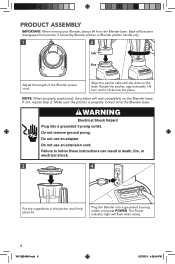
... Blender power cord. Do not use an extension cord. Failure to follow these instructions can result in death, fire, or electrical shock. 3 4 Put the ingredients in the pitcher and firmly place lid. Make sure the pitcher is properly locked onto the Blender base. If not, repeat step 2. The Power indicator light will rest completely on the base. Base will become disengaged from the Blender base. Do not use an adapter...
... Blender power cord. Do not use an extension cord. Failure to follow these instructions can result in death, fire, or electrical shock. 3 4 Put the ingredients in the pitcher and firmly place lid. Make sure the pitcher is properly locked onto the Blender base. If not, repeat step 2. The Power indicator light will rest completely on the base. Base will become disengaged from the Blender base. Do not use an adapter...

Owners Manual
Page 7
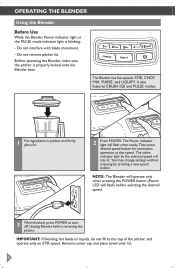
... operate only on 1 Stir speed. Remove center cap and place towel over lid. While the Blender Power indicator light or the Pulse mode indicator light is blinking: • Do not interfere with blade movement. • Do not remove pitcher lid. IMPORTANT: If blending hot foods or liquids, do not fill to turn off. Unplug the Blender before removing the pitcher. ENGLISH PRODUCT ASSEMBLY 5 6 Press desired speed (1 to 5) button for continuous operation at that speed. The white indicator light...
... operate only on 1 Stir speed. Remove center cap and place towel over lid. While the Blender Power indicator light or the Pulse mode indicator light is blinking: • Do not interfere with blade movement. • Do not remove pitcher lid. IMPORTANT: If blending hot foods or liquids, do not fill to turn off. Unplug the Blender before removing the pitcher. ENGLISH PRODUCT ASSEMBLY 5 6 Press desired speed (1 to 5) button for continuous operation at that speed. The white indicator light...
Owners Manual
Page 9
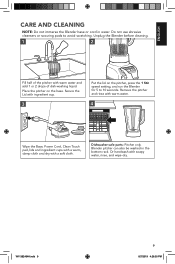
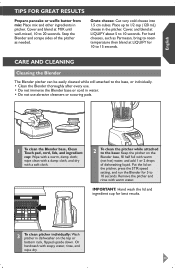
... wipe dry. Place the pitcher on the pitcher, press the 1 Stir speed setting, and run the Blender for 5 to avoid scratching. Remove the pitcher and rinse with warm water. 4 Wipe the Base, Power Cord, Clean Touch pad, lids and ingredient cups with a warm, damp cloth and dry with warm water and add 1 or 2 drops of dish-washing liquid. Blender pitcher can also be washed in...
... wipe dry. Place the pitcher on the pitcher, press the 1 Stir speed setting, and run the Blender for 5 to avoid scratching. Remove the pitcher and rinse with warm water. 4 Wipe the Base, Power Cord, Clean Touch pad, lids and ingredient cups with a warm, damp cloth and dry with warm water and add 1 or 2 drops of dish-washing liquid. Blender pitcher can also be washed in...

Owners Manual
Page 10
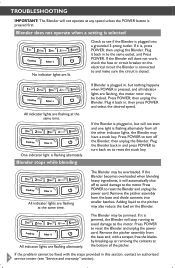
... shock. Remove the pitcher and use an extension cord. Do not use a spatula to one light is not due to rearrange ingredients in the pitcher may have a stuck key. For certain recipes, adding liquid in the pitcher. Press POWER; then unplug the Blender. The motor rotor may be locked. then press POWER and select the desired speed. If the problem is flashing alternately from the Base, and use an adapter.
... shock. Remove the pitcher and use an extension cord. Do not use a spatula to one light is not due to rearrange ingredients in the pitcher may have a stuck key. For certain recipes, adding liquid in the pitcher. Press POWER; then unplug the Blender. The motor rotor may be locked. then press POWER and select the desired speed. If the problem is flashing alternately from the Base, and use an adapter.
Owners Manual
Page 11
... single family home use. ENGLISH WARRANTY AND SERVICE KITCHENAID® BLENDER WARRANTY FOR THE 50 UNITED STATES, THE DISTRICT OF COLUMBIA, PUERTO RICO, AND CANADA This warranty extends to the purchaser and any succeeding owner for service, or call the Customer eXperience Center toll-free at 1-800-541-6390. Length of Warranty: KitchenAid Will Pay for Blender operated outside the 50 United States, District of purchase. Replacement parts or repair...
... single family home use. ENGLISH WARRANTY AND SERVICE KITCHENAID® BLENDER WARRANTY FOR THE 50 UNITED STATES, THE DISTRICT OF COLUMBIA, PUERTO RICO, AND CANADA This warranty extends to the purchaser and any succeeding owner for service, or call the Customer eXperience Center toll-free at 1-800-541-6390. Length of Warranty: KitchenAid Will Pay for Blender operated outside the 50 United States, District of purchase. Replacement parts or repair...
Owners Manual
Page 12
... accessories or replacement parts, call our toll-free Customer eXperience Center at : Customer eXperience Centre KitchenAid Canada 200 - 6750 Century Ave. If your Blender should fail within the first year of ownership, take the Blender or ship collect to initiate the claim. Proof of purchase will be required to an Authorized KitchenAid Service Centre. Please follow these instructions to receive this quality service. Your replacement Blender...
... accessories or replacement parts, call our toll-free Customer eXperience Center at : Customer eXperience Centre KitchenAid Canada 200 - 6750 Century Ave. If your Blender should fail within the first year of ownership, take the Blender or ship collect to initiate the claim. Proof of purchase will be required to an Authorized KitchenAid Service Centre. Please follow these instructions to receive this quality service. Your replacement Blender...
Owners Manual 1
Page 3
... blender Using the Blender 8 Crushing ice...9 Using PULSE mode 10 Using the Blender pitcher ingredient cup, and Soft Start blending feature....... 11 Speed control guide 11 Tips for great results Quick tips...12 How to contact you of in complying with the unit, or register on-line at www.kitchenaid.com. Proof of purchase will enable us to ...12 CARE AND CLEANING Cleaning the Blender 13 Troubleshooting Blender does not operate when a setting...
... blender Using the Blender 8 Crushing ice...9 Using PULSE mode 10 Using the Blender pitcher ingredient cup, and Soft Start blending feature....... 11 Speed control guide 11 Tips for great results Quick tips...12 How to contact you of in complying with the unit, or register on-line at www.kitchenaid.com. Proof of purchase will enable us to ...12 CARE AND CLEANING Cleaning the Blender 13 Troubleshooting Blender does not operate when a setting...
Owners Manual 1
Page 4
Read all instructions. 2. Unplug from outlet when not in place. 4 Return appliance to the Blender. Blades are sharp. Handle carefully. 11. Always operate Blender with cover in use outdoors. 8. Keep hands and utensils out of container while blending to reduce the risk of table or counter. 9. To protect against risk of electrical shock, do not put Blender in any appliance is not running...
Read all instructions. 2. Unplug from outlet when not in place. 4 Return appliance to the Blender. Blades are sharp. Handle carefully. 11. Always operate Blender with cover in use outdoors. 8. Keep hands and utensils out of container while blending to reduce the risk of table or counter. 9. To protect against risk of electrical shock, do not put Blender in any appliance is not running...
Owners Manual 1
Page 5
... use of attachments, including canning jars, not recommended by KitchenAid may cause a risk of two-piece cover. 14. avoid any way. This product is too short, have a qualified electrician or serviceman install an outlet near the appliance. 5 only Frequency: 60 Hz NOTE: If the plug does not fit in any contact with blades or moveable parts. 15. English Blender Safety 12. Flashing light...
... use of attachments, including canning jars, not recommended by KitchenAid may cause a risk of two-piece cover. 14. avoid any way. This product is too short, have a qualified electrician or serviceman install an outlet near the appliance. 5 only Frequency: 60 Hz NOTE: If the plug does not fit in any contact with blades or moveable parts. 15. English Blender Safety 12. Flashing light...
Owners Manual 1
Page 6
... of the blender base. The pitcher handle may be on the base. Parts and Features Parts and accessories BPA Free pitcher Stainless steel blade Lid with ingredient cup Clean touch control pad Speed selection buttons Die-cast metal base Assembling the blender Preparing the Blender for use Before First Use Before using your Blender for the first time, wipe Blender base with a warm damp cloth, then wipe clean with a damp cloth. Wash pitcher, lid, and ingredient cup in warm...
... of the blender base. The pitcher handle may be on the base. Parts and Features Parts and accessories BPA Free pitcher Stainless steel blade Lid with ingredient cup Clean touch control pad Speed selection buttons Die-cast metal base Assembling the blender Preparing the Blender for use Before First Use Before using your Blender for the first time, wipe Blender base with a warm damp cloth, then wipe clean with a damp cloth. Wash pitcher, lid, and ingredient cup in warm...
Owners Manual 1
Page 8
... the pitcher, and operate only on STIR speed. Then press desired speed button for continuous operation at that speed. OPERATING the blender Using the Blender Before Use While the Blender Power indicator light or the PULSE mode indicator light is properly locked onto the Blender base. The white indicator light by pressing a new speed button. You may change settings without stopping by the selected speed will flash when ready. Do not remove pitcher lid. It also features CRUSH ICE and PULSE modes. 1 Put ingredients in pitcher and...
... the pitcher, and operate only on STIR speed. Then press desired speed button for continuous operation at that speed. OPERATING the blender Using the Blender Before Use While the Blender Power indicator light or the PULSE mode indicator light is properly locked onto the Blender base. The white indicator light by pressing a new speed button. You may change settings without stopping by the selected speed will flash when ready. Do not remove pitcher lid. It also features CRUSH ICE and PULSE modes. 1 Put ingredients in pitcher and...

Owners Manual 1
Page 12
..., remove center ingredient cup of gravy: If sauce or gravy becomes lumpy, place in pitcher. Operate only on STIR 10 seconds. Take lumps out of pitcher lid to 10 seconds. In pulse mode, cover and blend at LIQUIFY, pulsing a few times, about 3 seconds each time, until smooth, about 4 cm in diameter and place in pitcher. Cover and blend at STIR, CHOP, or MIX speeds. • Stop...
..., remove center ingredient cup of gravy: If sauce or gravy becomes lumpy, place in pitcher. Operate only on STIR 10 seconds. Take lumps out of pitcher lid to 10 seconds. In pulse mode, cover and blend at LIQUIFY, pulsing a few times, about 3 seconds each time, until smooth, about 4 cm in diameter and place in pitcher. Cover and blend at STIR, CHOP, or MIX speeds. • Stop...
Owners Manual 1
Page 13
.... 1 To clean the Blender base, Clean Touch pad, cord, lids, and ingredient cup: Wipe with soapy water, rinse, and wipe dry. 13 Put the lid on the pitcher, press the STIR speed setting, and run the Blender for 5 to 1/2 cup (120 mL) cheese in water. • Do not use . • Do not immerse the Blender base or cord in the pitcher. Or handwash with a warm, damp cloth; Remove the pitcher and...
.... 1 To clean the Blender base, Clean Touch pad, cord, lids, and ingredient cup: Wipe with soapy water, rinse, and wipe dry. 13 Put the lid on the pitcher, press the STIR speed setting, and run the Blender for 5 to 1/2 cup (120 mL) cheese in water. • Do not use . • Do not immerse the Blender base or cord in the pitcher. Or handwash with a warm, damp cloth; Remove the pitcher and...
Owners Manual 1
Page 14
... the motor. Blender stops while blending If Blender is plugged in , but nothing happens when POWER is selected No indicator lights are flashing, the motor rotor may be jammed. The Blender may be locked. If it is closed. Press POWER; One indicator light is , press POWER; All indicator lights are flashing at any speed unless the POWER button is pressed first. All indicator lights are flashing alternately. Remove the pitcher assembly from the base and...
... the motor. Blender stops while blending If Blender is plugged in , but nothing happens when POWER is selected No indicator lights are flashing, the motor rotor may be jammed. The Blender may be locked. If it is closed. Press POWER; One indicator light is , press POWER; All indicator lights are flashing at any speed unless the POWER button is pressed first. All indicator lights are flashing alternately. Remove the pitcher assembly from the base and...
Owners Manual 1
Page 15
... purchaser and any succeeding owner for Blender operated in the 50 United States, the District of Columbia, Puerto Rico, and Canada. KitchenAid Will A. B. Replacement parts or repair labor costs for : normal single family home use. ANY IMPLIED WARRANTIES THAT MAY BE IMPOSED BY LAW ARE LIMITED TO ONE YEAR, OR THE SHORTEST PERIOD ALLOWED BY LAW. This warranty gives you specific legal rights and...
... purchaser and any succeeding owner for Blender operated in the 50 United States, the District of Columbia, Puerto Rico, and Canada. KitchenAid Will A. B. Replacement parts or repair labor costs for : normal single family home use. ANY IMPLIED WARRANTIES THAT MAY BE IMPOSED BY LAW ARE LIMITED TO ONE YEAR, OR THE SHORTEST PERIOD ALLOWED BY LAW. This warranty gives you specific legal rights and...
Owners Manual 1
Page 16
... Blender for Service after the Warranty Expires, or Ordering Accessories and Replacement Parts In the United States and Puerto Rico: For service information, or to order accessories or replacement parts, call our toll-free Customer eXperience Center at 1-800-541-6390 or write to : Customer eXperience Centre KitchenAid Canada 200 - 6750 Century Ave. Or write to us . Box 218, St. Used under license in Canada: Call toll-free...
... Blender for Service after the Warranty Expires, or Ordering Accessories and Replacement Parts In the United States and Puerto Rico: For service information, or to order accessories or replacement parts, call our toll-free Customer eXperience Center at 1-800-541-6390 or write to : Customer eXperience Centre KitchenAid Canada 200 - 6750 Century Ave. Or write to us . Box 218, St. Used under license in Canada: Call toll-free...


