
Dimension Guide
Page 1
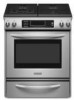
... the side wall or other (15.2 cm) installation of the range to change materials and specifications without notice. Ref. ® 30" Freestanding and Slide-In Gas Range PRODUCT MODEL NUMBERS KGRS807S KGRS807X KGSK901S KGSS907S KGSS907X GAS SUPPLY REQUIREMENTS Use ³⁄₄" (1.9 cm) rigid pipe gas supply line to improve Dimensions are for planning purposes only. With...
... the side wall or other (15.2 cm) installation of the range to change materials and specifications without notice. Ref. ® 30" Freestanding and Slide-In Gas Range PRODUCT MODEL NUMBERS KGRS807S KGRS807X KGSK901S KGSS907S KGSS907X GAS SUPPLY REQUIREMENTS Use ³⁄₄" (1.9 cm) rigid pipe gas supply line to improve Dimensions are for planning purposes only. With...

Installation Guide
Page 4
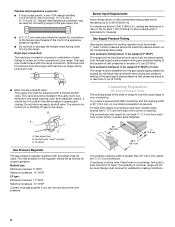
...needed ■ Tape measure ■ Masking tape Rear Filler Strip (optional) The filler strip may require longer screws to anchor bracket to LP gas B ■ Level 4.8 mm) carbide-tipped masonry drill bit (for C ■ Hand or electric drill concrete/ceramic floors) ■ Hammer...wrench nut driver 3.2 mm) drill bit (for convenient use in a freestanding range cutout. To install the antitip bracket shipped with the range, see the "Assistance or Service" section of the slide-in range and the wall in the kitchen. ■ Recessed installations must be avoided....
...needed ■ Tape measure ■ Masking tape Rear Filler Strip (optional) The filler strip may require longer screws to anchor bracket to LP gas B ■ Level 4.8 mm) carbide-tipped masonry drill bit (for C ■ Hand or electric drill concrete/ceramic floors) ■ Hammer...wrench nut driver 3.2 mm) drill bit (for convenient use in a freestanding range cutout. To install the antitip bracket shipped with the range, see the "Assistance or Service" section of the slide-in range and the wall in the kitchen. ■ Recessed installations must be avoided....

Installation Guide
Page 5
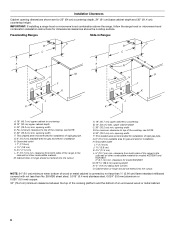
... (61 cm) base cabinet. See "Gas Supply Requirements" section. ■ Contact a qualified floor covering installer to rear of cooktop edge with 25" (63.5 cm) countertop; In Canada, the installation of this range is adequate as long as it must ...Title 24, HUD Part 280). Additional Installation Requirements The installation of this range must be available. When such standard is required. Freestanding Range Product Dimensions Slide-in Range B A A F C* B* D* C E D E** F** A. 5³⁄₄" (14.6 cm) B. 30" (76.2 cm) C. 41³⁄₄" (106 cm) overall...
... (61 cm) base cabinet. See "Gas Supply Requirements" section. ■ Contact a qualified floor covering installer to rear of cooktop edge with 25" (63.5 cm) countertop; In Canada, the installation of this range is adequate as long as it must ...Title 24, HUD Part 280). Additional Installation Requirements The installation of this range must be available. When such standard is required. Freestanding Range Product Dimensions Slide-in Range B A A F C* B* D* C E D E** F** A. 5³⁄₄" (14.6 cm) B. 30" (76.2 cm) C. 41³⁄₄" (106 cm) overall...
Installation Guide
Page 6
....2 cm) available area for gas and electric installation H. clearance from both sides of the range to the side wall or other combustible material. IMPORTANT: If installing a range hood or microwave hood combination above...30" (76.2 cm) min. clearance for dimensional clearances above the range, follow the range hood or microwave hood combination installation instructions for model KGSK901 M. 22 58.3 cm) opening depth N. ¾" (1.9 cm) radius both sides of the cooktop, see NOTE. Cabinet door or hinge should not extend into the cutout. Freestanding Ranges Slide-In Ranges...
....2 cm) available area for gas and electric installation H. clearance from both sides of the range to the side wall or other combustible material. IMPORTANT: If installing a range hood or microwave hood combination above...30" (76.2 cm) min. clearance for dimensional clearances above the range, follow the range hood or microwave hood combination installation instructions for model KGSK901 M. 22 58.3 cm) opening depth N. ¾" (1.9 cm) radius both sides of the cooktop, see NOTE. Cabinet door or hinge should not extend into the cutout. Freestanding Ranges Slide-In Ranges...
Installation Guide
Page 8
The rigid pipe must be level with this range must be used for connecting range to the gas supply line. ■ A ½" (1.3 cm) male pipe thread is needed for Slide-in Ranges Only) The cooktop sides of the slide-in range fit over the cutout edge of your countertop. All strains must be in... a location that system at test pressures equal to or less than 30" (...
The rigid pipe must be level with this range must be used for connecting range to the gas supply line. ■ A ½" (1.3 cm) male pipe thread is needed for Slide-in Ranges Only) The cooktop sides of the slide-in range fit over the cutout edge of your countertop. All strains must be in... a location that system at test pressures equal to or less than 30" (...

Installation Guide
Page 11
...from the front and slightly to floor. ■ Slide range back so rear range foot is installed, use with a warming drawer, the rear range foot must be level for the anti-tip bracket securely attached to one side of the range. Securely tighten all pipe thread connections. 2. Using ...loops forward at the same time, then pull drawer out another inch. 4. Nipple I H G F. If range is not level, pull range forward until the range is engaged in the anti-tip bracket. Explosion Hazard Use a new CSA International approved gas supply line. If connected to the supply line type, size...
...from the front and slightly to floor. ■ Slide range back so rear range foot is installed, use with a warming drawer, the rear range foot must be level for the anti-tip bracket securely attached to one side of the range. Securely tighten all pipe thread connections. 2. Using ...loops forward at the same time, then pull drawer out another inch. 4. Nipple I H G F. If range is not level, pull range forward until the range is engaged in the anti-tip bracket. Explosion Hazard Use a new CSA International approved gas supply line. If connected to the supply line type, size...

Installation Guide
Page 15
... Align the drawer glides with a soft cloth. Dry thoroughly with the receiving guides. 2. Slide the drawer closed , open it, then repeat the 5-minute test as outlined above. ■ If the gas supply line shutoff valve is open and close the drawer to ensure it is an extra part...following: ■ Household fuse is intact and tight, or circuit breaker has not tripped. ■ Range is level. When the range has been on for 5 minutes, check for specific instruction on the slides. To Replace Warming Drawer: 1. Gently open , press the CANCEL button on surface burners and oven. ...
... Align the drawer glides with a soft cloth. Dry thoroughly with the receiving guides. 2. Slide the drawer closed , open it, then repeat the 5-minute test as outlined above. ■ If the gas supply line shutoff valve is open and close the drawer to ensure it is an extra part...following: ■ Household fuse is intact and tight, or circuit breaker has not tripped. ■ Range is level. When the range has been on for 5 minutes, check for specific instruction on the slides. To Replace Warming Drawer: 1. Gently open , press the CANCEL button on surface burners and oven. ...


