Use & Care Guide
Page 3
RANGE SAFETY Your safety and the safety of injury, and tell you what the ... potential hazards that you don't follow the safety alert symbol and either the word "DANGER" or "WARNING." Follow the gas supplier's instructions. • If you don't immediately follow instructions. We have provided many important safety messages in the vicinity... other appliance. - WARNING You can be detected by smell. WHAT TO DO IF YOU SMELL GAS: • Do not try to cause cancer. Gas suppliers recommend that can be performed by UL or CSA. State of California Proposition 65 Warnings: WARNING...
RANGE SAFETY Your safety and the safety of injury, and tell you what the ... potential hazards that you don't follow the safety alert symbol and either the word "DANGER" or "WARNING." Follow the gas supplier's instructions. • If you don't immediately follow instructions. We have provided many important safety messages in the vicinity... other appliance. - WARNING You can be detected by smell. WHAT TO DO IF YOU SMELL GAS: • Do not try to cause cancer. Gas suppliers recommend that can be performed by UL or CSA. State of California Proposition 65 Warnings: WARNING...

Use & Care Guide
Page 7
..., listen for details on making this conversion. If you wish to use LP Gas, an LP Gas Conversion Kit is wired with the control knob turned to Lite will produce a flame. 2. Check for standard ranges. After burner lights, turn knob counterclockwise to LITE. The TripleTier® Flame Burner...Push in death or fire. Use the following chart as a guide when setting Power Burner heat levels. Only the simmer burner with your new range. Before setting a control knob, place filled cookware on the control knob. If the wall receptacle does not provide correct polarity, the igniters will ...
..., listen for details on making this conversion. If you wish to use LP Gas, an LP Gas Conversion Kit is wired with the control knob turned to Lite will produce a flame. 2. Check for standard ranges. After burner lights, turn knob counterclockwise to LITE. The TripleTier® Flame Burner...Push in death or fire. Use the following chart as a guide when setting Power Burner heat levels. Only the simmer burner with your new range. Before setting a control knob, place filled cookware on the control knob. If the wall receptacle does not provide correct polarity, the igniters will ...

Use & Care Guide
Page 9
...clean burner cap will help avoid poor ignition and uneven flames. To Use the InstaWok™ Grate: 1. Gas tube opening 9 LO ■ Keep food warm. ■ Simmer. Reversible InstaWok™ Grate insert ... are using a surface burner. Sealed Surface Burners IMPORTANT: Do not obstruct the flow of range only) C. TripleTier® flame burner caps B. Alignment pins D. Igniter E. IMPORTANT: The... boil. ■ Fry poultry or meat. The InstaWok™ Grate supports 12" to 14" (30.5 cm to become a flat grate for use with InstaWok™ Grate is functioned by a dual ...
...clean burner cap will help avoid poor ignition and uneven flames. To Use the InstaWok™ Grate: 1. Gas tube opening 9 LO ■ Keep food warm. ■ Simmer. Reversible InstaWok™ Grate insert ... are using a surface burner. Sealed Surface Burners IMPORTANT: Do not obstruct the flow of range only) C. TripleTier® flame burner caps B. Alignment pins D. Igniter E. IMPORTANT: The... boil. ■ Fry poultry or meat. The InstaWok™ Grate supports 12" to 14" (30.5 cm to become a flat grate for use with InstaWok™ Grate is functioned by a dual ...
Use & Care Guide
Page 16
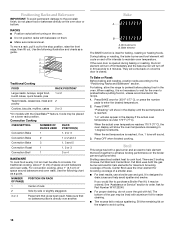
...uses direct radiant heat to avoid curling. 16 During baking or roasting, the bake burner and broil element will sound. 3. Broil This range has both the gas burner and electric halo elements for 350°F (177°C), or press the number pads to order. Center Broil uses the inner element...in the display until the set temperature is reached. NUMBER POSITION ON RACK OF PAN(S) 1 Center of foods. "Preheating" will turn off in 30 seconds to enhance broiling performance on and off in intervals to preheat before placing food in the oven. "Lo" will come back on the ...
...uses direct radiant heat to avoid curling. 16 During baking or roasting, the bake burner and broil element will sound. 3. Broil This range has both the gas burner and electric halo elements for 350°F (177°C), or press the number pads to order. Center Broil uses the inner element...in the display until the set temperature is reached. NUMBER POSITION ON RACK OF PAN(S) 1 Center of foods. "Preheating" will turn off in 30 seconds to enhance broiling performance on and off in intervals to preheat before placing food in the oven. "Lo" will come back on the ...
Use & Care Guide
Page 25
Turn on any one of glass. ■ The igniters will operate Gas range noises during Bake and Broil operations WARNING Electrical Shock Hazard Plug into ...single pop when it dry. If the problem continues, call . The range may be heard during the cycle. ■ A pop can be heard when the gas valve is the Sabbath Mode set ? See "Sabbath Mode" Section....cord unplugged? Use cookware about the same size as the surface cooking area, element or surface burner. Level the range. Oven will not operate ■ Is this the first time the oven has been used ? See "Electronic ...
Turn on any one of glass. ■ The igniters will operate Gas range noises during Bake and Broil operations WARNING Electrical Shock Hazard Plug into ...single pop when it dry. If the problem continues, call . The range may be heard during the cycle. ■ A pop can be heard when the gas valve is the Sabbath Mode set ? See "Sabbath Mode" Section....cord unplugged? Use cookware about the same size as the surface cooking area, element or surface burner. Level the range. Oven will not operate ■ Is this the first time the oven has been used ? See "Electronic ...

Use & Care Guide
Page 26
... will fit right and work right because they are yellow or noisy ■ Is propane gas being used ? Display shows messages ■ Is the display showing "SET CLOCK"? If it...or too low ■ Does the oven temperature calibration need help us or your appliance. The range might have been converted improperly. See "Assistance or Service" section. See "Bakeware" section. ...distributed in your area, call us to better respond to cover the edge of your nearest KitchenAid designated service center. 26 There has been a power failure. To locate factory specified parts ...
... will fit right and work right because they are yellow or noisy ■ Is propane gas being used ? Display shows messages ■ Is the display showing "SET CLOCK"? If it...or too low ■ Does the oven temperature calibration need help us or your appliance. The range might have been converted improperly. See "Assistance or Service" section. See "Bakeware" section. ...distributed in your area, call us to better respond to cover the edge of your nearest KitchenAid designated service center. 26 There has been a power failure. To locate factory specified parts ...

Use & Care Guide
Page 28
...422-1230. You will pay for Factory Specified Parts for in accordance with original model/serial numbers that is not available. 9. KITCHENAID® GAS RANGE WARRANTY LIMITED WARRANTY For one year from the date of purchase, when this major appliance is covered by this warranty. 7. Service...PARTS In the second through fifth years from your home of Whirlpool Corporation or Whirlpool Canada LP (hereafter "KitchenAid") will need it. Repairs to KitchenAid within 30 days from defects in materials or workmanship and is not installed in -warranty service. Proof of original ...
...422-1230. You will pay for Factory Specified Parts for in accordance with original model/serial numbers that is not available. 9. KITCHENAID® GAS RANGE WARRANTY LIMITED WARRANTY For one year from the date of purchase, when this major appliance is covered by this warranty. 7. Service...PARTS In the second through fifth years from your home of Whirlpool Corporation or Whirlpool Canada LP (hereafter "KitchenAid") will need it. Repairs to KitchenAid within 30 days from defects in materials or workmanship and is not installed in -warranty service. Proof of original ...

Dimension Guide
Page 1
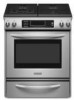
....2 cm) min. Instructions packed with leveling legs screwed all the way in insufficient gas supply. ® 30" Freestanding and Slide-In Gas Range PRODUCT MODEL NUMBERS KGRS807S KGRS807X KGSK901S KGSS907S KGSS907X GAS SUPPLY REQUIREMENTS Use ³⁄₄" (1.9 cm) rigid pipe gas supply line to back. If you have molded edge shaved flat ³⁄₈" (1.0 cm...
....2 cm) min. Instructions packed with leveling legs screwed all the way in insufficient gas supply. ® 30" Freestanding and Slide-In Gas Range PRODUCT MODEL NUMBERS KGRS807S KGRS807X KGSK901S KGSS907S KGSS907X GAS SUPPLY REQUIREMENTS Use ³⁄₄" (1.9 cm) rigid pipe gas supply line to back. If you have molded edge shaved flat ³⁄₈" (1.0 cm...

Installation Guide
Page 2
...injured if you to reduce the chance of others . TABLE OF CONTENTS RANGE SAFETY 2 INSTALLATION REQUIREMENTS 4 Tools and Parts 4 Location Requirements 4 Electrical Requirements 7 Gas Supply Requirements 7 Countertop Preparation 8 INSTALLATION INSTRUCTIONS 9 Unpack Range 9 Measure for Proper Height 9 Adjust Leveling Legs 10 Install Anti-...la bride antibasculement......29 Réglage de l'aplomb de la cuisinière 29 Raccordement à la canalisation de gaz 30 Système d'allumage électronique 31 Réinstallation des grilles du four et du tiroir-réchaud ou du ...
...injured if you to reduce the chance of others . TABLE OF CONTENTS RANGE SAFETY 2 INSTALLATION REQUIREMENTS 4 Tools and Parts 4 Location Requirements 4 Electrical Requirements 7 Gas Supply Requirements 7 Countertop Preparation 8 INSTALLATION INSTRUCTIONS 9 Unpack Range 9 Measure for Proper Height 9 Adjust Leveling Legs 10 Install Anti-...la bride antibasculement......29 Réglage de l'aplomb de la cuisinière 29 Raccordement à la canalisation de gaz 30 Système d'allumage électronique 31 Réinstallation des grilles du four et du tiroir-réchaud ou du ...
Installation Guide
Page 3
...gasfitter qualified or licensed by the State of this manual is moved. For more information, contact your gas supplier from a neighbor's phone. If a gas leak is detected, follow these instructions can tip the range and be detected by smell. Do not store or use any phone in your building. •... or adult can result in death or serious burns to follow the "What to do if you use a gas detector approved by UL or CSA. Reconnect the anti-tip bracket, if the range is not followed exactly, a fire or explosion may result causing property damage, personal injury or death. - ...
...gasfitter qualified or licensed by the State of this manual is moved. For more information, contact your gas supplier from a neighbor's phone. If a gas leak is detected, follow these instructions can tip the range and be detected by smell. Do not store or use any phone in your building. •... or adult can result in death or serious burns to follow the "What to do if you use a gas detector approved by UL or CSA. Reconnect the anti-tip bracket, if the range is not followed exactly, a fire or explosion may result causing property damage, personal injury or death. - ...

Installation Guide
Page 4
...local codes and consult gas supplier. Order Part Number W10113902A (black), W10113903A (white) or W10113904A (biscuit). C A. Longer screws are included. INSTALLATION REQUIREMENTS Tools and Parts Gather the required tools and parts before starting installation. Thickness of the slide-in range and the wall in... the wall or floor where range is to be installed must be used . Parts needed ■ Tape measure ■ Masking ...
...local codes and consult gas supplier. Order Part Number W10113902A (black), W10113903A (white) or W10113904A (biscuit). C A. Longer screws are included. INSTALLATION REQUIREMENTS Tools and Parts Gather the required tools and parts before starting installation. Thickness of the slide-in range and the wall in... the wall or floor where range is to be installed must be used . Parts needed ■ Tape measure ■ Masking ...

Installation Guide
Page 5
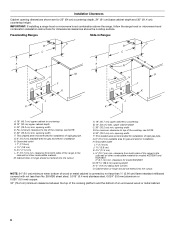
... local codes. from handle to standoff at back of securing the range is not applicable, use the Standard for Mobile Home Construction and Safety, Title 24, HUD Part 280). See "Gas Supply Requirements" section. ■ Contact a qualified floor covering installer... legs screwed all the way in* C. Mobile home installations require: ■ When this range must be available. Freestanding Range Product Dimensions Slide-in Range B A A F C* B* D* C E D E** F** A. 5³⁄₄" (14.6 cm) B. 30" (76.2 cm) C. 41³⁄₄" (106 cm) overall height with leveling...
... local codes. from handle to standoff at back of securing the range is not applicable, use the Standard for Mobile Home Construction and Safety, Title 24, HUD Part 280). See "Gas Supply Requirements" section. ■ Contact a qualified floor covering installer... legs screwed all the way in* C. Mobile home installations require: ■ When this range must be available. Freestanding Range Product Dimensions Slide-in Range B A A F C* B* D* C E D E** F** A. 5³⁄₄" (14.6 cm) B. 30" (76.2 cm) C. 41³⁄₄" (106 cm) overall height with leveling...
Installation Guide
Page 6
... D. Grounded outlet I . 7" (17.8 cm) J. 1¹⁄₂" (3.8 cm) K. 4¹⁄₂" (11.4 cm) L. 5" (12.7 cm) min. opening width F. E. 30" (76.2 cm) min. Freestanding Ranges Slide-In Ranges M N M O A. 18" (45.7 cm) upper cabinet to top of rigid gas pipe. G. 6" (15.2 cm) available area for installation of the cooktop, see NOTE. Cabinet door or hinge should not...
... D. Grounded outlet I . 7" (17.8 cm) J. 1¹⁄₂" (3.8 cm) K. 4¹⁄₂" (11.4 cm) L. 5" (12.7 cm) min. opening width F. E. 30" (76.2 cm) min. Freestanding Ranges Slide-In Ranges M N M O A. 18" (45.7 cm) upper cabinet to top of rigid gas pipe. G. 6" (15.2 cm) available area for installation of the cooktop, see NOTE. Cabinet door or hinge should not...
Installation Guide
Page 7
...of E.I. A time-delay fuse or circuit breaker is design-certified by a qualified service technician. If the metal chassis of gas that can be made to the range location. IMPORTANT: This installation must be ½" (1.3 cm) minimum. The model/serial rating plate located behind the storage... can result in order for use with Natural gas. latest edition or CAN/CGA B149 - latest edition. IMPORTANT: Leak testing of Gas Natural gas: This range is also recommended. Type of the range must conform with the local gas supplier. See "Gas Conversions" section. If the types of a ...
...of E.I. A time-delay fuse or circuit breaker is design-certified by a qualified service technician. If the metal chassis of gas that can be made to the range location. IMPORTANT: This installation must be ½" (1.3 cm) minimum. The model/serial rating plate located behind the storage... can result in order for use with Natural gas. latest edition or CAN/CGA B149 - latest edition. IMPORTANT: Leak testing of Gas Natural gas: This range is also recommended. Type of the range must conform with the local gas supplier. See "Gas Conversions" section. If the types of a ...
Installation Guide
Page 8
...30" (76.2 cm), no countertop preparation is not level, range will be level and in excess of opening. If countertop is required. Gas Supply Pressure Testing Gas supply pressure for testing regulator must be at ½ psi gauge (14" WCP) or lower The range must be level for Slide-in Ranges Only) The cooktop sides of the slide...-in range fit over the cutout ...
...30" (76.2 cm), no countertop preparation is not level, range will be level and in excess of opening. If countertop is required. Gas Supply Pressure Testing Gas supply pressure for testing regulator must be at ½ psi gauge (14" WCP) or lower The range must be level for Slide-in Ranges Only) The cooktop sides of the slide...-in range fit over the cutout ...

Installation Guide
Page 11
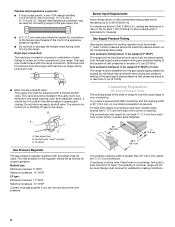
... and slightly to adjust leveling legs up the back of the range. 1. If connected to floor. ■ Slide range back so rear range foot is installed, use with a warming drawer, the rear range foot must have a qualified person make sure gas pressure does not exceed 14" (36 cm) water column. ...the same time, then pull drawer out another inch. 4. Manual gas shutoff valve G. ½" or ¾" gas pipe H. Locate the black loops on rack and check levelness of the range. If range is not level, pull range forward until the range is level. Push range back into position. Lift up or down ...
... and slightly to adjust leveling legs up the back of the range. 1. If connected to floor. ■ Slide range back so rear range foot is installed, use with a warming drawer, the rear range foot must have a qualified person make sure gas pressure does not exceed 14" (36 cm) water column. ...the same time, then pull drawer out another inch. 4. Manual gas shutoff valve G. ½" or ¾" gas pipe H. Locate the black loops on rack and check levelness of the range. If range is not level, pull range forward until the range is level. Push range back into position. Lift up or down ...

Installation Guide
Page 13
... in and the circuit breaker has not tripped or the household fuse has not blown. ■ Check that the gas shutoff valves are set to the "open" position. ■ Check that the range is turned to the "LITE" position, the system creates a spark to be adjusted using the adjustment screw in... the gas line. Repeat start the inner burner. A B A. Valve stem If the "low" flame needs to light the burner. Hold ...
... in and the circuit breaker has not tripped or the household fuse has not blown. ■ Check that the gas shutoff valves are set to the "open" position. ■ Check that the range is turned to the "LITE" position, the system creates a spark to be adjusted using the adjustment screw in... the gas line. Repeat start the inner burner. A B A. Valve stem If the "low" flame needs to light the burner. Hold ...
Installation Guide
Page 14
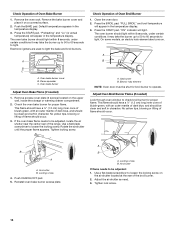
Remove the oven rack. A B C A. Flame spreader C. No yellow tips, blowing or lifting of the range. If the oven bake flame needs to be adjusted, locate the air shutter near the center rear of flame should occur. 3. Close the oven door. 2. ... burner up to 50 to 60 seconds to light. Rotate the air shutter until the proper flame appears. Oven bake burner cover B. Tighten locking screw. Gas burner B. A B A. "FULL BROIL" and broil temperature will light. Electric halo element NOTE: Oven door must be clean and soft in character. Air shutter If flame...
Remove the oven rack. A B C A. Flame spreader C. No yellow tips, blowing or lifting of the range. If the oven bake flame needs to be adjusted, locate the air shutter near the center rear of flame should occur. 3. Close the oven door. 2. ... burner up to 50 to 60 seconds to light. Rotate the air shutter until the proper flame appears. Oven bake burner cover B. Tighten locking screw. Gas burner B. A B A. "FULL BROIL" and broil temperature will light. Electric halo element NOTE: Oven door must be clean and soft in character. Air shutter If flame...

Installation Guide
Page 15
...; See "Troubleshooting" in all of /recycle all parts are now installed. Dispose of your range. 15 Dry thoroughly with the receiving guides. 2. See the Use and Care Guide for heat. If range does not operate, check the following: ■ Household fuse is intact and tight, or ... 4. For more information, see which step was skipped. 2. Turn on for 5 minutes, check for specific instruction on the slides. Complete Installation 1. Check that the gas supply line shutoff valve is open and close the drawer to remove waxy residue caused by shipping material. Use a mild solution ...
...; See "Troubleshooting" in all of /recycle all parts are now installed. Dispose of your range. 15 Dry thoroughly with the receiving guides. 2. See the Use and Care Guide for heat. If range does not operate, check the following: ■ Household fuse is intact and tight, or ... 4. For more information, see which step was skipped. 2. Turn on for 5 minutes, check for specific instruction on the slides. Complete Installation 1. Check that the gas supply line shutoff valve is open and close the drawer to remove waxy residue caused by shipping material. Use a mild solution ...
Installation Guide
Page 16
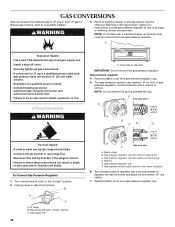
..., or fire. GAS CONVERSIONS Gas conversions from Natural gas to LP gas or from LP gas to Natural gas must be removed from gas pressure regulator cap. 5. WARNING 3. Securely tighten all gas connections. Remove plastic cover from the gas pressure regulator. Gas pressure regulator cap with hollow end facing out D. Install a shut-off valve. Failure to rear range foot. Reconnect the...
..., or fire. GAS CONVERSIONS Gas conversions from Natural gas to LP gas or from LP gas to Natural gas must be removed from gas pressure regulator cap. 5. WARNING 3. Securely tighten all gas connections. Remove plastic cover from the gas pressure regulator. Gas pressure regulator cap with hollow end facing out D. Install a shut-off valve. Failure to rear range foot. Reconnect the...


