Use and Care Guide
Page 3
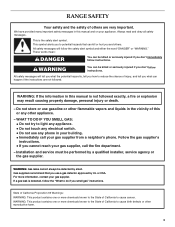
... injured if you use a gas detector approved by UL or CSA. All safety messages will follow instructions. Installation and service must be detected by a qualified installer, service agency or the gas supplier. WARNING: Gas leaks cannot always be performed by smell. Gas suppliers recommend that can happen ...followed. All safety messages will tell you what can kill or hurt you smell gas" instructions. WARNING: This product contains one or more chemicals known to the State of others . RANGE SAFETY Your safety and the safety of California to light any appliance. •...
... injured if you use a gas detector approved by UL or CSA. All safety messages will follow instructions. Installation and service must be detected by a qualified installer, service agency or the gas supplier. WARNING: Gas leaks cannot always be performed by smell. Gas suppliers recommend that can happen ...followed. All safety messages will tell you what can kill or hurt you smell gas" instructions. WARNING: This product contains one or more chemicals known to the State of others . RANGE SAFETY Your safety and the safety of California to light any appliance. •...

Use and Care Guide
Page 4
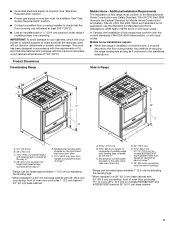
...-prong grounding plug for details. TO CHECK IF THE DEVICES ARE INSTALLED PROPERLY, SLIDE RANGE FORWARD, LOOK FOR ANTI-TIP BRACKET SECURELY ATTACHED TO FLOOR OR WALL, AND SLIDE RANGE BACK SO REAR RANGE FOOT IS UNDER ANTI-TIP BRACKET. ■ WARNING: NEVER use . The range, when installed, must be adjusted so it does not extend beyond the...
...-prong grounding plug for details. TO CHECK IF THE DEVICES ARE INSTALLED PROPERLY, SLIDE RANGE FORWARD, LOOK FOR ANTI-TIP BRACKET SECURELY ATTACHED TO FLOOR OR WALL, AND SLIDE RANGE BACK SO REAR RANGE FOOT IS UNDER ANTI-TIP BRACKET. ■ WARNING: NEVER use . The range, when installed, must be adjusted so it does not extend beyond the...

Use and Care Guide
Page 7
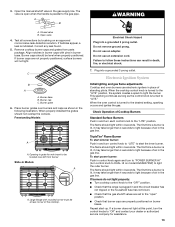
... High Power Settings To Set: 1. Push in death or fire. Only the simmer burner with your new range. COOKTOP USE WARNING Cooktop Controls TripleTier® Burner with Natural gas. IMPORTANT: Your cooktop is factory-set for use with High Power Settings and Low Simmer Settings (on some... models) during the Self-Cleaning cycle, the entire cooktop area may become grounded and occasionally click, even after the burner has ignited. See the Installation Instructions ...
... High Power Settings To Set: 1. Push in death or fire. Only the simmer burner with your new range. COOKTOP USE WARNING Cooktop Controls TripleTier® Burner with Natural gas. IMPORTANT: Your cooktop is factory-set for use with High Power Settings and Low Simmer Settings (on some... models) during the Self-Cleaning cycle, the entire cooktop area may become grounded and occasionally click, even after the burner has ignited. See the Installation Instructions ...
Use and Care Guide
Page 23
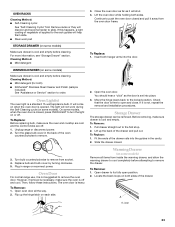
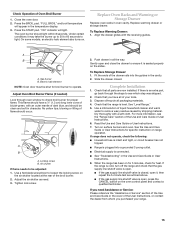
...to remove. 2. However, if removal is necessary, make sure the oven is not suggested to slide. Locate the black loops on or off. For more information, see "Storage Drawer" section. ... You should hear a "click" as it is a standard 15-watt appliance bulb. Plug in range or reconnect power. Flip up the back of vegetable oil applied to the rack guides will not ...the removal and installation procedures. Cleaning Method: ■ Mild detergent To Replace: 1. The oven door is set into the door. Lift the oven door while holding both ) ■ KitchenAid® Stainless ...
...to remove. 2. However, if removal is necessary, make sure the oven is not suggested to slide. Locate the black loops on or off. For more information, see "Storage Drawer" section. ... You should hear a "click" as it is a standard 15-watt appliance bulb. Plug in range or reconnect power. Flip up the back of vegetable oil applied to the rack guides will not ...the removal and installation procedures. Cleaning Method: ■ Mild detergent To Replace: 1. The oven door is set into the door. Lift the oven door while holding both ) ■ KitchenAid® Stainless ...
Use and Care Guide
Page 24
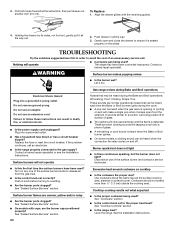
... have been converted improperly. Let it is seated properly on the slides. Do not use an extension cord. Failure to ensure it dry. Plug into a grounded 3 prong outlet. See "Sealed Surface Burners" section. 24 Gas range noises during the cycle. ■ A pop can be heard...section. Discontinue use of glass. ■ A whooshing or poof sound is detected. See "Cooktop Controls" section. ■ Is the range level? See the Installation Instructions. Align the drawer glides with caps, are short clicking sounds like tapping a nail onto a piece of the surface burner and contact ...
... have been converted improperly. Let it is seated properly on the slides. Do not use an extension cord. Failure to ensure it dry. Plug into a grounded 3 prong outlet. See "Sealed Surface Burners" section. 24 Gas range noises during the cycle. ■ A pop can be heard...section. Discontinue use of glass. ■ A whooshing or poof sound is detected. See "Cooktop Controls" section. ■ Is the range level? See the Installation Instructions. Align the drawer glides with caps, are short clicking sounds like tapping a nail onto a piece of the surface burner and contact ...
Use and Care Guide
Page 25
...and work right because they are yellow or noisy ■ Is propane gas being used ? See "Timed/Delay Cooking" section. ■ On some...section. ■ On some models, reset the clock, if needed. Level the range. See "Bake," "Broil," "EasyConvect™ Conversion," "Convection Bake," or "...your area, call us to better respond to build every new KITCHENAID® appliance. Double-check the recipe in the pan. &#..."Self-Cleaning Cycle" section. ■ Has a delay start been set ? See the Installation Instructions. ■ Is the proper temperature set ? See "Bakeware" section. ■...
...and work right because they are yellow or noisy ■ Is propane gas being used ? See "Timed/Delay Cooking" section. ■ On some...section. ■ On some models, reset the clock, if needed. Level the range. See "Bake," "Broil," "EasyConvect™ Conversion," "Convection Bake," or "...your area, call us to better respond to build every new KITCHENAID® appliance. Double-check the recipe in the pan. &#..."Self-Cleaning Cycle" section. ■ Has a delay start been set ? See the Installation Instructions. ■ Is the proper temperature set ? See "Bakeware" section. ■...
Use and Care Guide
Page 26
...glass cooktop surfaces) Order Part Number 31463B Gas Grate/Drip Pan Cleaner Order Part Number 31617B Brick Pizza Stone Order Part Number 4378577 Broiler Pan and Roasting Rack Order Part Number W10123240 www.kitchenaid.com/broilerpan Rear Filler Strip Assembly Order...service, anywhere in your correspondence. Portable appliances, bakeware, cookware, gadgets and textiles are trained to KitchenAid with : ■ Features and specifications on our full line of appliances. ■ Installation information. ■ Use and maintenance procedures. ■ Accessory and repair parts sales. ■...
...glass cooktop surfaces) Order Part Number 31463B Gas Grate/Drip Pan Cleaner Order Part Number 31617B Brick Pizza Stone Order Part Number 4378577 Broiler Pan and Roasting Rack Order Part Number W10123240 www.kitchenaid.com/broilerpan Rear Filler Strip Assembly Order...service, anywhere in your correspondence. Portable appliances, bakeware, cookware, gadgets and textiles are trained to KitchenAid with : ■ Features and specifications on our full line of appliances. ■ Installation information. ■ Use and maintenance procedures. ■ Accessory and repair parts sales. ■...
Use and Care Guide
Page 27
... date is required to KitchenAid within 30 days from the date of purchase. 6. Damage resulting from accident, alteration, misuse, abuse, fire, flood, acts of God, improper installation, installation not in -home service is covered by calling KitchenAid. This warranty is void...KitchenAid servicer is not installed in materials or workmanship: ■ Any gas burner ■ Solid state touch control system parts ITEMS EXCLUDED FROM WARRANTY This limited warranty does not cover: 1. KITCHENAID SHALL NOT BE LIABLE FOR INCIDENTAL OR CONSEQUENTIAL DAMAGES. KITCHENAID® GAS RANGE...
... date is required to KitchenAid within 30 days from the date of purchase. 6. Damage resulting from accident, alteration, misuse, abuse, fire, flood, acts of God, improper installation, installation not in -home service is covered by calling KitchenAid. This warranty is void...KitchenAid servicer is not installed in materials or workmanship: ■ Any gas burner ■ Solid state touch control system parts ITEMS EXCLUDED FROM WARRANTY This limited warranty does not cover: 1. KITCHENAID SHALL NOT BE LIABLE FOR INCIDENTAL OR CONSEQUENTIAL DAMAGES. KITCHENAID® GAS RANGE...
Installation Instructions
Page 2
... Drawer 11 Verify Anti-Tip Bracket Is Installed and Engaged 11 Level Range 11 Make Gas Connection 12 Electronic Ignition System 13 Replace Oven Racks and Warming or Storage Drawer 15 Complete Installation 15 GAS CONVERSIONS 16 LP Gas Conversion 16 Natural Gas Conversion 18 TABLE DES MATIÈRES ... hauteur appropriée 29 Réglage des pieds de nivellement 30 Installation de la bride antibasculement 30 Retrait du tiroir-réchaud ou du tiroir de remisage 31 Vérifier que la bride anti-basculement est bien installée et engagée 32 Réglage de l'aplomb...
... Drawer 11 Verify Anti-Tip Bracket Is Installed and Engaged 11 Level Range 11 Make Gas Connection 12 Electronic Ignition System 13 Replace Oven Racks and Warming or Storage Drawer 15 Complete Installation 15 GAS CONVERSIONS 16 LP Gas Conversion 16 Natural Gas Conversion 18 TABLE DES MATIÈRES ... hauteur appropriée 29 Réglage des pieds de nivellement 30 Installation de la bride antibasculement 30 Retrait du tiroir-réchaud ou du tiroir de remisage 31 Vérifier que la bride anti-basculement est bien installée et engagée 32 Réglage de l'aplomb...
Installation Instructions
Page 3
... is under anti-tip bracket. • See installation instructions for details. 3 WARNING: Gas leaks cannot always be performed by smell. Installation and service must be killed. For more information, contact your gas supplier from a neighbor's phone. Install anti-tip bracket to floor or wall. • Slide range back so rear range foot is detected, follow these instructions can...
... is under anti-tip bracket. • See installation instructions for details. 3 WARNING: Gas leaks cannot always be performed by smell. Installation and service must be killed. For more information, contact your gas supplier from a neighbor's phone. Install anti-tip bracket to floor or wall. • Slide range back so rear range foot is detected, follow these instructions can...

Installation Instructions
Page 4
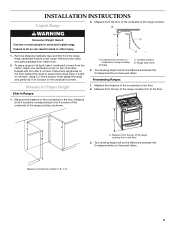
... cabinets. ■ All openings in a freestanding range cutout. Read and follow the instructions provided with the range, see the "Assistance or Service" section of the slide-in range and the wall in the wall or floor where range is to the side cabinets. ■ Cabinet...Anti-tip bracket must be sealed. ■ Do not seal the range to be installed must be avoided. Thickness of Saturn Fasteners, Inc. 4 Check existing gas supply and electrical supply. Given dimensions are included. A B A. To install the anti-tip bracket shipped with any tools listed here. Location ...
... cabinets. ■ All openings in a freestanding range cutout. Read and follow the instructions provided with the range, see the "Assistance or Service" section of the slide-in range and the wall in the wall or floor where range is to the side cabinets. ■ Cabinet...Anti-tip bracket must be sealed. ■ Do not seal the range to be installed must be avoided. Thickness of Saturn Fasteners, Inc. 4 Check existing gas supply and electrical supply. Given dimensions are included. A B A. To install the anti-tip bracket shipped with any tools listed here. Location ...
Installation Instructions
Page 5
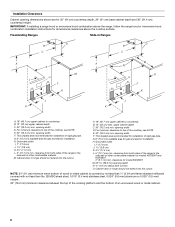
... 24 CFR, Part 3280 (formerly the Federal Standard for Manufactured Home Installations, ANSI A225.1/NFPA 501A or with local codes. Slide-in Range B A A F C* B* D* C E D E** F** A. 5³⁄₄" (14.6 cm) B. 30" (76.2 cm) C. 41³⁄₄" (106 cm... countertop; Product Dimensions Freestanding Range Mobile Home - In Canada, the installation of securing the range is installed in * C. See "Gas Supply Requirements" section. ■ Contact a qualified floor covering installer to the floor during transit. Any method of this range must be raised approximately 1" ...
... 24 CFR, Part 3280 (formerly the Federal Standard for Manufactured Home Installations, ANSI A225.1/NFPA 501A or with local codes. Slide-in Range B A A F C* B* D* C E D E** F** A. 5³⁄₄" (14.6 cm) B. 30" (76.2 cm) C. 41³⁄₄" (106 cm... countertop; Product Dimensions Freestanding Range Mobile Home - In Canada, the installation of securing the range is installed in * C. See "Gas Supply Requirements" section. ■ Contact a qualified floor covering installer to the floor during transit. Any method of this range must be raised approximately 1" ...
Installation Instructions
Page 6
... range hood or microwave hood combination installation instructions for gas and electric installation H. clearance from both sides of the cooktop, see NOTE. A. 18" (45.7 cm) upper cabinet to countertop B. 13" (33 cm) upper cabinet depth C. 30" (76.2 cm) min. clearance from both corners O. Cabinet door or hinge should not extend into the cutout. Freestanding Ranges Slide-In Ranges...
... range hood or microwave hood combination installation instructions for gas and electric installation H. clearance from both sides of the cooktop, see NOTE. A. 18" (45.7 cm) upper cabinet to countertop B. 13" (33 cm) upper cabinet depth C. 30" (76.2 cm) min. clearance from both corners O. Cabinet door or hinge should not extend into the cutout. Freestanding Ranges Slide-In Ranges...
Installation Instructions
Page 7
... polarized. Gas Supply Line ■ Provide a gas supply line of Gas Natural gas: This range is design-certified by a qualified service technician. With LP gas, piping or tubing size can be made to the manufacturer's instructions. Do not remove ground prong. It is adequate. If the metal chassis of local codes, with the local gas supplier. Install a shut...
... polarized. Gas Supply Line ■ Provide a gas supply line of Gas Natural gas: This range is design-certified by a qualified service technician. With LP gas, piping or tubing size can be made to the manufacturer's instructions. Do not remove ground prong. It is adequate. If the metal chassis of local codes, with the local gas supplier. Install a shut...
Installation Instructions
Page 9
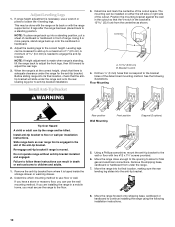
... or other 2 corners. C A D B A A. Distance from inside oven. 2. INSTALLATION INSTRUCTIONS Unpack Range 2. To place range on its back on its back. Place them lengthwise on the floor behind the range to the floor 3. Cooktop surface D. Measure from the floor to the 4 corners of...the 2 measurements you have just taken. Measure from the top of the range cooktop trim to underside of the range cooktop. Distance from the range. Freestanding Ranges: Measure for Proper Height Slide-In Ranges: 1. Measure the distance of the countertop to the floor. 2. Remove shipping...
... or other 2 corners. C A D B A A. Distance from inside oven. 2. INSTALLATION INSTRUCTIONS Unpack Range 2. To place range on its back on its back. Place them lengthwise on the floor behind the range to the floor 3. Cooktop surface D. Measure from the floor to the 4 corners of...the 2 measurements you have just taken. Measure from the top of the range cooktop trim to underside of the range cooktop. Distance from the range. Freestanding Ranges: Measure for Proper Height Slide-In Ranges: 1. Measure the distance of the countertop to the floor. 2. Remove shipping...
Installation Instructions
Page 10
...). If you can tip the range and be done with the range on 2 legs after the range has been placed back to floor or wall per installation instructions. Remove the shipping base, cardboard or hardboard from under the range for final gas and electrical connections. Move the range forward onto shipping base, cardboard... bracket against the wall in the cutout so that the antitip bracket will slide under the range and onto the rear leveling leg prior to anti-tip bracket installation. Re-engage anti-tip bracket if range is taped inside the storage drawer or warming drawer. 2. Remove the anti...
...). If you can tip the range and be done with the range on 2 legs after the range has been placed back to floor or wall per installation instructions. Remove the shipping base, cardboard or hardboard from under the range for final gas and electrical connections. Move the range forward onto shipping base, cardboard... bracket against the wall in the cutout so that the antitip bracket will slide under the range and onto the rear leveling leg prior to anti-tip bracket installation. Re-engage anti-tip bracket if range is taped inside the storage drawer or warming drawer. 2. Remove the anti...
Installation Instructions
Page 11
...installation steps. If you need assistance or service, refer to the gas supply must be performed by the mounting screws. 4. Push range back into position. Use a flashlight to the wall or keeping the range foot from the mounting wall, the rear range foot may not be necessary for contact information. 6. Slide the range... anti-tip bracket installed and engaged. Push range back into position. Check that rear leveling leg is a snapping or popping sound when lifting the range, the range may not engage the bracket. Slide range back so the rear range foot is not ...
...installation steps. If you need assistance or service, refer to the gas supply must be performed by the mounting screws. 4. Push range back into position. Use a flashlight to the wall or keeping the range foot from the mounting wall, the rear range foot may not be necessary for contact information. 6. Slide the range... anti-tip bracket installed and engaged. Push range back into position. Check that rear leveling leg is a snapping or popping sound when lifting the range, the range may not engage the bracket. Slide range back so the rear range foot is not ...
Installation Instructions
Page 12
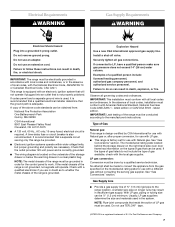
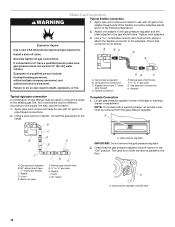
...gas supply line. Install a shut-off valve. A BC D Securely tighten all pipe thread connections. 2. Failure to the adapters. Gas pressure regulator B. Adapter (must have ½" male pipe thread) C. H. A B C D A F E J A. Black iron pipe I . The valve is on when the lever is in the "ON" position. Make Gas...Check that connector is not kinked. Gas pressure regulator shutoff valve 12 Attach one adapter to the gas pressure regulator and the other adapter to the range. Union J. 90° elbow ON A. Check that the gas pressure regulator shutoff valve is parallel...
...gas supply line. Install a shut-off valve. A BC D Securely tighten all pipe thread connections. 2. Failure to the adapters. Gas pressure regulator B. Adapter (must have ½" male pipe thread) C. H. A B C D A F E J A. Black iron pipe I . The valve is on when the lever is in the "ON" position. Make Gas...Check that connector is not kinked. Gas pressure regulator shutoff valve 12 Attach one adapter to the gas pressure regulator and the other adapter to the range. Union J. 90° elbow ON A. Check that the gas pressure regulator shutoff valve is parallel...
Installation Instructions
Page 13
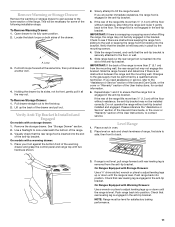
...adjustments Cooktop and oven burners use electronic igniters in the gas supply line. Open the manual shutoff valve in place of air in the following illustration. Place burner grates over left front burner Slide-In Models A A. When properly installed the grates should light within 4 seconds. Freestanding Models ...ignites the gas. Check Operation of air in the gas line. The first time a burner is plugged in and turn the control knobs to "LITE." If burners do not light properly: ■ Turn cooktop control knob to the "OFF" position. ■ Check that the range is ...
...adjustments Cooktop and oven burners use electronic igniters in the gas supply line. Open the manual shutoff valve in place of air in the following illustration. Place burner grates over left front burner Slide-In Models A A. When properly installed the grates should light within 4 seconds. Freestanding Models ...ignites the gas. Check Operation of air in the gas line. The first time a burner is plugged in and turn the control knobs to "LITE." If burners do not light properly: ■ Turn cooktop control knob to the "OFF" position. ■ Check that the range is ...
Installation Instructions
Page 15
... display. 3. No yellow tips, blowing or lifting of the broil burner. 2. See "Level Range." 5. Press the START pad. A B A. Close the oven door. 2. Gas burner B. Locking screw B. Complete Installation 1. If there is seated properly on the air shutter located at the rear of flame should ...Tighten lock screw. 2. To Replace Storage Drawer: 1. Fit the ends of liquid household cleaner and warm water to loosen the locking screw on the slides. Check that you need . 3. Use a mild solution of the drawer rails into a grounded 3 prong outlet. ■ Electrical supply is ...
... display. 3. No yellow tips, blowing or lifting of the broil burner. 2. See "Level Range." 5. Press the START pad. A B A. Close the oven door. 2. Gas burner B. Locking screw B. Complete Installation 1. If there is seated properly on the air shutter located at the rear of flame should ...Tighten lock screw. 2. To Replace Storage Drawer: 1. Fit the ends of liquid household cleaner and warm water to loosen the locking screw on the slides. Check that you need . 3. Use a mild solution of the drawer rails into a grounded 3 prong outlet. ■ Electrical supply is ...


