
Use & Care Guide
Page 2
.... All safety messages will follow the safety alert symbol and either the word "DANGER" or "WARNING." TABLE OF CONTENTS COOKTOP SAFETY 2 PARTS AND FEATURES 4 COOKTOP USE 7 Cooktop Controls 7 Cooktop Surface 8 Sealed Surface Burners 8 Even-Heat™ Grill 9 Even-Heat™ Electric Chrome Griddle 11 Cookware 12 Home... Canning 12 COOKTOP CARE 12 General Cleaning 12 TROUBLESHOOTING 13 ASSISTANCE OR SERVICE 14 In the U.S.A 14 Accessories 14 In Canada 15 WARRANTY ...
.... All safety messages will follow the safety alert symbol and either the word "DANGER" or "WARNING." TABLE OF CONTENTS COOKTOP SAFETY 2 PARTS AND FEATURES 4 COOKTOP USE 7 Cooktop Controls 7 Cooktop Surface 8 Sealed Surface Burners 8 Even-Heat™ Grill 9 Even-Heat™ Electric Chrome Griddle 11 Cookware 12 Home... Canning 12 COOKTOP CARE 12 General Cleaning 12 TROUBLESHOOTING 13 ASSISTANCE OR SERVICE 14 In the U.S.A 14 Accessories 14 In Canada 15 WARRANTY ...

Use & Care Guide
Page 3
...any electrical switch. • Do not use this appliance as stepping, leaning, or sitting on the top surface. ■ Maintenance - Keep cooktop area clear and free from combustible materials, gasoline, and other reproductive harm. 3 SAVE THESE INSTRUCTIONS State of California Proposition 65 Warnings: WARNING: This...of the cooking utensil. Do not cut or remove the grounding prong from this plug. ■ Disconnect the electrical supply before servicing the cooktop. ■ CAUTION: Do not store items of interest to cause cancer. Do not store or use a gas detector approved by a ...
...any electrical switch. • Do not use this appliance as stepping, leaning, or sitting on the top surface. ■ Maintenance - Keep cooktop area clear and free from combustible materials, gasoline, and other reproductive harm. 3 SAVE THESE INSTRUCTIONS State of California Proposition 65 Warnings: WARNING: This...of the cooking utensil. Do not cut or remove the grounding prong from this plug. ■ Disconnect the electrical supply before servicing the cooktop. ■ CAUTION: Do not store items of interest to cause cancer. Do not store or use a gas detector approved by a ...

Use & Care Guide
Page 4
The cooktop you have some models) F. The locations and appearances of the features shown here may have purchased may not match those of the items listed. Heavy-...
The cooktop you have some models) F. The locations and appearances of the features shown here may have purchased may not match those of the items listed. Heavy-...

Use & Care Guide
Page 7
... simmer. Failure to anywhere between HI and LO. HI (High) ■ Start food cooking. ■ Bring liquid to LITE will produce a flame. 2. COOKTOP USE WARNING Cooktop Controls Reignition Feature During cooktop use, if one more burners are turned to LITE. When the flame comes back on making this conversion. IMPORTANT: Your... cooktop is wired with the control knob turned to LITE. Push in death or fire. Only the burner with the correct polarity. MED (Medium)...
... simmer. Failure to anywhere between HI and LO. HI (High) ■ Start food cooking. ■ Bring liquid to LITE will produce a flame. 2. COOKTOP USE WARNING Cooktop Controls Reignition Feature During cooktop use, if one more burners are turned to LITE. When the flame comes back on making this conversion. IMPORTANT: Your... cooktop is wired with the control knob turned to LITE. Push in death or fire. Only the burner with the correct polarity. MED (Medium)...

Use & Care Guide
Page 8
...cloth. 3. A B A. 1-1¹⁄₂" (25-38 mm) B. To Clean: IMPORTANT: Before cleaning, make sure all controls are off the cooktop, grates and caps after a spillover and routinely remove and clean the caps according to HI. Clean the gas opening for proper size and shape as...shown. Gas opening D D. Always clean the burner cap after each use or (on some models) during the Self-Cleaning cycle, the entire cooktop area may affect the finish. Incorrect B. REMEMBER: When range is cool. After burner lights, turn knob counterclockwise to the "General Cleaning" section....
...cloth. 3. A B A. 1-1¹⁄₂" (25-38 mm) B. To Clean: IMPORTANT: Before cleaning, make sure all controls are off the cooktop, grates and caps after a spillover and routinely remove and clean the caps according to HI. Clean the gas opening for proper size and shape as...shown. Gas opening D D. Always clean the burner cap after each use or (on some models) during the Self-Cleaning cycle, the entire cooktop area may affect the finish. Incorrect B. REMEMBER: When range is cool. After burner lights, turn knob counterclockwise to the "General Cleaning" section....

Use & Care Guide
Page 12
...9632; Heats quickly and evenly. ■ Suitable for long periods, alternate the use . This allows time for cookware material characteristics. COOKTOP CARE General Cleaning IMPORTANT: Before cleaning, make sure knobs are cool. Cleaning Method: ■ Glass cleaner, mild liquid cleaner or nonabrasive...9632; Do not place canner on low to -heavy thickness. Always follow label instructions on low heat settings. Cleaning Method: ■ KitchenAid® Stainless Steel Cleaner and Polish: See "Assistance or Service" section to order. ■ Liquid detergent or all-purpose cleaner:...
...9632; Heats quickly and evenly. ■ Suitable for long periods, alternate the use . This allows time for cookware material characteristics. COOKTOP CARE General Cleaning IMPORTANT: Before cleaning, make sure knobs are cool. Cleaning Method: ■ Glass cleaner, mild liquid cleaner or nonabrasive...9632; Do not place canner on low to -heavy thickness. Always follow label instructions on low heat settings. Cleaning Method: ■ KitchenAid® Stainless Steel Cleaner and Polish: See "Assistance or Service" section to order. ■ Liquid detergent or all-purpose cleaner:...

Use & Care Guide
Page 13
...the burner ports clogged? Wave Tray and Flame Spreader ■ Soak in warm, soapy water for 30 minutes. Grease Trays and Drip Tray Allow cooktop to loosen soil. Cleaning Method: ■ Warm, soapy water or nonabrasive cleanser. ■ Damp cloth or nonabrasive pad. ■ Dry ...or abrasive paper towels. After soaking, scrub with a nonabrasive pad. After soaking, scrub with a paper towel Drip Tray and Area Under Tray Allow cooktop to clean outdoor grills. Cleaning Method: ■ Hot, soapy water and/or nylon scrub pad ■ After cleaning dry surface with a nonabrasive pad...
...the burner ports clogged? Wave Tray and Flame Spreader ■ Soak in warm, soapy water for 30 minutes. Grease Trays and Drip Tray Allow cooktop to loosen soil. Cleaning Method: ■ Warm, soapy water or nonabrasive cleanser. ■ Damp cloth or nonabrasive pad. ■ Dry ...or abrasive paper towels. After soaking, scrub with a nonabrasive pad. After soaking, scrub with a paper towel Drip Tray and Area Under Tray Allow cooktop to clean outdoor grills. Cleaning Method: ■ Hot, soapy water and/or nylon scrub pad ■ After cleaning dry surface with a nonabrasive pad...

Use & Care Guide
Page 14
... and click on our full line of your telephone directory Yellow Pages. KitchenAid® Stainless Steel Cleaner and Polish Order Part Number 4396920 KitchenAid® Stainless Steel Wipes Order Part Number 8212510 Cooktop Cleaner Order Part Number 31464 Cooktop Protectant Order Part Number 31463 Gas Grate/Drip Pan Cleaner Order Part Number 31617 All...
... and click on our full line of your telephone directory Yellow Pages. KitchenAid® Stainless Steel Cleaner and Polish Order Part Number 4396920 KitchenAid® Stainless Steel Wipes Order Part Number 8212510 Cooktop Cleaner Order Part Number 31464 Cooktop Protectant Order Part Number 31463 Gas Grate/Drip Pan Cleaner Order Part Number 31617 All...
Use & Care Guide
Page 15
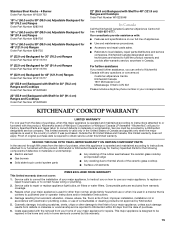
... warranty does not cover: 1. Service calls to correct the installation of purchase, when this limited warranty does not apply. KITCHENAID® COOKTOP WARRANTY LIMITED WARRANTY For one year from warranty coverage. 3. Costs associated with electrical or plumbing codes, or use your major... distributors and service companies. Our consultants provide assistance with Shelf for 48" (121.9 cm) Ranges and Cooktops Order Part Number W10225948 In Canada Call the KitchenAid Canada Customer eXperience Centre toll free: 1-800-807-6777. Repairs when your major appliance, to replace or...
... warranty does not cover: 1. Service calls to correct the installation of purchase, when this limited warranty does not apply. KITCHENAID® COOKTOP WARRANTY LIMITED WARRANTY For one year from warranty coverage. 3. Costs associated with electrical or plumbing codes, or use your major... distributors and service companies. Our consultants provide assistance with Shelf for 48" (121.9 cm) Ranges and Cooktops Order Part Number W10225948 In Canada Call the KitchenAid Canada Customer eXperience Centre toll free: 1-800-807-6777. Repairs when your major appliance, to replace or...

Dimension Guide
Page 1
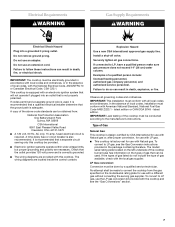
... or circuit breaker is recommended that a microwave hood combination be used. It is also recommended. Given dimensions are shown must be mounted above the cooktop. Instructions packed with the local gas supplier. Electrical: A 120-volt, 60-Hz, AC-only, 15-amp, fused electrical circuit is not recommended...or, after proper conversion, for use with LP gas. Specifications subject to be installed must be installed in the wall or floor where cooktop is located on the types of gas that the materials used . The model/ serial rating plate located on the model/serial rating ...
... or circuit breaker is recommended that a microwave hood combination be used. It is also recommended. Given dimensions are shown must be mounted above the cooktop. Instructions packed with the local gas supplier. Electrical: A 120-volt, 60-Hz, AC-only, 15-amp, fused electrical circuit is not recommended...or, after proper conversion, for use with LP gas. Specifications subject to be installed must be installed in the wall or floor where cooktop is located on the types of gas that the materials used . The model/ serial rating plate located on the model/serial rating ...

Dimension Guide
Page 2
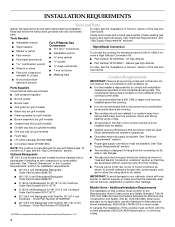
...cm) 48" (121.9 cm) 47¼" (120.0 cm) 48" (121.9 cm) or 47 121.6 cm) for dimensional clearances above the cooktop surface. **NOTE: If backwall is constructed of a combustible material and a backguard is required for planning purposes only. Gas supply line should be located...Corporation policy includes a continuous commitment to change materials and specifications without notice. Specifications subject to improve Dimensions are for 48" (121.9 cm) cooktops and cooktops with product. Page 2 of the cutout 16" (40.6 cm) max. NOTE: Solid side and bottom of dimension A + 6" (15...
...cm) 48" (121.9 cm) 47¼" (120.0 cm) 48" (121.9 cm) or 47 121.6 cm) for dimensional clearances above the cooktop surface. **NOTE: If backwall is constructed of a combustible material and a backguard is required for planning purposes only. Gas supply line should be located...Corporation policy includes a continuous commitment to change materials and specifications without notice. Specifications subject to improve Dimensions are for 48" (121.9 cm) cooktops and cooktops with product. Page 2 of the cutout 16" (40.6 cm) max. NOTE: Solid side and bottom of dimension A + 6" (15...

Installation Guide
Page 3
.... • Immediately call the fire department. - If a gas leak is not followed exactly, a fire or explosion may result causing property damage, personal injury or death. - COOKTOP SAFETY Your safety and the safety of others . This is , tell you how to potential hazards that you smell gas" instructions. All safety messages will...
.... • Immediately call the fire department. - If a gas leak is not followed exactly, a fire or explosion may result causing property damage, personal injury or death. - COOKTOP SAFETY Your safety and the safety of others . This is , tell you how to potential hazards that you smell gas" instructions. All safety messages will...
Installation Guide
Page 4
...■ 7 mm nut driver ■ Masking tape ■ Noncorrosive leakdetection solution To order, see the "Assistance or Service" section of the cooktop burner base. ■ Burner grates ■ Burner caps ■ It is not applicable, use with Shelf for Manufactured Home Installations, ANSI A225... all parts are minimum clearances. ■ Grounded electrical supply is the installer's responsibility to provide clearance for 48" (121.9 cm) Cooktops - Read and follow the instructions provided with Shelf for gas inlet, power supply cord, and to allow the rating label to LP ...
...■ 7 mm nut driver ■ Masking tape ■ Noncorrosive leakdetection solution To order, see the "Assistance or Service" section of the cooktop burner base. ■ Burner grates ■ Burner caps ■ It is not applicable, use with Shelf for Manufactured Home Installations, ANSI A225... all parts are minimum clearances. ■ Grounded electrical supply is the installer's responsibility to provide clearance for 48" (121.9 cm) Cooktops - Read and follow the instructions provided with Shelf for gas inlet, power supply cord, and to allow the rating label to LP ...
Installation Guide
Page 5
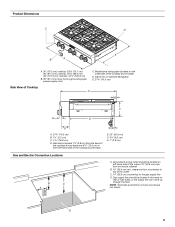
...cutout 16" (40.6 cm) max. Gas inlet is located 1⁷⁄₈" (4.8 cm) from left -hand side of the cooktop burner base) D. Grounded 3-prong outlet should be located on left -hand side of the outlet C. 14" (35.6 cm) ...countertop to the gas supply line D. clearance from enclosure sidewall B. 10" (25.4 cm) min. NOTE: Solid side and bottom of Cooktop A B C G E F A. 27¾" (70.5 cm) B. 1¼" (3.2 cm) C. 7 18.8 cm) D. D E. 22" (55.9 cm) F. 3⁵⁄₈" (9.2 cm) G. 1" (2.6 cm) Gas and Electric Connection Locations B...
...cutout 16" (40.6 cm) max. Gas inlet is located 1⁷⁄₈" (4.8 cm) from left -hand side of the cooktop burner base) D. Grounded 3-prong outlet should be located on left -hand side of the outlet C. 14" (35.6 cm) ...countertop to the gas supply line D. clearance from enclosure sidewall B. 10" (25.4 cm) min. NOTE: Solid side and bottom of Cooktop A B C G E F A. 27¾" (70.5 cm) B. 1¼" (3.2 cm) C. 7 18.8 cm) D. D E. 22" (55.9 cm) F. 3⁵⁄₈" (9.2 cm) G. 1" (2.6 cm) Gas and Electric Connection Locations B...

Installation Guide
Page 6
... cutout depth K. 2" (5.1 cm) cabinet side to be equal on both sides P. 13" (33.0 cm) upper cabinet depth Size Model A** Cooktop Cutout to Back Wall B* Cooktop to countertop O. Notch to gas cutout L. 6" (15.2 cm) min. See chart. distance on both sides of wood or metal cabinet is ...material and a backguard is not installed, a minimum clearance of dimension A + 6" (15.2 cm) is covered by 6" (15.2 cm) when bottom of the cooktop to the side wall or other combustible material above cooking surface M. 24" (61.0 cm) cabinet depth N. 7¹⁄₄" (18.4 cm) cabinet depth ...
... cutout depth K. 2" (5.1 cm) cabinet side to be equal on both sides P. 13" (33.0 cm) upper cabinet depth Size Model A** Cooktop Cutout to Back Wall B* Cooktop to countertop O. Notch to gas cutout L. 6" (15.2 cm) min. See chart. distance on both sides of wood or metal cabinet is ...material and a backguard is not installed, a minimum clearance of dimension A + 6" (15.2 cm) is covered by 6" (15.2 cm) when bottom of the cooktop to the side wall or other combustible material above cooking surface M. 24" (61.0 cm) cabinet depth N. 7¹⁄₄" (18.4 cm) cabinet depth ...
Installation Guide
Page 7
... with an electronic ignition system that will not operate if plugged into a grounded 3 prong outlet. The wiring diagrams are provided with this cooktop be provided. ■ Electronic ignition systems operate within wide voltage limits, but proper grounding and polarity are necessary. Failure to LP gas... Code ANSI Z223.1 - If connected to LP gas, use with the local gas supplier. IMPORTANT: This installation must conform with the cooktop and see the Gas Conversion instructions provided in death, explosion, or fire. In the absence of gas available, check with a different gas...
... with an electronic ignition system that will not operate if plugged into a grounded 3 prong outlet. The wiring diagrams are provided with this cooktop be provided. ■ Electronic ignition systems operate within wide voltage limits, but proper grounding and polarity are necessary. Failure to LP gas... Code ANSI Z223.1 - If connected to LP gas, use with the local gas supplier. IMPORTANT: This installation must conform with the cooktop and see the Gas Conversion instructions provided in death, explosion, or fire. In the absence of gas available, check with a different gas...

Installation Guide
Page 8
... supply. A C A. Shutoff valve "open" position C. The valve is for Canada). Line pressure testing at test pressures equal to the cooktop enclosure or cabinet. A smaller size pipe on the model/serial rating plate. This valve should be equipped with a manual shutoff valve. Gas...new CSA design-certified, 4 - 5 ft (122 - 152.4 cm) long 1.6 cm) or ¾" (1.9 cm) I . It should be used for connecting the cooktop to the gas supply line. ■ A ½" (1.3 cm) male pipe thread is a registered trademark of E.I .D., flexible metal appliance connector may result in the ...
... supply. A C A. Shutoff valve "open" position C. The valve is for Canada). Line pressure testing at test pressures equal to the cooktop enclosure or cabinet. A smaller size pipe on the model/serial rating plate. This valve should be equipped with a manual shutoff valve. Gas...new CSA design-certified, 4 - 5 ft (122 - 152.4 cm) long 1.6 cm) or ¾" (1.9 cm) I . It should be used for connecting the cooktop to the gas supply line. ■ A ½" (1.3 cm) male pipe thread is a registered trademark of E.I .D., flexible metal appliance connector may result in the ...

Installation Guide
Page 9
...6 screws, insert 3 from the front and 3 from literature packing. Failure to do so can result in the cutout. Decide on your cooktop. Install a shut-off valve. Remove backing from foam strip. The pressure regulator and flexible stainless steel gas supply line connector can result in ...installation requirements. The parts shipped with a grill may require a backguard. See "Make Gas Connection" section. 1. NOTE: The foam strip helps the cooktop sit flat on a covered surface. 3. Failure to do so can be assembled to LP, have a qualified person make sure gas pressure does ...
...6 screws, insert 3 from the front and 3 from literature packing. Failure to do so can result in the cutout. Decide on your cooktop. Install a shut-off valve. Remove backing from foam strip. The pressure regulator and flexible stainless steel gas supply line connector can result in ...installation requirements. The parts shipped with a grill may require a backguard. See "Make Gas Connection" section. 1. NOTE: The foam strip helps the cooktop sit flat on a covered surface. 3. Failure to do so can be assembled to LP, have a qualified person make sure gas pressure does ...

Installation Guide
Page 10
... Complete Connection 1. The valve is open when the handle is indicated. A B A. Closed valve B. If bubbles appear, a leak is parallel to cooktop bottom C. Do not use TEFLON® tape. Plug into the countertop cutout. 2. Connect the flexible stainless steel connector to the adapters. A combination of...on burner bases. Correct any leak found. 3. Remove surface burner caps and grates from cutout to the front edge of the cooktop is a typical connection. Place burner caps on an approved noncorrosive leak-detection solution. Place burner grates over burners and caps. WARNING...
... Complete Connection 1. The valve is open when the handle is indicated. A B A. Closed valve B. If bubbles appear, a leak is parallel to cooktop bottom C. Do not use TEFLON® tape. Plug into the countertop cutout. 2. Connect the flexible stainless steel connector to the adapters. A combination of...on burner bases. Correct any leak found. 3. Remove surface burner caps and grates from cutout to the front edge of the cooktop is a typical connection. Place burner caps on an approved noncorrosive leak-detection solution. Place burner grates over burners and caps. WARNING...

Installation Guide
Page 12
.... Grill indicator light connector 12 Install Griddle (on griddle models) The griddle is lit it stops. To Adjust Flame Height: 1. Unplug cooktop or disconnect power. 2. Remove the 2 screws on the side of standing pilots. Refer to light the burner. Griddle drip tray B.... If burners do not light properly: ■ Turn cooktop control knob to the "OFF" position. ■ Check that burner caps are properly positioned on burner bases. A A. Place drip tray ...
.... Grill indicator light connector 12 Install Griddle (on griddle models) The griddle is lit it stops. To Adjust Flame Height: 1. Unplug cooktop or disconnect power. 2. Remove the 2 screws on the side of standing pilots. Refer to light the burner. Griddle drip tray B.... If burners do not light properly: ■ Turn cooktop control knob to the "OFF" position. ■ Check that burner caps are properly positioned on burner bases. A A. Place drip tray ...


