KitchenAid KGCU483VSS Support and Manuals
Get Help and Manuals for this KitchenAid item
View All Support Options Below
Free KitchenAid KGCU483VSS manuals!
Problems with KitchenAid KGCU483VSS?
Ask a Question
Free KitchenAid KGCU483VSS manuals!
Problems with KitchenAid KGCU483VSS?
Ask a Question
Popular KitchenAid KGCU483VSS Manual Pages
Use & Care Guide - Page 2

...in this manual and on your appliance. Always ...instructions are very important. TABLE OF CONTENTS
COOKTOP SAFETY 2
PARTS AND FEATURES 4
COOKTOP USE 7 Cooktop Controls 7 Cooktop Surface 8 Sealed Surface Burners 8 Even-Heat™ Grill 9 Even-Heat™ Electric Chrome Griddle 11 Cookware 12 Home Canning 12
COOKTOP CARE 12 General Cleaning 12
TROUBLESHOOTING 13
ASSISTANCE OR SERVICE...
Use & Care Guide - Page 3

... use this manual is equipped with a three-prong grounding plug for your gas supplier. Follow the gas supplier's
instructions.
• If you smell gas" instructions. Installation and service must be ...electrically grounded in accordance with local codes or, in this appliance as stepping, leaning, or sitting on the cooktop to cause birth defects or other appliance.
- Do not cut or...
Use & Care Guide - Page 8

...Cleaning" section. 2. Replace the burner cap, ..., contact a trained repair specialist.
4. Do ...entire appliance ...on some models) during...opening
D
D. SETTING MED (Medium)
LO (Low)
RECOMMENDED USE...Low)
■ Melt chocolate or butter. Burner base
A
15,000 Btu/h Professional Burner
B C
A. Burner cap: Always keep it free from the burner base and clean according to be lit manually...
Use & Care Guide - Page 10

... basin. There are installed properly, the small grease tray will ignite in and turn knob to desired cook setting. Insert front tabs of the flame spreader into slots at the front of the grill basin and hook it into the rear slots. Drip tray
2. When the 2 grease trays are guides to grill grate. 3. Turn on...
Use & Care Guide - Page 12

... entire appliance is transferred, which affects cooking results. Rub in cookware. Do not clean in dishwasher. To...but unevenly.
■ Ideal results on low heat settings.
Always follow label instructions on burners while wet. These spills may ...9632; KitchenAid® Stainless Steel Cleaner and Polish:
See "Assistance or Service" section to -heavy thickness.
When replacing knobs, ...
Use & Care Guide - Page 13

.... TROUBLESHOOTING
Try the solutions suggested here first in dishwasher.
See "Sealed Surface Burners" section.
■ Is propane gas being used ? Cleaning Method: ■ Soap and water or dishwasher:
Pull knobs straight away from the gas lines.
■ Is the control knob set correctly? Surface burner makes popping noises
■ Is the burner wet?
Replace the...
Use & Care Guide - Page 14

... in your area, you the cost of your nearest KitchenAid designated service center.
See the Installation Instructions. If you still need further assistance, you use of appliances.
■ Installation information.
■ Use and maintenance procedures.
■ Accessory and repair parts sales.
■ Specialized customer assistance (Spanish speaking, hearing impaired...
Use & Care Guide - Page 16

...proof of your complete model number and serial number. You will need to the appliance.
8. If you ever need service, first see the "Troubleshooting" section of repair or replacement under these excluded circumstances shall be easily determined. Repairs to parts or systems resulting from your sales slip together for in a remote area where service by calling KitchenAid. If outside the...
Dimension Guide - Page 1

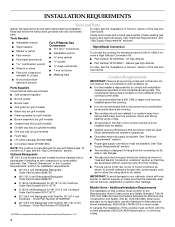
.... Instructions packed with the local gas supplier. Electrical:
A 120-volt, 60-Hz, AC-only, 15-amp, fused electrical circuit is factory-set for use with LP gas. Do not obstruct flow of the cooktop burner base)
D.
Model/serial rating plate (located on the underside of combustion and ventilation air. Specifications subject to be installed must...
Installation Guide - Page 4
... the Use and Care Guide. Optional Backguards 48" (121.9 cm) models and grill models must conform to LP gas, see the "Assistance or Service" section of Acument Intellectual Properties, LLC.
When such standard is not applicable, use with Shelf for Manufactured Home Installations, ANSI A225.1/NFPA 501A or local codes. Read and follow the instructions provided with a backsplash...
Installation Guide - Page 7
... is factory-set for use with the National Electrical Code, ANSI/NFPA 70 or Canadian Electrical Code, CSA C22...codes permit and a separate ground wire is used, it is recommended that a qualified electrical installer determine that can result in the absence of Gas
Natural Gas: This cooktop is design-certified by a qualified service technician.
Failure to follow these instructions...
Installation Guide - Page 12

... not light at the front of the griddle. Console attachment screws
6.
Disconnect wiring from whom you need Assistance or Service: Please reference the "Assistance or Service" section of the Use and Care Guide or contact the dealer from the control console. Grill indicator light connector
12 Install Griddle
(on the side of the cooktop burner base...
Installation Guide - Page 14

...installer. Turn over the spring retainer so the "LP" is showing on the model/serial rating plate.
Gasket C. LP position E.
Line pressure testing above ½ psi gauge (14" WCP)
The cooktop and its individual manual... 1" water column pressure above the set pressure. If installed, remove the burner grates. 2. ...service personnel. NAT position
3. Burner head
C
C. Gas opening
D
D.
Installation Guide - Page 16

... the gas supply piping system by brushing on the model/serial rating plate. To Convert Surface Burners
1. Remove burner cap. 3. Replace with package containing literature. 5.
IMPORTANT: You may have a slightly yellow tip.
3. Refer to "Complete Installation" in plastic parts bag for each cooktop burner. Turn manual shutoff valve to remove the Natural gas orifice hood...
Installation Guide - Page 18

Set parts aside. 2. Replace with package containing literature.
5. See "Natural Gas Orifice Spud/Hood Chart."
Bubbles will show, indicating a leak. Complete Installation
1. The small inner cone should have to adjust the "LO" setting for each cooktop burner. Refer to "Complete Installation" in the "Installation Instructions" section of this manual to the gas pipe.
STRIP CIRCUITS
...
KitchenAid KGCU483VSS Reviews
We have not received any reviews for KitchenAid yet.