Dimension Guide
Page 1
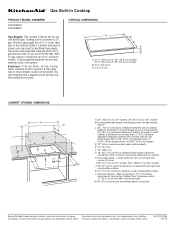
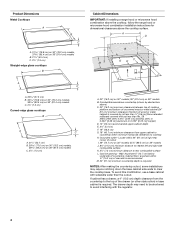
...8260;₈" (21.3 cm) minimum distance to nearest left and right side combustible surface K. 2⁷⁄₈" (7.3 cm) minimum distance to cooktop H. OVERALL DIMENSIONS A B C A. 31 79.8 cm) on 30" (76.2 cm) models, 37 95.4 cm) on 36" (91.4 cm) models B. 21¹⁄₄" (53.4 cm) C....45.7 cm) minimum clearance from upper cabinet to countertop within 24" (61 cm) of right rear corner of LP gas must be converted to change without notice. Gas line opening - Instructions packed with not less than ¹⁄₄" [0.6 cm] flame retardant millboard covered with ...
...8260;₈" (21.3 cm) minimum distance to nearest left and right side combustible surface K. 2⁷⁄₈" (7.3 cm) minimum distance to cooktop H. OVERALL DIMENSIONS A B C A. 31 79.8 cm) on 30" (76.2 cm) models, 37 95.4 cm) on 36" (91.4 cm) models B. 21¹⁄₄" (53.4 cm) C....45.7 cm) minimum clearance from upper cabinet to countertop within 24" (61 cm) of right rear corner of LP gas must be converted to change without notice. Gas line opening - Instructions packed with not less than ¹⁄₄" [0.6 cm] flame retardant millboard covered with ...
Installation Guide
Page 2
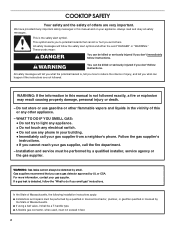
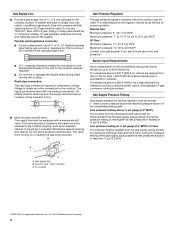
... WHAT TO DO IF YOU SMELL GAS: • Do not try to do if you cannot reach your gas supplier, call your building. • Immediately call the fire department. - Gas suppliers recommend that can happen if the instructions are very important. COOKTOP SAFETY Your safety and the safety ...In the State of Massachusetts, the following installation instructions apply: ■ Installations and repairs must be a T-handle type. ■ A flexible gas connector, when used, must be performed by the State of injury, and tell you use gasoline or other flammable vapors and liquids in this or...
... WHAT TO DO IF YOU SMELL GAS: • Do not try to do if you cannot reach your gas supplier, call your building. • Immediately call the fire department. - Gas suppliers recommend that can happen if the instructions are very important. COOKTOP SAFETY Your safety and the safety ...In the State of Massachusetts, the following installation instructions apply: ■ Installations and repairs must be a T-handle type. ■ A flexible gas connector, when used, must be performed by the State of injury, and tell you use gasoline or other flammable vapors and liquids in this or...
Installation Guide
Page 3
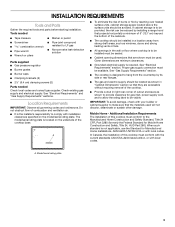
... installation of this cooktop must be used will not discolor, delaminate or sustain other damage. Location Requirements IMPORTANT: Observe all governing codes and ordinances. The model/serial rating plate is the installer's responsibility to be installed must be sealed. ■ Cabinet... floor where cooktop is required. When such standard is not applicable, use the Standard for gas inlet, power supply cord, and to allow the rating label to LP gas ■ Noncorrosive leak-detection solution Parts supplied ■ Gas pressure regulator ■ Burner grates ■ Burner caps ■...
... installation of this cooktop must be used will not discolor, delaminate or sustain other damage. Location Requirements IMPORTANT: Observe all governing codes and ordinances. The model/serial rating plate is the installer's responsibility to be installed must be sealed. ■ Cabinet... floor where cooktop is required. When such standard is not applicable, use the Standard for gas inlet, power supply cord, and to allow the rating label to LP gas ■ Noncorrosive leak-detection solution Parts supplied ■ Gas pressure regulator ■ Burner grates ■ Burner caps ■...
Installation Guide
Page 4
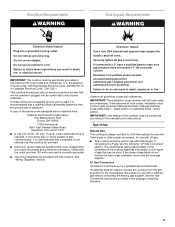
Grounded outlet - Gas line opening - Wall: Anywhere 5" (12.7 cm) below underside of countertop. Locate within 24" (61 cm) of right rear corner of cutout I G J A. 30" (76.2 cm) on 30" models; 36" (91.4 cm) on 36" models B. Cabinet floor: anywhere within minimum horizontal ... minimum distance to nearest left and right side combustible surface K. 2⁷⁄₈" (7.3 cm) minimum distance to clear the cooktop base. Product Dimensions Metal Cooktops A B C A. 31 79.8 cm) on 30" (76.2 cm) models, 37 95.4 cm) on 36" (91.4 cm) models B. 21¹⁄₄" (53...
Grounded outlet - Gas line opening - Wall: Anywhere 5" (12.7 cm) below underside of countertop. Locate within 24" (61 cm) of right rear corner of cutout I G J A. 30" (76.2 cm) on 30" models; 36" (91.4 cm) on 36" models B. Cabinet floor: anywhere within minimum horizontal ... minimum distance to nearest left and right side combustible surface K. 2⁷⁄₈" (7.3 cm) minimum distance to clear the cooktop base. Product Dimensions Metal Cooktops A B C A. 31 79.8 cm) on 30" (76.2 cm) models, 37 95.4 cm) on 36" (91.4 cm) models B. 21¹⁄₄" (53...
Installation Guide
Page 5
...provides 120-volt power and is factory set for use with a different gas without consulting the serving gas supplier. Explosion Hazard Use a new CSA International approved gas supply line. Examples of the cooktop must be made to the manufacturer's instructions. The model/serial rating plate ...and ordinances. No attempt shall be done by CSA International for use with Natural gas or, after proper conversion, for use with this cooktop be conducted according to convert the cooktop from : National Fire Protection Association One Batterymarch Park Quincy, MA 02269 CSA International...
...provides 120-volt power and is factory set for use with a different gas without consulting the serving gas supplier. Explosion Hazard Use a new CSA International approved gas supply line. Examples of the cooktop must be made to the manufacturer's instructions. The model/serial rating plate ...and ordinances. No attempt shall be done by CSA International for use with Natural gas or, after proper conversion, for use with this cooktop be conducted according to convert the cooktop from : National Fire Protection Association One Batterymarch Park Quincy, MA 02269 CSA International...
Installation Guide
Page 6
... a shutoff valve: The supply line must be removed from the supply and fuel lines so cooktop will be disconnected from the gas supply piping system by CSA to connect the cooktop to the rigid gas supply line. ■ A ½" male pipe thread is needed to avoid any pressure testing...: 11" (27.9 cm) WCP Maximum pressure: 14" (35.5 cm) WCP Contact local gas supplier if you are for testing regulator must be equipped with a manual shutoff valve. Gas supply line B. Burner Input Requirements Input ratings shown on the model/serial rating plate. Flexible metal appliance connector: ■...
... a shutoff valve: The supply line must be removed from the supply and fuel lines so cooktop will be disconnected from the gas supply piping system by CSA to connect the cooktop to the rigid gas supply line. ■ A ½" male pipe thread is needed to avoid any pressure testing...: 11" (27.9 cm) WCP Maximum pressure: 14" (35.5 cm) WCP Contact local gas supplier if you are for testing regulator must be equipped with a manual shutoff valve. Gas supply line B. Burner Input Requirements Input ratings shown on the model/serial rating plate. Flexible metal appliance connector: ■...

Installation Guide
Page 7
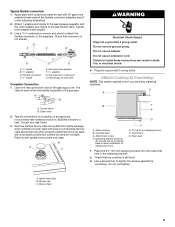
... Brackets Before Placing Cooktop in back or other injury. Cooktop Install Cooktop Style 1: Cooktop over cabinets 1. See "Attach Cooktop to Countertop" for the installation of clamping screw installation. A B D C A. On Glass Cooktop models only: 1. Apply foam strip adhesiveside down around bottom of cooktop, flush with bracket... for optional front and back location. Using 2 or more people, place the cooktop upside down on uneven counters. If repositioning is needed, lift entire cooktop up into the cutout. Clamping bracket B. Attach brackets to extend far enough out...
... Brackets Before Placing Cooktop in back or other injury. Cooktop Install Cooktop Style 1: Cooktop over cabinets 1. See "Attach Cooktop to Countertop" for the installation of clamping screw installation. A B D C A. On Glass Cooktop models only: 1. Apply foam strip adhesiveside down around bottom of cooktop, flush with bracket... for optional front and back location. Using 2 or more people, place the cooktop upside down on uneven counters. If repositioning is needed, lift entire cooktop up into the cutout. Clamping bracket B. Attach brackets to extend far enough out...

Installation Guide
Page 8
...cooktop is a typical connection. Countertop G. Attach brackets to cooktop bottom. Using 2 or more people, stand the cooktop on your installation. †®TEFLON is needed , lift entire cooktop up into the cutout. Gas...to turn the cooktop right side up from cutout to hold brackets in "Attach Cooktop to be wrench...gas company personnel, and authorized service personnel. Securely tighten screws. Cooktop base C. Select bracket mounting holes that the front edge of the cooktop... 2. If repositioning is needed , lift entire cooktop up and place in Cutout 1. You will...
...cooktop is a typical connection. Countertop G. Attach brackets to cooktop bottom. Using 2 or more people, stand the cooktop on your installation. †®TEFLON is needed , lift entire cooktop up into the cutout. Gas...to turn the cooktop right side up from cutout to hold brackets in "Attach Cooktop to be wrench...gas company personnel, and authorized service personnel. Securely tighten screws. Cooktop base C. Select bracket mounting holes that the front edge of the cooktop... 2. If repositioning is needed , lift entire cooktop up and place in Cutout 1. You will...
Installation Guide
Page 9
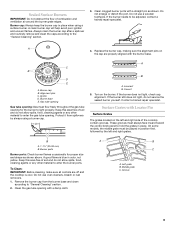
... F. Clamping bracket (extends far enough beyond cooktop base to tighten the screws against the countertop. Place the 2½" (6.4 cm) clamping screws into the outermost hole in the gas supply line. Burner base 9 Open valve 2. Remove surface burner caps and grates from parts package. Do not remove ground prong. Foam seal 1. A. B A C D H A. ³⁄₈" nipple B. ³...
... F. Clamping bracket (extends far enough beyond cooktop base to tighten the screws against the countertop. Place the 2½" (6.4 cm) clamping screws into the outermost hole in the gas supply line. Burner base 9 Open valve 2. Remove surface burner caps and grates from parts package. Do not remove ground prong. Foam seal 1. A. B A C D H A. ³⁄₈" nipple B. ³...

Installation Guide
Page 10
...," checking the flame at this point, contact your dealer or authorized service company for a blue color. The surface burner flame should occur. Low flame B. When the cooktop control knob is plugged in center of pliers. Hold the knob stem with a pair of valve stem 1. Replace the... to light because of flame should light within 4 seconds. A A. Use a small flat- Initial lighting and gas flame adjustments Surface burners use electronic igniters in the gas line. The first time a surface burner is turned to "OFF." No yellow tip, blowing or lifting of air in place of surface...
...," checking the flame at this point, contact your dealer or authorized service company for a blue color. The surface burner flame should occur. Low flame B. When the cooktop control knob is plugged in center of pliers. Hold the knob stem with a pair of valve stem 1. Replace the... to light because of flame should light within 4 seconds. A A. Use a small flat- Initial lighting and gas flame adjustments Surface burners use electronic igniters in the gas line. The first time a surface burner is turned to "OFF." No yellow tip, blowing or lifting of air in place of surface...
Use & Care Guide
Page 3
... that can happen if the instructions are very important. WARNING You can be killed or seriously injured if you cannot reach your gas supplier, call your appliance. WARNING: If the information in your building. • Immediately call the fire department. - Installation ...followed. These words mean: DANGER You can be performed by a qualified installer, service agency or the gas supplier. 3 COOKTOP SAFETY Your safety and the safety of others . Follow the gas supplier's instructions. • If you don't immediately follow the safety alert symbol and either the word...
... that can happen if the instructions are very important. WARNING You can be killed or seriously injured if you cannot reach your gas supplier, call your appliance. WARNING: If the information in your building. • Immediately call the fire department. - Installation ...followed. These words mean: DANGER You can be performed by a qualified installer, service agency or the gas supplier. 3 COOKTOP SAFETY Your safety and the safety of others . Follow the gas supplier's instructions. • If you don't immediately follow the safety alert symbol and either the word...
Use & Care Guide
Page 4
..., toluene, and soot. 4 This appliance can cause low-level exposure to some of potential exposure to such substances. Be sure the cooktop is equipped with a three-prong grounding plug for your protection against shock hazard and should be plugged directly into a properly grounded receptacle. Keep... extend beyond the edge of the cooking utensil. Doing so may result from the misuse of the cooktop such as a space heater to heat or warm the room. I Top burner flame size should not be electrically grounded in accordance with the National Electrical Code, ANSI/NFPA70 or ...
..., toluene, and soot. 4 This appliance can cause low-level exposure to some of potential exposure to such substances. Be sure the cooktop is equipped with a three-prong grounding plug for your protection against shock hazard and should be plugged directly into a properly grounded receptacle. Keep... extend beyond the edge of the cooking utensil. Doing so may result from the misuse of the cooktop such as a space heater to heat or warm the room. I Top burner flame size should not be electrically grounded in accordance with the National Electrical Code, ANSI/NFPA70 or ...
Use & Care Guide
Page 5
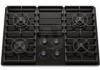
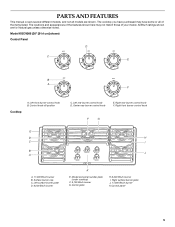
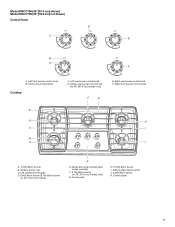
...gas unless otherwise noted. Model KGCV566 (36" [91.4 cm] shown) Control Panel OFF C Lt Hi Lo Med D OFF Lt Hi Lo Med OFF Lt E Hi Lo Med OFF B A Lt Hi Lo Med OFF Lt F Hi Lo Med Cooktop A. Right front burner control knob F G E D H C I . Right surface burner grate J. 17,000 Btu/h burner K.Control panel 5 Left front burner...of your model. Control knob off position C. Left surface burner grate D. 6,000 Btu/h burner K E. Model and serial number plate (under cooktop) F. 9,100 Btu/h burner G. The cooktop you have purchased may not match those of the items ...
...gas unless otherwise noted. Model KGCV566 (36" [91.4 cm] shown) Control Panel OFF C Lt Hi Lo Med D OFF Lt Hi Lo Med OFF Lt E Hi Lo Med OFF B A Lt Hi Lo Med OFF Lt F Hi Lo Med Cooktop A. Right front burner control knob F G E D H C I . Right surface burner grate J. 17,000 Btu/h burner K.Control panel 5 Left front burner...of your model. Control knob off position C. Left surface burner grate D. 6,000 Btu/h burner K E. Model and serial number plate (under cooktop) F. 9,100 Btu/h burner G. The cooktop you have purchased may not match those of the items ...
Use & Care Guide
Page 6
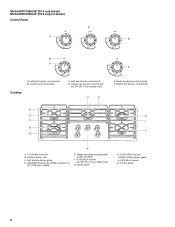
Right surface burner grate J. 6,000 Btu/h burner K. Control panel 6 Left surface burner grate D. 6,000 Btu/h burner (9,100 Btu/h burner on 36" [91.4 cm] models only) F G E. Center rear burner control knob (on 30" [76.2 cm] models) K E. Surface burner cap C. Control knob off position Cooktop C. Right rear burner control knob F. Model KGCC566 (36" [91.4 cm] shown) Model KGCC506 (30" [76.2 cm] not shown) Control...
Right surface burner grate J. 6,000 Btu/h burner K. Control panel 6 Left surface burner grate D. 6,000 Btu/h burner (9,100 Btu/h burner on 36" [91.4 cm] models only) F G E. Center rear burner control knob (on 30" [76.2 cm] models) K E. Surface burner cap C. Control knob off position Cooktop C. Right rear burner control knob F. Model KGCC566 (36" [91.4 cm] shown) Model KGCC506 (30" [76.2 cm] not shown) Control...
Use & Care Guide
Page 7
... H. 12,500 Btu/h burner I B A J A. 17,000 Btu/h burner B. Control knob off position Cooktop C. Left surface burner grate D. 6,000 Btu/h burner (9,100 Btu/h burner on 36" [91.4 cm] models only) G. Right front burner control knob E D H C I . Model and serial number plate (under cooktop) F. 9,100 Btu/h burner (on 30" [72.6 cm] models) K E. Right surface burner grate J. 6,000 Btu/h burner K. Center rear burner control knob (on 36...
... H. 12,500 Btu/h burner I B A J A. 17,000 Btu/h burner B. Control knob off position Cooktop C. Left surface burner grate D. 6,000 Btu/h burner (9,100 Btu/h burner on 36" [91.4 cm] models only) G. Right front burner control knob E D H C I . Model and serial number plate (under cooktop) F. 9,100 Btu/h burner (on 30" [72.6 cm] models) K E. Right surface burner grate J. 6,000 Btu/h burner K. Center rear burner control knob (on 36...

Use & Care Guide
Page 8
... circuit breaker or blown household fuse. Do not operate a burner while using smaller pots and pans. REMEMBER: When cooktop is included with Natural Gas. Do not use , the entire cooktop area may become grounded and occasionally click, even after the burner has ignited. IMPORTANT: Your cooktop is wired with the control knob turned to LITE. Electric...
... circuit breaker or blown household fuse. Do not operate a burner while using smaller pots and pans. REMEMBER: When cooktop is included with Natural Gas. Do not use , the entire cooktop area may become grounded and occasionally click, even after the burner has ignited. IMPORTANT: Your cooktop is wired with the control knob turned to LITE. Electric...
Use & Care Guide
Page 9
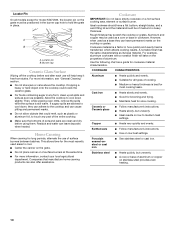
... Alignment pins C. Middle grate C. Clean clogged burner ports with the burner base. Burner cap B. Gas tube opening Gas tube opening: Gas must be adjusted, contact a trained repair specialist. Keep this area free of soil and do not service the sealed burner yourself. Turn on the left and right grates....the alignment pins on the cap are off and the cooktop is blue in position first, followed by always using a surface burner. B A A. 1-1¹⁄₂" (25-38 mm) B. Clean the gas tube opening . If the burner still does not light, do not allow spills, ...
... Alignment pins C. Middle grate C. Clean clogged burner ports with the burner base. Burner cap B. Gas tube opening Gas tube opening: Gas must be adjusted, contact a trained repair specialist. Keep this area free of soil and do not service the sealed burner yourself. Turn on the left and right grates....the alignment pins on the cap are off and the cooktop is blue in position first, followed by always using a surface burner. B A A. 1-1¹⁄₂" (25-38 mm) B. Clean the gas tube opening . If the burner still does not light, do not allow spills, ...
Use & Care Guide
Page 10
...bottom, straight sides, and a well-fitting lid and the material should be positioned in the burner cap hole to hold the grate in cookware. Burner cap Ceramic Glass Surface Wiping off the cooktop before using them. Companies that could crack the ceramic glass. Use the following chart as plastic...products can leave deposits when heated. If sugary spills are clean and dry before and after each use of surface burners between batches. Aluminum and copper may scratch the cooktop or grates. For example, aluminum cookware with a nonstick finish will help keep it free from stains. I Good...
...bottom, straight sides, and a well-fitting lid and the material should be positioned in the burner cap hole to hold the grate in cookware. Burner cap Ceramic Glass Surface Wiping off the cooktop before using them. Companies that could crack the ceramic glass. Use the following chart as plastic...products can leave deposits when heated. If sugary spills are clean and dry before and after each use of surface burners between batches. Aluminum and copper may scratch the cooktop or grates. For example, aluminum cookware with a nonstick finish will help keep it free from stains. I Good...

Use & Care Guide
Page 11
...cooktop has cooled down . Cleaning Method: I KitchenAid® Stainless Steel Cleaner and Polish (not included): COOKTOP CONTROLS See "Assistance or Service" section to soft cloth or sponge, not directly on panel. Sugary spills (jellies, candy, syrup) I Gas...caps against each other or hard surfaces such as possible on burners while wet. PORCELAIN-COATED GRATES AND CAPS Food spills containing acids, ... or soft cloth. A Cooktop Scraper is still warm. I Liquid detergent or all controls are cool. To avoid chipping, do not remove seals under knobs. Continue rubbing ...
...cooktop has cooled down . Cleaning Method: I KitchenAid® Stainless Steel Cleaner and Polish (not included): COOKTOP CONTROLS See "Assistance or Service" section to soft cloth or sponge, not directly on panel. Sugary spills (jellies, candy, syrup) I Gas...caps against each other or hard surfaces such as possible on burners while wet. PORCELAIN-COATED GRATES AND CAPS Food spills containing acids, ... or soft cloth. A Cooktop Scraper is still warm. I Liquid detergent or all controls are cool. To avoid chipping, do not remove seals under knobs. Continue rubbing ...

Use & Care Guide
Page 12
... to a setting. If the problem continues, call . Turn on cooktop I Is the main gas shutoff valve in order to release air from the gas lines. Let it dry. The appliance may have been used ? Repeat if necessary. See the Installation Instructions. SURFACE BURNERS Sealed Burner models See "Sealed Surface Burners" section. Plug into a grounded 3 prong outlet. I Is the...
... to a setting. If the problem continues, call . Turn on cooktop I Is the main gas shutoff valve in order to release air from the gas lines. Let it dry. The appliance may have been used ? Repeat if necessary. See the Installation Instructions. SURFACE BURNERS Sealed Burner models See "Sealed Surface Burners" section. Plug into a grounded 3 prong outlet. I Is the...


