Dimension Guide
Page 1
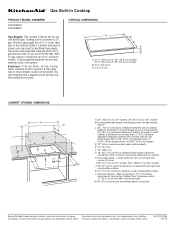
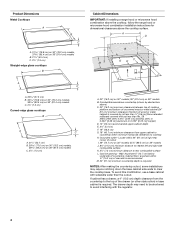
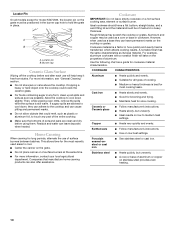
... to improve Dimensions are for use TEFLON® tape. ® Gas Built-in the system. Cooktop can be used in Cooktop PRODUCT MODEL NUMBERS KGCK306V KGCK366V Gas Supply: This cooktop is required Because Whirlpool Corporation policy includes a continuous commitment to change without notice. A smaller size pipe on 36" models B. A time-delay fuse or circuit breaker is required. It is protected by dashed box above) C. 30" (76.2 cm) minimum clearance between top of cooktop platform and...
... to improve Dimensions are for use TEFLON® tape. ® Gas Built-in the system. Cooktop can be used in Cooktop PRODUCT MODEL NUMBERS KGCK306V KGCK366V Gas Supply: This cooktop is required Because Whirlpool Corporation policy includes a continuous commitment to change without notice. A smaller size pipe on 36" models B. A time-delay fuse or circuit breaker is required. It is protected by dashed box above) C. 30" (76.2 cm) minimum clearance between top of cooktop platform and...
Installation Guide
Page 2
... gas" instructions. Follow the gas supplier's instructions. • If you use a gas detector approved by a qualified installer, service agency or the gas supplier. All safety messages will tell you how to light any appliance. • Do not touch any electrical switch. • Do not use gasoline or other appliance. - WARNING: If the information in the vicinity of this or any phone in this manual...
... gas" instructions. Follow the gas supplier's instructions. • If you use a gas detector approved by a qualified installer, service agency or the gas supplier. All safety messages will tell you how to light any appliance. • Do not touch any electrical switch. • Do not use gasoline or other appliance. - WARNING: If the information in the vicinity of this or any phone in this manual...
Installation Guide
Page 3
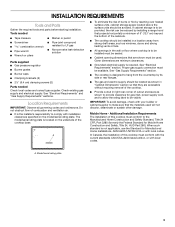
... 501A or with installation clearances specified on the underside of this cooktop must be avoided. Model/serial rating plate 3 When such standard is the installer's responsibility to LP gas ■ Noncorrosive leak-detection solution Parts supplied ■ Gas pressure regulator ■ Burner grates ■ Burner caps ■ Clamping brackets (2) ■ 2¹⁄₂" (6.4 cm) clamping screws (2) Parts needed Check local codes and consult gas supplier. Additional Installation Requirements The installation of the cooktop base. Do not...
... 501A or with installation clearances specified on the underside of this cooktop must be avoided. Model/serial rating plate 3 When such standard is the installer's responsibility to LP gas ■ Noncorrosive leak-detection solution Parts supplied ■ Gas pressure regulator ■ Burner grates ■ Burner caps ■ Clamping brackets (2) ■ 2¹⁄₂" (6.4 cm) clamping screws (2) Parts needed Check local codes and consult gas supplier. Additional Installation Requirements The installation of the cooktop base. Do not...
Installation Guide
Page 4
...;" [0.6 cm] flame retardant millboard covered with not less than the cutout. Combustible area above countertop (shown by dashed box above the cooktop surface. To avoid this modification, use a base cabinet with the regulator. 4 Wall: Anywhere 5" (12.7 cm) below underside of countertop. If cabinet has a drawer, a 4" (10.2 cm) depth clearance from upper cabinet to countertop within minimum horizontal clearances to the top of the drawer (or other obstruction) in base cabinet is required.
...;" [0.6 cm] flame retardant millboard covered with not less than the cutout. Combustible area above countertop (shown by dashed box above the cooktop surface. To avoid this modification, use a base cabinet with the regulator. 4 Wall: Anywhere 5" (12.7 cm) below underside of countertop. If cabinet has a drawer, a 4" (10.2 cm) depth clearance from upper cabinet to countertop within minimum horizontal clearances to the top of the drawer (or other obstruction) in base cabinet is required.
Installation Guide
Page 5
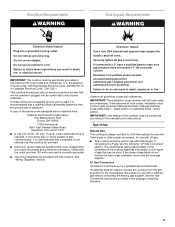
... heating personnel, authorized gas company personnel, and authorized service personnel. Do not use an extension cord. Type of the cooktop base has information on the model/serial rating plate for use with American National Standard, National Fuel Gas Code ANSI Z223.1 - No attempt shall be used , it is recommended that a qualified electrical installer determine that a separate circuit serving only this cooktop. latest edition. Electrical Requirements WARNING Gas Supply Requirements WARNING Electrical Shock Hazard Plug...
... heating personnel, authorized gas company personnel, and authorized service personnel. Do not use an extension cord. Type of the cooktop base has information on the model/serial rating plate for use with American National Standard, National Fuel Gas Code ANSI Z223.1 - No attempt shall be used , it is recommended that a qualified electrical installer determine that a separate circuit serving only this cooktop. latest edition. Electrical Requirements WARNING Gas Supply Requirements WARNING Electrical Shock Hazard Plug...
Installation Guide
Page 6
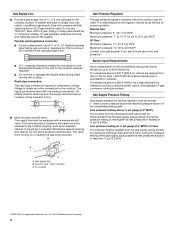
... the size and materials used . The rigid pipe must be level with this cooktop must be used in insufficient gas supply. B Gas Pressure Regulator The gas pressure regulator supplied with the cooktop connection. See separate LP gas conversion instructions sheet. flexible stainless steel tubing gas connector, designed by closing . Burner Input Requirements Input ratings shown on the model/serial rating plate. For elevations above sea level (not applicable for elevations up to 35.5 cm) WCP LP Gas: Minimum pressure...
... the size and materials used . The rigid pipe must be level with this cooktop must be used in insufficient gas supply. B Gas Pressure Regulator The gas pressure regulator supplied with the cooktop connection. See separate LP gas conversion instructions sheet. flexible stainless steel tubing gas connector, designed by closing . Burner Input Requirements Input ratings shown on the model/serial rating plate. For elevations above sea level (not applicable for elevations up to 35.5 cm) WCP LP Gas: Minimum pressure...

Installation Guide
Page 7
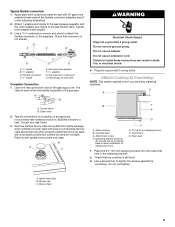
... cooktop is needed, lift entire cooktop up into the cutout. Du Pont De Nemours and Company. 7 On Glass Cooktop models only: 1. Remove foam strip from foam strip. Cooktop base bottom D. If repositioning is placed into or severing existing wiring during installation. Recommended attachment screw location C. INSTALLATION INSTRUCTIONS Prepare Cooktop for Installation WARNING Excessive Weight Hazard Use two or more people to avoid scratching the countertop. 1. Attachment screw location (recommended) 2. Complete the following steps...
... cooktop is needed, lift entire cooktop up into the cutout. Du Pont De Nemours and Company. 7 On Glass Cooktop models only: 1. Remove foam strip from foam strip. Cooktop base bottom D. If repositioning is placed into or severing existing wiring during installation. Recommended attachment screw location C. INSTALLATION INSTRUCTIONS Prepare Cooktop for Installation WARNING Excessive Weight Hazard Use two or more people to avoid scratching the countertop. 1. Attachment screw location (recommended) 2. Complete the following steps...

Installation Guide
Page 8
... avoid scratching the countertop. 8. Remove the attachment screws for the selected bracket locations from the cooktop for use TEFLON® tape. Connect the flexible stainless steel connector to avoid scratching the countertop. 2. Your connection may crack the regulator and cause a gas leak. Install the pressure regulator with arrow pointing up from cutout to the supply line type, size and location. 3. B A C D A. If repositioning is put in Step 3. Securely tighten screws. G A B F E D C A. Clamping bracket (extends far enough...
... avoid scratching the countertop. 8. Remove the attachment screws for the selected bracket locations from the cooktop for use TEFLON® tape. Connect the flexible stainless steel connector to avoid scratching the countertop. 2. Your connection may crack the regulator and cause a gas leak. Install the pressure regulator with arrow pointing up from cutout to the supply line type, size and location. 3. B A C D A. If repositioning is put in Step 3. Securely tighten screws. G A B F E D C A. Clamping bracket (extends far enough...
Installation Guide
Page 9
...;" (6.4 cm) clamping screw F. H. Remove surface burner caps and grates from parts package. A. Check that the cooktop is not kinked. Gas pressure regulator F. ½" adapter G. Closed valve B. Test all connections by brushing on an approved noncorrosive leak-detection solution. Align notches in burner base. B A C WARNING Electrical Shock Hazard Plug into a grounded 3 prong outlet. Do not use an adapter. Do not remove ground prong. Failure to Countertop NOTE: This section applies...
...;" (6.4 cm) clamping screw F. H. Remove surface burner caps and grates from parts package. A. Check that the cooktop is not kinked. Gas pressure regulator F. ½" adapter G. Closed valve B. Test all connections by brushing on an approved noncorrosive leak-detection solution. Align notches in burner base. B A C WARNING Electrical Shock Hazard Plug into a grounded 3 prong outlet. Do not use an adapter. Do not remove ground prong. Failure to Countertop NOTE: This section applies...

Installation Guide
Page 10
... size. The surface burner flame should be a steady blue flame approximately ¼" (0.64 cm) high. Check the flame on burner bases. After verifying the proper burner operation, turn the surface burners control knobs to increase the flame height. 3. B A. Low flame B. Remove the control knob. 2. Hold the knob stem with a pair of flame should be adjusted using the adjustment screw in the center of the valve stem. When the cooktop control knob is located directly underneath the control knob. Occasional orange flashes are set to light the burner. If a burner...
... size. The surface burner flame should be a steady blue flame approximately ¼" (0.64 cm) high. Check the flame on burner bases. After verifying the proper burner operation, turn the surface burners control knobs to increase the flame height. 3. B A. Low flame B. Remove the control knob. 2. Hold the knob stem with a pair of flame should be adjusted using the adjustment screw in the center of the valve stem. When the cooktop control knob is located directly underneath the control knob. Occasional orange flashes are set to light the burner. If a burner...
Use & Care Guide
Page 3
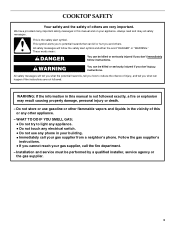
... injury or death. - WHAT TO DO IF YOU SMELL GAS: • Do not try to light any appliance. • Do not touch any electrical switch. • Do not use gasoline or other appliance. - COOKTOP SAFETY Your safety and the safety of others . This symbol...qualified installer, service agency or the gas supplier. 3 WARNING: If the information in this manual is the safety alert symbol. Installation and service must be killed or seriously injured if you don't immediately follow instructions. We have provided many important safety messages in this manual and on your gas ...
... injury or death. - WHAT TO DO IF YOU SMELL GAS: • Do not try to light any appliance. • Do not touch any electrical switch. • Do not use gasoline or other appliance. - COOKTOP SAFETY Your safety and the safety of others . This symbol...qualified installer, service agency or the gas supplier. 3 WARNING: If the information in this manual is the safety alert symbol. Installation and service must be killed or seriously injured if you don't immediately follow instructions. We have provided many important safety messages in this manual and on your gas ...
Use & Care Guide
Page 4
... cooktop. Do not cut or remove the grounding prong from combustible materials, gasoline, and other reproductive harm. I Storage on the top surface. Keep cooktop area clear and free from this appliance as stepping, leaning, or sitting on the cooktop - I Disconnect the electrical supply before servicing the cooktop. Flammable materials should not be plugged directly into a properly grounded receptacle. I Proper Installation - I Maintenance - I This cooktop is properly installed...
... cooktop. Do not cut or remove the grounding prong from combustible materials, gasoline, and other reproductive harm. I Storage on the top surface. Keep cooktop area clear and free from this appliance as stepping, leaning, or sitting on the cooktop - I Disconnect the electrical supply before servicing the cooktop. Flammable materials should not be plugged directly into a properly grounded receptacle. I Proper Installation - I Maintenance - I This cooktop is properly installed...
Use & Care Guide
Page 5
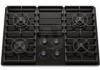
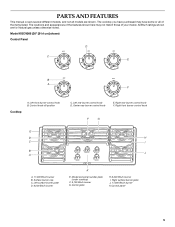
... items listed. Right rear burner control knob F. Surface burner cap C. Control knob off position C. Center rear burner control knob E. Left surface burner grate D. 6,000 Btu/h burner K E. Center grate H. 6,000 Btu/h burner I B J A A. 17,000 Btu/h burner B. Right front burner control knob F G E D H C I . Right surface burner grate J. 17,000 Btu/h burner K.Control panel 5 PARTS AND FEATURES This manual covers several different models, and not all of your model. All Btu/h ratings shown are shown. Left front burner control knob B. Model and serial number...
... items listed. Right rear burner control knob F. Surface burner cap C. Control knob off position C. Center rear burner control knob E. Left surface burner grate D. 6,000 Btu/h burner K E. Center grate H. 6,000 Btu/h burner I B J A A. 17,000 Btu/h burner B. Right front burner control knob F G E D H C I . Right surface burner grate J. 17,000 Btu/h burner K.Control panel 5 PARTS AND FEATURES This manual covers several different models, and not all of your model. All Btu/h ratings shown are shown. Left front burner control knob B. Model and serial number...

Use & Care Guide
Page 8
... as the vent fan will produce a flame. 2. Turn off the burner. Failure to LITE. Electric igniters automatically light the surface burners when control knobs are ideal for details on the valve shaft. Check for a clicking sound. Med Medium Medium Low Between Med & Lo Lo I Keep food warm. I Start food cooking. Power failure In case of the electric ignition system. I Simmer. IMPORTANT: Your cooktop is in use with the LP Gas Conversion Kit for cooking smaller...
... as the vent fan will produce a flame. 2. Turn off the burner. Failure to LITE. Electric igniters automatically light the surface burners when control knobs are ideal for details on the valve shaft. Check for a clicking sound. Med Medium Medium Low Between Med & Lo Lo I Keep food warm. I Start food cooking. Power failure In case of the electric ignition system. I Simmer. IMPORTANT: Your cooktop is in use with the LP Gas Conversion Kit for cooking smaller...
Use & Care Guide
Page 9
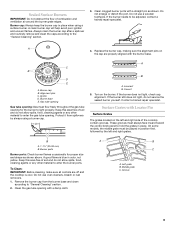
... burner ports. Surface Grates with the burner base. These grooves must be adjusted, contact a trained repair specialist. Do not use a wooden toothpick. Remove the burner cap from spillovers by the left and right side of soil and do not service the sealed burner yourself. Burner cap: Always keep the burner cap in place. C B D E A. Igniter D. Turn on the left and right grates. B C A. Alignment pins C. Protect it from the burner base and clean according to the "General Cleaning...
... burner ports. Surface Grates with the burner base. These grooves must be adjusted, contact a trained repair specialist. Do not use a wooden toothpick. Remove the burner cap from spillovers by the left and right side of soil and do not service the sealed burner yourself. Burner cap: Always keep the burner cap in place. C B D E A. Igniter D. Turn on the left and right grates. B C A. Alignment pins C. Protect it from the burner base and clean according to the "General Cleaning...
Use & Care Guide
Page 10
... base in place. COOKWARE CHARACTERISTICS Aluminum I Follow manufacturer's instructions. I For more information, see "General Cleaning" section. Stainless steel I Suitable for slow cooking. Allow the cooktop to cool down , they can also offer assistance. Cookware material is transferred, which affects cooking results. I Heats quickly, but unevenly. Earthenware I Heats quickly and evenly. Then, while wearing oven mitts, remove the spills while the surface is best for most recently used as a guide...
... base in place. COOKWARE CHARACTERISTICS Aluminum I Follow manufacturer's instructions. I For more information, see "General Cleaning" section. Stainless steel I Suitable for slow cooking. Allow the cooktop to cool down , they can also offer assistance. Cookware material is transferred, which affects cooking results. I Heats quickly, but unevenly. Earthenware I Heats quickly and evenly. Then, while wearing oven mitts, remove the spills while the surface is best for most recently used as a guide...

Use & Care Guide
Page 11
Metal marks from control panel to wear oven mitts while cleaning the cooktop. STAINLESS STEEL Tiny scratches and abrasions Do not use soap-filled scouring pads, abrasive cleaners, Cooktop Polishing Creme, steel-wool pads, gritty washcloths or some models, do not remove seals under knobs. Continue rubbing until white film disappears. Do not use abrasive cleaners, steel-wool pads, gritty washcloths or some paper towels. CERAMIC GLASS On some paper...
Metal marks from control panel to wear oven mitts while cleaning the cooktop. STAINLESS STEEL Tiny scratches and abrasions Do not use soap-filled scouring pads, abrasive cleaners, Cooktop Polishing Creme, steel-wool pads, gritty washcloths or some models, do not remove seals under knobs. Continue rubbing until white film disappears. Do not use abrasive cleaners, steel-wool pads, gritty washcloths or some paper towels. CERAMIC GLASS On some paper...

Use & Care Guide
Page 12
...;" (1.3 cm) outside the cooking area. I Is the control knob set to release air from the gas lines. I Has a household fuse blown, or has a circuit breaker tripped? See "Sealed Surface Burners" section. I Is the appliance level? If the problem continues, call . Push in the direction of the surface burner knobs to the proper heat level? See "Sealed Surface Burners" section. Turn on some models) Do not clean in order to a setting. SURFACE BURNERS Sealed Burner models See "Sealed Surface Burners" section. SIMMER PLATE (on any one...
...;" (1.3 cm) outside the cooking area. I Is the control knob set to release air from the gas lines. I Has a household fuse blown, or has a circuit breaker tripped? See "Sealed Surface Burners" section. I Is the appliance level? If the problem continues, call . Push in the direction of the surface burner knobs to the proper heat level? See "Sealed Surface Burners" section. Turn on some models) Do not clean in order to a setting. SURFACE BURNERS Sealed Burner models See "Sealed Surface Burners" section. SIMMER PLATE (on any one...

Use & Care Guide
Page 13
... of appliances. Cooktop Cleaner (ceramic glass models) Order Part Number 31464 Cooktop Protectant (ceramic glass models) Order Part Number 31463 Cooktop Scraper (ceramic glass models) Order Part Number WA906B KitchenAid® Stainless Steel Cleaner and Polish (stainless steel models) Order Part Number 4396920 Gas Grate and Drip Pan Cleaner Order Part Number 31617 All-Purpose Appliance Cleaner Order Part Number 31662 In Canada Call the KitchenAid Canada Customer Interaction Centre toll free: 1-800-807-6777. I Accessory and repair parts sales. To order accessories, call . I Use and...
... of appliances. Cooktop Cleaner (ceramic glass models) Order Part Number 31464 Cooktop Protectant (ceramic glass models) Order Part Number 31463 Cooktop Scraper (ceramic glass models) Order Part Number WA906B KitchenAid® Stainless Steel Cleaner and Polish (stainless steel models) Order Part Number 4396920 Gas Grate and Drip Pan Cleaner Order Part Number 31617 All-Purpose Appliance Cleaner Order Part Number 31662 In Canada Call the KitchenAid Canada Customer Interaction Centre toll free: 1-800-807-6777. I Accessory and repair parts sales. To order accessories, call . I Use and...

Use & Care Guide
Page 14
... by KitchenAid. 5. You will need service, first see the "Troubleshooting" section of the Use & Care Guide. Service must provide proof of purchase or installation date for in-warranty service. Damage resulting from accident, alteration, misuse, abuse, fire, flood, acts of God, improper installation, installation not in accordance with electrical or plumbing codes, or use your complete model number and serial number. Major appliances with original model/serial numbers that is contrary to published user...
... by KitchenAid. 5. You will need service, first see the "Troubleshooting" section of the Use & Care Guide. Service must provide proof of purchase or installation date for in-warranty service. Damage resulting from accident, alteration, misuse, abuse, fire, flood, acts of God, improper installation, installation not in accordance with electrical or plumbing codes, or use your complete model number and serial number. Major appliances with original model/serial numbers that is contrary to published user...


