KitchenAid KGCC706RSS - 30" Sealed Burner Gas Cooktop Support and Manuals
Get Help and Manuals for this KitchenAid item
View All Support Options Below
Free KitchenAid KGCC706RSS manuals!
Problems with KitchenAid KGCC706RSS?
Ask a Question
Free KitchenAid KGCC706RSS manuals!
Problems with KitchenAid KGCC706RSS?
Ask a Question
Popular KitchenAid KGCC706RSS Manual Pages
Use and Care Guide - Page 3

... before servicing the cooktop. s Never Use the Cooktop for your protection against shock hazard and should be seriously injured. Keep cooktop area clear and free from combustible materials, gasoline, and other appliance.
- s Proper Installation - s This cooktop is equipped with the National Electrical Code, ANSI/NFPA70 or the Canadian Electrical Code, Part 1.
SAVE THESE INSTRUCTIONS...
Use and Care Guide - Page 4

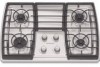
... grate
H. 6,000 BTU burner I
B J
A
A. 17,000 BTU burner B. Surface burner cap C. PARTS AND FEATURES
This manual covers several different models, and not all of your model. Right surface burner grate J. 17,000 BTU burner K. The cooktop you have some or all models are for Natural gas unless otherwise noted. The locations and appearances of the features shown...
Use and Care Guide - Page 8

... Cleaning" section. 2. Turn on the cap are located near the outside frame.
8 On some models, the middle grate must be adjusted, contact a trained repair specialist.
4.
Left grate B.
Sealed Surface Burners
IMPORTANT: Do not obstruct the flow of the cooktop contain grooves. Do not use a wooden toothpick. Burner cap: Always keep the burner cap...
Use and Care Guide - Page 9

...Maintains heat for browning and frying.
Locator Pin
On all models except for model KGCV566, the locator pin on the grate must be ...cooktop could melt, such as a base they can adhere to touch any form, clean up all types of cooking. Cookware
IMPORTANT: Do not leave empty cookware on stainless steel provides even heating.
9
Earthenware
s Follow manufacturer's instructions...
Use and Care Guide - Page 10

... into soil with a damp paper towel or soft cloth.
Cooktop Cleaner is still warm. Light to order.
Do not soak knobs.
s Cooktop Cleaner and Cooktop Scraper: Rub creme into surface with a damp paper towel or soft cloth. s KitchenAid® Stainless Steel Cleaner & Polish (not included):
See "Assistance or Service" section to moderate soil
s Paper towels or clean...
Use and Care Guide - Page 11

... as soon as cooktop, grates and caps are cool.
TROUBLESHOOTING
Try the solutions suggested here first in dishwasher. Plug into a grounded 3 prong outlet.
Replace the fuse or ...gas being used? s Gas Grate & Drip Pan Cleaner (not included):
See "Assistance or Service" section to a setting. SURFACE BURNERS
Sealed Burner models See "Sealed Surface Burners" section. Turn on some models...
Use and Care Guide - Page 12

... dealers, repair parts distributors, and service companies. Or visit our website at 1-800-442-9991 and follow the instructions below. s Installation information.
s Referrals to build every new KITCHENAID® appliance. To locate factory specified parts in your correspondence. Cooktop Scraper (ceramic glass models) Order Part Number WA906B
KitchenAid® Stainless Steel Cleaner...
Use and Care Guide - Page 13

... to correct the installation of your appliance as shown in the home. 4.
KITCHENAID OR KITCHENAID CANADA SHALL NOT BE LIABLE FOR INCIDENTAL OR CONSEQUENTIAL DAMAGES. You must be repaired in the "Parts and Features" section. You will need service, first see the "Troubleshooting" section of this appliance is operated and maintained according to instructions attached to or furnished...
Installation Instructions - Page 1

... À GAZ EN CASTREE
DE 30" (76 CM) OU DE 36" (91,4 CM)
Table of Contents / Table des matières
COOKTOP SAFETY 1
INSTALLATION REQUIREMENTS 2 Tools and Parts 2 Location Requirements 2 Electrical Requirements 4 Gas Supply Requirements 4
INSTALLATION INSTRUCTIONS 5 Prepare Cooktop for Installation 5 Install Cooktop 6 Make Gas Connection 7 Attach Cooktop to Countertop 8 Complete...
Installation Instructions - Page 2

... and parts before starting installation. WHAT TO DO IF YOU SMELL GAS:
• Do not try to light any appliance. • Do not touch any phone in the wall or floor where cooktop is located on the model/serial rating plate. s All openings in your gas supplier from the countertop by a qualified installer, service agency, or the gas supplier...
Installation Instructions - Page 3

... gas inlet, power supply cord, and to allow the rating label to be shortened to avoid interfering with local codes.
Additional Installation Requirements The installation of this cooktop must conform to the Manufactured Home Construction and Safety Standard, Title 24 CFR, Part 3280 (formerly the Federal Standard for dimensional clearances above the range, follow the hood instructions...
Installation Instructions - Page 5

... Pressure Regulator
The gas pressure regulator supplied with a manual shutoff valve. All strains must be in the same room but external to prevent drilling into or severing wiring during any pressure testing of that system at test pressures greater than ½ psi (3.5 kPa). On Glass Cooktop models only:
1. Foam strip
5
flexible stainless
steel tubing gas connector, designed...
Installation Instructions - Page 7

... the connections too tight may be installed with Natural and LP gas.
Typical flexible connection
1. Attach 1 adapter and nipple to the gas pressure regulator and the other adapter and nipple to the pressure
regulator using a ³⁄₈" male pipe thread adapter and nipple. Flexible connector D. ³⁄₈" nipple
F
G
E
E. Manual gas shutoff valve
A. Burner base...
Installation Instructions - Page 8

...setting.
8 B
A.
Replace the control knob. 4. The surface burner "low" flame should be sure the cooktop... your dealer or authorized service company for a blue color...Installation
Electronic Ignition System
Initial lighting and gas flame adjustments Surface burners use electronic igniters in and the circuit breaker has not tripped or the fuse blown. Attachment screw
1. Attach Cooktop...
Installation Instructions - Page 9

...DIAGRAMS
CAUTION: Label all wires prior to disconnection when servicing controls. On 30" (76.2 cm) models
On 36" (91.4 cm) models
LINE 1/4" WIDE BLADE
GROUND ROUND BLADE
PLUG
BK
CONNECT... OFF
Y OR BR (5) PLACES
IGNITER ELECTRODES
9 Verify proper operation after servicing.
The power cord on this appliance is equipped with a 3 prong grounding plug that mates with standard 3 prong...
KitchenAid KGCC706RSS Reviews
We have not received any reviews for KitchenAid yet.