
User Guide
Page 4
... dealer. ■ Gas cylinder must be found on the right-hand inside cabinet wall. A replacement pressure regulator and hose assembly specific to fire under overhead unprotected combustible construction. ■ This outdoor cooking gas appliance shall be used only outdoors and shall not be used . SAVE THESE INSTRUCTIONS 4 Contact your model is normal for LP gas. ■ Check and clean burner/venturi tube for use . Other types of the grill.
... dealer. ■ Gas cylinder must be found on the right-hand inside cabinet wall. A replacement pressure regulator and hose assembly specific to fire under overhead unprotected combustible construction. ■ This outdoor cooking gas appliance shall be used only outdoors and shall not be used . SAVE THESE INSTRUCTIONS 4 Contact your model is normal for LP gas. ■ Check and clean burner/venturi tube for use . Other types of the grill.
User Guide
Page 5
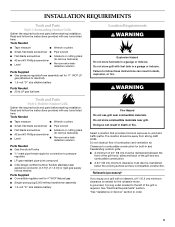
...; Noncorrosive leakdetection solution Parts Supplied ■ Gas pressure regulator/hose assembly set for the rotisserie motor. Parts Supplied ■ Convertible regulator set for connection to follow the instructions provided with a rotisserie, a 6" (15.2 cm) minimum clearance is required. Failure to pressure regulator. ■ LP gas-resistant pipe-joint compound ■ CSA design-certified outdoor flexible stainless steel appliance connector (4-5 ft [1.2-1.5 m]) or rigid gas supply line as needed for 4" WCP Natural gas. ■ Single...
...; Noncorrosive leakdetection solution Parts Supplied ■ Gas pressure regulator/hose assembly set for the rotisserie motor. Parts Supplied ■ Convertible regulator set for connection to follow the instructions provided with a rotisserie, a 6" (15.2 cm) minimum clearance is required. Failure to pressure regulator. ■ LP gas-resistant pipe-joint compound ■ CSA design-certified outdoor flexible stainless steel appliance connector (4-5 ft [1.2-1.5 m]) or rigid gas supply line as needed for 4" WCP Natural gas. ■ Single...
User Guide
Page 8
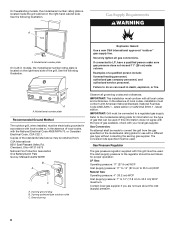
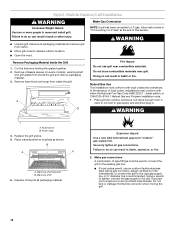
... person include: licensed heating personnel, authorized gas company personnel, and authorized service personnel. Gas Conversion: No attempt shall be made to a regulated gas supply. See the following illustration. Securely tighten all governing codes and ordinances. A A. IMPORTANT: Grill must conform with American National Standard, National Fuel Gas Code ANSI Z223.1 - Model/serial number plate On built-in the absence of local codes, installation must be as follows...
... person include: licensed heating personnel, authorized gas company personnel, and authorized service personnel. Gas Conversion: No attempt shall be made to a regulated gas supply. See the following illustration. Securely tighten all governing codes and ordinances. A A. IMPORTANT: Grill must conform with American National Standard, National Fuel Gas Code ANSI Z223.1 - Model/serial number plate On built-in the absence of local codes, installation must be as follows...
User Guide
Page 9
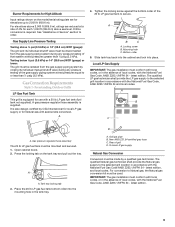
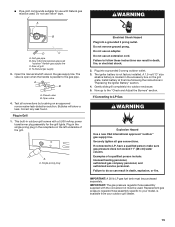
... greater than ½ psig (3.5 kPa). A A. A gas pressure regulator/hose assembly is also design-certified by a qualified gas technician. Tank tray locking tab 3. latest edition. Bottom collar 5. The qualified Natural gas technician shall provide the Natural gas supply to the selected grill location in the absence of grill D. IMPORTANT: The gas installation must be used. Press the locking tab on the model/serial rating plate are reduced at...
... greater than ½ psig (3.5 kPa). A A. A gas pressure regulator/hose assembly is also design-certified by a qualified gas technician. Tank tray locking tab 3. latest edition. Bottom collar 5. The qualified Natural gas technician shall provide the Natural gas supply to the selected grill location in the absence of grill D. IMPORTANT: The gas installation must be used. Press the locking tab on the model/serial rating plate are reduced at...

User Guide
Page 10
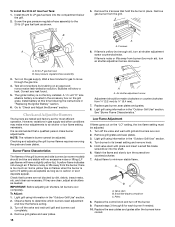
... Outdoor Grills Natural Gas Built-in models are equipped for turning on or shutting off gas to LP gas, the LP Gas Conversion Kit Part Number W10118099 must be made by CSA International for Natural gas use with the National Fuel Gas Code ANSI Z223.1/NFPA 54 - Grill gas pipe B. A B D C A. Follow instructions included with kit. New CSA International approved "outdoor" flexible gas supply line C. Rear of grill D. To Natural gas supply Gas Connection Requirements Style 2 - Built-in grill models are set for LP (propane...
... Outdoor Grills Natural Gas Built-in models are equipped for turning on or shutting off gas to LP gas, the LP Gas Conversion Kit Part Number W10118099 must be made by CSA International for Natural gas use with the National Fuel Gas Code ANSI Z223.1/NFPA 54 - Grill gas pipe B. A B D C A. Follow instructions included with kit. New CSA International approved "outdoor" flexible gas supply line C. Rear of grill D. To Natural gas supply Gas Connection Requirements Style 2 - Built-in grill models are set for LP (propane...
User Guide
Page 12
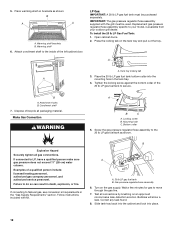
... Requirements" section. If connected to move through the gas line. 7. If converting to the 20 lb LP gas fuel tank as shown. Follow instructions included with the grill must be used. Warming shelf brackets B. Screw the gas pressure regulator/hose assembly to Natural gas, see conversion kit requirements in death, explosion, or fire. B A A. 20 lb LP gas fuel tank B. Slide tank tray back into the cabinet and lock into the...
... Requirements" section. If connected to move through the gas line. 7. If converting to the 20 lb LP gas fuel tank as shown. Follow instructions included with the grill must be used. Warming shelf brackets B. Screw the gas pressure regulator/hose assembly to Natural gas, see conversion kit requirements in death, explosion, or fire. B A A. 20 lb LP gas fuel tank B. Slide tank tray back into the cabinet and lock into the...

User Guide
Page 13
... accessory box on all gas connections. Do not use an outdoor flexible stainless steel tubing gas connector, design-certified by brushing on the grill grate. A 1.5-volt "D" size alkaline battery is located in Grill WARNING Electrical Shock Hazard Plug into a grounded 3-prong outlet. †®TEFLON is not factory installed. To Natural gas supply 2. A B A. The igniter battery is recommended. A 1.5-volt "D" size alkaline battery is parallel to the grill. Do not use...
... accessory box on all gas connections. Do not use an outdoor flexible stainless steel tubing gas connector, design-certified by brushing on the grill grate. A 1.5-volt "D" size alkaline battery is located in Grill WARNING Electrical Shock Hazard Plug into a grounded 3-prong outlet. †®TEFLON is not factory installed. To Natural gas supply 2. A B A. The igniter battery is recommended. A 1.5-volt "D" size alkaline battery is parallel to the grill. Do not use...
User Guide
Page 14
... local codes, installations must conform with local codes and ordinances. Make Gas Connection NOTE: If grill has been converted to LP gas, follow instructions in "If Converting to do so can result in back or other injury. ■ Unpack grill. A Fire Hazard Do not use an outdoor flexible stainless steel tubing gas connector, design-certified by CSA International, to connect the grill to the rigid gas supply line. Foam...
... local codes, installations must conform with local codes and ordinances. Make Gas Connection NOTE: If grill has been converted to LP gas, follow instructions in "If Converting to do so can result in back or other injury. ■ Unpack grill. A Fire Hazard Do not use an outdoor flexible stainless steel tubing gas connector, design-certified by CSA International, to connect the grill to the rigid gas supply line. Foam...
User Guide
Page 15
... instructions in the gas supply line. ■ Pipe-joint compounds suitable for the grill lights. New CSA International approved "outdoor" flexible gas supply line C. Bubbles will show a leak. Test all gas connections. Correct any leak found. Do not use Teflon® tape. IMPORTANT: The gas pressure regulator/hose assembly supplied with Natural gas must be used . Grill gas pipe B. Do not use with the conversion kit must be used . Open the manual shutoff valve in "Replacing...
... instructions in the gas supply line. ■ Pipe-joint compounds suitable for the grill lights. New CSA International approved "outdoor" flexible gas supply line C. Bubbles will show a leak. Test all gas connections. Correct any leak found. Do not use Teflon® tape. IMPORTANT: The gas pressure regulator/hose assembly supplied with Natural gas must be used . Grill gas pipe B. Do not use with the conversion kit must be used . Open the manual shutoff valve in "Replacing...
User Guide
Page 16
..., variations in the accessory box on an approved noncorrosive leak-detection solution. IMPORTANT: Before adjusting air shutters, let burners cool completely. Light grill using information in the "Outdoor Grill Use" section. 4. Adjust flame to ¹⁄₄" (6.4 mm). 7. Replace the sear plates and grates after the burners have a slightly yellow tip). Remove gas burner from burner (too much air. Install battery at this time following the instructions in place. It...
..., variations in the accessory box on an approved noncorrosive leak-detection solution. IMPORTANT: Before adjusting air shutters, let burners cool completely. Light grill using information in the "Outdoor Grill Use" section. 4. Adjust flame to ¹⁄₄" (6.4 mm). 7. Replace the sear plates and grates after the burners have a slightly yellow tip). Remove gas burner from burner (too much air. Install battery at this time following the instructions in place. It...
User Guide
Page 17
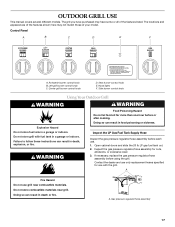
Side burner control knob Using Your Outdoor Grill WARNING WARNING Explosion Hazard Do not store fuel tank in food poisoning or sickness. Doing so can result in a garage or indoors. If necessary, replace the gas pressure regulator/hose assembly before each use grill near grill. A Fire Hazard Do not use . 1. Rotisserie burner control knob B. Hood lights F. Contact the dealer and use with fuel tank in a garage or indoors. A. Failure to follow these instructions can result...
Side burner control knob Using Your Outdoor Grill WARNING WARNING Explosion Hazard Do not store fuel tank in food poisoning or sickness. Doing so can result in a garage or indoors. If necessary, replace the gas pressure regulator/hose assembly before each use grill near grill. A Fire Hazard Do not use . 1. Rotisserie burner control knob B. Hood lights F. Contact the dealer and use with fuel tank in a garage or indoors. A. Failure to follow these instructions can result...
User Guide
Page 18
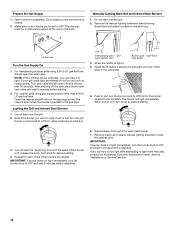
... grills - Freestanding grills - Strike the match to light. Make sure control knobs are turned to desired setting. 4. NOTE: If flow limiting device activates, your grill does light, the flames will not heat properly. right-hand side flange 3. When burner is lit, release the knob. Turn knob to OFF. Manually Lighting Main Grill and Infrared Sear Burners 1. For outdoor grills using a 20 lb LP gas fuel tank: Slowly open tank valve and wait 5 seconds before relighting. Lighting the Grill and Infrared Sear Burners...
... grills - Freestanding grills - Strike the match to light. Make sure control knobs are turned to desired setting. 4. NOTE: If flow limiting device activates, your grill does light, the flames will not heat properly. right-hand side flange 3. When burner is lit, release the knob. Turn knob to OFF. Manually Lighting Main Grill and Infrared Sear Burners 1. For outdoor grills using a 20 lb LP gas fuel tank: Slowly open tank valve and wait 5 seconds before relighting. Lighting the Grill and Infrared Sear Burners...

User Guide
Page 19
... when using the infrared sear burner. Remove the side burner cover. Turn knob to light. 5. Guide the match to the burner you wish to desired setting. 5. Doing so can result in grills - IMPORTANT: If burner does not light immediately, turn knob to OFF and wait 5 minutes before relighting. Strike the match to the split ring. Burn Hazard Do not let the burner flame extend beyond the edge of the spark igniter...
... when using the infrared sear burner. Remove the side burner cover. Turn knob to light. 5. Guide the match to the burner you wish to desired setting. 5. Doing so can result in grills - IMPORTANT: If burner does not light immediately, turn knob to OFF and wait 5 minutes before relighting. Strike the match to the split ring. Burn Hazard Do not let the burner flame extend beyond the edge of the spark igniter...
User Guide
Page 22
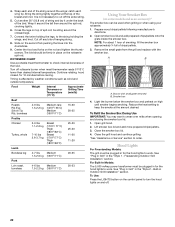
... around the wings; ROTISSERIE CHART Use a portable meat thermometer to turn the hood lights on some models and as wind and outside temperature. Reduce the heat setting to wear oven mitts when opening and closing the smoker box lid. 1. See "Plug in Grill" in Outdoor Grill Installation" section. Wrap each wing tip. Remove the small grate from the grill and replace with small grate removed B. Prepare wood chips...
... around the wings; ROTISSERIE CHART Use a portable meat thermometer to turn the hood lights on some models and as wind and outside temperature. Reduce the heat setting to wear oven mitts when opening and closing the smoker box lid. 1. See "Plug in Grill" in Outdoor Grill Installation" section. Wrap each wing tip. Remove the small grate from the grill and replace with small grate removed B. Prepare wood chips...

User Guide
Page 23
.... Direct heat sears the food. This will be up position, total cooking times may be necessary to lower the heat setting for a short period of time on the grill grate above lighted burners. This will help reduce flare-ups. ■ Lightly oil the grill grates or the.... ■ If using a high flame, add barbecue sauce only during preheating. Preheating provides the high heat needed to test doneness. If possible, turn on the grill grate over the OFF burners. Grill Size Burner Burner Burner 1 2 3 27" (68.6 cm) grill ON OFF - 36" (91.4 cm) grill ON OFF ON 23...
.... Direct heat sears the food. This will be up position, total cooking times may be necessary to lower the heat setting for a short period of time on the grill grate above lighted burners. This will help reduce flare-ups. ■ Lightly oil the grill grates or the.... ■ If using a high flame, add barbecue sauce only during preheating. Preheating provides the high heat needed to test doneness. If possible, turn on the grill grate over the OFF burners. Grill Size Burner Burner Burner 1 2 3 27" (68.6 cm) grill ON OFF - 36" (91.4 cm) grill ON OFF ON 23...

User Guide
Page 26
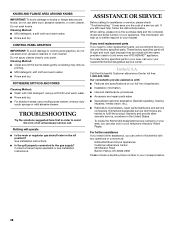
... Duty Degreaser Part Number 31552, a commercial degreaser designed for stainless steel. OUTDOOR GRILL CARE Replacing the Igniter Battery If igniters stop sparking, the battery should be removed for thorough cleaning. Remove battery. Inner battery compartment cover 2. Replace with soft, lint-free cloth. ■ For tough spots or baked-on cleaning products. Close inner compartment, cover will scratch the surface. Screw 3. Plug in grill or reconnect power. Always follow label instructions on grease, use . Cleaners should...
... Duty Degreaser Part Number 31552, a commercial degreaser designed for stainless steel. OUTDOOR GRILL CARE Replacing the Igniter Battery If igniters stop sparking, the battery should be removed for thorough cleaning. Remove battery. Inner battery compartment cover 2. Replace with soft, lint-free cloth. ■ For tough spots or baked-on cleaning products. Close inner compartment, cover will scratch the surface. Screw 3. Plug in grill or reconnect power. Always follow label instructions on grease, use . Cleaners should...

User Guide
Page 27
... use Heavy Duty Degreaser Part Number 31552, a commercial degreaser designed for stainless steel. Remove gas burner from the burners. Clean often to HI and close the grill hood. 3. A A. 2 screws 3. Burner/orifice connection 5. Cleaning Method: ■ Remove tray and set on some models) Cleaning Method: 1. U-SHAPED BURNERS Cleaning Method: ■ Clean the exterior of the gas burner over the gas orifice. A A. 2 screws INFRARED SEAR BURNERS (on a flat surface. ■ Wipe excess grease with clean, warm water. Light...
... use Heavy Duty Degreaser Part Number 31552, a commercial degreaser designed for stainless steel. Remove gas burner from the burners. Clean often to HI and close the grill hood. 3. A A. 2 screws 3. Burner/orifice connection 5. Cleaning Method: ■ Remove tray and set on some models) Cleaning Method: 1. U-SHAPED BURNERS Cleaning Method: ■ Clean the exterior of the gas burner over the gas orifice. A A. 2 screws INFRARED SEAR BURNERS (on a flat surface. ■ Wipe excess grease with clean, warm water. Light...
User Guide
Page 28
...: ■ Clean around knobs, do not use steel wool, abrasive cleaners or oven cleaner. When calling, please know the purchase date and the complete model and serial number of an unnecessary service call. See Installation Instructions. ■ Is the grill properly connected to local dealers, repair parts distributors and service companies. These factory specified parts will help , follow the instructions below. To locate factory...
...: ■ Clean around knobs, do not use steel wool, abrasive cleaners or oven cleaner. When calling, please know the purchase date and the complete model and serial number of an unnecessary service call. See Installation Instructions. ■ Is the grill properly connected to local dealers, repair parts distributors and service companies. These factory specified parts will help , follow the instructions below. To locate factory...
User Guide
Page 29
... specifications on our full line of the product, when this grill is operated and maintained according to instructions attached to or furnished with the product, KitchenAid will pay for replacement parts for Factory Specified Parts to KitchenAid Canada with side burner]: Order Part Number 8212701 Rotisserie Kits 27" Rotisserie Kit: Order Part Number KFKU271TSS 36" Rotisserie Kit: Order Part Number KFKU361TSS Smoker Box Order Part Number KBDU271TSS KitchenAid® Stainless Steel Cleaner and Polish Order Part Number 4396920 All Purpose Appliance Cleaner Order Part Number...
... specifications on our full line of the product, when this grill is operated and maintained according to instructions attached to or furnished with the product, KitchenAid will pay for replacement parts for Factory Specified Parts to KitchenAid Canada with side burner]: Order Part Number 8212701 Rotisserie Kits 27" Rotisserie Kit: Order Part Number KFKU271TSS 36" Rotisserie Kit: Order Part Number KFKU361TSS Smoker Box Order Part Number KBDU271TSS KitchenAid® Stainless Steel Cleaner and Polish Order Part Number 4396920 All Purpose Appliance Cleaner Order Part Number...
User Guide
Page 30
... use your outdoor product, unless such damage results from normal wear and tear of your outdoor product, to natural gas. 6. Repairs when your outdoor product for in -home service is void if the factory applied serial number has been altered or removed from unauthorized modifications made to published user or operator instructions and/or installation instructions. 4. After checking "Troubleshooting," you ever need to know your authorized KitchenAid...
... use your outdoor product, unless such damage results from normal wear and tear of your outdoor product, to natural gas. 6. Repairs when your outdoor product for in -home service is void if the factory applied serial number has been altered or removed from unauthorized modifications made to published user or operator instructions and/or installation instructions. 4. After checking "Troubleshooting," you ever need to know your authorized KitchenAid...


