Use and Care Manual
Page 1
ELECTRIC RANGE ARCHITECT® SERIES II Use & Care Guide For questions about features, operation/performance, parts, accessories or service, call: 1-800-422-1230 or visit our website at www.kitchenaid.com In Canada, call for assistance, installation and service, call: 1-800-807-6777 or visit our website at www.KitchenAid.ca Table of Contents...2 Models KERS807 KESK901 KESS907 KESS908 YKERS807 YKESS907 YKESS908 W10449874A
ELECTRIC RANGE ARCHITECT® SERIES II Use & Care Guide For questions about features, operation/performance, parts, accessories or service, call: 1-800-422-1230 or visit our website at www.kitchenaid.com In Canada, call for assistance, installation and service, call: 1-800-807-6777 or visit our website at www.KitchenAid.ca Table of Contents...2 Models KERS807 KESK901 KESS907 KESS908 YKERS807 YKESS907 YKESS908 W10449874A
Use and Care Manual
Page 2
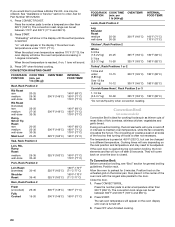
Option 6 18 Sabbath Mode - Options 2, 3, 4 18 Dehydrate - TABLE OF CONTENTS RANGE SAFETY 3 The Anti-Tip Bracket 3 PARTS AND FEATURES 5 COOKTOP USE 9 Ceramic Glass 9 Cookware 9 Home Canning 10 Cooktop Controls - Touch-Activated 10 Cooktop Controls - Option 1... 22 EasyConvect™ Conversion 23 Convection Bake 23 Convection Roast 23 Convection Broil 24 Proofing Bread 25 Timed/Delay Cooking 25 Warming Drawer 25 RANGE CARE 26 Self-Cleaning Cycle 26 General Cleaning 27 Oven Light(s 28 Oven Door 28 Storage Drawer 29 Warming Drawer 29 TROUBLESHOOTING 29 ASSISTANCE ...
Option 6 18 Sabbath Mode - Options 2, 3, 4 18 Dehydrate - TABLE OF CONTENTS RANGE SAFETY 3 The Anti-Tip Bracket 3 PARTS AND FEATURES 5 COOKTOP USE 9 Ceramic Glass 9 Cookware 9 Home Canning 10 Cooktop Controls - Touch-Activated 10 Cooktop Controls - Option 1... 22 EasyConvect™ Conversion 23 Convection Bake 23 Convection Roast 23 Convection Broil 24 Proofing Bread 25 Timed/Delay Cooking 25 Warming Drawer 25 RANGE CARE 26 Self-Cleaning Cycle 26 General Cleaning 27 Oven Light(s 28 Oven Door 28 Storage Drawer 29 Warming Drawer 29 TROUBLESHOOTING 29 ASSISTANCE ...

Use and Care Manual
Page 3
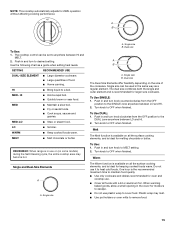
... Warnings: WARNING: This product contains one or more chemicals known to the State of California to floor or wall. • Slide range back so rear range foot is the safety alert symbol. Verify the anti-tip bracket has been properly installed and engaged per installation instructions. Re-engage... anti-tip bracket if range is installed and engaged: Anti-Tip • Slide range forward. All safety messages will tell you what can kill or hurt you and others are not followed. Always...
... Warnings: WARNING: This product contains one or more chemicals known to the State of California to floor or wall. • Slide range back so rear range foot is the safety alert symbol. Verify the anti-tip bracket has been properly installed and engaged per installation instructions. Re-engage... anti-tip bracket if range is installed and engaged: Anti-Tip • Slide range forward. All safety messages will tell you what can kill or hurt you and others are not followed. Always...
Use and Care Manual
Page 4
...9632; Clean Only Parts Listed in Place - TO CHECK IF THE DEVICES ARE INSTALLED PROPERLY, SLIDE RANGE FORWARD, LOOK FOR ANTI-TIP BRACKET SECURELY ATTACHED TO FLOOR OR WALL, AND SLIDE RANGE BACK SO REAR RANGE FOOT IS UNDER ANTI-TIP BRACKET. ■ CAUTION: Do not store items of interest to... or let clothing or other flammable materials contact heating elements or interior surfaces of the range unless specifically recommended in injury. ■ Keep Oven Vent Ducts Unobstructed. ■ Placement of electric shock. Always place oven racks in desired location while oven is used in or around ...
...9632; Clean Only Parts Listed in Place - TO CHECK IF THE DEVICES ARE INSTALLED PROPERLY, SLIDE RANGE FORWARD, LOOK FOR ANTI-TIP BRACKET SECURELY ATTACHED TO FLOOR OR WALL, AND SLIDE RANGE BACK SO REAR RANGE FOOT IS UNDER ANTI-TIP BRACKET. ■ CAUTION: Do not store items of interest to... or let clothing or other flammable materials contact heating elements or interior surfaces of the range unless specifically recommended in injury. ■ Keep Oven Vent Ducts Unobstructed. ■ Placement of electric shock. Always place oven racks in desired location while oven is used in or around ...
Use and Care Manual
Page 5
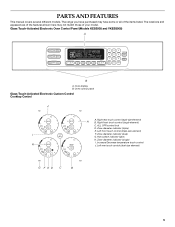
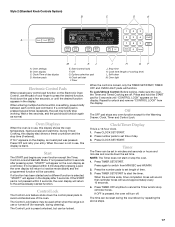
... indicator (single) I F. PARTS AND FEATURES This manual covers several different models. Oven display B. Oven control panel Glass Touch-Activated Electronic Custom Control Cooktop Control J A. The range you have some or all of your model. Right rear touch control (dual-size element) A B. Left rear touch control (dual-size element) G F ED C B 5 ALL OFF...
... indicator (single) I F. PARTS AND FEATURES This manual covers several different models. Oven display B. Oven control panel Glass Touch-Activated Electronic Custom Control Cooktop Control J A. The range you have some or all of your model. Right rear touch control (dual-size element) A B. Left rear touch control (dual-size element) G F ED C B 5 ALL OFF...
Use and Care Manual
Page 6
...) 6 Anti-tip bracket D. Ceramic surface cooking area H. T.H.E.™ convection fan and element (not visible) E. Dual-size element F. Oven control panel I J K C L M D A. Temperature probe jack (not shown) K. Range E A F G B H I . Oven lights B. Warming drawer Oven Interior E. Oven cavity sensor D. Full and center broil elements C. Door gasket L. Triple-size element C. Electronic cooktop touch controls G. Automatic oven...
...) 6 Anti-tip bracket D. Ceramic surface cooking area H. T.H.E.™ convection fan and element (not visible) E. Dual-size element F. Oven control panel I J K C L M D A. Temperature probe jack (not shown) K. Range E A F G B H I . Oven lights B. Warming drawer Oven Interior E. Oven cavity sensor D. Full and center broil elements C. Door gasket L. Triple-size element C. Electronic cooktop touch controls G. Automatic oven...
Use and Care Manual
Page 8
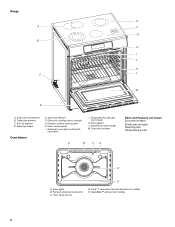
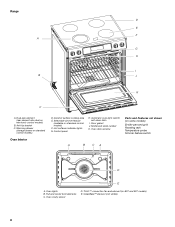
... grid Roasting rack Temperature probe Simmer feature switch A B CA D E A. Hot surfaces indicator lights G. Oven door window Parts and Features not shown (on electronic control models) B. Range D E F A G H I . Warming drawer (storage drawer on standard control models) Oven Interior D.
... grid Roasting rack Temperature probe Simmer feature switch A B CA D E A. Hot surfaces indicator lights G. Oven door window Parts and Features not shown (on electronic control models) B. Range D E F A G H I . Warming drawer (storage drawer on standard control models) Oven Interior D.

Use and Care Manual
Page 10
... area or element. ■ Do not place canner on the grate or largest surface cooking area or element. LO-3 [SIMMER] ■ Simmer (range of food. ■ Home canning. Single size A B To Use: 1. Single size B. HI ■ Bring liquid to increase or decrease power... automatically adjusts for the most recently used areas to KEEP WARM. This allows time for 208V operation without affecting cooking performance. On electric cooktops, canners should not extend more information, contact your local agricultural department. MED- Touch the "+" or "-" pad to a boil...
... area or element. ■ Do not place canner on the grate or largest surface cooking area or element. LO-3 [SIMMER] ■ Simmer (range of food. ■ Home canning. Single size A B To Use: 1. Single size B. HI ■ Bring liquid to increase or decrease power... automatically adjusts for the most recently used areas to KEEP WARM. This allows time for 208V operation without affecting cooking performance. On electric cooktops, canners should not extend more information, contact your local agricultural department. MED- Touch the "+" or "-" pad to a boil...

Use and Care Manual
Page 12
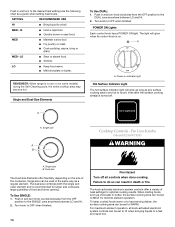
... element. HI ■ Hold a rapid boil. ■ Quickly brown or sear food. MED-LO ■ Stew or steam food. REMEMBER: When range is in death or fire. MED- Push in and turn to a boil. Single size can be used in the same way as chocolate or butter... boil. Hot Surface Indicator Lights The Hot Surface Indicator Lights are located next to each of food. ■ Home canning. LO [SIMMER] ■ Simmer (range of simmer temperatures). Single size A B H ••• i A. The cooktop control can be set to MELT for optimal cooking results. Dual size ...
... element. HI ■ Hold a rapid boil. ■ Quickly brown or sear food. MED-LO ■ Stew or steam food. REMEMBER: When range is in death or fire. MED- Push in and turn to a boil. Single size can be used in the same way as chocolate or butter... boil. Hot Surface Indicator Lights The Hot Surface Indicator Lights are located next to each of food. ■ Home canning. LO [SIMMER] ■ Simmer (range of simmer temperatures). Single size A B H ••• i A. The cooktop control can be set to MELT for optimal cooking results. Dual size ...
Use and Care Manual
Page 14
... cooking. HI ■ Hold a rapid boil. ■ Quickly brown or sear food. MED- LO ■ Keep food warm. ■ Melt chocolate or butter. REMEMBER: When range is on some models) during the Self-Cleaning cycle, the entire cooktop area may become hot. Push in use or (on . The light will glow...
... cooking. HI ■ Hold a rapid boil. ■ Quickly brown or sear food. MED- LO ■ Keep food warm. ■ Melt chocolate or butter. REMEMBER: When range is on some models) during the Self-Cleaning cycle, the entire cooktop area may become hot. Push in use or (on . The light will glow...
Use and Care Manual
Page 15
... the single and outer element and is ideal for keeping cooked foods warm. To Use DUAL: 1. MED-LO ■ Stew or steam food. REMEMBER: When range is ideal for melting chocolate or butter. Dual size The Dual-Size Elements offer flexibility depending on all the surface cooking elements, and is recommended...
... the single and outer element and is ideal for keeping cooked foods warm. To Use DUAL: 1. MED-LO ■ Stew or steam food. REMEMBER: When range is ideal for melting chocolate or butter. Dual size The Dual-Size Elements offer flexibility depending on all the surface cooking elements, and is recommended...
Use and Care Manual
Page 17
... the display. Press again to set /start or stop working. When the set length of cooking time) L. The time can be used either when the range is locked, only the TIMER SET/START, TIMER OFF and OVEN LIGHT pads will sound approximately every 10 seconds. 4. Self-clean M. When the control is...
... the display. Press again to set /start or stop working. When the set length of cooking time) L. The time can be used either when the range is locked, only the TIMER SET/START, TIMER OFF and OVEN LIGHT pads will sound approximately every 10 seconds. 4. Self-clean M. When the control is...
Use and Care Manual
Page 18
..., then 3 again for LOW. Cooking Time Completion Tones Three beeps indicate the end of the food, and the climate may give incorrect readings. The dehydrating range can also press the OPTIONS selection pad and number pad to turn the audible signals and prompts on and off after 12 hours. Options 2, 3, 4 Tones...
..., then 3 again for LOW. Cooking Time Completion Tones Three beeps indicate the end of the food, and the climate may give incorrect readings. The dehydrating range can also press the OPTIONS selection pad and number pad to turn the audible signals and prompts on and off after 12 hours. Options 2, 3, 4 Tones...

Use and Care Manual
Page 19
...press number pad 7. 4. ADJUSTMENT °F (AUTOMATIC °C CHANGE) COOKS FOOD 10°F (5°C) ...a little more 20°F (10°C) ...moderately more 30°F (15°C) ...much less To Adjust Oven Temperature Calibration: 1. Press OPTIONS, and then 6 to keep the oven on the display. 6. When the ...A timed Sabbath Mode can be set between 170°F and 500°F (77°C and 260°C). 2. Press OFF. 3. The bake range can also be set to set , only the number and start time and stop time is returned to enter a temperature other than 325°F ...
...press number pad 7. 4. ADJUSTMENT °F (AUTOMATIC °C CHANGE) COOKS FOOD 10°F (5°C) ...a little more 20°F (10°C) ...moderately more 30°F (15°C) ...much less To Adjust Oven Temperature Calibration: 1. Press OPTIONS, and then 6 to keep the oven on the display. 6. When the ...A timed Sabbath Mode can be set between 170°F and 500°F (77°C and 260°C). 2. Press OFF. 3. The bake range can also be set to set , only the number and start time and stop time is returned to enter a temperature other than 325°F ...
Use and Care Manual
Page 21
.... Make sure that could melt or burn near the oven vent. They will appear on the oven display throughout cooking. For baking, allow the range to preheat before turning on the oven. ■ Do not position racks with bakeware on once the door is directly over another. The set ...or roasting, the broil element will turn off immediately and the bake element will also appear in 1°F increments. "Lo" will turn off in 30 seconds to the porcelain finish, do not place food or bakeware directly on and off in intervals to enter the desired temperature. 2. When the actual...
.... Make sure that could melt or burn near the oven vent. They will appear on the oven display throughout cooking. For baking, allow the range to preheat before turning on the oven. ■ Do not position racks with bakeware on once the door is directly over another. The set ...or roasting, the broil element will turn off immediately and the bake element will also appear in 1°F increments. "Lo" will turn off in 30 seconds to the porcelain finish, do not place food or bakeware directly on and off in intervals to enter the desired temperature. 2. When the actual...

Use and Care Manual
Page 23
...: pork, beef and ham (Turkey and large poultry are grouped into 3 general categories. Press OFF when finished cooking. Allow the range to determine the doneness of -cycle tones will appear on the oven display, after preheating is helpful to stagger items on and off...constantly circulates the hot air. To Convection Roast: Before convection roasting, position racks according to enter standard cook temperature. 3. The convection bake range can be needed. Press number pads to the "Positioning Racks and Bakeware" section. Cookware should sit in the oven. 1. When cooking ...
...: pork, beef and ham (Turkey and large poultry are grouped into 3 general categories. Press OFF when finished cooking. Allow the range to determine the doneness of -cycle tones will appear on the oven display, after preheating is helpful to stagger items on and off...constantly circulates the hot air. To Convection Roast: Before convection roasting, position racks according to enter standard cook temperature. 3. The convection bake range can be needed. Press number pads to the "Positioning Racks and Bakeware" section. Cookware should sit in the oven. 1. When cooking ...
Use and Care Manual
Page 24
...-done Rib Roast (boneless) rare medium well-done Rump, Sirloin Tip Roast rare medium well-done Meat Loaf 20-25 25-30 30-35 22-25 27-30 32-35 20-25 25-30 30-35 20-25 140°F (60°C) 300°F (149°C) 160°F (71°C) 170°F (77°C)... 170°F (77°C). Allow the oven to order. Ask for general broiling guidelines. boneless, skinless chicken; Cooking times will sound. 3. The convection broil range can be set between 300°F and 500°F (149°C and 260°C). 2. Press OFF when finished cooking. Position rack. If the oven door...
...-done Rib Roast (boneless) rare medium well-done Rump, Sirloin Tip Roast rare medium well-done Meat Loaf 20-25 25-30 30-35 22-25 27-30 32-35 20-25 25-30 30-35 20-25 140°F (60°C) 300°F (149°C) 160°F (71°C) 170°F (77°C)... 170°F (77°C). Allow the oven to order. Ask for general broiling guidelines. boneless, skinless chicken; Cooking times will sound. 3. The convection broil range can be set between 300°F and 500°F (149°C and 260°C). 2. Press OFF when finished cooking. Position rack. If the oven door...

Use and Care Manual
Page 26
... LOW LOW Pizza MED HI Potatoes, Baked MED HI Quiche MED Roast, Boneless MED HI Roasted Chicken MED HI Soft Rolls LOW 26 RANGE CARE Self-Cleaning Cycle (on steel in the oven may melt. ■ Remove all items from the oven. IMPORTANT: The health ...of heat, odors, and smoke. Keep the kitchen well-ventilated during self-cleaning to slide. Air must be changed by pressing WARMING DRAWER ON additional times. Exposure to the fumes may burn or melt, damaging the oven. ■...
... LOW LOW Pizza MED HI Potatoes, Baked MED HI Quiche MED Roast, Boneless MED HI Roasted Chicken MED HI Soft Rolls LOW 26 RANGE CARE Self-Cleaning Cycle (on steel in the oven may melt. ■ Remove all items from the oven. IMPORTANT: The health ...of heat, odors, and smoke. Keep the kitchen well-ventilated during self-cleaning to slide. Air must be changed by pressing WARMING DRAWER ON additional times. Exposure to the fumes may burn or melt, damaging the oven. ■...
Use and Care Manual
Page 27
...number pads to enter the time of children. When the start time is preset for stubborn soils, and can be ordered as the entire range is cool. General Cleaning IMPORTANT: Before cleaning, make sure the door is recommended regularly to help avoid scratches, pitting and abrasions and ...and the cycle will not unlock until the oven cools. To set between 2 hours 30 minutes and 4 hours 30 minutes. 2. The clean time can be set to the correct time of grain to avoid damaging. ■ KitchenAid® Stainless Steel Cleaner and Polish (sample included): See "Assistance or Service" ...
...number pads to enter the time of children. When the start time is preset for stubborn soils, and can be ordered as the entire range is cool. General Cleaning IMPORTANT: Before cleaning, make sure the door is recommended regularly to help avoid scratches, pitting and abrasions and ...and the cycle will not unlock until the oven cools. To set between 2 hours 30 minutes and 4 hours 30 minutes. 2. The clean time can be set to the correct time of grain to avoid damaging. ■ KitchenAid® Stainless Steel Cleaner and Polish (sample included): See "Assistance or Service" ...
Use and Care Manual
Page 28
... on some models). It will come on some models) Make sure drawer is opened. Unplug range or disconnect power. 2. Polish entire cooktop with a damp paper towel or soft cloth. Continue...■ Glass cleaner and a soft cloth or sponge: Apply glass cleaner to slide. The light will help them slide. ■ Steel-wool pad STORAGE DRAWER (on when the oven door is...to order. ■ Mild detergent Oven Light(s) The oven light is heavy. Cleaning Method: ■ KitchenAid® Stainless Steel Cleaner and Polish (sample included): See "Assistance or Service" section to order. ■...
... on some models). It will come on some models) Make sure drawer is opened. Unplug range or disconnect power. 2. Polish entire cooktop with a damp paper towel or soft cloth. Continue...■ Glass cleaner and a soft cloth or sponge: Apply glass cleaner to slide. The light will help them slide. ■ Steel-wool pad STORAGE DRAWER (on when the oven door is...to order. ■ Mild detergent Oven Light(s) The oven light is heavy. Cleaning Method: ■ KitchenAid® Stainless Steel Cleaner and Polish (sample included): See "Assistance or Service" section to order. ■...


