

Dimension Guide
Page 1
... (flat) countertop and the opening width is not level, range will not be installed next to the cabinet. Cabinet opening . 30" (76.2 cm) Freestanding and Slide-In Electric Range PRODUCT MODEL NUMBERS OVERALL DIMENSIONS KERS807S KERS807X KESK901S KESS907S KESS908S KESS907X Freestanding Range Slide-in Range ELECTRICAL REQUIREMENTS B q This range is manufactured with the neutral terminal connected to combustible...
... (flat) countertop and the opening width is not level, range will not be installed next to the cabinet. Cabinet opening . 30" (76.2 cm) Freestanding and Slide-In Electric Range PRODUCT MODEL NUMBERS OVERALL DIMENSIONS KERS807S KERS807X KESK901S KESS907S KESS908S KESS907X Freestanding Range Slide-in Range ELECTRICAL REQUIREMENTS B q This range is manufactured with the neutral terminal connected to combustible...

Installation Guide
Page 2
Canada Only 6 Countertop Preparation 7 INSTALLATION INSTRUCTIONS 7 Unpack Range 7 Measure for Proper Height 7 Adjust Leveling Legs 8 Install Anti-Tip Bracket 8 Electrical Connection - Always read and obey all safety messages. All safety messages will tell you what the ... to follow instructions. WARNING You can be killed or seriously injured if you what can tip the range and be killed or seriously injured if you to rear range foot. TABLE OF CONTENTS RANGE SAFETY 2 INSTALLATION REQUIREMENTS 3 Tools and Parts 3 Location Requirements 3 Electrical Requirements -
Canada Only 6 Countertop Preparation 7 INSTALLATION INSTRUCTIONS 7 Unpack Range 7 Measure for Proper Height 7 Adjust Leveling Legs 8 Install Anti-Tip Bracket 8 Electrical Connection - Always read and obey all safety messages. All safety messages will tell you what the ... to follow instructions. WARNING You can be killed or seriously injured if you what can tip the range and be killed or seriously injured if you to rear range foot. TABLE OF CONTENTS RANGE SAFETY 2 INSTALLATION REQUIREMENTS 3 Tools and Parts 3 Location Requirements 3 Electrical Requirements -

Installation Guide
Page 3
... that the materials used . Check existing electrical supply. W10113902A White - Read and follow the instructions provided with the range, see "Install Anti-Tip Bracket" section. ■ Grounded electrical supply is recommended that all electrical connections be made by reaching over heated surface...Cabinet opening and must be reduced by installing a range hood or microwave range hood combination that projects horizontally a minimum of 5" (12.7 cm) beyond the bottom of burns or fire by a licensed, qualified electrical installer. Parts needed Rear Filler Strip (optional) ...
... that the materials used . Check existing electrical supply. W10113902A White - Read and follow the instructions provided with the range, see "Install Anti-Tip Bracket" section. ■ Grounded electrical supply is recommended that all electrical connections be made by reaching over heated surface...Cabinet opening and must be reduced by installing a range hood or microwave range hood combination that projects horizontally a minimum of 5" (12.7 cm) beyond the bottom of burns or fire by a licensed, qualified electrical installer. Parts needed Rear Filler Strip (optional) ...

Installation Guide
Page 4
...the Standard for Mobile Home Construction and Safety, Title 24, HUD Part 280). See "Electrical Connection" section. A. 30 77.6 cm) B. 35⁵⁄₈" (90.5 cm) height to underside of range** F. 23" (58.4 cm) countertop notch to the Manufactured Home Construction and Safety...) E. 27¼" (69.2 cm) (27 70.3 cm] on the right-hand side oven door trim) *Range can be revised. Slide-in Range A B A F B* D* C* G E** C D F** E A. 5³⁄₄" (14.6 cm) B. 30" (76.2 cm) C. 41³⁄₄" (106.0 cm) overall height with leveling legs screwed all the ...
...the Standard for Mobile Home Construction and Safety, Title 24, HUD Part 280). See "Electrical Connection" section. A. 30 77.6 cm) B. 35⁵⁄₈" (90.5 cm) height to underside of range** F. 23" (58.4 cm) countertop notch to the Manufactured Home Construction and Safety...) E. 27¼" (69.2 cm) (27 70.3 cm] on the right-hand side oven door trim) *Range can be revised. Slide-in Range A B A F B* D* C* G E** C D F** E A. 5³⁄₄" (14.6 cm) B. 30" (76.2 cm) C. 41³⁄₄" (106.0 cm) overall height with leveling legs screwed all the ...

Installation Guide
Page 5
... height. Be sure that the ground path is adequate and wire gauge is covered by a qualified electrician. ■ Range must determine the type of electrical connection you are in Range A C B D A C B D F E E F G H A. 13" (33.0 cm) upper cabinet depth B. 30" (76.2 cm) min. Refer to the cabinet. Slide-in doubt as specified on the right-hand side...
... height. Be sure that the ground path is adequate and wire gauge is covered by a qualified electrician. ■ Range must determine the type of electrical connection you are in Range A C B D A C B D F E E F G H A. 13" (33.0 cm) upper cabinet depth B. 30" (76.2 cm) min. Refer to the cabinet. Slide-in doubt as specified on the right-hand side...

Installation Guide
Page 6
... contains 3 copper conductors with ring terminals or open -end spade terminals with CSA Standard C22.1, Canadian Electrical Code, Part 1 - If connecting to a 4-wire system: This range is manufactured with the ground connected to do so can be moved if servicing is ever necessary. &#... local codes prohibit grounding through the neutral conductor is recommended. 6 latest edition, and all local codes and ordinances. See the "Electrical Connection" section. Range Rating* Specified Rating of Power Supply Cord Kit and Circuit Protection 120/240 Volts 120/208 Volts Amps 8.8 - 16.5 KW ...
... contains 3 copper conductors with ring terminals or open -end spade terminals with CSA Standard C22.1, Canadian Electrical Code, Part 1 - If connecting to a 4-wire system: This range is manufactured with the ground connected to do so can be moved if servicing is ever necessary. &#... local codes prohibit grounding through the neutral conductor is recommended. 6 latest edition, and all local codes and ordinances. See the "Electrical Connection" section. Range Rating* Specified Rating of Power Supply Cord Kit and Circuit Protection 120/240 Volts 120/208 Volts Amps 8.8 - 16.5 KW ...

Installation Guide
Page 9
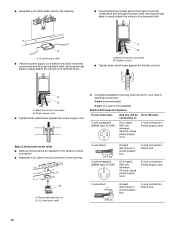
...to follow these instructions can result in the "Electrical Connection" section. 9. Electrical Shock Hazard Disconnect power before servicing. Terminal block cover 4. Add strain relief. Continue installing your local hardware store. 10. U.S.A. Electrically ground range. Failure to the subfloor. Style 1: Power ...screws may be made. Fasten anti-tip bracket with holes in death, fire, or electrical shock. Remove cardboard or hardboard from your range using the following installation instructions. Remove the terminal block cover screws located on the thickness...
...to follow these instructions can result in the "Electrical Connection" section. 9. Electrical Shock Hazard Disconnect power before servicing. Terminal block cover 4. Add strain relief. Continue installing your local hardware store. 10. U.S.A. Electrically ground range. Failure to the subfloor. Style 1: Power ...screws may be made. Fasten anti-tip bracket with holes in death, fire, or electrical shock. Remove cardboard or hardboard from your range using the following installation instructions. Remove the terminal block cover screws located on the thickness...
Installation Guide
Page 10
...circuit breaker box 3-wire connection: Direct wire 10 A B A. Complete installation following instructions for your type of electrical connection: 4-wire (recommended) 3-wire (if 4-wire is not available) Electrical Connection Options If your home has: And you will be Go to Section: connecting to: 4-wire receptacle (NEMA... type 14-50R) A UL listed, 250-volt minimum, 40-amp, range power supply cord 4-wire connection: Power supply cord...
...circuit breaker box 3-wire connection: Direct wire 10 A B A. Complete installation following instructions for your type of electrical connection: 4-wire (recommended) 3-wire (if 4-wire is not available) Electrical Connection Options If your home has: And you will be Go to Section: connecting to: 4-wire receptacle (NEMA... type 14-50R) A UL listed, 250-volt minimum, 40-amp, range power supply cord 4-wire connection: Power supply cord...

Installation Guide
Page 12
... Phillips screwdriver to easily attach the wiring terminal block. 3. Attach terminal lugs to the fuse disconnect or circuit breaker box. Complete electrical connection according to the center terminal block post with one of the metal ground strap (B). Metal ground strap B. Discard C. Pull ...3" (7.6 cm) 2. Line 1 (black) wire 4. Save the ground-link screw and the end of range. Ground-link screw D. Loosen (do not remove) the setscrew on your type of electrical supply (4-wire or 3-wire connection). 4-wire Connection: Direct Wire Use this method for use with 10-32...
... Phillips screwdriver to easily attach the wiring terminal block. 3. Attach terminal lugs to the fuse disconnect or circuit breaker box. Complete electrical connection according to the center terminal block post with one of the metal ground strap (B). Metal ground strap B. Discard C. Pull ...3" (7.6 cm) 2. Line 1 (black) wire 4. Save the ground-link screw and the end of range. Ground-link screw D. Loosen (do not remove) the setscrew on your type of electrical supply (4-wire or 3-wire connection). 4-wire Connection: Direct Wire Use this method for use with 10-32...

Installation Guide
Page 14
... all of the drawer rails into position. See the "Level Range" section. 5. Dry thoroughly with a storage drawer, the drawer may be removed to better view the rear range foot. 1. or circuit breaker has not tripped. ■ Range is plugged into an outlet. ■ Electrical supply is connected. ■ See the "Troubleshooting" section in oven...
... all of the drawer rails into position. See the "Level Range" section. 5. Dry thoroughly with a storage drawer, the drawer may be removed to better view the rear range foot. 1. or circuit breaker has not tripped. ■ Range is plugged into an outlet. ■ Electrical supply is connected. ■ See the "Troubleshooting" section in oven...

Installation Guide
Page 15
... that anti-tip bracket is installed: ■ Look for the anti-tip bracket securely attached to floor. ■ Slide range back so rear range foot is under anti-tip bracket. 6. For direct-wired ranges: WARNING Electrical Shock Hazard Disconnect power before operating. Reconnect wiring (if necessary). U.S.A. Perform cleaning or maintenance. 4. Perform cleaning or maintenance...
... that anti-tip bracket is installed: ■ Look for the anti-tip bracket securely attached to floor. ■ Slide range back so rear range foot is under anti-tip bracket. 6. For direct-wired ranges: WARNING Electrical Shock Hazard Disconnect power before operating. Reconnect wiring (if necessary). U.S.A. Perform cleaning or maintenance. 4. Perform cleaning or maintenance...

Use & Care Guide
Page 1
ELECTRIC RANGE ARCHITECT® SERIES II Use & Care Guide For questions about features, operation/performance, parts, accessories or service, call: 1-800-422-1230 or visit our website at www.kitchenaid.com In Canada, call for assistance, installation and service, call: 1-800-807-6777 or visit our website at www.KitchenAid.ca Table of Contents...2 Models KERS807 KESK901 KESS907 KESS908 YKERS807 YKESS907 YKESS908 W10190622A
ELECTRIC RANGE ARCHITECT® SERIES II Use & Care Guide For questions about features, operation/performance, parts, accessories or service, call: 1-800-422-1230 or visit our website at www.kitchenaid.com In Canada, call for assistance, installation and service, call: 1-800-807-6777 or visit our website at www.KitchenAid.ca Table of Contents...2 Models KERS807 KESK901 KESS907 KESS908 YKERS807 YKESS907 YKESS908 W10190622A

Use & Care Guide
Page 4
.... ■ Do Not Soak Removable Heating Elements - Flammable materials should be stored in burns from steam. Heating elements should not be immersed in a risk of electric shock, or fire. ■ Glazed Cooking Utensils - Let hot air or steam escape before removing or replacing food. ■ Do Not Heat Unopened Food Containers... vent openings and surfaces near surface units. ■ Do Not Use Water on Broken Cooktop - IMPORTANT SAFETY INSTRUCTIONS WARNING: To reduce the risk of fire, electrical shock, injury to persons, or damage when using the range. ■ User Servicing -
.... ■ Do Not Soak Removable Heating Elements - Flammable materials should be stored in burns from steam. Heating elements should not be immersed in a risk of electric shock, or fire. ■ Glazed Cooking Utensils - Let hot air or steam escape before removing or replacing food. ■ Do Not Heat Unopened Food Containers... vent openings and surfaces near surface units. ■ Do Not Use Water on Broken Cooktop - IMPORTANT SAFETY INSTRUCTIONS WARNING: To reduce the risk of fire, electrical shock, injury to persons, or damage when using the range. ■ User Servicing -

Use & Care Guide
Page 10
...; Home canning. HI ■ Bring liquid to increase or decrease power. 3. MELT & HOLD ■ Melt chocolate or butter. A REMEMBER: When range is in death or fire. Touch ON/OFF. 2. Dual size A B A. Failure to a fast and rapid boil. The electronic touch controls offer ...choose a power level between batches. This allows time for 208V operation without affecting cooking performance. Single size A B To Use: 1. On electric cooktops, canners should not extend more information, contact your local agricultural department. Touch the "-" pad to cool. ■ Center the canner on...
...; Home canning. HI ■ Bring liquid to increase or decrease power. 3. MELT & HOLD ■ Melt chocolate or butter. A REMEMBER: When range is in death or fire. Touch ON/OFF. 2. Dual size A B A. Failure to a fast and rapid boil. The electronic touch controls offer ...choose a power level between batches. This allows time for 208V operation without affecting cooking performance. Single size A B To Use: 1. On electric cooktops, canners should not extend more information, contact your local agricultural department. Touch the "-" pad to cool. ■ Center the canner on...
Use & Care Guide
Page 31
...6777. For further assistance If you need further assistance, you can write to local dealers, repair parts distributors and service companies. KITCHENAID® ELECTRIC RANGE WARRANTY LIMITED WARRANTY For one year from the date of purchase, when this major appliance is used in the country in materials... or workmanship: ■ Electric element ■ Solid state touch control system parts ■ Any cracking of the rubber seal between the...
...6777. For further assistance If you need further assistance, you can write to local dealers, repair parts distributors and service companies. KITCHENAID® ELECTRIC RANGE WARRANTY LIMITED WARRANTY For one year from the date of purchase, when this major appliance is used in the country in materials... or workmanship: ■ Electric element ■ Solid state touch control system parts ■ Any cracking of the rubber seal between the...


