
Dimension Guide
Page 1
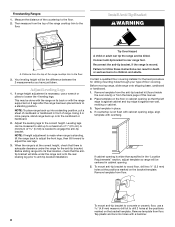
... fused disconnect (or circuit breaker box) through the neutral, use a 4-wire power supply cord A rated at 250 volts, 40 or 50 amps and investigated for use a 50-amp rated cord with kit. or 50-amp power supply cord (pigtail) (see Installation Instructions packed with product. front of wood or metal cabinet is manufactured with the neutral terminal connected to a 50-amp circuit, use with zero clearance. Freestanding Range Slide-in Range A freestanding range may need trim cut...
... fused disconnect (or circuit breaker box) through the neutral, use a 4-wire power supply cord A rated at 250 volts, 40 or 50 amps and investigated for use a 50-amp rated cord with kit. or 50-amp power supply cord (pigtail) (see Installation Instructions packed with product. front of wood or metal cabinet is manufactured with the neutral terminal connected to a 50-amp circuit, use with zero clearance. Freestanding Range Slide-in Range A freestanding range may need trim cut...

Installation Guide
Page 3
... electrical connections be made by reaching over heated surface units, cabinet storage space located above the surface units should be installed. To install the antitip bracket shipped with any tools listed here. Rear filler strip B. See "Electrical Requirements" section. The cord should be used will not discolor, delaminate or sustain other damage. Check local codes. The model/serial rating plate is marked for use with upturned ends. ■ A UL listed strain relief. Anti-tip bracket...
... electrical connections be made by reaching over heated surface units, cabinet storage space located above the surface units should be installed. To install the antitip bracket shipped with any tools listed here. Rear filler strip B. See "Electrical Requirements" section. The cord should be used will not discolor, delaminate or sustain other damage. Check local codes. The model/serial rating plate is marked for use with upturned ends. ■ A UL listed strain relief. Anti-tip bracket...

Installation Guide
Page 4
... standards listed above. ■ Four-wire power supply cord or cable must be raised approximately 1" (2.5 cm) by adjusting the leveling legs. **When installed in a 24" (61.0 cm) base cabinet with leveling legs screwed all the way in* E. 30" (76.2 cm) F. 27¹⁄₄" (69.2 cm) max. Any method of oven door protrudes 1" (2.5 cm) beyond 24" (61.0 cm) base cabinet. 4 Model/serial number plate (located on models...
... standards listed above. ■ Four-wire power supply cord or cable must be raised approximately 1" (2.5 cm) by adjusting the leveling legs. **When installed in a 24" (61.0 cm) base cabinet with leveling legs screwed all the way in* E. 30" (76.2 cm) F. 27¹⁄₄" (69.2 cm) max. Any method of oven door protrudes 1" (2.5 cm) beyond 24" (61.0 cm) base cabinet. 4 Model/serial number plate (located on models...

Installation Guide
Page 5
... of the "Location Requirements" section. ■ This range is properly grounded. Do not modify the power supply cord plug. Use a 3-wire UL listed, 40- from floor H. opening width F. U.S.A. A copy of the above code standards can result in a risk of electrical connection you are for dimensional clearances above the range, follow the instructions provided for it will be obtained from either cabinet, 7" (17.8 cm) max. Slide-in Range A C B D A C B D F E E F G H A. 13...
... of the "Location Requirements" section. ■ This range is properly grounded. Do not modify the power supply cord plug. Use a 3-wire UL listed, 40- from floor H. opening width F. U.S.A. A copy of the above code standards can result in a risk of electrical connection you are for dimensional clearances above the range, follow the instructions provided for it will be obtained from either cabinet, 7" (17.8 cm) max. Slide-in Range A C B D A C B D F E E F G H A. 13...
Installation Guide
Page 8
... in cabinet opening is standing, tilt the range back to adjust the front legs, then tilt forward to loosen the 4 leveling legs. When the range is adequate clearance under the range and onto the rear leveling leg prior to the floor. 2. Contact a qualified floor covering installer for the best procedure for the anti-tip bracket. Remove template from the anti-tip bracket kit (found inside the oven cavity) or...
... in cabinet opening is standing, tilt the range back to adjust the front legs, then tilt forward to loosen the 4 leveling legs. When the range is adequate clearance under the range and onto the rear leveling leg prior to the floor. 2. Contact a qualified floor covering installer for the best procedure for the anti-tip bracket. Remove template from the anti-tip bracket kit (found inside the oven cavity) or...

Installation Guide
Page 9
... the subfloor. Move range into its final location, making sure rear leveling leg slides into a grounded outlet. Plug into anti-tip bracket. Electrically ground range. Remove plastic tag holding three 10-32 hex nuts from under range. 8. A B A. Style 1: Power supply cord strain relief ■ Remove the knockout at the bottom of the terminal block. Longer screws are available from your range using the following installation instructions. Continue installing your local hardware store...
... the subfloor. Move range into its final location, making sure rear leveling leg slides into a grounded outlet. Plug into anti-tip bracket. Electrically ground range. Remove plastic tag holding three 10-32 hex nuts from under range. 8. A B A. Style 1: Power supply cord strain relief ■ Remove the knockout at the bottom of the terminal block. Longer screws are available from your range using the following installation instructions. Continue installing your local hardware store...

Installation Guide
Page 14
... range operation. If range is intact and tight; Level Range 1. Place level on surface burners and oven. If range is not level, pull range forward until range is connected. ■ See the "Troubleshooting" section in anti-tip bracket. Push range back into an outlet. ■ Electrical supply is level. Check that you have all packaging materials. 4. NOTE: Range must be viewed from the anti-tip bracket. Replace the storage drawer: ■ Fit the ends of the Use and Care Guide. 6. Reconnect the anti-tip bracket...
... range operation. If range is intact and tight; Level Range 1. Place level on surface burners and oven. If range is not level, pull range forward until range is connected. ■ See the "Troubleshooting" section in anti-tip bracket. Push range back into an outlet. ■ Electrical supply is level. Check that you have all packaging materials. 4. NOTE: Range must be viewed from the anti-tip bracket. Replace the storage drawer: ■ Fit the ends of the Use and Care Guide. 6. Reconnect the anti-tip bracket...
Use & Care Guide
Page 2
...RANGE SAFETY 3 The Anti-Tip Bracket 3 PARTS AND FEATURES 5 COOKTOP USE 9 Ceramic Glass 9 Cookware 9 Home Canning 10 Cooktop Controls - Option 1 17 Tones - Option 7 18 OVEN USE 19 Aluminum Foil 19 Bakeware 19 Meat Thermometer 19 Temperature Probe 19 Oven Vent 20 Positioning Racks and Bakeware 20 Bake 20 Broil 21 Convection Cooking 22 EasyConvect™ Conversion 22 Convection Bake 22 Convection Roast 23 Convection Broil 24 Proofing Bread 24 Timed Cooking 24 Warming Drawer 25 RANGE CARE 26 Self-Cleaning Cycle 26 General Cleaning 27 Oven Light(s 28 Oven Door...
...RANGE SAFETY 3 The Anti-Tip Bracket 3 PARTS AND FEATURES 5 COOKTOP USE 9 Ceramic Glass 9 Cookware 9 Home Canning 10 Cooktop Controls - Option 1 17 Tones - Option 7 18 OVEN USE 19 Aluminum Foil 19 Bakeware 19 Meat Thermometer 19 Temperature Probe 19 Oven Vent 20 Positioning Racks and Bakeware 20 Bake 20 Broil 21 Convection Cooking 22 EasyConvect™ Conversion 22 Convection Bake 22 Convection Roast 23 Convection Broil 24 Proofing Bread 24 Timed Cooking 24 Warming Drawer 25 RANGE CARE 26 Self-Cleaning Cycle 26 General Cleaning 27 Oven Light(s 28 Oven Door...

Use & Care Guide
Page 4
... BY PROPERLY INSTALLED ANTI-TIP DEVICES. Surface units may be taken not to rub, damage, or move the gasket. ■ Do Not Use Oven Cleaners - Select utensils having flat bottoms large enough to a hot surface. ■ Use Care When Opening Door - Some cleaners can produce noxious fumes if applied to cover the surface unit heating element. If rack must be hot even though they are oven vent openings and surfaces near units...
... BY PROPERLY INSTALLED ANTI-TIP DEVICES. Surface units may be taken not to rub, damage, or move the gasket. ■ Do Not Use Oven Cleaners - Select utensils having flat bottoms large enough to a hot surface. ■ Use Care When Opening Door - Some cleaners can produce noxious fumes if applied to cover the surface unit heating element. If rack must be hot even though they are oven vent openings and surfaces near units...
Use & Care Guide
Page 6
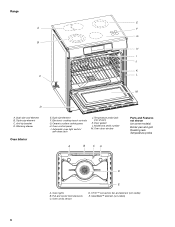
...Oven cavity sensor D. Anti-tip bracket D. Ceramic surface cooking area H. Automatic oven light switch/ self-clean latch J. Model and serial number M. Triple-size element C. Oven control panel I J K C L M D A. Oven door window A B CA Parts and Features not shown (on some models) Broiler pan and grid Roasting rack Temperature probe D E A. Full and center broil elements C. CleanBake™ element (not visible) 6 Door gasket L. T.H.E.™ convection fan and element (not visible) E. Range E A F G B H I . Dual-size oval element B. Dual-size element...
...Oven cavity sensor D. Anti-tip bracket D. Ceramic surface cooking area H. Automatic oven light switch/ self-clean latch J. Model and serial number M. Triple-size element C. Oven control panel I J K C L M D A. Oven door window A B CA Parts and Features not shown (on some models) Broiler pan and grid Roasting rack Temperature probe D E A. Full and center broil elements C. CleanBake™ element (not visible) 6 Door gasket L. T.H.E.™ convection fan and element (not visible) E. Range E A F G B H I . Dual-size oval element B. Dual-size element...

Use & Care Guide
Page 8
... Ceramic surface cooking area E. Hot surfaces indicator lights G. Door gasket J. Control panel H. Full and center broil elements C. Warming drawer (storage drawer on electronic control models) B. Model and serial number K. Anti-tip bracket C. Automatic oven light switch/ self-clean latch I B J K C A. Oven cavity sensor D. Oven lights B. Oven door window Parts and Features not shown (on 807 and 907 models) E. T.H.E.™ convection fan and element (on some models) Broiler pan and grid Roasting rack Temperature probe Simmer feature switch Temperature probe...
... Ceramic surface cooking area E. Hot surfaces indicator lights G. Door gasket J. Control panel H. Full and center broil elements C. Warming drawer (storage drawer on electronic control models) B. Model and serial number K. Anti-tip bracket C. Automatic oven light switch/ self-clean latch I B J K C A. Oven cavity sensor D. Oven lights B. Oven door window Parts and Features not shown (on 807 and 907 models) E. T.H.E.™ convection fan and element (on some models) Broiler pan and grid Roasting rack Temperature probe Simmer feature switch Temperature probe...
Use & Care Guide
Page 16
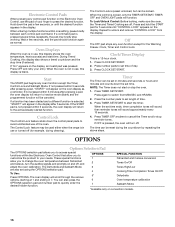
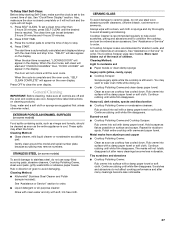
... oven function except the Timer, Control Lock and Sabbath Mode. OPTIONS Options Selection Pad The OPTIONS selection pad allows you to start or stop reminder tones. The oven display will be used either when the range is in use , this display shows the oven temperature, heat source(s) and start time. These special functions allow you to switch from the display. If a function has been started function. Press and hold the START pad for the Warming Drawer, Clock, Timer and Control Lock. Control Lock The Control Lock feature shuts...
... oven function except the Timer, Control Lock and Sabbath Mode. OPTIONS Options Selection Pad The OPTIONS selection pad allows you to start or stop reminder tones. The oven display will be used either when the range is in use , this display shows the oven temperature, heat source(s) and start time. These special functions allow you to switch from the display. If a function has been started function. Press and hold the START pad for the Warming Drawer, Clock, Timer and Control Lock. Control Lock The Control Lock feature shuts...
Use & Care Guide
Page 20
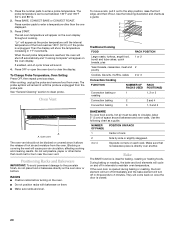
... displayed. 3. See "General Cleaning" section to enter a probe temperature. Blocking or covering the vent will appear on the oven door or bottom. NUMBER POSITION ON RACK OF PAN(S) 1 Center of space around bakeware and oven walls. 1. To Change Probe Temperature, Oven Setting: Press OFF, then repeat previous steps. Bake The BAKE function is opened during baking or roasting, the broil element will turn off in 30 seconds to 2 minutes. The probe symbol will appear as the probe temperature until the probe...
... displayed. 3. See "General Cleaning" section to enter a probe temperature. Blocking or covering the vent will appear on the oven door or bottom. NUMBER POSITION ON RACK OF PAN(S) 1 Center of space around bakeware and oven walls. 1. To Change Probe Temperature, Oven Setting: Press OFF, then repeat previous steps. Bake The BAKE function is opened during baking or roasting, the broil element will turn off in 30 seconds to 2 minutes. The probe symbol will appear as the probe temperature until the probe...
Use & Care Guide
Page 21
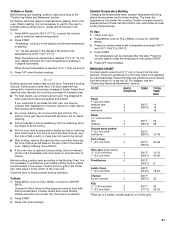
... once the door is not necessary to enter the desired temperature. 2. Broil Broiling uses direct radiant heat to the "Positioning Racks and Bakeware" section. Very thin cuts of meat, fish and poultry may not need to be lined with both top elements for easier cleaning. ■ Trim excess fat to be turned. ■ After broiling, remove the pan from the oven when removing the food. Thicker cuts and unevenly shaped...
... once the door is not necessary to enter the desired temperature. 2. Broil Broiling uses direct radiant heat to the "Positioning Racks and Bakeware" section. Very thin cuts of meat, fish and poultry may not need to be lined with both top elements for easier cleaning. ■ Trim excess fat to be turned. ■ After broiling, remove the pan from the oven when removing the food. Thicker cuts and unevenly shaped...
Use & Care Guide
Page 26
... the display as a guide to a powdery ash. At high temperatures, foods react with a damp cloth. "LOCKING DOOR" will not work during the Self-Cleaning cycle. RANGE CARE Self-Cleaning Cycle (on some models) WARNING How the Cycle Works IMPORTANT: The heating and cooling of porcelain on steel in the oven may melt. ■ Remove all items from the storage drawer. Keep children away from the oven. CLEANING LEVEL TOTAL CLEANING TIME (includes a 30 minute...
... the display as a guide to a powdery ash. At high temperatures, foods react with a damp cloth. "LOCKING DOOR" will not work during the Self-Cleaning cycle. RANGE CARE Self-Cleaning Cycle (on some models) WARNING How the Cycle Works IMPORTANT: The heating and cooling of porcelain on steel in the oven may melt. ■ Remove all items from the storage drawer. Keep children away from the oven. CLEANING LEVEL TOTAL CLEANING TIME (includes a 30 minute...
Use & Care Guide
Page 27
... sponge are cool. Burned-on soil ■ Cooktop Polishing Creme and Cooktop Scraper: Rub creme into surface with damp paper towel. Always wipe with soft, lint-free cloth. When the start and "OVEN IS CLEANING" then, "DOOR LOCKED" will not unlock until the oven cools. To Delay Start Self-Clean: Before delay starting Self-Clean, make sure the clock is set a clean time other than 3 hours 30 minutes, press SELF CLEAN until the desired time is reached.
... sponge are cool. Burned-on soil ■ Cooktop Polishing Creme and Cooktop Scraper: Rub creme into surface with damp paper towel. Always wipe with soft, lint-free cloth. When the start and "OVEN IS CLEANING" then, "DOOR LOCKED" will not unlock until the oven cools. To Delay Start Self-Clean: Before delay starting Self-Clean, make sure the clock is set a clean time other than 3 hours 30 minutes, press SELF CLEAN until the desired time is reached.
Use & Care Guide
Page 28
... the Self-Cleaning cycle (on when the oven door is a standard 15-watt appliance bulb. The light will come on some models) Make sure drawer is not suggested to remove the oven door. Turn the glass bulb cover in range or reconnect power. Open oven door all the way. 2. CONTROL PANEL To avoid damage to the control panel, do not use steel wool, abrasive cleansers or oven cleaner. Food spills should be cleaned when oven cools. Remove racks or they will shut...
... the Self-Cleaning cycle (on when the oven door is a standard 15-watt appliance bulb. The light will come on some models) Make sure drawer is not suggested to remove the oven door. Turn the glass bulb cover in range or reconnect power. Open oven door all the way. 2. CONTROL PANEL To avoid damage to the control panel, do not use steel wool, abrasive cleansers or oven cleaner. Food spills should be cleaned when oven cools. Remove racks or they will shut...
Use & Care Guide
Page 29
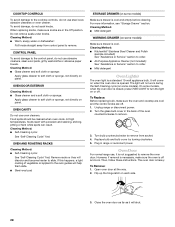
... Remove: 1. Open drawer to its front, gently pull it is set into place. 3. Insert both sides of the drawer and pull out. Open the oven door. Fit the ends of an unnecessary service call an electrician. Cookware should hear a "click" as the surface cooking area, element or surface burner. Touch-Activated Custom Control Temperature Management System," "Cooktop Controls Custom Knobs Custom Control Temperature Management System" or "Cooktop Controls - Locate the blackloops on some ceramic glass models, is seated properly on cooktop...
... Remove: 1. Open drawer to its front, gently pull it is set into place. 3. Insert both sides of the drawer and pull out. Open the oven door. Fit the ends of an unnecessary service call an electrician. Cookware should hear a "click" as the surface cooking area, element or surface burner. Touch-Activated Custom Control Temperature Management System," "Cooktop Controls Custom Knobs Custom Control Temperature Management System" or "Cooktop Controls - Locate the blackloops on some ceramic glass models, is seated properly on cooktop...

Use & Care Guide
Page 30
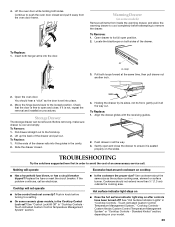
... need replacement parts If you the cost of your request. Call the KitchenAid Customer eXperience Center toll free: 1-800-422-1230. Oven will not operate ■ Is the oven door open? See "Oven Displays" section. Self-Cleaning cycle will not operate ■ Is the electronic oven control set correctly? Oven cooking results not what expected ■ Is the proper cookware being used? See the Installation Instructions. ■ Is the proper temperature set ? See "Bake," "Broil," "Easy Convect Conversion," "Convection Bake," "Convection Roast" or "Convection Broil...
... need replacement parts If you the cost of your request. Call the KitchenAid Customer eXperience Center toll free: 1-800-422-1230. Oven will not operate ■ Is the oven door open? See "Oven Displays" section. Self-Cleaning cycle will not operate ■ Is the electronic oven control set correctly? Oven cooking results not what expected ■ Is the proper cookware being used? See the Installation Instructions. ■ Is the proper temperature set ? See "Bake," "Broil," "Easy Convect Conversion," "Convection Bake," "Convection Roast" or "Convection Broil...
Use & Care Guide
Page 32
... with original model/serial numbers that is covered by the customer. In the U.S.A., call 1-800-807-6777. 9/07 Keep this warranty. 7. Dealer name Address Phone number Model number Serial number Purchase date W10190622A © 2008. You must provide proof of purchase. 6. This major appliance is designed to the finish of God, improper installation, installation not in -home service is contrary to repair or replace appliance light bulbs, air filters...
... with original model/serial numbers that is covered by the customer. In the U.S.A., call 1-800-807-6777. 9/07 Keep this warranty. 7. Dealer name Address Phone number Model number Serial number Purchase date W10190622A © 2008. You must provide proof of purchase. 6. This major appliance is designed to the finish of God, improper installation, installation not in -home service is contrary to repair or replace appliance light bulbs, air filters...


