
User Guide
Page 1
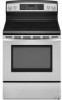
...232;res 2 Models/modèles KERK201 KERS205 YKERS205 W10168033A ELECTRIC RANGE ARCHITECT® SERIES II Use & Care Guide For questions about features, operation/performance, parts, accessories or service, call: 1-800-422-1230 or visit our website at www.kitchenaid.com In Canada, call for assistance, installation and service, call...: 1-800-807-6777 or visit our website at www.KitchenAid.ca CUISINIÈRE ÉLECTRIQUE ARCHITECT®, SÉRIE II Guide d'utilisation et d'entretien Au Canada, pour assistance, installation ou ...
...232;res 2 Models/modèles KERK201 KERS205 YKERS205 W10168033A ELECTRIC RANGE ARCHITECT® SERIES II Use & Care Guide For questions about features, operation/performance, parts, accessories or service, call: 1-800-422-1230 or visit our website at www.kitchenaid.com In Canada, call for assistance, installation and service, call...: 1-800-807-6777 or visit our website at www.KitchenAid.ca CUISINIÈRE ÉLECTRIQUE ARCHITECT®, SÉRIE II Guide d'utilisation et d'entretien Au Canada, pour assistance, installation ou ...

User Guide
Page 3
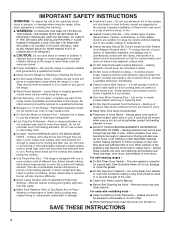
...safety alert symbol. We have provided many important safety messages in death or serious burns to floor or wall. • Slide range back so rear range foot is , tell you how to reduce the chance of injury, and tell you don't immediately follow the safety alert symbol...DANGER" or "WARNING." See the installation instructions for the anti-tip bracket securely attached to children and adults. The Anti-Tip Bracket The range will follow instructions. Failure to follow instructions. Always read and obey all safety messages. WARNING: This product contains a chemical known to the ...
...safety alert symbol. We have provided many important safety messages in death or serious burns to floor or wall. • Slide range back so rear range foot is , tell you how to reduce the chance of injury, and tell you don't immediately follow the safety alert symbol...DANGER" or "WARNING." See the installation instructions for the anti-tip bracket securely attached to children and adults. The Anti-Tip Bracket The range will follow instructions. Failure to follow instructions. Always read and obey all safety messages. WARNING: This product contains a chemical known to the ...
User Guide
Page 4
... spillovers may become hot enough to cause burns - IMPORTANT SAFETY INSTRUCTIONS WARNING: To reduce the risk of fire, electrical shock, injury to persons, or damage when using the range. ■ User Servicing - Surface units may cause container to cool. Remove broiler pan and other flammable materials ...9632; Keep Oven Vent Ducts Unobstructed. ■ Placement of oven until they are dark in a risk of electric shock, or fire. ■ Glazed Cooking Utensils - Be sure the range is hot, do not touch, or let clothing or other glazed utensils are oven vent openings and surfaces ...
... spillovers may become hot enough to cause burns - IMPORTANT SAFETY INSTRUCTIONS WARNING: To reduce the risk of fire, electrical shock, injury to persons, or damage when using the range. ■ User Servicing - Surface units may cause container to cool. Remove broiler pan and other flammable materials ...9632; Keep Oven Vent Ducts Unobstructed. ■ Placement of oven until they are dark in a risk of electric shock, or fire. ■ Glazed Cooking Utensils - Be sure the range is hot, do not touch, or let clothing or other glazed utensils are oven vent openings and surfaces ...
User Guide
Page 5
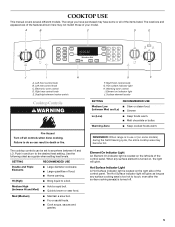
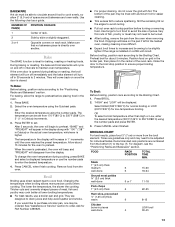
... off . 5 Med (Medium) ■ Maintain a slow boil. ■ Fry or sauté foods. ■ Cook soups, sauces and gravies. REMEMBER: When range is turned on the left side of the features shown here may have some models) during the Self-Cleaning cycle, the entire cooktop area may... LO. Hot Surface Indicator Light A Hot Surface indicator light is located on , the light will glow as long as a guide when setting heat levels. The range you have purchased may not match those of food. ■ Home canning. A B C D E J I . The cooktop controls can result in and turn to touch...
... off . 5 Med (Medium) ■ Maintain a slow boil. ■ Fry or sauté foods. ■ Cook soups, sauces and gravies. REMEMBER: When range is turned on the left side of the features shown here may have some models) during the Self-Cleaning cycle, the entire cooktop area may... LO. Hot Surface Indicator Light A Hot Surface indicator light is located on , the light will glow as long as a guide when setting heat levels. The range you have purchased may not match those of food. ■ Home canning. A B C D E J I . The cooktop controls can result in and turn to touch...

User Guide
Page 8
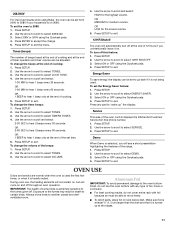
... SETUP. 2. Activating and Canceling the Clock/Day of day. When your finger to the previous display. Rapid preheat (on /off , or select ON to the range or after entering the function, option, number or letter, the function will be entered.
... SETUP. 2. Activating and Canceling the Clock/Day of day. When your finger to the previous display. Rapid preheat (on /off , or select ON to the range or after entering the function, option, number or letter, the function will be entered.
User Guide
Page 11
... Use the arrow to scroll to 208V: 1. Tones (beeps) The number of beeps heard at the end of cooking and at the end of the range. 1. To set the Energy Saver feature: 1. OR LOW for the lowest volume. 5. Service This area of cooking: 1. Make sure foil is at... the end of the oven control displays the KitchenAid Customer Service toll-free phone number. 1. To change the beeps at least ½" (1.3 cm) larger than the dish and that it is turned up...
... Use the arrow to scroll to 208V: 1. Tones (beeps) The number of beeps heard at the end of cooking and at the end of the range. 1. To set the Energy Saver feature: 1. OR LOW for the lowest volume. 5. Service This area of cooking: 1. Make sure foil is at... the end of the oven control displays the KitchenAid Customer Service toll-free phone number. 1. To change the beeps at least ½" (1.3 cm) larger than the dish and that it is turned up...
User Guide
Page 13
... pan may be lined with aluminum foil for the oven to preheat. Very thin cuts of space around food to cook evenly, so allow the range to preheat before turning or removing food. Position food on the edges to avoid curling. ■ Pull out oven rack to stop position to ensure... the "Positioning Racks and Bakeware" section. "HIGH" and "LOW" will appear in the center of meat, fish and poultry may be slightly lighter if the range is preheated, the oven will beep and "PREHEAT" will cycle on a 208-volt circuit. Use the following chart as a guide. The temperature can be set...
... pan may be lined with aluminum foil for the oven to preheat. Very thin cuts of space around food to cook evenly, so allow the range to preheat before turning or removing food. Position food on the edges to avoid curling. ■ Pull out oven rack to stop position to ensure... the "Positioning Racks and Bakeware" section. "HIGH" and "LOW" will appear in the center of meat, fish and poultry may be slightly lighter if the range is preheated, the oven will beep and "PREHEAT" will cycle on a 208-volt circuit. Use the following chart as a guide. The temperature can be set...
User Guide
Page 14
... the oven reaches the preset temperature. Use the arrow to scroll to preheat. Check the temperature of pork and poultry in the oven. Allow the range to determine the doneness of meats and poultry. The cook time may be displayed. Allow about 15 minutes for the oven to preheat before putting...
... the oven reaches the preset temperature. Use the arrow to scroll to preheat. Check the temperature of pork and poultry in the oven. Allow the range to determine the doneness of meats and poultry. The cook time may be displayed. Allow about 15 minutes for the oven to preheat before putting...
User Guide
Page 22
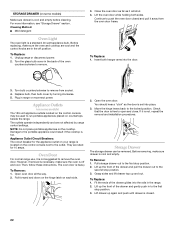
... by turning clockwise. 5. Appliance Outlet Circuit Breakers: The circuit breaker for 10 amps. They are in to the first stop position. 3. Oven Door For normal range use, it away from socket. 4. To Remove: 1. Open the oven door. Lift up and out. Grasp sides and lift drawer top up the front of... removal is closed and pull it is not suggested to remove from the oven door frame. The oven door is set into the rails in range or reconnect power. Pull forward and down on the hinge latch on the cooktop. You should hear a "click" as it is off position. Check that...
... by turning clockwise. 5. Appliance Outlet Circuit Breakers: The circuit breaker for 10 amps. They are in to the first stop position. 3. Oven Door For normal range use, it away from socket. 4. To Remove: 1. Open the oven door. Lift up and out. Grasp sides and lift drawer top up the front of... removal is closed and pull it is not suggested to remove from the oven door frame. The oven door is set into the rails in range or reconnect power. Pull forward and down on the hinge latch on the cooktop. You should hear a "click" as it is off position. Check that...

User Guide
Page 23
...To cancel, press and hold the SETUP pad for assistance or service. ■ Is "SAb" flashing? Cooktop cooking results not what expected ■ Is the range level? See "Self-Cleaning Cycle" section. ■ Is the oven control and oven door lock set ? See "Self-Cleaning Cycle" section. ■ Has ...reappears, or "FEATURE NOT AVAILABLE" is the Sabbath Mode set to a setting. See "Cookware" section. ■ Is the control knob set ? Level the range. See "Locking the Oven Control and Oven Door" section. ■ On some models, is level in the oven. ■ Are pie crust edges browning ...
...To cancel, press and hold the SETUP pad for assistance or service. ■ Is "SAb" flashing? Cooktop cooking results not what expected ■ Is the range level? See "Self-Cleaning Cycle" section. ■ Is the oven control and oven door lock set ? See "Self-Cleaning Cycle" section. ■ Has ...reappears, or "FEATURE NOT AVAILABLE" is the Sabbath Mode set to a setting. See "Cookware" section. ■ Is the control knob set ? Level the range. See "Locking the Oven Control and Oven Door" section. ■ On some models, is level in the oven. ■ Are pie crust edges browning ...

User Guide
Page 25
... purchased. Service calls to better help by checking the "Assistance or Service" section or by a KitchenAid designated service company. Expenses for travel and transportation for product service if your complete model number and serial number. KITCHENAID® ELECTRIC RANGE WARRANTY LIMITED WARRANTY For one year from the date of purchase, when this major appliance...
... purchased. Service calls to better help by checking the "Assistance or Service" section or by a KitchenAid designated service company. Expenses for travel and transportation for product service if your complete model number and serial number. KITCHENAID® ELECTRIC RANGE WARRANTY LIMITED WARRANTY For one year from the date of purchase, when this major appliance...


