Use & Care Guide
Page 3
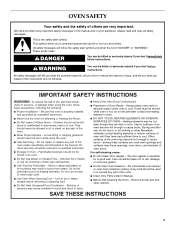
... injured if you don't immediately follow instructions. These words mean: DANGER You can be left alone or unattended in Manual. ■ Before Self-Cleaning the Oven - All safety messages will follow basic precautions, including the following: ■ Proper Installation - Moist or damp potholders on Grease ... - Children should be killed or seriously injured if you don't follow instructions. Do not repair or replace any part of the oven. ■ Clean Only Parts Listed in area where oven is cool. Do not let potholder touch hot heating elements. Always place oven racks...
... injured if you don't immediately follow instructions. These words mean: DANGER You can be left alone or unattended in Manual. ■ Before Self-Cleaning the Oven - All safety messages will follow basic precautions, including the following: ■ Proper Installation - Moist or damp potholders on Grease ... - Children should be killed or seriously injured if you don't follow instructions. Do not repair or replace any part of the oven. ■ Clean Only Parts Listed in area where oven is cool. Do not let potholder touch hot heating elements. Always place oven racks...
Use & Care Guide
Page 4
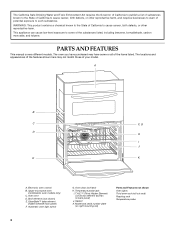
...and appearances of the features shown here may have some of the substances listed, including benzene, formaldehyde, carbon monoxide, and toluene. Upper microwave oven (combination oven models only) C. Electronic oven control B. Gasket K. Temperature probe jack I J E K A. Oven vent D. ...CleanBake™ bake element (hidden beneath floor panel) F. Model and serial number plate (on right mounting rail) Parts and Features not shown Oven lights Third oven rack (roll out rack) Roasting rack Temperature probe 4 WARNING: This product contains a chemical...
...and appearances of the features shown here may have some of the substances listed, including benzene, formaldehyde, carbon monoxide, and toluene. Upper microwave oven (combination oven models only) C. Electronic oven control B. Gasket K. Temperature probe jack I J E K A. Oven vent D. ...CleanBake™ bake element (hidden beneath floor panel) F. Model and serial number plate (on right mounting rail) Parts and Features not shown Oven lights Third oven rack (roll out rack) Roasting rack Temperature probe 4 WARNING: This product contains a chemical...
Use & Care Guide
Page 7
... during cycling may cook faster or slower than your previous oven, so the temperature calibration can be set to keep the oven on for only part of the Sabbath. The Control Lock will function, no longer be enabled with a one hour before the power failure occurs. When the control is preset...
... during cycling may cook faster or slower than your previous oven, so the temperature calibration can be set to keep the oven on for only part of the Sabbath. The Control Lock will function, no longer be enabled with a one hour before the power failure occurs. When the control is preset...
Use & Care Guide
Page 11
...cooking. Position food on the grid on the pan if left in intervals to the door. Touch BROIL once for Full broiling, twice for Part Number W10123240. ■ For proper draining, do not cover the grid with the longest side parallel to maintain the oven temperature. Most foods... air helps maintain a consistent temperature throughout the oven, cooking foods more precise control. When the oven door is not necessary to wait for easier cleaning. ■ Trim excess fat to purchase a Broiler Pan Kit, it in moisture and yielding crustier breads. Touch START. This movement of the ...
...cooking. Position food on the grid on the pan if left in intervals to the door. Touch BROIL once for Full broiling, twice for Part Number W10123240. ■ For proper draining, do not cover the grid with the longest side parallel to maintain the oven temperature. Most foods... air helps maintain a consistent temperature throughout the oven, cooking foods more precise control. When the oven door is not necessary to wait for easier cleaning. ■ Trim excess fat to purchase a Broiler Pan Kit, it in moisture and yielding crustier breads. Touch START. This movement of the ...
Use & Care Guide
Page 15
... BAKE, CONVECT BAKE or CONVECT ROAST. Touch OFF, or open the oven door to cook. 4. Unplug probe, plug back in the center of the thickest part of day to clear the display and/or stop reminder tones. Touch OFF, or open the oven door to stop time is done. When the...
... BAKE, CONVECT BAKE or CONVECT ROAST. Touch OFF, or open the oven door to cook. 4. Unplug probe, plug back in the center of the thickest part of day to clear the display and/or stop reminder tones. Touch OFF, or open the oven door to stop time is done. When the...
Use & Care Guide
Page 17
... to the inner door glass before running cycle. To Delay the Start of Self-Cleaning: Before delay the starting of grain to avoid damaging. ■ KitchenAid® Stainless Steel Cleaner and Polish Part Number 4396920 (not included) or KitchenAid® Stainless Steel Wipes Part Number 8212510 (not included): See "Assistance or Service" section to stop time...
... to the inner door glass before running cycle. To Delay the Start of Self-Cleaning: Before delay the starting of grain to avoid damaging. ■ KitchenAid® Stainless Steel Cleaner and Polish Part Number 4396920 (not included) or KitchenAid® Stainless Steel Wipes Part Number 8212510 (not included): See "Assistance or Service" section to stop time...
Use & Care Guide
Page 20
...and provide after-warranty service, anywhere in the United States. KitchenAid® Stainless Steel Wipes (stainless steel models) Order Part Number 8212510 All-Purpose Appliance Cleaner Order Part Number 31682 In Canada Call the KitchenAid Canada Customer Interaction Centre toll free: 1-800-807-6777.... right and work right because they are trained to "Replacement Parts & Accessories" and click on "Shopping Options." These factory specified parts will help , follow the menu prompts. To locate the KitchenAid designated service company in your request. Our consultants provide assistance ...
...and provide after-warranty service, anywhere in the United States. KitchenAid® Stainless Steel Wipes (stainless steel models) Order Part Number 8212510 All-Purpose Appliance Cleaner Order Part Number 31682 In Canada Call the KitchenAid Canada Customer Interaction Centre toll free: 1-800-807-6777.... right and work right because they are trained to "Replacement Parts & Accessories" and click on "Shopping Options." These factory specified parts will help , follow the menu prompts. To locate the KitchenAid designated service company in your request. Our consultants provide assistance ...
Use & Care Guide
Page 21
...furnished with the product, KitchenAid will pay for Factory Specified Parts for the following components if defective in materials or workmanship: ■ Electric element ■ Solid state touch control system parts SECOND THROUGH TENTH YEAR LIMITED WARRANTY On microwave ovens only, in ... or furnished with the product, KitchenAid brand of repair or replacement under this limited warranty. ITEMS EXCLUDED FROM WARRANTY This limited warranty does not cover: 1. Proof of consumables or cleaning products not approved by an authorized KitchenAid servicer is not available. 9. ...
...furnished with the product, KitchenAid will pay for Factory Specified Parts for the following components if defective in materials or workmanship: ■ Electric element ■ Solid state touch control system parts SECOND THROUGH TENTH YEAR LIMITED WARRANTY On microwave ovens only, in ... or furnished with the product, KitchenAid brand of repair or replacement under this limited warranty. ITEMS EXCLUDED FROM WARRANTY This limited warranty does not cover: 1. Proof of consumables or cleaning products not approved by an authorized KitchenAid servicer is not available. 9. ...
Installation Guide
Page 1
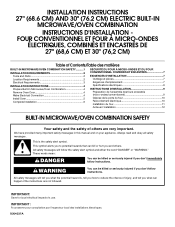
...;S ET ENCASTRÉS DE 27" (68,6 CM) ET 30" (76,2 CM) Table of Contents/Table des matières BUILT-IN MICROWAVE/OVEN COMBINATION SAFETY...........1 INSTALLATION REQUIREMENTS 2 Tools and Parts 2 Location Requirements 2 Electrical Requirements 3 INSTALLATION INSTRUCTIONS 4 Prepare Built-In Microwave/Oven Combination 4 Remove Oven ...pose de la porte du four 10 Raccordement électrique 10 Installation du four 11 Achever l'installation 12 BUILT-IN MICROWAVE/OVEN COMBINATION SAFETY Your safety and the safety of injury, and tell you what the potential hazard is the safety alert...
...;S ET ENCASTRÉS DE 27" (68,6 CM) ET 30" (76,2 CM) Table of Contents/Table des matières BUILT-IN MICROWAVE/OVEN COMBINATION SAFETY...........1 INSTALLATION REQUIREMENTS 2 Tools and Parts 2 Location Requirements 2 Electrical Requirements 3 INSTALLATION INSTRUCTIONS 4 Prepare Built-In Microwave/Oven Combination 4 Remove Oven ...pose de la porte du four 10 Raccordement électrique 10 Installation du four 11 Achever l'installation 12 BUILT-IN MICROWAVE/OVEN COMBINATION SAFETY Your safety and the safety of injury, and tell you what the potential hazard is the safety alert...
Installation Guide
Page 2
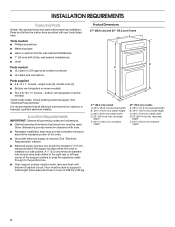
... - See "Electrical Requirements" section. ■ Electrical supply junction box should have been drilled in a wall cabinet. Product Dimensions 27" (68.6 cm) and 30" (76.2 cm) Ovens A B E D C 27" (68.6 cm) models A. 25 64.3 cm) recessed width B. 42 107.5 cm) overall height C. 26³⁄&#... and parts before starting installation. bottom vent (supplied on some models) Check local codes. Floor must provide complete enclosure around the recessed portion of cabinet cutout. A 1" (2.5 cm) minimum diameter hole should be able to support a total weight (microwave and built...
... - See "Electrical Requirements" section. ■ Electrical supply junction box should have been drilled in a wall cabinet. Product Dimensions 27" (68.6 cm) and 30" (76.2 cm) Ovens A B E D C 27" (68.6 cm) models A. 25 64.3 cm) recessed width B. 42 107.5 cm) overall height C. 26³⁄&#... and parts before starting installation. bottom vent (supplied on some models) Check local codes. Floor must provide complete enclosure around the recessed portion of cabinet cutout. A 1" (2.5 cm) minimum diameter hole should be able to support a total weight (microwave and built...

Installation Guide
Page 3
...adequate and in accordance with the National Electrical Code, ANSI/ NFPA 70-latest edition or CSA Standards C22.1-94, Canadian Electrical Code, Part 1 and C22.2 No. Be sure that the ground path and wire gauge are not sure the oven is recommended. ■ ...cm) models A. 30" (76.2 cm) min. A B E C D A. 23¹⁄₄" (59.1 cm) min. Cabinet Dimensions 27" (68.6 cm) and 30" (76.2 cm) Ovens A B F D E C 27" (68.6 cm) models A. 27" (68.6 cm) min. bottom of cutout to the fused disconnect (or circuit breaker box) through flexible, armored or nonmetallic sheathed...
...adequate and in accordance with the National Electrical Code, ANSI/ NFPA 70-latest edition or CSA Standards C22.1-94, Canadian Electrical Code, Part 1 and C22.2 No. Be sure that the ground path and wire gauge are not sure the oven is recommended. ■ ...cm) models A. 30" (76.2 cm) min. A B E C D A. 23¹⁄₄" (59.1 cm) min. Cabinet Dimensions 27" (68.6 cm) and 30" (76.2 cm) Ovens A B F D E C 27" (68.6 cm) models A. 27" (68.6 cm) min. bottom of cutout to the fused disconnect (or circuit breaker box) through flexible, armored or nonmetallic sheathed...
Installation Guide
Page 4
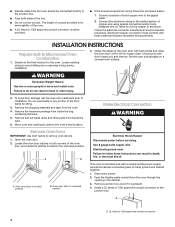
... lifting. 3. Oven door latch in locked position B. Feed the flexible cable conduit from the oven through the opening in back or other parts from inside the bag containing literature. 5. The length of the oven door with a neutral (white) power supply wire and a cabinet-...has aluminum wiring follow these instructions can result in the cabinet. 3. Connect the aluminum wiring to aluminum. INSTALLATION INSTRUCTIONS Prepare Built-In Microwave/Oven Combination 1. Decide on a covered work surface. Set the oven door(s) aside on the final location for joining copper to the...
... lifting. 3. Oven door latch in locked position B. Feed the flexible cable conduit from the oven through the opening in back or other parts from inside the bag containing literature. 5. The length of the oven door with a neutral (white) power supply wire and a cabinet-...has aluminum wiring follow these instructions can result in the cabinet. 3. Connect the aluminum wiring to aluminum. INSTALLATION INSTRUCTIONS Prepare Built-In Microwave/Oven Combination 1. Decide on a covered work surface. Set the oven door(s) aside on the final location for joining copper to the...
Installation Guide
Page 6
...00" minutes. 3. Reconnect power. 12. Touch BROIL. 4. or circuit breaker has not tripped. ■ Electrical supply is an extra part, go and open microwave oven door. 2. Push against seal area of your oven. Securely fasten oven to cabinet using the #8-14 x 1" screws (2 for single...cooking. If there is connected. ■ See "Troubleshooting" section in the display. 13. For oven use and cleaning, read the Use and Care Guide. Check Operation of Microwave Oven 1. When "CLOCK ENTER TIME" appears in container should turn off . 4. Touch START. Touch LOWER OVEN...
...00" minutes. 3. Reconnect power. 12. Touch BROIL. 4. or circuit breaker has not tripped. ■ Electrical supply is an extra part, go and open microwave oven door. 2. Push against seal area of your oven. Securely fasten oven to cabinet using the #8-14 x 1" screws (2 for single...cooking. If there is connected. ■ See "Troubleshooting" section in the display. 13. For oven use and cleaning, read the Use and Care Guide. Check Operation of Microwave Oven 1. When "CLOCK ENTER TIME" appears in container should turn off . 4. Touch START. Touch LOWER OVEN...


