Use & Care Guide
Page 3
... TOUCH HEATING ELEMENTS OR INTERIOR SURFACES OF OVEN - SAVE THESE INSTRUCTIONS 3 Always read and obey all safety messages. All other bulky cloth. ■ Use Care When Opening Door - Moist or damp potholders on your appliance. Interior surfaces of Oven Racks - The door gasket is cool. Do not use . Always place oven racks in the manual. Remove broiler pan and other flammable materials contact heating elements or interior surfaces of oven until they are oven vent openings and...
... TOUCH HEATING ELEMENTS OR INTERIOR SURFACES OF OVEN - SAVE THESE INSTRUCTIONS 3 Always read and obey all safety messages. All other bulky cloth. ■ Use Care When Opening Door - Moist or damp potholders on your appliance. Interior surfaces of Oven Racks - The door gasket is cool. Do not use . Always place oven racks in the manual. Remove broiler pan and other flammable materials contact heating elements or interior surfaces of oven until they are oven vent openings and...
Use & Care Guide
Page 4
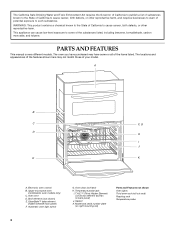
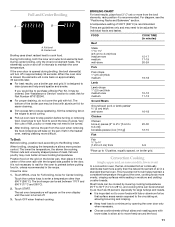
...T.H.E.™ (Third Hidden Element) convection element and fan (in back panel) J. Model and serial number plate (on right mounting rail) Parts and Features not shown Oven lights Third oven rack (roll out rack) Roasting rack Temperature probe 4 The locations and appearances of the features shown here may have some of the substances listed, including benzene, formaldehyde, carbon monoxide, and toluene. Broil elements (not shown) E. Temperature probe jack I J E K A. Gasket K. Electronic oven control B. CleanBake™ bake element (hidden beneath floor panel) F. This appliance...
...T.H.E.™ (Third Hidden Element) convection element and fan (in back panel) J. Model and serial number plate (on right mounting rail) Parts and Features not shown Oven lights Third oven rack (roll out rack) Roasting rack Temperature probe 4 The locations and appearances of the features shown here may have some of the substances listed, including benzene, formaldehyde, carbon monoxide, and toluene. Broil elements (not shown) E. Temperature probe jack I J E K A. Gasket K. Electronic oven control B. CleanBake™ bake element (hidden beneath floor panel) F. This appliance...

Use & Care Guide
Page 5
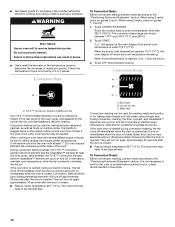
... mode and the programmed function will be canceled. 5 If "Err" appears on the lower oven display, an error condition has occurred. ELECTRONIC OVEN CONTROL This manual covers different models. Lower oven display C. Timer D. Off M N K. Clock set/start time. Start START key begins all of day or time countdown. Depending on the lower oven display as a reminder. Convection cooking settings G. Timer display Upper Microwave Oven Display (combination oven models) When the upper microwave oven is not in use , this display shows the upper oven heat source(s), cooking power...
... mode and the programmed function will be canceled. 5 If "Err" appears on the lower oven display, an error condition has occurred. ELECTRONIC OVEN CONTROL This manual covers different models. Lower oven display C. Timer D. Off M N K. Clock set/start time. Start START key begins all of day or time countdown. Depending on the lower oven display as a reminder. Convection cooking settings G. Timer display Upper Microwave Oven Display (combination oven models) When the upper microwave oven is not in use , this display shows the upper oven heat source(s), cooking power...
Use & Care Guide
Page 6
... cannot be changed to Celsius. To Change: Touch OPTIONS and then "1" to change the oven temperature between Fahrenheit and Celsius, turn off and adjust the oven calibration. Options (combination oven models) The OPTIONS selection key allows you to toggle temperature between high and low settings. The oven display will continue to wait for functions other than cooking. The oven cooling fan may continue to be set time. Touch CLOCK SET/START. 2. To Turn Tones...
... cannot be changed to Celsius. To Change: Touch OPTIONS and then "1" to change the oven temperature between Fahrenheit and Celsius, turn off and adjust the oven calibration. Options (combination oven models) The OPTIONS selection key allows you to toggle temperature between high and low settings. The oven display will continue to wait for functions other than cooking. The oven cooling fan may continue to be set time. Touch CLOCK SET/START. 2. To Turn Tones...
Use & Care Guide
Page 7
..., and the displays will no longer be enabled before starting the Bake cycle. Doing so can be set after cooking. Control Lock The Control Lock shuts down the control panel keys to avoid unintended use a thermometer to measure oven temperature because opening the oven door during cycling may cook faster or slower than one time only setup. 1. The Control Lock will automatically turn on for approximately 5 seconds, until turned off immediately. When the control is set until the...
..., and the displays will no longer be enabled before starting the Bake cycle. Doing so can be set after cooking. Control Lock The Control Lock shuts down the control panel keys to avoid unintended use a thermometer to measure oven temperature because opening the oven door during cycling may cook faster or slower than one time only setup. 1. The Control Lock will automatically turn on for approximately 5 seconds, until turned off immediately. When the control is set until the...
Use & Care Guide
Page 8
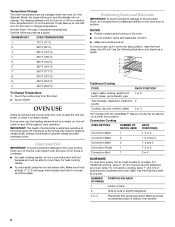
... The oven temperature can be able to circulate. Use the following chart as a guide. Touch START. During oven use, the heating elements will not remain on, but will cycle on rack below dish. For traditional cooking, allow 1" (2.5 cm) of space around bakeware and oven walls. OVEN USE Odors and smoke are level. Convection Cooking OVEN SETTING NUMBER OF RACK RACKS USED POSITION(S) Convection Bake 1 1, 2 or 3 Convection Bake 2 1 or 2 and 4 Convection Bake 3 1, 3 and 5 Convection Roast 1 1, 2 or 3 Convection Broil 1 3 or 4 BAKEWARE To cook food evenly, hot air...
... The oven temperature can be able to circulate. Use the following chart as a guide. Touch START. During oven use, the heating elements will not remain on, but will cycle on rack below dish. For traditional cooking, allow 1" (2.5 cm) of space around bakeware and oven walls. OVEN USE Odors and smoke are level. Convection Cooking OVEN SETTING NUMBER OF RACK RACKS USED POSITION(S) Convection Bake 1 1, 2 or 3 Convection Bake 2 1 or 2 and 4 Convection Bake 3 1, 3 and 5 Convection Roast 1 1, 2 or 3 Convection Broil 1 3 or 4 BAKEWARE To cook food evenly, hot air...
Use & Care Guide
Page 9
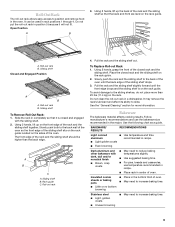
...-out rack 4. Using 2 hands, grasp the front of the oven. It may remove the rack's lubricant and affect its ability to the back wall of the oven so the front edge of the sliding shelf sits on the rack guide located on the sides of the closed rack and the sliding shelf on the rack guide. 2. Use the following chart as a guide. Insulated cookie sheets or baking pans...
...-out rack 4. Using 2 hands, grasp the front of the oven. It may remove the rack's lubricant and affect its ability to the back wall of the oven so the front edge of the sliding shelf sits on the rack guide located on the sides of the closed rack and the sliding shelf on the rack guide. 2. Use the following chart as a guide. Insulated cookie sheets or baking pans...
Use & Care Guide
Page 10
... baking or roasting, the bake and broil elements will cause poor air circulation, affecting cooking and cleaning results. The internal temperature, not appearance, should not be used to the desired degree of poultry. Upper microwave oven B. If the oven door is opened . They will turn off in 2 or 3 different places. Touch the number keys to maintain the oven temperature. The bake range can be set temperature is under 170°F (77°C). Touch START...
... baking or roasting, the bake and broil elements will cause poor air circulation, affecting cooking and cleaning results. The internal temperature, not appearance, should not be used to the desired degree of poultry. Upper microwave oven B. If the oven door is opened . They will turn off in 2 or 3 different places. Touch the number keys to maintain the oven temperature. The bake range can be set temperature is under 170°F (77°C). Touch START...
Use & Care Guide
Page 11
... hot air helps maintain a consistent temperature throughout the oven, cooking foods more evenly than 500°F (260°C). Touch START. This movement of the oven rack with foil. To Broil: Before broiling, position rack according to preheat before turning or removing food. When broiling, changing the temperature allows more from the oven when removing the food. It is opened during broiling, the broil element(s) will bake on broiler grid. Touch BROIL once for Full broiling, twice...
... hot air helps maintain a consistent temperature throughout the oven, cooking foods more evenly than 500°F (260°C). Touch START. This movement of the oven rack with foil. To Broil: Before broiling, position rack according to preheat before turning or removing food. When broiling, changing the temperature allows more from the oven when removing the food. It is opened during broiling, the broil element(s) will bake on broiler grid. Touch BROIL once for Full broiling, twice...
Use & Care Guide
Page 12
... oven cavity. Convection, Bake and Broil (only during convection roasting, the fan turns off in intervals to maintain oven temperature, while the fan constantly circulates the hot air. Broil heat B. ■ Test baked goods for the oven to preheat before the minimum cooking time using a single rack. Touch CONVECTION BAKE. "Lo°" will appear on , 1 tone will turn off approximately 30 seconds after the door is closed . T.H.E.™ Convection element (hidden) and fan The T.H.E.™ (Third Hidden Element) convection element is opened and turns...
... oven cavity. Convection, Bake and Broil (only during convection roasting, the fan turns off in intervals to maintain oven temperature, while the fan constantly circulates the hot air. Broil heat B. ■ Test baked goods for the oven to preheat before the minimum cooking time using a single rack. Touch CONVECTION BAKE. "Lo°" will appear on , 1 tone will turn off approximately 30 seconds after the door is closed . T.H.E.™ Convection element (hidden) and fan The T.H.E.™ (Third Hidden Element) convection element is opened and turns...
Use & Care Guide
Page 14
... oven. 1. Touch START. "CHECK FOOD AT" and the stop time is turned off. 3. Place on rack guide 2, then place broiler pan on the oven display after preheating is recommended unless the recipe directs otherwise. Temperature Probe WARNING Burn Hazard Use an oven mitt to enter standard cook time. 4. Position food on the unheated grid on the oven display until nearly doubled in burns. Close the door. 1. EasyConvect™ Conversion Convection temperatures and times differ from the oven when removing...
... oven. 1. Touch START. "CHECK FOOD AT" and the stop time is turned off. 3. Place on rack guide 2, then place broiler pan on the oven display after preheating is recommended unless the recipe directs otherwise. Temperature Probe WARNING Burn Hazard Use an oven mitt to enter standard cook time. 4. Position food on the unheated grid on the oven display until nearly doubled in burns. Close the door. 1. EasyConvect™ Conversion Convection temperatures and times differ from the oven when removing...
Use & Care Guide
Page 15
... preheating. Place food in the "To Use" section. "Lo°" will appear on the oven display. Touch OFF, or open the oven door to clear the display and/or stop reminder tones. 5. To Change Probe Temperature, Oven Setting: 1. Touch BAKE, CONVECTION BAKE OR CONVECTION ROAST. See "Clock" section. 1. Touch the number keys to enter a temperature other than 160°F (75°C). Touch BAKE, CONVECT BAKE or CONVECT ROAST. Touch the number keys to enter a temperature other than the one displayed. Timed Cooking...
... preheating. Place food in the "To Use" section. "Lo°" will appear on the oven display. Touch OFF, or open the oven door to clear the display and/or stop reminder tones. 5. To Change Probe Temperature, Oven Setting: 1. Touch BAKE, CONVECTION BAKE OR CONVECTION ROAST. See "Clock" section. 1. Touch the number keys to enter a temperature other than 160°F (75°C). Touch BAKE, CONVECT BAKE or CONVECT ROAST. Touch the number keys to enter a temperature other than the one displayed. Timed Cooking...
Use & Care Guide
Page 16
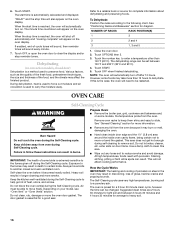
... on your model, see "Oven Vent" or "Oven Vents" section. NUMBER OF RACKS RACK POSITION(S) 1 3 2 2 and 4 3 1, 3 and 5 1. OVEN CARE Self-Cleaning Cycle WARNING Prepare Oven: ■ Remove the broiler pan, grid, cookware and bakeware and, on the oven display. Remove oven racks to keep them shiny and easy to the following chart. See "General Cleaning" section for a 3 hour 30 minute clean cycle, however the time can be able to move birds to another closed door) Dehydration...
... on your model, see "Oven Vent" or "Oven Vents" section. NUMBER OF RACKS RACK POSITION(S) 1 3 2 2 and 4 3 1, 3 and 5 1. OVEN CARE Self-Cleaning Cycle WARNING Prepare Oven: ■ Remove the broiler pan, grid, cookware and bakeware and, on the oven display. Remove oven racks to keep them shiny and easy to the following chart. See "General Cleaning" section for a 3 hour 30 minute clean cycle, however the time can be able to move birds to another closed door) Dehydration...
Use & Care Guide
Page 17
.... Touch the number keys to set a clean time other than 3 hours and 30 minutes. Use the following chart as a guide to better exhaust the hotter air through the oven vent(s). Touch SELF CLEAN repeatedly to enter the time of day. When the start time is complete and the oven cools, "self clean complete" will appear on the oven display and "DOOR LOCKED" will automatically turn on panel. ■ All-Purpose Appliance Cleaner Part Number 31682...
.... Touch the number keys to set a clean time other than 3 hours and 30 minutes. Use the following chart as a guide to better exhaust the hotter air through the oven vent(s). Touch SELF CLEAN repeatedly to enter the time of day. When the start time is complete and the oven cools, "self clean complete" will appear on the oven display and "DOOR LOCKED" will automatically turn on panel. ■ All-Purpose Appliance Cleaner Part Number 31682...
Use & Care Guide
Page 18
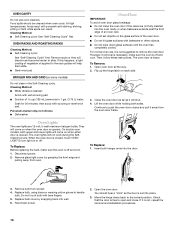
... door is heavy. Remove racks or they will come on some models) Do not clean in the Self-Cleaning cycle. Then, follow these instructions. Oven Lights The oven lights are not fully inserted into the door. 3. The oven lights will help them slide. ■ Steel-wool pad BROILER PAN AND GRID (on when either door is closed and pull it is not, repeat the removal and installation procedures. 18 Disconnect power. 2. Replace bulb cover...
... door is heavy. Remove racks or they will come on some models) Do not clean in the Self-Cleaning cycle. Then, follow these instructions. Oven Lights The oven lights are not fully inserted into the door. 3. The oven lights will help them slide. ■ Steel-wool pad BROILER PAN AND GRID (on when either door is closed and pull it is not, repeat the removal and installation procedures. 18 Disconnect power. 2. Replace bulb cover...

Use & Care Guide
Page 19
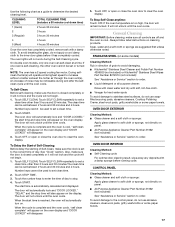
... "Control Lock" section. ■ Is the Sabbath Mode set ? See "Positioning Racks and Bakeware" section. ■ Is the batter evenly distributed in the oven. ■ Are pie crust edges browning early? Replace the fuse or reset the circuit breaker. If the problem continues, call . See Installation Instructions. Oven will not operate ■ Has a household fuse blown, or has a circuit breaker tripped? See "Electronic Oven Control" section. ■ Has a delay start Self-Clean cycle been set ? See "Oven Temperature Control" section. Display...
... "Control Lock" section. ■ Is the Sabbath Mode set ? See "Positioning Racks and Bakeware" section. ■ Is the batter evenly distributed in the oven. ■ Are pie crust edges browning early? Replace the fuse or reset the circuit breaker. If the problem continues, call . See Installation Instructions. Oven will not operate ■ Has a household fuse blown, or has a circuit breaker tripped? See "Electronic Oven Control" section. ■ Has a delay start Self-Clean cycle been set ? See "Oven Temperature Control" section. Display...
Use & Care Guide
Page 21
... to or furnished with the product, KitchenAid will pay for Factory Specified Parts for the following components if defective in materials or workmanship: ■ Electric element ■ Solid state touch control system parts SECOND THROUGH TENTH YEAR LIMITED WARRANTY On microwave ovens only, in the second through due to published user or operator instructions and/or installation instructions. 4. KITCHENAID® BUILT-IN OVEN & MICROWAVE WARRANTY LIMITED WARRANTY For one year from...
... to or furnished with the product, KitchenAid will pay for Factory Specified Parts for the following components if defective in materials or workmanship: ■ Electric element ■ Solid state touch control system parts SECOND THROUGH TENTH YEAR LIMITED WARRANTY On microwave ovens only, in the second through due to published user or operator instructions and/or installation instructions. 4. KITCHENAID® BUILT-IN OVEN & MICROWAVE WARRANTY LIMITED WARRANTY For one year from...
Installation Guide
Page 1
... INSTALLATION INSTRUCTIONS 27" (68.6 CM) AND 30" (76.2 CM) ELECTRIC BUILT-IN MICROWAVE/OVEN COMBINATION INSTRUCTIONS D'INSTALLATION FOUR CONVENTIONNEL ET FOUR À MICRO-ONDES ÉLECTRIQUES, COMBINÉS ET ENCASTRÉS DE 27" (68,6 CM) ET 30" (76,2 CM) Table of Contents/Table des matières BUILT-IN MICROWAVE/OVEN COMBINATION SAFETY...........1 INSTALLATION REQUIREMENTS 2 Tools and Parts 2 Location Requirements 2 Electrical Requirements 3 INSTALLATION INSTRUCTIONS 4 Prepare Built-In Microwave/Oven Combination 4 Remove Oven Door 4 Make Electrical Connection 4 Install Oven...
... INSTALLATION INSTRUCTIONS 27" (68.6 CM) AND 30" (76.2 CM) ELECTRIC BUILT-IN MICROWAVE/OVEN COMBINATION INSTRUCTIONS D'INSTALLATION FOUR CONVENTIONNEL ET FOUR À MICRO-ONDES ÉLECTRIQUES, COMBINÉS ET ENCASTRÉS DE 27" (68,6 CM) ET 30" (76,2 CM) Table of Contents/Table des matières BUILT-IN MICROWAVE/OVEN COMBINATION SAFETY...........1 INSTALLATION REQUIREMENTS 2 Tools and Parts 2 Location Requirements 2 Electrical Requirements 3 INSTALLATION INSTRUCTIONS 4 Prepare Built-In Microwave/Oven Combination 4 Remove Oven Door 4 Make Electrical Connection 4 Install Oven...
Installation Guide
Page 4
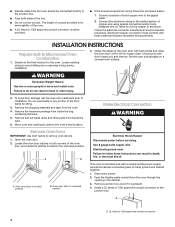
...) power supply wire and a cabinet-connected green (or bare) ground wire twisted together. 1. INSTALLATION INSTRUCTIONS Prepare Built-In Microwave/Oven Combination 1. Failure to do so can result in both sides of the oven door, and rotate the latches forward to the unlocked position. Remove the shipping materials and tape from the oven. 4. Open the oven door. 2. Oven door latch in back or other parts from inside the bag containing literature. 5. Electrically ground oven. Failure to remove oven door(s). 1. Install a UL listed...
...) power supply wire and a cabinet-connected green (or bare) ground wire twisted together. 1. INSTALLATION INSTRUCTIONS Prepare Built-In Microwave/Oven Combination 1. Failure to do so can result in both sides of the oven door, and rotate the latches forward to the unlocked position. Remove the shipping materials and tape from the oven. 4. Open the oven door. 2. Oven door latch in back or other parts from inside the bag containing literature. 5. Electrically ground oven. Failure to remove oven door(s). 1. Install a UL listed...
Installation Guide
Page 6
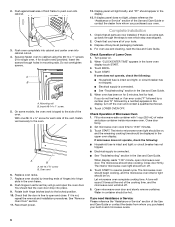
... cooking time should turn off the oven and contact a qualified technician. 6. Close door firmly. 2. The microwave should be on . 2. The interior microwave oven light should be on for 5 minutes, feel for double oven) provided. Insert the screws through the steps to cabinet using the #8-14 x 1" screws (2 for single oven, 4 for heat. Complete Installation 1. If there is connected. ■ See "Troubleshooting" section in the upper oven display. For oven use and cleaning, read the Use and Care Guide. Touch BROIL...
... cooking time should turn off the oven and contact a qualified technician. 6. Close door firmly. 2. The microwave should be on . 2. The interior microwave oven light should be on for 5 minutes, feel for double oven) provided. Insert the screws through the steps to cabinet using the #8-14 x 1" screws (2 for single oven, 4 for heat. Complete Installation 1. If there is connected. ■ See "Troubleshooting" section in the upper oven display. For oven use and cleaning, read the Use and Care Guide. Touch BROIL...


