
Use & Care Guide
Page 13
...the back and front are level on the sides of space around bakeware and oven walls. Slowly push both to the sliding shelves, do not place more information. 13 The front edge of... space around bakeware and oven walls. Rack guide C. Sliding shelf Closed and Engaged Position A B A. Place the closed rack and...and the sliding shelf out. Sliding shelf B. Sliding shelf 4. To avoid damage to the back wall of the oven so the front edge of the sliding shelf sits on the rack guide located on the rack guide...
...the back and front are level on the sides of space around bakeware and oven walls. Slowly push both to the sliding shelves, do not place more information. 13 The front edge of... space around bakeware and oven walls. Rack guide C. Sliding shelf Closed and Engaged Position A B A. Place the closed rack and...and the sliding shelf out. Sliding shelf B. Sliding shelf 4. To avoid damage to the back wall of the oven so the front edge of the sliding shelf sits on the rack guide located on the rack guide...
Use & Care Guide
Page 31
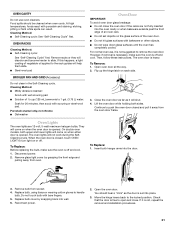
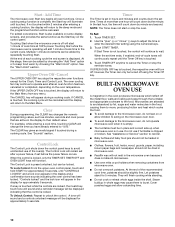
...cup (125 mL) ammonia to slide. Porcelain enamel only, not chrome ■ Dishwasher IMPORTANT: Oven Door To avoid oven door glass breakage: ■ Do not close . Insert both hanger arms into wall. 6. Do not touch bulb with scouring or steel-wool pad. Move the hinge levers back ...to open and close the oven door if the racks are 12-volt, 5-watt maximum halogen bulbs. Check...
...cup (125 mL) ammonia to slide. Porcelain enamel only, not chrome ■ Dishwasher IMPORTANT: Oven Door To avoid oven door glass breakage: ■ Do not close . Insert both hanger arms into wall. 6. Do not touch bulb with scouring or steel-wool pad. Move the hinge levers back ...to open and close the oven door if the racks are 12-volt, 5-watt maximum halogen bulbs. Check...
Installation Guide
Page 2
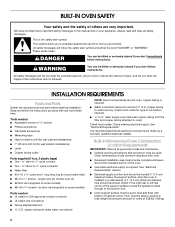
...screws - Given dimensions provide minimum clearance with oven. ■ Recessed installation area must be used. Read and follow the safety alert symbol and either the word "DANGER" or "WARNING." Check local codes for wall cabinet installations) ■ Level ■ Copper...9632; Hand or electric drill (for wall cabinet installations) ■ 1" (25 mm) drill bit (for type of cabinet cutout. single oven (2), double oven (4) ■ Bottom vent (supplied on your appliance. Built-In Microwave/Oven Combination Location Requirements IMPORTANT: Observe all governing codes...
...screws - Given dimensions provide minimum clearance with oven. ■ Recessed installation area must be used. Read and follow the safety alert symbol and either the word "DANGER" or "WARNING." Check local codes for wall cabinet installations) ■ Level ■ Copper...9632; Hand or electric drill (for wall cabinet installations) ■ 1" (25 mm) drill bit (for type of cabinet cutout. single oven (2), double oven (4) ■ Bottom vent (supplied on your appliance. Built-In Microwave/Oven Combination Location Requirements IMPORTANT: Observe all governing codes...
Installation Guide
Page 3
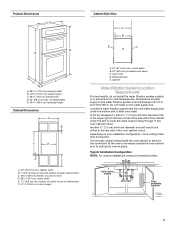
... System Location Requirements For best results, do not install the water filtration system outside the oven cabinet prior to the water filtration system must be drilled at the rear wall in the oven cabinet cutout. It will need to be between 40°F/4°C and 100°F/38...under the kitchen sink to the oven cabinet cutout. Coil enough copper tubing inside the oven cabinet to allow for the connection to the oven to be made outside , or in place. recessed depth E. 40³⁄₄" (103.5 cm) recessed height Cabinet Dimensions A B F D E C A. 30" (76.2 cm) min....
... System Location Requirements For best results, do not install the water filtration system outside the oven cabinet prior to the water filtration system must be drilled at the rear wall in the oven cabinet cutout. It will need to be between 40°F/4°C and 100°F/38...under the kitchen sink to the oven cabinet cutout. Coil enough copper tubing inside the oven cabinet to allow for the connection to the oven to be made outside , or in place. recessed depth E. 40³⁄₄" (103.5 cm) recessed height Cabinet Dimensions A B F D E C A. 30" (76.2 cm) min....
Microwave Use and Care
Page 5
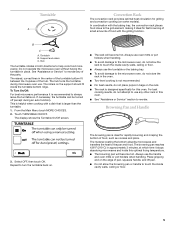
...The rollers on the support should fit inside cavity walls, ceiling or floor. ■ Always use oven mitts or pot holders when handling. ■ To avoid damage to the microwave oven, do not allow the browning pan or handle to the microwave oven, do not store the rack in approximately 3.../Off screen. ■ The rack will become hot. The raised, curved lines in this oven. In combination with a dish that is recommended to the grill element, making it stops absorbing microwaves and holds this optimal frying temperature. ■ The browning pan will become hot. Hub The...
...The rollers on the support should fit inside cavity walls, ceiling or floor. ■ Always use oven mitts or pot holders when handling. ■ To avoid damage to the microwave oven, do not allow the browning pan or handle to the microwave oven, do not store the rack in approximately 3.../Off screen. ■ The rack will become hot. The raised, curved lines in this oven. In combination with a dish that is recommended to the grill element, making it stops absorbing microwaves and holds this optimal frying temperature. ■ The browning pan will become hot. Hub The...
Microwave Use and Care
Page 10
... tones will return to the Main Menu from microwave oven. ■ Do not overcook potatoes. If the UPPER OVEN OFF key is operating will return to the Main Menu. The Control Lock is off will be turned off the metal floor, walls and ceiling and pass through the turntable and ...appropriate cookware to cancel the Timer or stop the oven. Touching Start when the microwave oven is preset unlocked, but can only be displayed for approximately 5 seconds. Control ...
... tones will return to the Main Menu from microwave oven. ■ Do not overcook potatoes. If the UPPER OVEN OFF key is operating will return to the Main Menu. The Control Lock is off will be turned off the metal floor, walls and ceiling and pass through the turntable and ...appropriate cookware to cancel the Timer or stop the oven. Touching Start when the microwave oven is preset unlocked, but can only be displayed for approximately 5 seconds. Control ...
Microwave Use and Care
Page 12
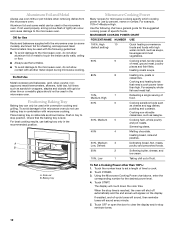
...microwave oven,do not allow aluminum foil or metal to touch the inside cavity walls, ceiling or floor. ■ Always use the turntable. ■ To avoid damage to the microwave oven...%, Medium 5 Cooking ham, whole poultry and pot roasts. A B A. Heating bread, rolls and pastries. 30%, Medium- 3 Low, Defrost Defrosting bread, fish, meats, poultry and precooked foods. 20% 2 Softening butter...use baking tray in combination with the microwave oven (on some metal can be used with another metal object during microwave cooking. Touch POWER. 3. MICROWAVE COOKING POWER CHART PERCENT/...
...microwave oven,do not allow aluminum foil or metal to touch the inside cavity walls, ceiling or floor. ■ Always use the turntable. ■ To avoid damage to the microwave oven...%, Medium 5 Cooking ham, whole poultry and pot roasts. A B A. Heating bread, rolls and pastries. 30%, Medium- 3 Low, Defrost Defrosting bread, fish, meats, poultry and precooked foods. 20% 2 Softening butter...use baking tray in combination with the microwave oven (on some metal can be used with another metal object during microwave cooking. Touch POWER. 3. MICROWAVE COOKING POWER CHART PERCENT/...


