Use & Care Guide
Page 1
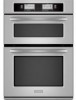
BUILT-IN ELECTRIC CONVECTION OVEN WITH STEAM ASSIST Use & Care Guide For questions about features, operation/performance, parts, accessories or service, call: 1-800-422-1230 or visit our website at www.kitchenaid.com In Canada, for assistance, installation and service, call: 1-800-807-6777 or visit our website at www.KitchenAid.ca FOUR É... d'entretien Au Canada, pour assistance composez le 1-800-461-5681, pour installation ou service composez le 1-800-807-6777 ou visitez notre site Web www.KitchenAid.ca Table of Contents/Table des matières 2 Models/Modèles KEHU309 W10162201A
BUILT-IN ELECTRIC CONVECTION OVEN WITH STEAM ASSIST Use & Care Guide For questions about features, operation/performance, parts, accessories or service, call: 1-800-422-1230 or visit our website at www.kitchenaid.com In Canada, for assistance, installation and service, call: 1-800-807-6777 or visit our website at www.KitchenAid.ca FOUR É... d'entretien Au Canada, pour assistance composez le 1-800-461-5681, pour installation ou service composez le 1-800-807-6777 ou visitez notre site Web www.KitchenAid.ca Table of Contents/Table des matières 2 Models/Modèles KEHU309 W10162201A
Use & Care Guide
Page 2
... 12 Aluminum Foil 12 Positioning Racks and Bakeware 12 Roll-Out Rack 13 Bakeware 14 Meat Thermometer 14 Oven Vent 14 Baking and Roasting 14 Full and Center Broiling 15 Convection Cooking 16 Convection Bake 16 Convection Roast 17 Convection Broil 18 ...25 Auto Steam Seafood Cooking Chart 25 Manual Steam Cooking Chart 26 Meats and Poultry Roasting Chart 27 OVEN CARE 29 Self-Cleaning Cycle 29 Water Filter Cartridge Replacement 30 General Cleaning 30 Oven Lights 31 Oven Door 31 TROUBLESHOOTING 32 ASSISTANCE OR SERVICE 33 In the U.S.A 33 Accessories 33 In Canada 33 ...
... 12 Aluminum Foil 12 Positioning Racks and Bakeware 12 Roll-Out Rack 13 Bakeware 14 Meat Thermometer 14 Oven Vent 14 Baking and Roasting 14 Full and Center Broiling 15 Convection Cooking 16 Convection Bake 16 Convection Roast 17 Convection Broil 18 ...25 Auto Steam Seafood Cooking Chart 25 Manual Steam Cooking Chart 26 Meats and Poultry Roasting Chart 27 OVEN CARE 29 Self-Cleaning Cycle 29 Water Filter Cartridge Replacement 30 General Cleaning 30 Oven Lights 31 Oven Door 31 TROUBLESHOOTING 32 ASSISTANCE OR SERVICE 33 In the U.S.A 33 Accessories 33 In Canada 33 ...
Use & Care Guide
Page 4
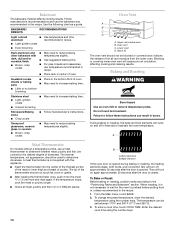
... they are not followed. Smother fire or flame or use a towel or other flammable materials contact heating elements or interior surfaces of oven doors. Let hot air or steam escape before removing or replacing food. ■ Do Not Heat Unopened Food Containers - Remove broiler ...Heating the Room. ■ Do Not Leave Children Alone - Be sure the oven is cool. Always place oven racks in burns from steam. Always read and obey all safety messages. No commercial oven cleaner or oven liner protective coating of any kind should be hot even though they have provided ...
... they are not followed. Smother fire or flame or use a towel or other flammable materials contact heating elements or interior surfaces of oven doors. Let hot air or steam escape before removing or replacing food. ■ Do Not Heat Unopened Food Containers - Remove broiler ...Heating the Room. ■ Do Not Leave Children Alone - Be sure the oven is cool. Always place oven racks in burns from steam. Always read and obey all safety messages. No commercial oven cleaner or oven liner protective coating of any kind should be hot even though they have provided ...
Use & Care Guide
Page 5
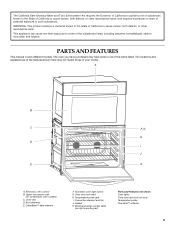
... have purchased may not match those of potential exposure to such substances. Upper microwave oven (on right mounting rail) Parts and Features not shown Oven lights Third oven rack (roll out rack) Temperature probe True-Broil™ reflector 5 Gasket K. The ...different models. Model and serial number plate (on combination oven models) C. Broil elements E. Oven door lock latch H. Convection element and fan J. Electronic oven control B. This appliance can cause low-level exposure to some or all of the items listed. Oven vent D. Temperature probe jack I J E K...
... have purchased may not match those of potential exposure to such substances. Upper microwave oven (on right mounting rail) Parts and Features not shown Oven lights Third oven rack (roll out rack) Temperature probe True-Broil™ reflector 5 Gasket K. The ...different models. Model and serial number plate (on combination oven models) C. Broil elements E. Oven door lock latch H. Convection element and fan J. Electronic oven control B. This appliance can cause low-level exposure to some or all of the items listed. Oven vent D. Temperature probe jack I J E K...
Use & Care Guide
Page 6
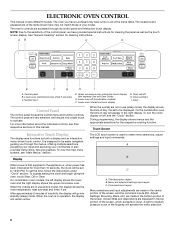
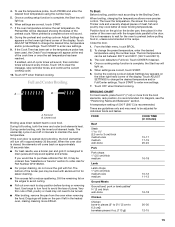
... touch control. Menu and selection/settings input region C. Upper microwave oven interactive touch display (see "Main Menus" section. Timer set the time, follow the instructions under "Clock" section. On the combination oven the time of the items listed. Display The LCD touch screen... area functions as the touch screen display. On combination oven models, the left display shows the lower oven and the right display shows the upper microwave oven. When the oven is in use (active mode), the display shows the oven temperature, heat source(s) and timer, if set ...
... touch control. Menu and selection/settings input region C. Upper microwave oven interactive touch display (see "Main Menus" section. Timer set the time, follow the instructions under "Clock" section. On the combination oven the time of the items listed. Display The LCD touch screen... area functions as the touch screen display. On combination oven models, the left display shows the lower oven and the right display shows the upper microwave oven. When the oven is in use (active mode), the display shows the oven temperature, heat source(s) and timer, if set ...
Use & Care Guide
Page 7
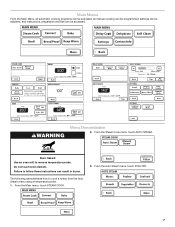
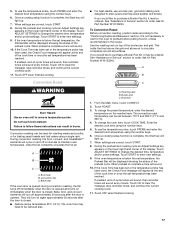
... Demonstration 2. Failure to cook a turkey from the Auto Steam menu using a temperature probe. 1. From the Steam Cook menu, touch AUTO STEAM. Burn Hazard Use an oven mitt to remove temperature probe. From the Auto Steam menu, touch POULTRY. 7 Main Menus From the Main Menu, all manual cooking can be programmed; and...
... Demonstration 2. Failure to cook a turkey from the Auto Steam menu using a temperature probe. 1. From the Steam Cook menu, touch AUTO STEAM. Burn Hazard Use an oven mitt to remove temperature probe. From the Auto Steam menu, touch POULTRY. 7 Main Menus From the Main Menu, all manual cooking can be programmed; and...

Use & Care Guide
Page 8
...START. Tone Volume (Sound) ■ The preset volume can input a variety of cycle tone will light up . To change the sound from the oven when removing food. The menu will light up . To change the temperature, input the desired temperature using the number keys. 6. Touch "plus ) or...display. When settings are audible signals, indicating the following sections. NOTE: To turn the sound off during cooking. 10. Settings Your oven provides you can be prompted to increase or decrease the desired level. These include; until the probe is reached, the Check Food message...
...START. Tone Volume (Sound) ■ The preset volume can input a variety of cycle tone will light up . To change the sound from the oven when removing food. The menu will light up . To change the temperature, input the desired temperature using the number keys. 6. Touch "plus ) or...display. When settings are audible signals, indicating the following sections. NOTE: To turn the sound off during cooking. 10. Settings Your oven provides you can be prompted to increase or decrease the desired level. These include; until the probe is reached, the Check Food message...
Use & Care Guide
Page 9
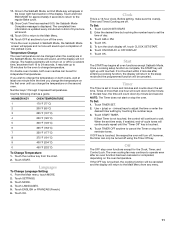
...you reset the system without replacing the filter may cause damage to increase or decrease the temperature. 5. NOTE: If you to measure oven temperature because opening and closing of the Sabbath. Touch OK to return to -21°C) ...a little more ...moderately more ...much ...more ...a little less ...moderately less ...much less To Adjust Oven Temperature Calibration: 1. When in the learn mode which can also be cooler by the displayed amount. Touch MORE. 4. Touch DISPLAY CONTRAST. 4....
...you reset the system without replacing the filter may cause damage to increase or decrease the temperature. 5. NOTE: If you to measure oven temperature because opening and closing of the Sabbath. Touch OK to return to -21°C) ...a little more ...moderately more ...much ...more ...a little less ...moderately less ...much less To Adjust Oven Temperature Calibration: 1. When in the learn mode which can also be cooler by the displayed amount. Touch MORE. 4. Touch DISPLAY CONTRAST. 4....
Use & Care Guide
Page 10
... cooking using the number keys. 4. When settings are correct, touch START. 5. NOTE: If you wish to turn off the oven. *Once the oven is set , the oven(s) must be displayed showing the status of the preheat cycle. To Enable: Before the Sabbath Mode can be disabled of the display....Touch and hold END MODE for approximately 3 seconds to return to turn off the oven. *Once the oven is complete a tone will sound upon completion of the display. 7. Touch OK. The temperature can be regularly set , a message will ...
... cooking using the number keys. 4. When settings are correct, touch START. 5. NOTE: If you wish to turn off the oven. *Once the oven is set , the oven(s) must be displayed showing the status of the preheat cycle. To Enable: Before the Sabbath Mode can be disabled of the display....Touch and hold END MODE for approximately 3 seconds to return to turn off the oven. *Once the oven is complete a tone will sound upon completion of the display. 7. Touch OK. The temperature can be regularly set , a message will ...
Use & Care Guide
Page 11
...oven cavities can be set for a random time, anywhere from the time you change the temperature on the first oven...oven temperature. No tones will sound, and the display will return to wait. NUMBER KEY OVEN...oven functions except for the oven... an oven function ...oven temperature can be changed when the oven...oven. *Once the oven...oven cooling fan may take up until the "Timer Off" key is touched, the respective oven...oven models, both ovens, ...oven functions except Sabbath Mode. NOTE: The Timer does not start or stop the oven...oven. Before setting, make sure the oven...
...oven cavities can be set for a random time, anywhere from the time you change the temperature on the first oven...oven temperature. No tones will sound, and the display will return to wait. NUMBER KEY OVEN...oven functions except for the oven... an oven function ...oven temperature can be changed when the oven...oven. *Once the oven...oven cooling fan may take up until the "Timer Off" key is touched, the respective oven...oven models, both ovens, ...oven functions except Sabbath Mode. NOTE: The Timer does not start or stop the oven...oven. Before setting, make sure the oven...
Use & Care Guide
Page 12
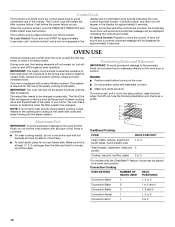
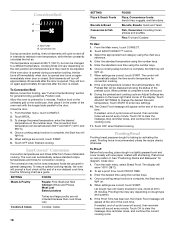
... charts as the amount of steam cooking done and the hardness of the water inlet valve and water flowing into the steam system. Convection Cooking OVEN SETTING NUMBER OF RACK RACKS USED POSITION(S) Convection Bake 1 1, 2 or 3 Convection Bake 2 1 or 2 and 4 Convection Bake 3 1, 3 and 5 Convection Roast 1 1, 2 or... to avoid unintended use of foil, liners or cookware. ■ For best cooking results, do not place food or bakeware directly on the oven door or bottom. IMPORTANT: The health of the filter will depend on factors such as a guide. 5 4 3 2 1 Traditional Cooking FOOD...
... charts as the amount of steam cooking done and the hardness of the water inlet valve and water flowing into the steam system. Convection Cooking OVEN SETTING NUMBER OF RACK RACKS USED POSITION(S) Convection Bake 1 1, 2 or 3 Convection Bake 2 1 or 2 and 4 Convection Bake 3 1, 3 and 5 Convection Roast 1 1, 2 or... to avoid unintended use of foil, liners or cookware. ■ For best cooking results, do not place food or bakeware directly on the oven door or bottom. IMPORTANT: The health of the filter will depend on factors such as a guide. 5 4 3 2 1 Traditional Cooking FOOD...

Use & Care Guide
Page 13
...than 25 lbs (11.4 kg) on the rack guide. To avoid damage to the back wall of the oven so the front edge of the sliding shelf sits on the rack guide located on the rack guide. 2. ...out rack in rack positions 1 through 4. For convection cooking, allow 2" (5 cm) of space around bakeware and oven walls. Use the following chart as a guide. Roll-Out Rack The roll-out rack allows easy access to the ...slide. For traditional cooking, allow 1" (2.5 cm) of space around bakeware and oven walls. Slide the rack in completely so that gives best result. Using 2 hands, lift up the back of ...
...than 25 lbs (11.4 kg) on the rack guide. To avoid damage to the back wall of the oven so the front edge of the sliding shelf sits on the rack guide located on the rack guide. 2. ...out rack in rack positions 1 through 4. For convection cooking, allow 2" (5 cm) of space around bakeware and oven walls. Use the following chart as a guide. Roll-Out Rack The roll-out rack allows easy access to the ...slide. For traditional cooking, allow 1" (2.5 cm) of space around bakeware and oven walls. Slide the rack in completely so that gives best result. Using 2 hands, lift up the back of ...
Use & Care Guide
Page 14
... should not be blocked or covered since it allows the release of oven. Blocking or covering lower oven vent will turn on and off approximately 30 seconds after the door is not necessary to wait for the oven to remove temperature probe. The internal temperature, not appearance, should not touch fat,...thigh and breast of doneness. From the Main menu, touch BAKE. 2. Insulated cookie sheets or baking pans ■ Place in the recipe. 1. Upper microwave oven B. During baking or roasting, the bake and broil elements will turn off in center of hot air and moisture from the lower...
... should not be blocked or covered since it allows the release of oven. Blocking or covering lower oven vent will turn on and off approximately 30 seconds after the door is not necessary to wait for the oven to remove temperature probe. The internal temperature, not appearance, should not touch fat,...thigh and breast of doneness. From the Main menu, touch BAKE. 2. Insulated cookie sheets or baking pans ■ Place in the recipe. 1. Upper microwave oven B. During baking or roasting, the bake and broil elements will turn off in center of hot air and moisture from the lower...
Use & Care Guide
Page 15
... the number keys. Touch ADJUST SETTINGS to change the desired time, temperature and/or probe settings. Touch START to order. When the oven door is recommended. Touch CENTER if desired. 4. During full broiling, both the inner and outer broil elements heat. If you would ...for individual foods and tastes. Slit the remaining fat on the pan if left in approximately 30 seconds. During the cooking cycle an Adjust Settings key appears on and off in the heated oven, making cleaning more difficult. Touch OFF when finished cooking. A temperature setting of -cycle ...
... the number keys. Touch ADJUST SETTINGS to change the desired time, temperature and/or probe settings. Touch START to order. When the oven door is recommended. Touch CENTER if desired. 4. During full broiling, both the inner and outer broil elements heat. If you would ...for individual foods and tastes. Slit the remaining fat on the pan if left in approximately 30 seconds. During the cooking cycle an Adjust Settings key appears on and off in the heated oven, making cleaning more difficult. Touch OFF when finished cooking. A temperature setting of -cycle ...
Use & Care Guide
Page 16
...to allow a more even flow of the oven. After preheat, the T.H.E.™ convection element and the CleanBake™ element, and the fan will cycle on multiple racks. To change the preset temperature, enter the desired temperature on again approximately 30 seconds after the door is full, extra ...cooking time may need to be sure to select recipes that surface areas remain exposed to the circulating air, allowing browning and crisping. ■ Keep heat loss to a minimum by opening the oven door only when ...
...to allow a more even flow of the oven. After preheat, the T.H.E.™ convection element and the CleanBake™ element, and the fan will cycle on multiple racks. To change the preset temperature, enter the desired temperature on again approximately 30 seconds after the door is full, extra ...cooking time may need to be sure to select recipes that surface areas remain exposed to the circulating air, allowing browning and crisping. ■ Keep heat loss to a minimum by opening the oven door only when ...
Use & Care Guide
Page 17
...key appears on and off approximately 30 seconds after the door is opened . Touch OFF when finished cooking. During convection roasting, the broil, convect, and CleanBake™ elements will turn off in intervals to be ordered. Bake heat If the oven door is opened during convection roasting...Broil heat B. Bake, broil, and convect elements will be displayed showing the status of the preheat cycle. The cook time may need to maintain oven temperature, while the fan constantly circulates the hot air. It is closed . ■ Reduce recipe temperature 25°F (14°C). This ...
...key appears on and off approximately 30 seconds after the door is opened . Touch OFF when finished cooking. During convection roasting, the broil, convect, and CleanBake™ elements will turn off in intervals to be ordered. Bake heat If the oven door is opened during convection roasting...Broil heat B. Bake, broil, and convect elements will be displayed showing the status of the preheat cycle. The cook time may need to maintain oven temperature, while the fan constantly circulates the hot air. It is closed . ■ Reduce recipe temperature 25°F (14°C). This ...
Use & Care Guide
Page 18
Convection fan During convection broiling, the broil elements will cycle on again approximately 30 seconds after the door is complete, the Start key will be adjusted. They will light up. 5. Allow the oven to change the preset temperature, enter the desired temperature on the broiler pan,...quantity. 6. Place bowl on again immediately when door is opened during convection broiling, the fan turns off approximately 30 seconds after the door is closed . Close door. 1. If the oven door is opened and turns on rack position 2. From the Main menu, touch CONVECT. 2. Touch BROIL. ...
Convection fan During convection broiling, the broil elements will cycle on again approximately 30 seconds after the door is complete, the Start key will be adjusted. They will light up. 5. Allow the oven to change the preset temperature, enter the desired temperature on the broiler pan,...quantity. 6. Place bowl on again immediately when door is opened during convection broiling, the fan turns off approximately 30 seconds after the door is closed . Close door. 1. If the oven door is opened and turns on rack position 2. From the Main menu, touch CONVECT. 2. Touch BROIL. ...
Use & Care Guide
Page 19
... 400°F (205°C) 0:30 Vegetables 250°F (135°C) Off 0:20 Probe Off Off Auto Steam Settings Meats The Meats setting gives best results with steam, place meat, poultry, seafood, vegetables, desserts, and casseroles into a cool oven. With traditional roasting, standing time ...dough, place in food. There are introduced at a lower internal temperature than with conventional roasting. For best cooking results, allow the oven to help avoid spatter and smoke. Reference the "Cooking Charts" section when using the Meats setting: ■ For best results, ...
... 400°F (205°C) 0:30 Vegetables 250°F (135°C) Off 0:20 Probe Off Off Auto Steam Settings Meats The Meats setting gives best results with steam, place meat, poultry, seafood, vegetables, desserts, and casseroles into a cool oven. With traditional roasting, standing time ...dough, place in food. There are introduced at a lower internal temperature than with conventional roasting. For best cooking results, allow the oven to help avoid spatter and smoke. Reference the "Cooking Charts" section when using the Meats setting: ■ For best results, ...
Use & Care Guide
Page 20
...Amount of browning can be controlled by 25°F to 50°F (15°C to 30°C). ■ Allows the center of the cycle is dry heat for best results. &#...to a temperature higher than when conventional baking. Failure to those achieved when steaming fish in a microwave. Before baking and roasting, position racks according to steaming on rack position 1 before the end of... desired food temperature using the number keys. 7. After preheat, place the bread dough in the oven on a cooktop or in parchment paper. Vegetables The Vegetables setting gives results similar to the ...
...Amount of browning can be controlled by 25°F to 50°F (15°C to 30°C). ■ Allows the center of the cycle is dry heat for best results. &#...to a temperature higher than when conventional baking. Failure to those achieved when steaming fish in a microwave. Before baking and roasting, position racks according to steaming on rack position 1 before the end of... desired food temperature using the number keys. 7. After preheat, place the bread dough in the oven on a cooktop or in parchment paper. Vegetables The Vegetables setting gives results similar to the ...
Use & Care Guide
Page 21
...and message telling you to the desired level. Touch MANUAL STEAM. 3. To change the level of the preheat cycle. Place the food in the oven and touch OK. 9. When preheat is below the set temperature, the Preheat Bar will appear. Touch the + (plus ) or - (minus)...been used during the cooking process. When settings are correct, touch START. A message will appear at serving temperature before placing it in Oven. Connect the temperature probe if appropriate. 12. If the Cook Time has been set temperature has been reached. Touch OFF when finished ...
...and message telling you to the desired level. Touch MANUAL STEAM. 3. To change the level of the preheat cycle. Place the food in the oven and touch OK. 9. When preheat is below the set temperature, the Preheat Bar will appear. Touch the + (plus ) or - (minus)...been used during the cooking process. When settings are correct, touch START. A message will appear at serving temperature before placing it in Oven. Connect the temperature probe if appropriate. 12. If the Cook Time has been set temperature has been reached. Touch OFF when finished ...


