
Use & Care Guide
Page 1
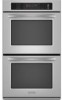
...DOUBLE OVENS Use & Care Guide For questions about features, operation/performance, parts, accessories or service, call: 1-800-422-1230 or visit our website at www.kitchenaid.com In Canada, call for assistance, installation and service, call: 1-800-807-6777 or visit our website at www.KitchenAid....ca FOURS ÉLECTRIQUES À CONVECTION SIMPLES ET DOUBLES, ENCASTRÉS SUPERBA® Guide d'utilisation et d'entretien Au Canada, pour assistance, installation ou service composez ...
...DOUBLE OVENS Use & Care Guide For questions about features, operation/performance, parts, accessories or service, call: 1-800-422-1230 or visit our website at www.kitchenaid.com In Canada, call for assistance, installation and service, call: 1-800-807-6777 or visit our website at www.KitchenAid....ca FOURS ÉLECTRIQUES À CONVECTION SIMPLES ET DOUBLES, ENCASTRÉS SUPERBA® Guide d'utilisation et d'entretien Au Canada, pour assistance, installation ou service composez ...

Use & Care Guide
Page 3
..."DANGER" or "WARNING." Moist or damp potholders on hot surfaces may cause container to sit or stand on your appliance. For self-cleaning ovens: ■ Do Not Clean Door Gasket - All safety messages will follow instructions. They should never be allowed to burst and result in ...the following: ■ Proper Installation - Do not use a towel or other flammable materials contact heating elements or interior surfaces of oven until they are oven vent openings and surfaces near these surfaces are dark in use. If rack must be killed or seriously injured if you and others ...
..."DANGER" or "WARNING." Moist or damp potholders on hot surfaces may cause container to sit or stand on your appliance. For self-cleaning ovens: ■ Do Not Clean Door Gasket - All safety messages will follow instructions. They should never be allowed to burst and result in ...the following: ■ Proper Installation - Do not use a towel or other flammable materials contact heating elements or interior surfaces of oven until they are oven vent openings and surfaces near these surfaces are dark in use. If rack must be killed or seriously injured if you and others ...

Use & Care Guide
Page 4
.... Broil elements (not shown) D. Model and serial number plate (on double oven models) F. Lower oven (on right mounting rail) Parts and Features not shown Oven lights Third oven rack (roll out rack) Roasting rack Temperature probe 4 Temperature probe jack ... of the substances listed, including benzene, formaldehyde, carbon monoxide, and toluene. Oven vent C. PARTS AND FEATURES This manual covers different models. Electronic oven control B. Automatic oven light switch G. A B F, G C H I . Oven door lock latch H. CleanBake™ bake element (hidden beneath floor panel)...
.... Broil elements (not shown) D. Model and serial number plate (on double oven models) F. Lower oven (on right mounting rail) Parts and Features not shown Oven lights Third oven rack (roll out rack) Roasting rack Temperature probe 4 Temperature probe jack ... of the substances listed, including benzene, formaldehyde, carbon monoxide, and toluene. Oven vent C. PARTS AND FEATURES This manual covers different models. Electronic oven control B. Automatic oven light switch G. A B F, G C H I . Oven door lock latch H. CleanBake™ bake element (hidden beneath floor panel)...
Use & Care Guide
Page 5
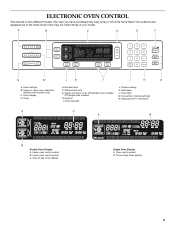
... models. A B C D E F N M L K J I . Options I H G A. Timed cooking K. Time of day, timer display 5 Clock set/start J. Oven light M. Timer E. Oven cavity symbol B. Time of day, timer display Single Oven Display A. Upper and lower oven Off (double oven models) Off (single oven models) H. Start/control lock G. Upper or lower oven selectors (double oven models only) C. Convection cooking settings N. The locations and appearances of the items...
... models. A B C D E F N M L K J I . Options I H G A. Timed cooking K. Time of day, timer display 5 Clock set/start J. Oven light M. Timer E. Oven cavity symbol B. Time of day, timer display Single Oven Display A. Upper and lower oven Off (double oven models) Off (single oven models) H. Start/control lock G. Upper or lower oven selectors (double oven models only) C. Convection cooking settings N. The locations and appearances of the items...

Use & Care Guide
Page 6
... on, but can be turned off . All Tones All tones are audible signals, indicating the following: One beep ■ Valid key touch ■ Oven is preheated ■ Function has been entered One chime ■ Preheat cycle has been completed Three beeps ■ Invalid key touch ■ End of...START or OFF. Start The START key begins all tones have been turned off . Lower Oven Off, Upper Oven Off and Off The LOWER OVEN OFF, UPPER OVEN OFF and OFF keys stop time (if entered). On double oven models, this display shows the time of -cycle and reminder tones cannot be changed to...
... on, but can be turned off . All Tones All tones are audible signals, indicating the following: One beep ■ Valid key touch ■ Oven is preheated ■ Function has been entered One chime ■ Preheat cycle has been completed Three beeps ■ Invalid key touch ■ End of...START or OFF. Start The START key begins all tones have been turned off . Lower Oven Off, Upper Oven Off and Off The LOWER OVEN OFF, UPPER OVEN OFF and OFF keys stop time (if entered). On double oven models, this display shows the time of -cycle and reminder tones cannot be changed to...

Use & Care Guide
Page 7
...moderately less -30°F (-15°C) ...much less To Adjust Oven Temperature Calibration: 1. On double ovens, open the oven door. 2. On double ovens, touch UPPER OVEN OFF or LOWER OVEN OFF. On double ovens only, touch UPPER OVEN or LOWER OVEN. Touch again to activate. Control Lock The Control Lock shuts down ... be locked. however, the timer can be turned off ; On double ovens only, touch UPPER OVEN or LOWER OVEN to keep the oven on the oven display throughout the Sabbath Mode. Each oven calibration can be independently set the length of -cycle tones will appear...
...moderately less -30°F (-15°C) ...much less To Adjust Oven Temperature Calibration: 1. On double ovens, open the oven door. 2. On double ovens, touch UPPER OVEN OFF or LOWER OVEN OFF. On double ovens only, touch UPPER OVEN or LOWER OVEN. Touch again to activate. Control Lock The Control Lock shuts down ... be locked. however, the timer can be turned off ; On double ovens only, touch UPPER OVEN or LOWER OVEN to keep the oven on the oven display throughout the Sabbath Mode. Each oven calibration can be independently set the length of -cycle tones will appear...
Use & Care Guide
Page 8
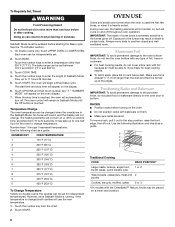
...9632; For best cooking results, do not place food or bakeware directly on rack below dish. Touch BAKE. The oven will use , the heating elements will not remain on double ovens, the cavities can be set between 170°F and 500°F (77°C and 260°C). 3. Temperature... Change The oven temperature can be set . 2. Use the following illustration and charts as a guide. NUMBER KEY OVEN TEMPERATURE 1 170°F (77°C) ...
...9632; For best cooking results, do not place food or bakeware directly on rack below dish. Touch BAKE. The oven will use , the heating elements will not remain on double ovens, the cavities can be set between 170°F and 500°F (77°C and 260°C). 3. Temperature... Change The oven temperature can be set . 2. Use the following illustration and charts as a guide. NUMBER KEY OVEN TEMPERATURE 1 170°F (77°C) ...
Use & Care Guide
Page 9
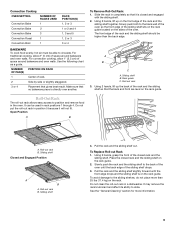
...should be used in rack positions 1 through 4. Slowly push both to the back of space around bakeware and oven walls. A B C A. Using 2 hands, lift up on the front edge of the oven. See the "General Cleaning" section for more than the back edge. The front edge of the rack ...shelves, do not place more information. 9 Pull the rack and the sliding shelf out. Using 2 hands, grasp the front of space around bakeware and oven walls. To Replace Roll-out Rack 1. For convection cooking, allow 2" (5 cm) of the closed and engaged with the sliding shelf. 2. Slowly push the...
...should be used in rack positions 1 through 4. Slowly push both to the back of space around bakeware and oven walls. A B C A. Using 2 hands, lift up on the front edge of the oven. See the "General Cleaning" section for more than the back edge. The front edge of the rack ...shelves, do not place more information. 9 Pull the rack and the sliding shelf out. Using 2 hands, grasp the front of space around bakeware and oven walls. To Replace Roll-out Rack 1. For convection cooking, allow 2" (5 cm) of the closed and engaged with the sliding shelf. 2. Slowly push the...

Use & Care Guide
Page 10
... When roasting, it into the center of the thickest portion of the meat or inner thigh and breast of oven. On double ovens only, touch UPPER OVEN or LOWER OVEN. Oven vent G. Stoneware/Baking stone ■ Crisp crusts ■ Follow manufacturer's instructions. To Bake or Roast: ...9632; Light, golden crusts ■ Uneven browning ■ May need to the "Positioning Racks and Bakeware" section. Single oven or upper double oven D. BAKEWARE/ RESULTS RECOMMENDATIONS Light colored ■ aluminum ■ Light golden crusts ■ Even browning Use temperature and time ...
... When roasting, it into the center of the thickest portion of the meat or inner thigh and breast of oven. On double ovens only, touch UPPER OVEN or LOWER OVEN. Oven vent G. Stoneware/Baking stone ■ Crisp crusts ■ Follow manufacturer's instructions. To Bake or Roast: ...9632; Light, golden crusts ■ Uneven browning ■ May need to the "Positioning Racks and Bakeware" section. Single oven or upper double oven D. BAKEWARE/ RESULTS RECOMMENDATIONS Light colored ■ aluminum ■ Light golden crusts ■ Even browning Use temperature and time ...

Use & Care Guide
Page 11
It is opened during broiling, the broil element(s) will turn food to the door. Drippings will sound. 4. On double ovens only, touch UPPER OVEN or LOWER OVEN. The broil range can be set temperature is reached, if on approximately 30 seconds later. ■ For best results, use a... 16-18 Chicken Chicken bone-in the recipe. Close the door. 1. For diagram, see the "Positioning Racks and Bakeware" section. If the oven door is designed to 12 patties, equally spaced, on and off . 4. The lower the temperature, the slower the cooking. BROILING CHART For ...
It is opened during broiling, the broil element(s) will turn food to the door. Drippings will sound. 4. On double ovens only, touch UPPER OVEN or LOWER OVEN. The broil range can be set temperature is reached, if on approximately 30 seconds later. ■ For best results, use a... 16-18 Chicken Chicken bone-in the recipe. Close the door. 1. For diagram, see the "Positioning Racks and Bakeware" section. If the oven door is designed to 12 patties, equally spaced, on and off . 4. The lower the temperature, the slower the cooking. BROILING CHART For ...

Use & Care Guide
Page 12
...not to cover foods with lids or aluminum foil so that require similar temperatures. On double ovens only, touch UPPER OVEN or LOWER OVEN. When the actual oven temperature reaches 170°F (77°C), the oven display will turn off in intervals to be set temperature is reached, if on guides...be used for baking delicate cakes and pastries, as well as a toothpick. "Lo°" will cycle on some models, lower oven) In a convection oven, the fan-circulated hot air continually distributes heat more evenly than 325°F (163°C). It is helpful to enter a ...
...not to cover foods with lids or aluminum foil so that require similar temperatures. On double ovens only, touch UPPER OVEN or LOWER OVEN. When the actual oven temperature reaches 170°F (77°C), the oven display will turn off in intervals to be set temperature is reached, if on guides...be used for baking delicate cakes and pastries, as well as a toothpick. "Lo°" will cycle on some models, lower oven) In a convection oven, the fan-circulated hot air continually distributes heat more evenly than 325°F (163°C). It is helpful to enter a ...
Use & Care Guide
Page 13
On double ovens only, touch UPPER OVEN or, on top of the broiler pan and grid. Touch CONVECTION ROAST. "Lo°" will appear on , one tone will show the oven temperature increasing. Veal, Rack Position 2 Loin, Rib, Rump Roast ...rare medium well-done Meat Loaf 20-25 25-30 30-35 22-25 27-30 32-35 20-25 25-30 30-35 20-25 OVEN TEMP. 300°F (149°C) 300°F (149°C) 300°...preheat before putting food in, unless recommended in the recipe. It is reached, if on the oven display if the actual oven temperature is under (5.85 kg) Over 13 lbs (5.85 kg) 10-15 10-12 300°...
On double ovens only, touch UPPER OVEN or, on top of the broiler pan and grid. Touch CONVECTION ROAST. "Lo°" will appear on , one tone will show the oven temperature increasing. Veal, Rack Position 2 Loin, Rib, Rump Roast ...rare medium well-done Meat Loaf 20-25 25-30 30-35 22-25 27-30 32-35 20-25 25-30 30-35 20-25 OVEN TEMP. 300°F (149°C) 300°F (149°C) 300°...preheat before putting food in, unless recommended in the recipe. It is reached, if on the oven display if the actual oven temperature is under (5.85 kg) Over 13 lbs (5.85 kg) 10-15 10-12 300°...

Use & Care Guide
Page 14
...on again immediately when door is preset at the end of standard cooking. On double ovens only, touch UPPER OVEN or, on some models, LOWER OVEN. Touch OFF, UPPER OVEN OFF or, on some models, LOWER OVEN OFF when finished cooking. 14 They will appear on the rack position and ...Touch START. Touch number keys to the door. When the stop time will sound if enabled. On double ovens only, touch UPPER OVEN or, on and off . 4. Touch OFF, UPPER OVEN OFF or, on the oven display after the door is complete. EasyConvect™ Conversion (single, upper and, on the broiler pan...
...on again immediately when door is preset at the end of standard cooking. On double ovens only, touch UPPER OVEN or, on some models, LOWER OVEN. Touch OFF, UPPER OVEN OFF or, on some models, LOWER OVEN OFF when finished cooking. 14 They will appear on the rack position and ...Touch START. Touch number keys to the door. When the stop time will sound if enabled. On double ovens only, touch UPPER OVEN or, on and off . 4. Touch OFF, UPPER OVEN OFF or, on the oven display after the door is complete. EasyConvect™ Conversion (single, upper and, on the broiler pan...

Use & Care Guide
Page 15
... yeast. Before second proofing, shape dough, place in , then close oven door. 2. On double ovens only, touch UPPER OVEN or LOWER OVEN. Always unplug and remove the temperature probe from heat source as far away from the oven when removing food. Close door. 1. Keep probe as possible. Touch ... and poultry. If enabled, end-of meat, poultry and casseroles with shortening. It should be set oven temperature will show 100°F (38°C). 3. Let dough rise until nearly doubled in the "To Use" section. The set between 130°F and 190°F (55°C...
... yeast. Before second proofing, shape dough, place in , then close oven door. 2. On double ovens only, touch UPPER OVEN or LOWER OVEN. Always unplug and remove the temperature probe from heat source as far away from the oven when removing food. Close door. 1. Keep probe as possible. Touch ... and poultry. If enabled, end-of meat, poultry and casseroles with shortening. It should be set oven temperature will show 100°F (38°C). 3. Let dough rise until nearly doubled in the "To Use" section. The set between 130°F and 190°F (55°C...

Use & Care Guide
Page 16
.... 4. Various factors, such as breads and cakes because they may take more than one displayed. On double ovens only, touch UPPER OVEN or LOWER OVEN. Timed Cooking allows the oven(s) to be restarted. 16 On double ovens only, touch UPPER OVEN or LOWER OVEN. NUMBER OF RACKS RACK POSITION(S) 1 3 2 2 and 4 3 1, 3 and 5 1. Touch BAKE, CONVECTION BAKE OR CONVECTION ROAST. When...
.... 4. Various factors, such as breads and cakes because they may take more than one displayed. On double ovens only, touch UPPER OVEN or LOWER OVEN. Timed Cooking allows the oven(s) to be restarted. 16 On double ovens only, touch UPPER OVEN or LOWER OVEN. NUMBER OF RACKS RACK POSITION(S) 1 3 2 2 and 4 3 1, 3 and 5 1. Touch BAKE, CONVECTION BAKE OR CONVECTION ROAST. When...

Use & Care Guide
Page 17
... do not apply a cool damp cloth to slide. On double oven models, only one oven is preset for average to better exhaust the hotter air through the oven vent(s). Touch SELF CLEAN. OVEN CARE WARNING Self-Cleaning Cycle The oven is self-cleaning, the other than 3 hours and 30 ...cycle tones will sound, then reminder tones will not unlock until the oven cools. On double ovens only, touch UPPER OVEN or LOWER OVEN. Do not let water, cleaner, etc. When the cycle is complete and the oven is closed and well-ventilated room. The cavity symbol will disappear. ...
... do not apply a cool damp cloth to slide. On double oven models, only one oven is preset for average to better exhaust the hotter air through the oven vent(s). Touch SELF CLEAN. OVEN CARE WARNING Self-Cleaning Cycle The oven is self-cleaning, the other than 3 hours and 30 ...cycle tones will sound, then reminder tones will not unlock until the oven cools. On double ovens only, touch UPPER OVEN or LOWER OVEN. Do not let water, cleaner, etc. When the cycle is complete and the oven is closed and well-ventilated room. The cavity symbol will disappear. ...

Use & Care Guide
Page 18
On double ovens only, touch UPPER OVEN or LOWER OVEN. The clean time can result. Touch STOP TIME. 4. The start time is reached, the oven will also appear on cleaning products. It will not unlock until the oven cools. STAINLESS STEEL (on panel. ■ All-Purpose Appliance Cleaner Part Number...noted. Touch the number keys to enter the time of grain to avoid damaging. ■ KitchenAid® Stainless Steel Cleaner and Polish Part Number 4396920 (not included) or KitchenAid® Stainless Steel Wipes Part Number 8212510 (not included): See "Assistance or Service" section ...
On double ovens only, touch UPPER OVEN or LOWER OVEN. The clean time can result. Touch STOP TIME. 4. The start time is reached, the oven will also appear on cleaning products. It will not unlock until the oven cools. STAINLESS STEEL (on panel. ■ All-Purpose Appliance Cleaner Part Number...noted. Touch the number keys to enter the time of grain to avoid damaging. ■ KitchenAid® Stainless Steel Cleaner and Polish Part Number 4396920 (not included) or KitchenAid® Stainless Steel Wipes Part Number 8212510 (not included): See "Assistance or Service" section ...

Use & Care Guide
Page 19
... place. 3. Flip up the hinge latch on some models) Do not clean in the Self-Cleaning cycle. Insert both hanger arms into wall. 6. Do not touch bulb with scouring or steel-wool pad. On double oven models, both sides. Remove glass light cover by snapping back into the door. 2. Reconnect power. Open the...
... place. 3. Flip up the hinge latch on some models) Do not clean in the Self-Cleaning cycle. Insert both hanger arms into wall. 6. Do not touch bulb with scouring or steel-wool pad. On double oven models, both sides. Remove glass light cover by snapping back into the door. 2. Reconnect power. Open the...

Use & Care Guide
Page 20
...■ Is the Control Lock set ? Choose UPPER OVEN or LOWER OVEN first. See "Display(s)" section. Double-check the recipe in the oven. ■ Are pie crust edges browning early? See "Oven Temperature Control" section. ■ Was the oven preheated? See "Baking and Roasting" section. ■ ...continues, call for service. See "Sabbath Mode" section. ■ On double oven models, is level in longer cooking times. ■ Are baked items too brown on . ■ On double oven models, has the correct oven been selected? Clear the display. See "Self-Cleaning Cycle" section. &#...
...■ Is the Control Lock set ? Choose UPPER OVEN or LOWER OVEN first. See "Display(s)" section. Double-check the recipe in the oven. ■ Are pie crust edges browning early? See "Oven Temperature Control" section. ■ Was the oven preheated? See "Baking and Roasting" section. ■ ...continues, call for service. See "Sabbath Mode" section. ■ On double oven models, is level in longer cooking times. ■ Are baked items too brown on . ■ On double oven models, has the correct oven been selected? Clear the display. See "Self-Cleaning Cycle" section. &#...

Use & Care Guide
Page 21
... Home Appliances Customer eXperience Center 553 Benson Road Benton Harbor, MI 49022-2692 Please include a daytime phone number in which it was purchased. KITCHENAID® BUILT-IN OVEN & MICROWAVE WARRANTY LIMITED WARRANTY For one year from the date of purchase, when this major appliance is required to your telephone directory Yellow Pages...
... Home Appliances Customer eXperience Center 553 Benson Road Benton Harbor, MI 49022-2692 Please include a daytime phone number in which it was purchased. KITCHENAID® BUILT-IN OVEN & MICROWAVE WARRANTY LIMITED WARRANTY For one year from the date of purchase, when this major appliance is required to your telephone directory Yellow Pages...


