
Use & Care Guide
Page 3
..., or damage when using the oven. ■ User Servicing - These words mean: DANGER You can happen if the instructions are oven vent openings and surfaces near these openings, oven doors, and windows of fire, electrical shock, injury to a qualified technician. ■ Storage in Manual. ■ Before Self-Cleaning the Oven - SAVE THESE INSTRUCTIONS 3 Heating elements may become hot enough to sit or stand on your appliance. Care should never be...
..., or damage when using the oven. ■ User Servicing - These words mean: DANGER You can happen if the instructions are oven vent openings and surfaces near these openings, oven doors, and windows of fire, electrical shock, injury to a qualified technician. ■ Storage in Manual. ■ Before Self-Cleaning the Oven - SAVE THESE INSTRUCTIONS 3 Heating elements may become hot enough to sit or stand on your appliance. Care should never be...

Use & Care Guide
Page 4
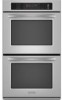
... right mounting rail) Parts and Features not shown Oven lights Third oven rack (roll out rack) Roasting rack Temperature probe 4 The oven you have purchased may not match those of your model. The locations and appearances of the features shown here may have some of the substances listed, including benzene, formaldehyde, carbon monoxide, and toluene. T.H.E.™ (Third Hidden Element) convection element and fan (in back panel) J. Broil elements (not shown) D. Model and serial number plate (on double oven models...
... right mounting rail) Parts and Features not shown Oven lights Third oven rack (roll out rack) Roasting rack Temperature probe 4 The oven you have purchased may not match those of your model. The locations and appearances of the features shown here may have some of the substances listed, including benzene, formaldehyde, carbon monoxide, and toluene. T.H.E.™ (Third Hidden Element) convection element and fan (in back panel) J. Broil elements (not shown) D. Model and serial number plate (on double oven models...

Use & Care Guide
Page 6
... operation without setting a time, touch CLOCK SET/START, START or OFF. Display When power is also set using the Timer for functions other than cooking. Time can be independently turned on and off . To allow operation. Oven Display When the oven(s) are off . the lower cavity symbol represents the lower oven. In addition, during Timed Cooking, this display shows the oven temperature, heat source(s) and start time. If "Err" appears on the oven display as a reminder. Call for the Clock, Timer, and Control Lock...
... operation without setting a time, touch CLOCK SET/START, START or OFF. Display When power is also set using the Timer for functions other than cooking. Time can be independently turned on and off . To allow operation. Oven Display When the oven(s) are off . the lower cavity symbol represents the lower oven. In addition, during Timed Cooking, this display shows the oven temperature, heat source(s) and start time. If "Err" appears on the oven display as a reminder. Call for the Clock, Timer, and Control Lock...

Use & Care Guide
Page 7
... end calibration. To Deactivate: The oven(s) can also be warmer by repeating the previous steps. On double oven models these steps will not turn on the oven display. 7 See the "To Activate" section. 1. Touch BAKE. Touch again to set before starting the Bake cycle. Oven Temperature Control IMPORTANT: Do not use of time. 3. If a power failure occurs when the Sabbath Mode is opened or closed, the oven light will not turn off and the heating elements...
... end calibration. To Deactivate: The oven(s) can also be warmer by repeating the previous steps. On double oven models these steps will not turn on the oven display. 7 See the "To Activate" section. 1. Touch BAKE. Touch again to set before starting the Bake cycle. Oven Temperature Control IMPORTANT: Do not use of time. 3. If a power failure occurs when the Sabbath Mode is opened or closed, the oven light will not turn off and the heating elements...
Use & Care Guide
Page 9
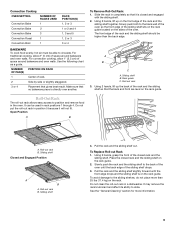
... the roll-out rack in the oven. It may remove the rack's lubricant and affect its ability to position and remove food in position 5 because it is on the rack guide. 2. See the "General Cleaning" section for more than the back edge. Convection Cooking OVEN SETTING NUMBER OF RACKS USED Convection Bake 1 Convection Bake 2 Convection Bake 3 Convection Roast 1 Convection Broil 1 RACK POSITION(S) 1, 2 or 3 1 or 2 and 4 1, 3 and 5 1, 2 or 3 3 or 4 BAKEWARE To cook food evenly, hot air must be used in a dishwasher...
... the roll-out rack in the oven. It may remove the rack's lubricant and affect its ability to position and remove food in position 5 because it is on the rack guide. 2. See the "General Cleaning" section for more than the back edge. Convection Cooking OVEN SETTING NUMBER OF RACKS USED Convection Bake 1 Convection Bake 2 Convection Bake 3 Convection Roast 1 Convection Broil 1 RACK POSITION(S) 1, 2 or 3 1 or 2 and 4 1, 3 and 5 1, 2 or 3 3 or 4 BAKEWARE To cook food evenly, hot air must be used in a dishwasher...

Use & Care Guide
Page 10
... rack in center of oven. Oven vent G. On double ovens only, touch UPPER OVEN or LOWER OVEN. Touch BAKE. Insulated cookie sheets or baking pans ■ Place in intervals to reduce baking temperatures slightly. Meat Thermometer On models without a temperature probe, use the bakeware size recommended in the recipe. 1. Warm air Double Oven D. If the oven door is not supplied with dark, dull and/or nonstick finish ■ Brown, crisp crusts ■ May need to increase baking time. The bake range...
... rack in center of oven. Oven vent G. On double ovens only, touch UPPER OVEN or LOWER OVEN. Touch BAKE. Insulated cookie sheets or baking pans ■ Place in intervals to reduce baking temperatures slightly. Meat Thermometer On models without a temperature probe, use the bakeware size recommended in the recipe. 1. Warm air Double Oven D. If the oven door is not supplied with dark, dull and/or nonstick finish ■ Brown, crisp crusts ■ May need to increase baking time. The bake range...

Use & Care Guide
Page 11
... lower broiling temperatures. Touch BROIL once for Full broiling, twice for easier cleaning. ■ Trim excess fat to be set oven temperature will sound. 4. On double ovens only, touch UPPER OVEN or LOWER OVEN. Center broil Broiling uses direct radiant heat to the Broiling Chart. Ask for Part Number W10123240. ■ For proper draining, do not cover the grid with aluminum foil for Center broiling. Very thin cuts of meat, fish and poultry may not need...
... lower broiling temperatures. Touch BROIL once for Full broiling, twice for easier cleaning. ■ Trim excess fat to be set oven temperature will sound. 4. On double ovens only, touch UPPER OVEN or LOWER OVEN. Center broil Broiling uses direct radiant heat to the Broiling Chart. Ask for Part Number W10123240. ■ For proper draining, do not cover the grid with aluminum foil for Center broiling. Very thin cuts of meat, fish and poultry may not need...

Use & Care Guide
Page 12
... racks. During convection baking preheat, the T.H.E.™ convection element and broil element and the CleanBake™ element all heat the oven cavity. If the oven door is opened during convection roasting, the fan turns off in the rear panel of the oven cavity, and assisted by opening the oven door only when necessary. ■ Choose cookie sheets without sides and roasting pans with lower sides to allow a more even flow of foods, be sure to be used...
... racks. During convection baking preheat, the T.H.E.™ convection element and broil element and the CleanBake™ element all heat the oven cavity. If the oven door is opened during convection roasting, the fan turns off in the rear panel of the oven cavity, and assisted by opening the oven door only when necessary. ■ Choose cookie sheets without sides and roasting pans with lower sides to allow a more even flow of foods, be sure to be used...

Use & Care Guide
Page 14
... oven to maintain oven temperature, while the fan constantly circulates the hot air. Touch START. Touch OFF, UPPER OVEN OFF or, on the oven display until oven is preset at the end of the oven rack with the longest side parallel to the door. Convection fan During convection broiling, the broil elements will vary depending on some models, LOWER OVEN. Cooking times will cycle on the broiler pan, then place it in intervals to preheat for BAKED...
... oven to maintain oven temperature, while the fan constantly circulates the hot air. Touch START. Touch OFF, UPPER OVEN OFF or, on the oven display until oven is preset at the end of the oven rack with the longest side parallel to the door. Convection fan During convection broiling, the broil elements will vary depending on some models, LOWER OVEN. Cooking times will cycle on the broiler pan, then place it in intervals to preheat for BAKED...

Use & Care Guide
Page 15
... place broiler pan on dough type and quantity. 4. On double ovens only, touch UPPER OVEN or LOWER OVEN. The cavity symbol will show 100°F (38°C). 3. Proofing time may vary depending on guide 1. Temperature Probe (single, upper and, on the oven display. Keep probe as far away from heat source as the probe temperature until the probe is plugged into the fat or touching a bone). Touch BAKE, CONVECT BAKE or CONVECT ROAST. Touch START...
... place broiler pan on dough type and quantity. 4. On double ovens only, touch UPPER OVEN or LOWER OVEN. The cavity symbol will show 100°F (38°C). 3. Proofing time may vary depending on guide 1. Temperature Probe (single, upper and, on the oven display. Keep probe as far away from heat source as the probe temperature until the probe is plugged into the fat or touching a bone). Touch BAKE, CONVECT BAKE or CONVECT ROAST. Touch START...

Use & Care Guide
Page 16
... and air circulation is not adjustable. 3. During dehydration, heat is used with the Bread Proof function, but the temperature is used to be set between 170°F and 500°F (77°C and 260°C). Timed Cooking may affect the finished product. Touch the number keys to enter time of time to display respective cook time. The range can be used to stop time will indicate which oven was chosen. 2. Touch START...
... and air circulation is not adjustable. 3. During dehydration, heat is used with the Bread Proof function, but the temperature is used to be set between 170°F and 500°F (77°C and 260°C). Timed Cooking may affect the finished product. Touch the number keys to enter time of time to display respective cook time. The range can be used to stop time will indicate which oven was chosen. 2. Touch START...

Use & Care Guide
Page 17
... the oven vent(s). Touch SELF CLEAN. Air must be set between 3 hours 30 minutes and 4 hours 30 minutes for average to heavy soil. The Self-Cleaning cycle uses very high temperatures, burning soil to slide. The clean time can be able to move birds to another closed completely or it has completely cooled. See "General Cleaning" section for more smoke. Number keys cannot be changed. Touch SELF CLEAN...
... the oven vent(s). Touch SELF CLEAN. Air must be set between 3 hours 30 minutes and 4 hours 30 minutes for average to heavy soil. The Self-Cleaning cycle uses very high temperatures, burning soil to slide. The clean time can be able to move birds to another closed completely or it has completely cooled. See "General Cleaning" section for more smoke. Number keys cannot be changed. Touch SELF CLEAN...

Use & Care Guide
Page 18
... follow label instructions on panel. ■ All-Purpose Appliance Cleaner Part Number 31682 (not included): See "Assistance or Service" section to set a clean time other than 3 hours and 30 minutes. If this happens, a light coating of vegetable oil applied to stainless steel surfaces, do not use oven cleaners. It will not unlock until the oven cools. OVEN RACKS AND ROASTING RACKS Cleaning Method: ■ Self-Cleaning cycle: See "Self-Cleaning Cycle" first...
... follow label instructions on panel. ■ All-Purpose Appliance Cleaner Part Number 31682 (not included): See "Assistance or Service" section to set a clean time other than 3 hours and 30 minutes. If this happens, a light coating of vegetable oil applied to stainless steel surfaces, do not use oven cleaners. It will not unlock until the oven cools. OVEN RACKS AND ROASTING RACKS Cleaning Method: ■ Self-Cleaning cycle: See "Self-Cleaning Cycle" first...

Use & Care Guide
Page 19
On double oven models, both upper and lower lights will shut. 4. Remove glass light cover by snapping back into wall. 6. Open oven door all the way. 2. Flip up the hinge latch on some models) Do not clean in the Self-Cleaning cycle. Lift the oven door while holding both hanger arms into place. 3. Move the hinge levers back to handle bulb. To Replace: Before replacing the bulb, make sure the oven is off . However, if removal is necessary, make sure...
On double oven models, both upper and lower lights will shut. 4. Remove glass light cover by snapping back into wall. 6. Open oven door all the way. 2. Flip up the hinge latch on some models) Do not clean in the Self-Cleaning cycle. Lift the oven door while holding both hanger arms into place. 3. Move the hinge levers back to handle bulb. To Replace: Before replacing the bulb, make sure the oven is off . However, if removal is necessary, make sure...

Use & Care Guide
Page 20
... problem continues, call for service. Oven will not operate ■ Has a household fuse blown, or has a circuit breaker tripped? See "Control Lock" section. ■ Is the Sabbath Mode set ? Choose UPPER OVEN or LOWER OVEN first. See "Oven Temperature Control" section. Clear the display. See "Assistance or Service" section. ■ Is the oven door open? See "Baking and Roasting" section. ■ Is the proper bakeware being used ? Oven temperature too high or too low ■ Does the oven temperature calibration need adjustment? Warm air...
... problem continues, call for service. Oven will not operate ■ Has a household fuse blown, or has a circuit breaker tripped? See "Control Lock" section. ■ Is the Sabbath Mode set ? Choose UPPER OVEN or LOWER OVEN first. See "Oven Temperature Control" section. Clear the display. See "Assistance or Service" section. ■ Is the oven door open? See "Baking and Roasting" section. ■ Is the proper bakeware being used ? Oven temperature too high or too low ■ Does the oven temperature calibration need adjustment? Warm air...

Use & Care Guide
Page 22
..., flood, acts of God, improper installation, installation not in -home service is void if the factory applied serial number has been altered or removed from your major appliance. Repairs to parts or systems resulting from unauthorized modifications made to repair or replace appliance light bulbs, air filters or water filters. This warranty is covered by KitchenAid. 5. You will pay for Factory Specified Parts for the following information about your...
..., flood, acts of God, improper installation, installation not in -home service is void if the factory applied serial number has been altered or removed from your major appliance. Repairs to parts or systems resulting from unauthorized modifications made to repair or replace appliance light bulbs, air filters or water filters. This warranty is covered by KitchenAid. 5. You will pay for Factory Specified Parts for the following information about your...

Dimension Guide
Page 1
....8 cm) cutout width E. 27³⁄₄" (70.5 cm) min. cutout height Because Whirlpool Corporation policy includes a continuous commitment to change without cooktop installed above) A B OVERALL DIMENSIONS A A B E B E D C D C 27" (68.6 cm) models A. 25 64.3 cm) max. For complete details, see Installation our products, we reserve the right to improve Dimensions are for planning purposes only. A time-delay fuse or circuit breaker is located on the oven door or on the model/serial number rating plate. (The model/serial number rating plate is...
....8 cm) cutout width E. 27³⁄₄" (70.5 cm) min. cutout height Because Whirlpool Corporation policy includes a continuous commitment to change without cooktop installed above) A B OVERALL DIMENSIONS A A B E B E D C D C 27" (68.6 cm) models A. 25 64.3 cm) max. For complete details, see Installation our products, we reserve the right to improve Dimensions are for planning purposes only. A time-delay fuse or circuit breaker is located on the oven door or on the model/serial number rating plate. (The model/serial number rating plate is...

Installation Guide
Page 4
...94, Canadian Electrical Code, Part 1 and C22.2 No. Oven front D. This oven must be connected to a grounded metal, permanent wiring system. A copy of cutout to the proper electrical voltage and frequency as specified on the model/serial number rating plate. The model/serial number rating plate is located at 208 volts) require a separate 30-amp circuit. ■ A time-delay fuse or circuit breaker is properly grounded. Cabinet Dimensions - cutout depth B. 23" (58.4 cm) recessed oven depth C. Model/serial number plate Double Oven A. bottom of the above code standards can...
...94, Canadian Electrical Code, Part 1 and C22.2 No. Oven front D. This oven must be connected to a grounded metal, permanent wiring system. A copy of cutout to the proper electrical voltage and frequency as specified on the model/serial number rating plate. The model/serial number rating plate is located at 208 volts) require a separate 30-amp circuit. ■ A time-delay fuse or circuit breaker is properly grounded. Cabinet Dimensions - cutout depth B. 23" (58.4 cm) recessed oven depth C. Model/serial number plate Double Oven A. bottom of the above code standards can...

Installation Guide
Page 5
... oven. 4. Move oven and cardboard close . Electrically ground oven. Make Electrical Connection WARNING Electrical Shock Hazard Disconnect power before servicing. Connect a section of solid copper wire to move and install oven. A A. WARNING Excessive Weight Hazard Use two or more people to the pigtail leads. 2. This oven is for joining copper to remove oven door(s). 1. Oven door latch in unlocked position 3. ■ Connect directly to the junction box. ■ Fuse both sides of the line. ■ Do not cut...
... oven. 4. Move oven and cardboard close . Electrically ground oven. Make Electrical Connection WARNING Electrical Shock Hazard Disconnect power before servicing. Connect a section of solid copper wire to move and install oven. A A. WARNING Excessive Weight Hazard Use two or more people to the pigtail leads. 2. This oven is for joining copper to remove oven door(s). 1. Oven door latch in unlocked position 3. ■ Connect directly to the junction box. ■ Fuse both sides of the line. ■ Do not cut...

Installation Guide
Page 7
... Use and Care Guide or contact the dealer from whom you have all parts are testing. 4. Replace oven racks. 7. Replace oven door by a number) appears in the Use and Care Guide. 5. If display panel does not light, please reference the "Assistance or Service" section of Single Oven" steps 2-6. Check Operation of your built-in the display. 14. or circuit breaker has not tripped. ■ Electrical supply is free to the oven. Turn power on. 2. Rotate both hinge latches back to the Use and Care Guide...
... Use and Care Guide or contact the dealer from whom you have all parts are testing. 4. Replace oven racks. 7. Replace oven door by a number) appears in the Use and Care Guide. 5. If display panel does not light, please reference the "Assistance or Service" section of Single Oven" steps 2-6. Check Operation of your built-in the display. 14. or circuit breaker has not tripped. ■ Electrical supply is free to the oven. Turn power on. 2. Rotate both hinge latches back to the Use and Care Guide...


