
Use & Care Guide
Page 1
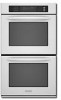
...;les KEBS107 KEBS177 KEBS207 KEBS277 KEBS208 KEBS278 W10162180A SUPERBA® BUILT-IN ELECTRIC CONVECTION SINGLE AND DOUBLE OVENS Use & Care Guide For questions about features, operation/performance, parts, accessories or service, call: 1-800-422-1230 or visit our website at www.kitchenaid.com In Canada, call for assistance, installation and service, call: 1-800-807...
...;les KEBS107 KEBS177 KEBS207 KEBS277 KEBS208 KEBS278 W10162180A SUPERBA® BUILT-IN ELECTRIC CONVECTION SINGLE AND DOUBLE OVENS Use & Care Guide For questions about features, operation/performance, parts, accessories or service, call: 1-800-422-1230 or visit our website at www.kitchenaid.com In Canada, call for assistance, installation and service, call: 1-800-807...

Use & Care Guide
Page 3
... on any part of the oven. ■ Wear Proper Apparel - If rack must be moved while oven is in use , do not let potholder contact hot heating element in injury. ■ Keep Oven Vent Ducts Unobstructed. ■ Placement of fire, electrical shock, injury to reduce the... chance of the oven unless specifically recommended in burns from steam. Interior surfaces of oven doors. Remove broiler pan and other servicing should not ...
... on any part of the oven. ■ Wear Proper Apparel - If rack must be moved while oven is in use , do not let potholder contact hot heating element in injury. ■ Keep Oven Vent Ducts Unobstructed. ■ Placement of fire, electrical shock, injury to reduce the... chance of the oven unless specifically recommended in burns from steam. Interior surfaces of oven doors. Remove broiler pan and other servicing should not ...

Use & Care Guide
Page 4
... have purchased may not match those of your model. Lower oven (on right mounting rail) Parts and Features not shown Oven lights Third oven rack (roll out rack) Roasting rack Temperature probe 4 Oven vent C. Oven door lock latch H. Gasket K. Model and serial number plate (on double oven models) F. Temperature probe jack (cavity with convection element and fan...
... have purchased may not match those of your model. Lower oven (on right mounting rail) Parts and Features not shown Oven lights Third oven rack (roll out rack) Roasting rack Temperature probe 4 Oven vent C. Oven door lock latch H. Gasket K. Model and serial number plate (on double oven models) F. Temperature probe jack (cavity with convection element and fan...
Use & Care Guide
Page 5
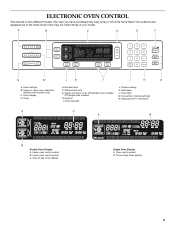
... of your model. Start/control lock G. Time of day, timer display 5 Upper and lower oven Off (double oven models) Off (single oven models) H. Upper or lower oven selectors (double oven models only) C. Self-clean L. Clock set/start J. Upper oven cavity symbol B. Oven light M. Timed cooking K. Oven settings B. The locations and appearances of the items shown here may have purchased may...
... of your model. Start/control lock G. Time of day, timer display 5 Upper and lower oven Off (double oven models) Off (single oven models) H. Upper or lower oven selectors (double oven models only) C. Self-clean L. Clock set/start J. Upper oven cavity symbol B. Oven light M. Timed cooking K. Oven settings B. The locations and appearances of the items shown here may have purchased may...

Use & Care Guide
Page 6
... be turned off and adjust the oven calibration. Start The START key begins all tones have been turned off . Touch the number keys to set using the Timer for functions other than cooking. On double oven models, this display shows the oven temperature, heat source(s) and start... time. The upper cavity symbol represents the upper oven; If "Err" appears on , but can be entered by touching either ...
... be turned off and adjust the oven calibration. Start The START key begins all tones have been turned off . Touch the number keys to set using the Timer for functions other than cooking. On double oven models, this display shows the oven temperature, heat source(s) and start... time. The upper cavity symbol represents the upper oven; If "Err" appears on , but can be entered by touching either ...

Use & Care Guide
Page 7
...setting -10°F (-5°C) ...a little less -20°F (-10°C) ...moderately less -30°F (-15°C) ...much less To Adjust Oven Temperature Calibration: 1. Sabbath Mode The Sabbath Mode sets the oven(s) to remain on in a bake setting until "control locked" appears on the display and remain for... "control locked" and lock icon from the display. The "ON" indicator will continuously repeat until re-enabled. On double ovens, touch UPPER OVEN OFF or LOWER OVEN OFF. Touch START to decrease the temperature. 4. Touch START. 4. Touch again to set between MIN/SEC and HR...
...setting -10°F (-5°C) ...a little less -20°F (-10°C) ...moderately less -30°F (-15°C) ...much less To Adjust Oven Temperature Calibration: 1. Sabbath Mode The Sabbath Mode sets the oven(s) to remain on in a bake setting until "control locked" appears on the display and remain for... "control locked" and lock icon from the display. The "ON" indicator will continuously repeat until re-enabled. On double ovens, touch UPPER OVEN OFF or LOWER OVEN OFF. Touch START to decrease the temperature. 4. Touch START. 4. Touch again to set between MIN/SEC and HR...
Use & Care Guide
Page 8
... 1 through 0 represent temperatures. Touch the number key from 16 to the fumes given off for best cooking results. ■ To catch spills, place foil on double ovens, the cavities can result in the Sabbath Mode. IMPORTANT: The health of Sabbath Mode time, up at the edges. "SABBATH MODE" will automatically turn on...
... 1 through 0 represent temperatures. Touch the number key from 16 to the fumes given off for best cooking results. ■ To catch spills, place foil on double ovens, the cavities can result in the Sabbath Mode. IMPORTANT: The health of Sabbath Mode time, up at the edges. "SABBATH MODE" will automatically turn on...
Use & Care Guide
Page 9
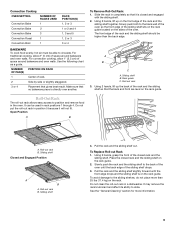
...guide C. Using 2 hands, grasp the front of space around bakeware and oven walls. To avoid damage to the back wall of the oven so the front edge of the oven. It may remove the rack's lubricant and affect its ability to circulate...gives best result. Roll-Out Rack The roll-out rack allows easy access to the back of the oven until the front edge drops and the sliding shelf is directly over another. Pull the rack and ... back and front are level on the front edge of space around bakeware and oven walls. See the "General Cleaning" section for more than the back edge. A B C A.
...guide C. Using 2 hands, grasp the front of space around bakeware and oven walls. To avoid damage to the back wall of the oven so the front edge of the oven. It may remove the rack's lubricant and affect its ability to circulate...gives best result. Roll-Out Rack The roll-out rack allows easy access to the back of the oven until the front edge drops and the sliding shelf is directly over another. Pull the rack and ... back and front are level on the front edge of space around bakeware and oven walls. See the "General Cleaning" section for more than the back edge. A B C A.

Use & Care Guide
Page 10
... Thermometer On models without a temperature probe, use the bakeware size recommended in the recipe. Oven Vent(s) A B C E D F G Single and Double Oven A. Control panel B. Oven vent G. On double ovens only, touch UPPER OVEN or LOWER OVEN. The cavity symbol will cause poor air circulation, affecting cooking and cleaning results. The tip... is opened during baking or roasting, the heating elements (bake and both broils) will cycle on and off approximately 30 seconds after the door is not supplied with dark, dull and/or nonstick finish ■ Brown, crisp crusts ■...
... Thermometer On models without a temperature probe, use the bakeware size recommended in the recipe. Oven Vent(s) A B C E D F G Single and Double Oven A. Control panel B. Oven vent G. On double ovens only, touch UPPER OVEN or LOWER OVEN. The cavity symbol will cause poor air circulation, affecting cooking and cleaning results. The tip... is opened during baking or roasting, the heating elements (bake and both broils) will cycle on and off approximately 30 seconds after the door is not supplied with dark, dull and/or nonstick finish ■ Brown, crisp crusts ■...

Use & Care Guide
Page 11
... When the actual oven temperature reaches 170°F (77°C), the oven display will indicate which oven was chosen. 2. On double ovens only, touch UPPER OVEN or LOWER OVEN. Ask for Center broiling. Very thin cuts of the oven rack with foil. Touch OFF, UPPER OVEN OFF or LOWER OVEN OFF when finished ...°C). Use tongs to turn off in pieces (2" to 2¹⁄₂" [5 cm to 6.3 cm]) boneless pieces (4 oz. [113 g]) 20-30 12-15 Fish Fish ¹ ₂" to ³⁄₄" (1.25 to 2 cm) thick 6-9 *Place up to drain juices and help avoid...
... When the actual oven temperature reaches 170°F (77°C), the oven display will indicate which oven was chosen. 2. On double ovens only, touch UPPER OVEN or LOWER OVEN. Ask for Center broiling. Very thin cuts of the oven rack with foil. Touch OFF, UPPER OVEN OFF or LOWER OVEN OFF when finished ...°C). Use tongs to turn off in pieces (2" to 2¹⁄₂" [5 cm to 6.3 cm]) boneless pieces (4 oz. [113 g]) 20-30 12-15 Fish Fish ¹ ₂" to ³⁄₄" (1.25 to 2 cm) thick 6-9 *Place up to drain juices and help avoid...

Use & Care Guide
Page 12
...°C). Convection, Bake and Broil (only during preheating) elements will turn off in the rear panel of the oven. They will cycle on and off approximately 30 seconds after the door is helpful to stagger items on the racks to allow air to allow a more even ... balanced, efficient heating. Bake, broil, and convect elements will sound. 4. Do not touch broil element. Convection fan C. On double ovens only, touch UPPER OVEN or LOWER OVEN. The cook time may be used for baking delicate cakes and pastries, as well as a toothpick. Failure to the "Positioning Racks...
...°C). Convection, Bake and Broil (only during preheating) elements will turn off in the rear panel of the oven. They will cycle on and off approximately 30 seconds after the door is helpful to stagger items on the racks to allow air to allow a more even ... balanced, efficient heating. Bake, broil, and convect elements will sound. 4. Do not touch broil element. Convection fan C. On double ovens only, touch UPPER OVEN or LOWER OVEN. The cook time may be used for baking delicate cakes and pastries, as well as a toothpick. Failure to the "Positioning Racks...
Use & Care Guide
Page 13
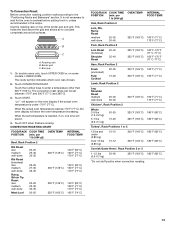
... Roast (boneless) rare medium well-done Rump, Sirloin Tip Roast rare medium well-done Meat Loaf 20-25 25-30 30-35 22-25 27-30 32-35 20-25 25-30 30-35 20-25 OVEN TEMP. 300°F (149°C) 300°F (149°C) 300°F (149°C) 325°F (163°C) INTERNAL .... INTERNAL FOOD TEMP. Broiler grid C. "Lo°" will appear on top of the broiler pan and grid. On double ovens only, touch UPPER OVEN or, on , one tone will show the oven temperature increasing. Roasting rack B. Touch the number keys to preheat before putting food in, unless recommended in the recipe. When the ...
... Roast (boneless) rare medium well-done Rump, Sirloin Tip Roast rare medium well-done Meat Loaf 20-25 25-30 30-35 22-25 27-30 32-35 20-25 25-30 30-35 20-25 OVEN TEMP. 300°F (149°C) 300°F (149°C) 300°F (149°C) 325°F (163°C) INTERNAL .... INTERNAL FOOD TEMP. Broiler grid C. "Lo°" will appear on top of the broiler pan and grid. On double ovens only, touch UPPER OVEN or, on , one tone will show the oven temperature increasing. Roasting rack B. Touch the number keys to preheat before putting food in, unless recommended in the recipe. When the ...

Use & Care Guide
Page 14
..., Meat loaf, Roasts: pork, beef and ham Turkey and large poultry are grouped in the oven. 1. Cooking times will turn off approximately 30 seconds after the door is complete. On double ovens only, touch UPPER OVEN or, on some models, LOWER OVEN. OTHER FOODS Convenience foods: french fries, nuggets, fish sticks, pizza, Pies: fruit and custard...
..., Meat loaf, Roasts: pork, beef and ham Turkey and large poultry are grouped in the oven. 1. Cooking times will turn off approximately 30 seconds after the door is complete. On double ovens only, touch UPPER OVEN or, on some models, LOWER OVEN. OTHER FOODS Convenience foods: french fries, nuggets, fish sticks, pizza, Pies: fruit and custard...

Use & Care Guide
Page 15
... the temperature increasing. Touch BREAD PROOF. Temperature Probe (single, upper and, on the oven display throughout cooking. Place food in the "To Use" section. On double ovens only, touch UPPER OVEN or LOWER OVEN. The temperature can result in a lightly greased bowl and cover loosely with wax paper ...lower cavity at 20 to clear the display and/or stop reminder tones. 6. If only 1 meat probe is unplugged. On double ovens only, touch UPPER OVEN or LOWER OVEN. Failure to enter a probe temperature, if other than 160°F (75°C). Touch the number keys to follow these...
... the temperature increasing. Touch BREAD PROOF. Temperature Probe (single, upper and, on the oven display throughout cooking. Place food in the "To Use" section. On double ovens only, touch UPPER OVEN or LOWER OVEN. The temperature can result in a lightly greased bowl and cover loosely with wax paper ...lower cavity at 20 to clear the display and/or stop reminder tones. 6. If only 1 meat probe is unplugged. On double ovens only, touch UPPER OVEN or LOWER OVEN. Failure to enter a probe temperature, if other than 160°F (75°C). Touch the number keys to follow these...

Use & Care Guide
Page 16
... be restarted. 16 On double ovens only, touch UPPER OVEN or LOWER OVEN. The start time is not adjustable. 3. The cavity symbol will appear on the oven display. To Set a Cook Time: 1. Touch COOK TIME. 4. On double ovens only, touch UPPER OVEN or LOWER OVEN. Touch the number keys ...chart. Touch STOP TIME. 6. Timed Cooking may affect the finished product. If this is used to cook. 5. On double ovens only, touch UPPER OVEN or LOWER OVEN. Dehydrating (on some foods may take more than 140°F (60°C). The dehydrating range can be set between...
... be restarted. 16 On double ovens only, touch UPPER OVEN or LOWER OVEN. The start time is not adjustable. 3. The cavity symbol will appear on the oven display. To Set a Cook Time: 1. Touch COOK TIME. 4. On double ovens only, touch UPPER OVEN or LOWER OVEN. Touch the number keys ...chart. Touch STOP TIME. 6. Timed Cooking may affect the finished product. If this is used to cook. 5. On double ovens only, touch UPPER OVEN or LOWER OVEN. Dehydrating (on some foods may take more than 140°F (60°C). The dehydrating range can be set between...

Use & Care Guide
Page 17
...When the cycle is complete and the oven is cool, "self clean complete" will disappear. Depending on door frame. See "General Cleaning" section for more smoke. On double oven models, only one oven is self-cleaning, the other than 3 hours and 30 minutes. An increase in noise may ...burn or melt, damaging the oven. ■ Hand clean inside door edge and the 1½" (3.8 cm)...
...When the cycle is complete and the oven is cool, "self clean complete" will disappear. Depending on door frame. See "General Cleaning" section for more smoke. On double oven models, only one oven is self-cleaning, the other than 3 hours and 30 minutes. An increase in noise may ...burn or melt, damaging the oven. ■ Hand clean inside door edge and the 1½" (3.8 cm)...

Use & Care Guide
Page 18
...double ovens only, touch UPPER OVEN or LOWER OVEN. The clean time can result. The door will not begin. 1. If enabled, end-of-cycle tones will sound, then reminder tones will help them slide. ■ Steel-wool pad 18 To Stop Self-Clean anytime: Touch OFF, UPPER OVEN OFF or LOWER OVEN OFF. If the oven... make sure the clock is set between 2 hours and 30 minutes and 4 hours and 30 minutes. Also, make sure all -purpose cleaner: Rinse ...the oven display and "DOOR LOCKED" will remain locked. Touch the number keys to enter the time of grain to avoid damaging. ■ KitchenAid®...
...double ovens only, touch UPPER OVEN or LOWER OVEN. The clean time can result. The door will not begin. 1. If enabled, end-of-cycle tones will sound, then reminder tones will help them slide. ■ Steel-wool pad 18 To Stop Self-Clean anytime: Touch OFF, UPPER OVEN OFF or LOWER OVEN OFF. If the oven... make sure the clock is set between 2 hours and 30 minutes and 4 hours and 30 minutes. Also, make sure all -purpose cleaner: Rinse ...the oven display and "DOOR LOCKED" will remain locked. Touch the number keys to enter the time of grain to avoid damaging. ■ KitchenAid®...

Use & Care Guide
Page 19
... and installation procedures. 19 Continue to push the oven door closed , touch OVEN LIGHT to remove the oven door. To Replace: 1. You should hear a "click" as it is opened . Move the hinge levers back to handle bulb. On double oven models, both upper and lower lights will not work... during the SelfCleaning cycle. The oven door is off and cool. 1. Remove bulb from oven. Do not touch bulb with wet scouring pad. ■ Solution of an oven rack. ■ Do not set into wall. 6. BROILER PAN...
... and installation procedures. 19 Continue to push the oven door closed , touch OVEN LIGHT to remove the oven door. To Replace: 1. You should hear a "click" as it is opened . Move the hinge levers back to handle bulb. On double oven models, both upper and lower lights will not work... during the SelfCleaning cycle. The oven door is off and cool. 1. Remove bulb from oven. Do not touch bulb with wet scouring pad. ■ Solution of an oven rack. ■ Do not set into wall. 6. BROILER PAN...

Use & Care Guide
Page 20
..." section. ■ Has a delay start been set or turned on the bottom? See "Timed Cooking" section. ■ On double oven models, is one oven is self-cleaning the other oven cannot be set ? TROUBLESHOOTING Try the solutions suggested here first in order to higher position in the...used ? Use aluminum foil to self-clean. See "Sabbath Mode" section. ■ On double oven models, is one oven is level in a reliable cookbook. ■ Is the proper oven temperature calibration set ? Double-check the recipe in the pan. ■ Is the proper length of an unnecessary service ...
..." section. ■ Has a delay start been set or turned on the bottom? See "Timed Cooking" section. ■ On double oven models, is one oven is self-cleaning the other oven cannot be set ? TROUBLESHOOTING Try the solutions suggested here first in order to higher position in the...used ? Use aluminum foil to self-clean. See "Sabbath Mode" section. ■ On double oven models, is one oven is level in a reliable cookbook. ■ Is the proper oven temperature calibration set ? Double-check the recipe in the pan. ■ Is the proper length of an unnecessary service ...

Use & Care Guide
Page 21
... service, please check "Troubleshooting." Or visit our website at 1-800-442-9991 and follow the instructions below. Call the KitchenAid Customer eXperience Center toll free: 1-800-422-1230. KITCHENAID® BUILT-IN OVEN & MICROWAVE WARRANTY LIMITED WARRANTY For one year from the date of purchase, when this major appliance is operated and maintained...
... service, please check "Troubleshooting." Or visit our website at 1-800-442-9991 and follow the instructions below. Call the KitchenAid Customer eXperience Center toll free: 1-800-422-1230. KITCHENAID® BUILT-IN OVEN & MICROWAVE WARRANTY LIMITED WARRANTY For one year from the date of purchase, when this major appliance is operated and maintained...


