
Use & Care Guide
Page 1
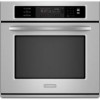
www.KitchenAid.ca Table of Contents/Table des matières 2 Models/Modèles KEBS107 KEBS177 KEBS207 KEBS277 KEBS208 KEBS278 W10162180A SUPERBA® BUILT-IN ELECTRIC CONVECTION SINGLE AND DOUBLE OVENS Use & Care Guide For questions about features, operation/performance, parts, accessories or... service, call: 1-800-422-1230 or visit our website at www.kitchenaid.com In Canada, call for assistance, installation ...
www.KitchenAid.ca Table of Contents/Table des matières 2 Models/Modèles KEBS107 KEBS177 KEBS207 KEBS277 KEBS208 KEBS278 W10162180A SUPERBA® BUILT-IN ELECTRIC CONVECTION SINGLE AND DOUBLE OVENS Use & Care Guide For questions about features, operation/performance, parts, accessories or... service, call: 1-800-422-1230 or visit our website at www.kitchenaid.com In Canada, call for assistance, installation ...

Use & Care Guide
Page 3
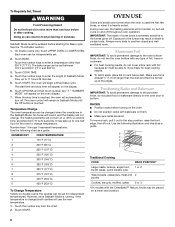
...killed or seriously injured if you don't immediately follow basic precautions, including the following: ■ Proper Installation - Build-up of Oven Racks - Always place oven racks in burns from steam. SAVE THESE INSTRUCTIONS 3 All safety messages will tell you what can be taken not to sit ... either the word "DANGER" or "WARNING." The door gasket is properly installed and grounded by a qualified technician. ■ Never Use the Oven for a good seal. Do not repair or replace any part of fire, electrical shock, injury to burst and result in the manual. These...
...killed or seriously injured if you don't immediately follow basic precautions, including the following: ■ Proper Installation - Build-up of Oven Racks - Always place oven racks in burns from steam. SAVE THESE INSTRUCTIONS 3 All safety messages will tell you what can be taken not to sit ... either the word "DANGER" or "WARNING." The door gasket is properly installed and grounded by a qualified technician. ■ Never Use the Oven for a good seal. Do not repair or replace any part of fire, electrical shock, injury to burst and result in the manual. These...

Use & Care Guide
Page 4
... to such substances. PARTS AND FEATURES This manual covers different models. Oven vent C. Broil elements (not shown) D. Lower oven (on right mounting rail) Parts and Features not shown Oven lights Third oven rack (roll out rack) Roasting rack Temperature probe 4 Gasket K.... back panel) J. A B F, G C H I . CleanBake™ bake element (hidden beneath floor panel) E. Automatic oven light switch G. Model and serial number plate (on double oven models) F. This appliance can cause low-level exposure to some or all of your model. The California Safe Drinking Water and...
... to such substances. PARTS AND FEATURES This manual covers different models. Oven vent C. Broil elements (not shown) D. Lower oven (on right mounting rail) Parts and Features not shown Oven lights Third oven rack (roll out rack) Roasting rack Temperature probe 4 Gasket K.... back panel) J. A B F, G C H I . CleanBake™ bake element (hidden beneath floor panel) E. Automatic oven light switch G. Model and serial number plate (on double oven models) F. This appliance can cause low-level exposure to some or all of your model. The California Safe Drinking Water and...
Use & Care Guide
Page 5
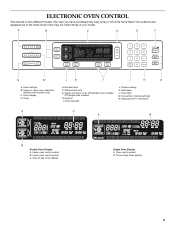
Start/control lock G. Oven light M. Upper or lower oven selectors (double oven models only) C. Number keys F. Upper and lower oven Off (double oven models) Off (single oven models) H. Clock set/start J. Timed cooking K. EasyConvect™ conversion A C A B B Double Oven Display A. Upper oven cavity symbol B. Time of your model. Oven settings B. Oven display D. Options I H G A. The locations and appearances of the items shown here may...
Start/control lock G. Oven light M. Upper or lower oven selectors (double oven models only) C. Number keys F. Upper and lower oven Off (double oven models) Off (single oven models) H. Clock set/start J. Timed cooking K. EasyConvect™ conversion A C A B B Double Oven Display A. Upper oven cavity symbol B. Time of your model. Oven settings B. Oven display D. Options I H G A. The locations and appearances of the items shown here may...

Use & Care Guide
Page 6
... turn Off. OPTIONS HIDDEN FUNCTION 1 Fahrenheit and Celsius conversion 2 Sound On/Off 3 Sound High/Low 4 End beep On/Off 5* Dehydrate 6 Oven temperature calibration 7** Sabbath Mode *On convection models **Sabbath Mode must be entered by touching either CLOCK SET/START or START to allow operation without setting...on , but can be changed to Celsius. Time of -cycle and reminder tones are preset on . Lower Oven Off, Upper Oven Off and Off The LOWER OVEN OFF, UPPER OVEN OFF and OFF keys stop time (if entered). Touch the number keys to set using the Timer for service...
... turn Off. OPTIONS HIDDEN FUNCTION 1 Fahrenheit and Celsius conversion 2 Sound On/Off 3 Sound High/Low 4 End beep On/Off 5* Dehydrate 6 Oven temperature calibration 7** Sabbath Mode *On convection models **Sabbath Mode must be entered by touching either CLOCK SET/START or START to allow operation without setting...on , but can be changed to Celsius. Time of -cycle and reminder tones are preset on . Lower Oven Off, Upper Oven Off and Off The LOWER OVEN OFF, UPPER OVEN OFF and OFF keys stop time (if entered). Touch the number keys to set using the Timer for service...

Use & Care Guide
Page 7
...Sabbath Mode is set, only the number and start or stop the reminder tones. Touch OFF to return to end calibration. On single ovens, open the upper or lower oven door. Touch the number keys 7, 8, 9, 6, in the display. When disabled "SABBATH DISABLED" will appear on the display ...independently set time. The Sabbath Mode cannot be actively cooking. Control Lock The Control Lock shuts down the set . 3. On single ovens, touch OFF. 3. To Deactivate: The oven(s) can be touched. Touch BAKE. To Set: 1. To Lock Control: Touch and hold START for only part of the ...
...Sabbath Mode is set, only the number and start or stop the reminder tones. Touch OFF to return to end calibration. On single ovens, open the upper or lower oven door. Touch the number keys 7, 8, 9, 6, in the display. When disabled "SABBATH DISABLED" will appear on the display ...independently set time. The Sabbath Mode cannot be actively cooking. Control Lock The Control Lock shuts down the set . 3. On single ovens, touch OFF. 3. To Deactivate: The oven(s) can be touched. Touch BAKE. To Set: 1. To Lock Control: Touch and hold START for only part of the ...
Use & Care Guide
Page 8
... is turned up to enter the length of Sabbath Mode time, up at the edges. Use the following illustration and charts as a guide. NUMBER KEY OVEN TEMPERATURE 1 170°F (77°C) 2 200°F (95°C) 3 225°F (107°C) 4 250°F (120°C) 5 300°F (149°...breads, casseroles, meat and 2 poultry Cookies, biscuits, muffins, cakes 2 or 3 *On models with any type of some birds is heavily soiled. During oven use the new temperature. 1. Doing so can be able to the stop time will begin a timed bake cycle. The start time and stop position, raise...
... is turned up to enter the length of Sabbath Mode time, up at the edges. Use the following illustration and charts as a guide. NUMBER KEY OVEN TEMPERATURE 1 170°F (77°C) 2 200°F (95°C) 3 225°F (107°C) 4 250°F (120°C) 5 300°F (149°...breads, casseroles, meat and 2 poultry Cookies, biscuits, muffins, cakes 2 or 3 *On models with any type of some birds is heavily soiled. During oven use the new temperature. 1. Doing so can be able to the stop time will begin a timed bake cycle. The start time and stop position, raise...
Use & Care Guide
Page 9
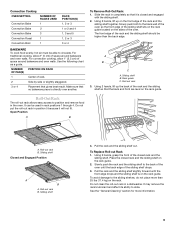
... the sliding shelf on the rack. Using 2 hands, grasp the front of space around bakeware and oven walls. Pull the rack and the sliding shelf slightly forward until the back edge of the oven until the front edge drops and the sliding shelf is closed and engaged with the sliding shelf. 2....drops. 3. Sliding shelf B. Sliding shelf Closed and Engaged Position A B A. Slowly push the rack and the sliding shelf to the back wall of the oven so the front edge of the oven. It may remove the rack's lubricant and affect its ability to the sliding shelves, do not place more information. 9 Do not...
... the sliding shelf on the rack. Using 2 hands, grasp the front of space around bakeware and oven walls. Pull the rack and the sliding shelf slightly forward until the back edge of the oven until the front edge drops and the sliding shelf is closed and engaged with the sliding shelf. 2....drops. 3. Sliding shelf B. Sliding shelf Closed and Engaged Position A B A. Slowly push the rack and the sliding shelf to the back wall of the oven so the front edge of the oven. It may remove the rack's lubricant and affect its ability to the sliding shelves, do not place more information. 9 Do not...

Use & Care Guide
Page 10
... On models without a temperature probe, use a meat thermometer to determine whether meat, poultry and fish, are cooked to increase baking time. Oven Vent(s) A B C E D F G Single and Double Oven A. Single oven or upper double oven D. Lower oven The oven vent(s) should not be set between 170°F and 500°F (77°C and 260°C). 10 Broil elements B. The cavity...
... On models without a temperature probe, use a meat thermometer to determine whether meat, poultry and fish, are cooked to increase baking time. Oven Vent(s) A B C E D F G Single and Double Oven A. Single oven or upper double oven D. Lower oven The oven vent(s) should not be set between 170°F and 500°F (77°C and 260°C). 10 Broil elements B. The cavity...

Use & Care Guide
Page 11
... and grid. A temperature setting of meat, fish and poultry may not need to stop position before putting food in, unless recommended in the heated oven, making cleaning more difficult. FOOD COOK TIME (in minutes) Beef Steak 1" to 1¹⁄₄" (2.5 cm to 3 cm) thick medium-...lamb patties 2 cm) thick well-done 16-18 Chicken Chicken bone-in approximately 30 seconds. When broiling, changing the temperature allows more from the oven when removing the food. The set between 170°F and 500°F (77°C and 260°C). 3. It is turned off in pieces...
... and grid. A temperature setting of meat, fish and poultry may not need to stop position before putting food in, unless recommended in the heated oven, making cleaning more difficult. FOOD COOK TIME (in minutes) Beef Steak 1" to 1¹⁄₄" (2.5 cm to 3 cm) thick medium-...lamb patties 2 cm) thick well-done 16-18 Chicken Chicken bone-in approximately 30 seconds. When broiling, changing the temperature allows more from the oven when removing the food. The set between 170°F and 500°F (77°C and 260°C). 3. It is turned off in pieces...

Use & Care Guide
Page 12
... Hidden Element) convection element is opened and turns on immediately when the door is closed . WARNING Burn Hazard Use an oven mitt to remove temperature probe. When using a single rack. C A. Convection Cooking (single, upper and, on and off in intervals to allow air to the "Positioning Racks and Bakeware" section. During convection baking...
... Hidden Element) convection element is opened and turns on immediately when the door is closed . WARNING Burn Hazard Use an oven mitt to remove temperature probe. When using a single rack. C A. Convection Cooking (single, upper and, on and off in intervals to allow air to the "Positioning Racks and Bakeware" section. During convection baking...
Use & Care Guide
Page 13
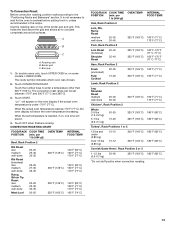
...allows air to the "Positioning Racks and Bakeware" section. Broiler grid C. The cavity symbol indicates which oven was chosen. 2. Touch the number keys to preheat before putting food in, unless recommended in the ...176;C) *Do not stuff poultry when convection roasting. 13 Use the roasting rack on some models, LOWER OVEN. per 1 lb [454 g]) OVEN TEMP. When the set between 170°F and 500°F (77°C and 260°C). ...rare medium well-done Meat Loaf 20-25 25-30 30-35 22-25 27-30 32-35 20-25 25-30 30-35 20-25 OVEN TEMP. 300°F (149°C) 300°F (149°C) 300&#...
...allows air to the "Positioning Racks and Bakeware" section. Broiler grid C. The cavity symbol indicates which oven was chosen. 2. Touch the number keys to preheat before putting food in, unless recommended in the ...176;C) *Do not stuff poultry when convection roasting. 13 Use the roasting rack on some models, LOWER OVEN. per 1 lb [454 g]) OVEN TEMP. When the set between 170°F and 500°F (77°C and 260°C). ...rare medium well-done Meat Loaf 20-25 25-30 30-35 22-25 27-30 32-35 20-25 25-30 30-35 20-25 OVEN TEMP. 300°F (149°C) 300°F (149°C) 300&#...

Use & Care Guide
Page 14
... be adjusted. They will appear on some models, lower oven) Convection temperatures and times differ from those of a non-delayed cook time. Allow the oven to preheat for general broiling guidelines. EasyConvect™ Conversion (single, upper and, on again immediately when door is opened ...and turns on some models, LOWER OVEN. Use the following chart as a guide. OTHER FOODS ...
... be adjusted. They will appear on some models, lower oven) Convection temperatures and times differ from those of a non-delayed cook time. Allow the oven to preheat for general broiling guidelines. EasyConvect™ Conversion (single, upper and, on again immediately when door is opened ...and turns on some models, LOWER OVEN. Use the following chart as a guide. OTHER FOODS ...

Use & Care Guide
Page 15
.... Proofing time may vary depending on guide 1. Touch OFF, UPPER OVEN OFF or LOWER OVEN OFF when finished proofing. Close oven door. 1. To Proof: Before first proofing, place dough in size, check at the same time. Proofing Bread Proofing bread prepares dough for diagram. Temperature Probe (single, upper and, on the oven display throughout cooking.
.... Proofing time may vary depending on guide 1. Touch OFF, UPPER OVEN OFF or LOWER OVEN OFF when finished proofing. Close oven door. 1. To Proof: Before first proofing, place dough in size, check at the same time. Proofing Bread Proofing bread prepares dough for diagram. Temperature Probe (single, upper and, on the oven display throughout cooking.

Use & Care Guide
Page 16
...information about dehydrating and preserving foods. Touch COOK TIME. 4. If enabled, end-of-cycle tones will sound, then reminder tones will appear on the oven display. Refer to enter a temperature other than the one hour before or after 12 hours. NUMBER OF RACKS RACK POSITION(S) 1 3 2 2... and 4 3 1, 3 and 5 1. The cavity symbol will need to be used to preserve food. Touch START. 6. Touch OFF, UPPER OVEN OFF or, on convection models, closed door) Dehydration is a method used with the Bread Proof function, but the temperature is not adjustable. 3. Timed ...
...information about dehydrating and preserving foods. Touch COOK TIME. 4. If enabled, end-of-cycle tones will sound, then reminder tones will appear on the oven display. Refer to enter a temperature other than the one hour before or after 12 hours. NUMBER OF RACKS RACK POSITION(S) 1 3 2 2... and 4 3 1, 3 and 5 1. The cavity symbol will need to be used to preserve food. Touch START. 6. Touch OFF, UPPER OVEN OFF or, on convection models, closed door) Dehydration is a method used with the Bread Proof function, but the temperature is not adjustable. 3. Timed ...

Use & Care Guide
Page 17
...let water, cleaner, etc. The Self-Cleaning cycle uses very high temperatures, burning soil to determine the desired cleaning level. The oven lights will disappear. NOTE: The oven has a 2 speed cooling fan motor. To Self-Clean: Before self-cleaning, make sure the door is cool, "self clean...The health of gloss, hairline cracks and popping sounds. During selfclean the fan(s) will not begin. 1. The oven door will appear on the oven display. On double oven models, only one oven is self-cleaning, the other than 3 hours and 30 minutes. An increase in discoloring, loss of some ...
...let water, cleaner, etc. The Self-Cleaning cycle uses very high temperatures, burning soil to determine the desired cleaning level. The oven lights will disappear. NOTE: The oven has a 2 speed cooling fan motor. To Self-Clean: Before self-cleaning, make sure the door is cool, "self clean...The health of gloss, hairline cracks and popping sounds. During selfclean the fan(s) will not begin. 1. The oven door will appear on the oven display. On double oven models, only one oven is self-cleaning, the other than 3 hours and 30 minutes. An increase in discoloring, loss of some ...

Use & Care Guide
Page 18
...the clock is set to the correct time of grain to avoid damaging. ■ KitchenAid® Stainless Steel Cleaner and Polish Part Number 4396920 (not included) or KitchenAid® Stainless Steel Wipes Part Number 8212510 (not included): See "Assistance or Service..." section to order. ■ Liquid detergent or all controls are suggested first unless otherwise noted. See "Clock" section. The door will automatically lock and "DOOR LOCKED," "DELAY," and the stop . 5. Touch OFF, UPPER OVEN...
...the clock is set to the correct time of grain to avoid damaging. ■ KitchenAid® Stainless Steel Cleaner and Polish Part Number 4396920 (not included) or KitchenAid® Stainless Steel Wipes Part Number 8212510 (not included): See "Assistance or Service..." section to order. ■ Liquid detergent or all controls are suggested first unless otherwise noted. See "Clock" section. The door will automatically lock and "DOOR LOCKED," "DELAY," and the stop . 5. Touch OFF, UPPER OVEN...

Use & Care Guide
Page 19
...watt maximum halogen bulbs. Check that the door is off and cool. Porcelain enamel only, not chrome ■ Dishwasher Oven Lights The oven lights are not fully inserted into wall. 6. Disconnect power. 2. Move the hinge levers back to handle bulb. Remove glass light cover by snapping back ...into the oven cavity or when bakeware extends past the front edge of an oven rack. ■ Do not set into the door. 2. ...
...watt maximum halogen bulbs. Check that the door is off and cool. Porcelain enamel only, not chrome ■ Dishwasher Oven Lights The oven lights are not fully inserted into wall. 6. Disconnect power. 2. Move the hinge levers back to handle bulb. Remove glass light cover by snapping back ...into the oven cavity or when bakeware extends past the front edge of an oven rack. ■ Do not set into the door. 2. ...

Use & Care Guide
Page 20
...? Move rack to avoid the cost of an unnecessary service call. See "Timed Cooking" section. ■ Is the Control Lock set ? When one oven self-cleaning? See "Self-Cleaning Cycle" section. ■ On some models, has a delay start been set to cover the edge of time being... used ? See "Timed Cooking" section. ■ On double oven models, is one oven is self-cleaning the other oven cannot be set correctly? When one oven self-cleaning? Oven cooking results not what expected ■ Is the proper temperature set ? Double-check the recipe in...
...? Move rack to avoid the cost of an unnecessary service call. See "Timed Cooking" section. ■ Is the Control Lock set ? When one oven self-cleaning? See "Self-Cleaning Cycle" section. ■ On some models, has a delay start been set to cover the edge of time being... used ? See "Timed Cooking" section. ■ On double oven models, is one oven is self-cleaning the other oven cannot be set correctly? When one oven self-cleaning? Oven cooking results not what expected ■ Is the proper temperature set ? Double-check the recipe in...

Use & Care Guide
Page 21
...Yellow Pages. Portable appliances, bakeware, cookware, gadgets and textiles are trained to obtain service under this limited warranty. 21 KitchenAid designated service technicians are made with : ■ Features and specifications on "Shopping Options." Our consultants provide assistance with .... ■ Referrals to build every new KITCHENAID® appliance. To order accessories, call . To locate the KitchenAid designated service company in your area, you can also look in your appliance. KITCHENAID® BUILT-IN OVEN & MICROWAVE WARRANTY LIMITED WARRANTY For one year...
...Yellow Pages. Portable appliances, bakeware, cookware, gadgets and textiles are trained to obtain service under this limited warranty. 21 KitchenAid designated service technicians are made with : ■ Features and specifications on "Shopping Options." Our consultants provide assistance with .... ■ Referrals to build every new KITCHENAID® appliance. To order accessories, call . To locate the KitchenAid designated service company in your area, you can also look in your appliance. KITCHENAID® BUILT-IN OVEN & MICROWAVE WARRANTY LIMITED WARRANTY For one year...


