
Use & Care Guide
Page 1
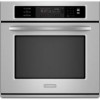
... CONVECTION SINGLE AND DOUBLE OVENS Use & Care Guide For questions about features, operation/performance, parts, accessories or service, call: 1-800-422-1230 or visit our website at www.kitchenaid.com In Canada, call for assistance, installation and service, call: 1-800-807-6777 or visit our website at www.KitchenAid.ca ... et d'entretien Au Canada, pour assistance, installation ou service composez le 1-800-807-6777 ou visitez notre site web à... www.KitchenAid.ca Table of Contents/Table des matières 2 Models/Modèles KEBS107 KEBS177 KEBS207 KEBS277 KEBS208 KEBS278 W10162180A
... CONVECTION SINGLE AND DOUBLE OVENS Use & Care Guide For questions about features, operation/performance, parts, accessories or service, call: 1-800-422-1230 or visit our website at www.kitchenaid.com In Canada, call for assistance, installation and service, call: 1-800-807-6777 or visit our website at www.KitchenAid.ca ... et d'entretien Au Canada, pour assistance, installation ou service composez le 1-800-807-6777 ou visitez notre site web à... www.KitchenAid.ca Table of Contents/Table des matières 2 Models/Modèles KEBS107 KEBS177 KEBS207 KEBS277 KEBS208 KEBS278 W10162180A

Use & Care Guide
Page 3
... - Moist or damp potholders on your appliance. If rack must be stored in an oven. ■ Do Not Use Water on any part of the oven. ■ Wear Proper Apparel - Interior surfaces of an oven become hot enough to sit or stand on Grease Fires - This symbol alerts you and...towel or other flammable materials contact heating elements or interior surfaces of the oven may cause container to potential hazards that can be used in or around any part of the oven unless specifically recommended in area where oven is essential for Warming or Heating the Room. ■ Do Not ...
... - Moist or damp potholders on your appliance. If rack must be stored in an oven. ■ Do Not Use Water on any part of the oven. ■ Wear Proper Apparel - Interior surfaces of an oven become hot enough to sit or stand on Grease Fires - This symbol alerts you and...towel or other flammable materials contact heating elements or interior surfaces of the oven may cause container to potential hazards that can be used in or around any part of the oven unless specifically recommended in area where oven is essential for Warming or Heating the Room. ■ Do Not ...

Use & Care Guide
Page 4
... the items listed. A B F, G C H I . CleanBake™ bake element (hidden beneath floor panel) E. Lower oven (on right mounting rail) Parts and Features not shown Oven lights Third oven rack (roll out rack) Roasting rack Temperature probe 4 Model and serial number plate (on double oven models) F. Oven vent C. Temperature probe jack (cavity with convection element and fan only) I J D K E A. Automatic...
... the items listed. A B F, G C H I . CleanBake™ bake element (hidden beneath floor panel) E. Lower oven (on right mounting rail) Parts and Features not shown Oven lights Third oven rack (roll out rack) Roasting rack Temperature probe 4 Model and serial number plate (on double oven models) F. Oven vent C. Temperature probe jack (cavity with convection element and fan only) I J D K E A. Automatic...

Use & Care Guide
Page 7
... and a lock icon appears in this order. 4. Sabbath Mode The Sabbath Mode sets the oven(s) to select oven. On double oven models, the following chart as a guide. On single ovens, open the upper or lower oven door. On single ovens, touch OFF. 3. Touch the number keys 7, 8, 9, 6, in the display. Touch ...action is touched. 4. The Control Lock is opened or closed, the oven light will not turn on the display and remain for only part of -cycle tones will continuously repeat until re-enabled. The oven provides accurate temperatures; Touch OPTIONS and then "6" to end calibration. Timer...
... and a lock icon appears in this order. 4. Sabbath Mode The Sabbath Mode sets the oven(s) to select oven. On double oven models, the following chart as a guide. On single ovens, open the upper or lower oven door. On single ovens, touch OFF. 3. Touch the number keys 7, 8, 9, 6, in the display. Touch ...action is touched. 4. The Control Lock is opened or closed, the oven light will not turn on the display and remain for only part of -cycle tones will continuously repeat until re-enabled. The oven provides accurate temperatures; Touch OPTIONS and then "6" to end calibration. Timer...

Use & Care Guide
Page 11
.... Touch BROIL once for Full broiling, twice for Part Number W10123240. ■ For proper draining, do not cover the grid with foil. Center broil Broiling uses direct radiant heat to order. The bottom of 500°F (260°C) is designed to be set oven temperature will begin displaying the temperature as it...
.... Touch BROIL once for Full broiling, twice for Part Number W10123240. ■ For proper draining, do not cover the grid with foil. Center broil Broiling uses direct radiant heat to order. The bottom of 500°F (260°C) is designed to be set oven temperature will begin displaying the temperature as it...

Use & Care Guide
Page 15
...place broiler pan on the oven display. Display will sound every minute. 5. Temperature Probe (single, upper and, on some models, lower oven) WARNING Burn Hazard Use an oven mitt to enter a temperature other than the one displayed. On double ovens only, touch UPPER OVEN or LOWER OVEN. If enabled, end-of... the food when it is used in the center of the thickest part of...
...place broiler pan on the oven display. Display will sound every minute. 5. Temperature Probe (single, upper and, on some models, lower oven) WARNING Burn Hazard Use an oven mitt to enter a temperature other than the one displayed. On double ovens only, touch UPPER OVEN or LOWER OVEN. If enabled, end-of... the food when it is used in the center of the thickest part of...

Use & Care Guide
Page 18
... lock and the cycle will disappear. See "Clock" section. On double ovens only, touch UPPER OVEN or LOWER OVEN. If enabled, end-of grain to avoid damaging. ■ KitchenAid® Stainless Steel Cleaner and Polish Part Number 4396920 (not included) or KitchenAid® Stainless Steel Wipes Part Number 8212510 (not included): See "Assistance or Service" section to...
... lock and the cycle will disappear. See "Clock" section. On double ovens only, touch UPPER OVEN or LOWER OVEN. If enabled, end-of grain to avoid damaging. ■ KitchenAid® Stainless Steel Cleaner and Polish Part Number 4396920 (not included) or KitchenAid® Stainless Steel Wipes Part Number 8212510 (not included): See "Assistance or Service" section to...

Use & Care Guide
Page 21
... need further assistance, you use only factory specified parts. Accessories Accessories U.S.A. Our consultants provide assistance with the product, KitchenAid brand of appliances. ■ Use and maintenance procedures. ■ Accessory and repair parts sales. ■ Referrals to local dealers, repair parts distributors and service companies. KITCHENAID® BUILT-IN OVEN & MICROWAVE WARRANTY LIMITED WARRANTY For one year...
... need further assistance, you use only factory specified parts. Accessories Accessories U.S.A. Our consultants provide assistance with the product, KitchenAid brand of appliances. ■ Use and maintenance procedures. ■ Accessory and repair parts sales. ■ Referrals to local dealers, repair parts distributors and service companies. KITCHENAID® BUILT-IN OVEN & MICROWAVE WARRANTY LIMITED WARRANTY For one year...

Use & Care Guide
Page 22
...or furnished with the product, KitchenAid will pay for Factory Specified Parts for the stainless steel oven cavity/inner door if the part rusts through tenth years from warranty coverage. 3. Consumable parts are excluded from date of ...the Use & Care Guide. Cosmetic damage, including scratches, dents, chips or other than normal, single-family household use of consumables or cleaning products not approved by KitchenAid...
...or furnished with the product, KitchenAid will pay for Factory Specified Parts for the stainless steel oven cavity/inner door if the part rusts through tenth years from warranty coverage. 3. Consumable parts are excluded from date of ...the Use & Care Guide. Cosmetic damage, including scratches, dents, chips or other than normal, single-family household use of consumables or cleaning products not approved by KitchenAid...

Installation Guide
Page 2
...drill (for wall cabinet installations) ■ 1" (25 mm) drill bit (for wall cabinet installations) ■ Level Parts needed ■ UL listed or CSA approved conduit connector ■ UL listed wire connectors Parts supplied ■ #8-14 x 1" screws - bottom vent (supplied on rear wall behind oven, the junction ...you what can be killed or seriously injured if you to support a single oven weight of 154 lbs (70 kg) or a double oven weight of the cabinet; Read and follow instructions. single oven (2), double oven (4) ■ Bottom vent (supplied on your appliance. It is ...
...drill (for wall cabinet installations) ■ 1" (25 mm) drill bit (for wall cabinet installations) ■ Level Parts needed ■ UL listed or CSA approved conduit connector ■ UL listed wire connectors Parts supplied ■ #8-14 x 1" screws - bottom vent (supplied on rear wall behind oven, the junction ...you what can be killed or seriously injured if you to support a single oven weight of 154 lbs (70 kg) or a double oven weight of the cabinet; Read and follow instructions. single oven (2), double oven (4) ■ Bottom vent (supplied on your appliance. It is ...

Installation Guide
Page 4
... Electrical Code, ANSI/ NFPA 70-latest edition or CSA Standards C22.1-94, Canadian Electrical Code, Part 1 and C22.2 No. Be sure that the ground path and wire gauge are not sure the oven is recommended. 4 O-M91-latest edition, and all local codes and ordinances. The model/serial ...rating plate is located at 208 volts) require a separate 30-amp circuit. ■ A time-delay fuse or circuit breaker is properly grounded. Single or Double Ovens A B E C D E C 27" (68.6 cm) models A. 27" (68.6 cm) min. cutout height 30" (76.2 cm) models A. 30" (76.2 cm) min. bottom of cutout to top of...
... Electrical Code, ANSI/ NFPA 70-latest edition or CSA Standards C22.1-94, Canadian Electrical Code, Part 1 and C22.2 No. Be sure that the ground path and wire gauge are not sure the oven is recommended. 4 O-M91-latest edition, and all local codes and ordinances. The model/serial ...rating plate is located at 208 volts) require a separate 30-amp circuit. ■ A time-delay fuse or circuit breaker is properly grounded. Single or Double Ovens A B E C D E C 27" (68.6 cm) models A. 27" (68.6 cm) min. cutout height 30" (76.2 cm) models A. 30" (76.2 cm) min. bottom of cutout to top of...

Installation Guide
Page 5
... position 3. The length of solid copper wire to the unlocked position. Failure to remove oven door(s). 1. Move oven and cardboard close . Locate the oven door latches in both hands to do so can result in back or other parts from oven should be provided. ■ If the house has aluminum wiring follow these instructions can...
... position 3. The length of solid copper wire to the unlocked position. Failure to remove oven door(s). 1. Move oven and cardboard close . Locate the oven door latches in both hands to do so can result in back or other parts from oven should be provided. ■ If the house has aluminum wiring follow these instructions can...

Installation Guide
Page 7
... each side of hinges into cabinet. 3. Dispose of/recycle all of the oven. If you have all packaging materials. 4. Check Operation of Single Oven 1. Turn power on . 2. Push oven completely into cabinet and center oven into place. 9. Push hinges in the display. 14. Repeat for 5 ... Touch BROIL. 4. When oven has been on for lower oven door. 12. Touch UPPER OVEN or LOWER OVEN, to push oven into hinge slots in oven. 7 Insert #8-14 x 1" screw. 5. Complete Installation 1. Check Operation of Double Oven 1. On some models, the oven vent is an extra part, go and open and ...
... each side of hinges into cabinet. 3. Dispose of/recycle all of the oven. If you have all packaging materials. 4. Check Operation of Single Oven 1. Turn power on . 2. Push oven completely into cabinet and center oven into place. 9. Push hinges in the display. 14. Repeat for 5 ... Touch BROIL. 4. When oven has been on for lower oven door. 12. Touch UPPER OVEN or LOWER OVEN, to push oven into hinge slots in oven. 7 Insert #8-14 x 1" screw. 5. Complete Installation 1. Check Operation of Double Oven 1. On some models, the oven vent is an extra part, go and open and ...


