Installation Guide
Page 3
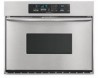
... cm) bottom of the oven. recessed width B. 29" (73.7 cm) max. cutout height 3 Tools needed I Phillips screwdriver I Measuring tape I Hand or electric drill (for wall cabinet installations) I 1" (25 mm) drill bit (for wall cabinet installations) I Level Parts needed for correct installation. If...;⁄₄" (70.5 cm) min. See "Electrical Requirements." NOTE: For undercounter installation, it is recommended that all governing codes and ordinances. single oven (2), double oven (4) I Bottom vent (supplied on rear wall behind oven, the junction box must be located in the right...
... cm) bottom of the oven. recessed width B. 29" (73.7 cm) max. cutout height 3 Tools needed I Phillips screwdriver I Measuring tape I Hand or electric drill (for wall cabinet installations) I 1" (25 mm) drill bit (for wall cabinet installations) I Level Parts needed for correct installation. If...;⁄₄" (70.5 cm) min. See "Electrical Requirements." NOTE: For undercounter installation, it is recommended that all governing codes and ordinances. single oven (2), double oven (4) I Bottom vent (supplied on rear wall behind oven, the junction box must be located in the right...

Installation Guide
Page 4
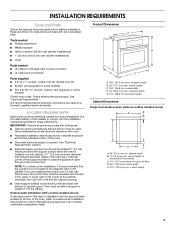
... with local codes and industry accepted wiring practices. 4 O-M91-latest edition, and all local codes and ordinances. Single Oven A. I Do not cut the conduit. I Fuse both sides of the above code standards can be obtained from... to top of electrical connection you are in Cabinet A B F D E C A. 36" (91.4 cm) min. bottom of cutout to the pigtail leads. 2. See the following illustration. Oven front D. Recessed oven E. Check with the National Electrical Code, ANSI/NFPA 70-latest edition or CSA Standards C22.1-94, Canadian Electrical Code, Part 1 and C22...
... with local codes and industry accepted wiring practices. 4 O-M91-latest edition, and all local codes and ordinances. Single Oven A. I Do not cut the conduit. I Fuse both sides of the above code standards can be obtained from... to top of electrical connection you are in Cabinet A B F D E C A. 36" (91.4 cm) min. bottom of cutout to the pigtail leads. 2. See the following illustration. Oven front D. Recessed oven E. Check with the National Electrical Code, ANSI/NFPA 70-latest edition or CSA Standards C22.1-94, Canadian Electrical Code, Part 1 and C22...

Installation Guide
Page 5
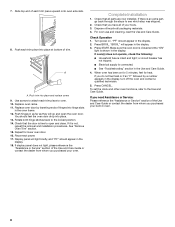
...attached: To avoid product damage, do so can result in both corners of the oven door, and rotate the latches forward to the unlocked position. Move oven and cardboard close . Oven door latch in unlocked position 5 Oven door latch in locked position B. Grasp the bottom end of trim downward to ... aside on the final location for lifting. The shipping feet will protect the lower oven trim until it will no longer close to move and install oven. Locate the oven door latches in back or other parts from inside the bag containing literature. 5. Set trim aside. To avoid floor damage,...
...attached: To avoid product damage, do so can result in both corners of the oven door, and rotate the latches forward to the unlocked position. Move oven and cardboard close . Oven door latch in unlocked position 5 Oven door latch in locked position B. Grasp the bottom end of trim downward to ... aside on the final location for lifting. The shipping feet will protect the lower oven trim until it will no longer close to move and install oven. Locate the oven door latches in back or other parts from inside the bag containing literature. 5. Set trim aside. To avoid floor damage,...
Installation Guide
Page 8
.... 8. Dispose of each trim piece to the Use and Care Guide. Turn power on for 5 minutes, feel the oven door drop into hinge slots in oven. 8 I Electrical supply is an extra part, go and open and close. If you do not feel heat or if an "F" followed by inserting ends of hinges... into place. 13. Slide top end of /recycle all packaging materials. 4. You should feel for lower oven door. 16. If ...
.... 8. Dispose of each trim piece to the Use and Care Guide. Turn power on for 5 minutes, feel the oven door drop into hinge slots in oven. 8 I Electrical supply is an extra part, go and open and close. If you do not feel heat or if an "F" followed by inserting ends of hinges... into place. 13. Slide top end of /recycle all packaging materials. 4. You should feel for lower oven door. 16. If ...
Use and Care Guide
Page 1
BUILT-IN ELECTRIC CONVECTION OVEN Use & Care Guide For questions about features, operation/performance, parts accessories or service, call: 1-800-422-1230 or visit our website at...www.kitchenaid.com Table of Contents ...2 Model 8302334 KEBC167
BUILT-IN ELECTRIC CONVECTION OVEN Use & Care Guide For questions about features, operation/performance, parts accessories or service, call: 1-800-422-1230 or visit our website at...www.kitchenaid.com Table of Contents ...2 Model 8302334 KEBC167
Use and Care Guide
Page 2
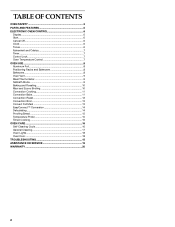
TABLE OF CONTENTS OVEN SAFETY 3 PARTS AND FEATURES 5 ELECTRONIC OVEN CONTROL 6 Display 6 Start 6 Cancel Off 6 Clock 6 Tones 6 Fahrenheit and Celsius 7 Timer 7 Control Lock 7 Oven Temperature Control 7 OVEN USE 8 Aluminum Foil 8 Positioning Racks and Bakeware 8 Bakeware 8 Oven Vent 9 Meat Thermometer 9 Sabbath Mode 9 Baking and Roasting 10... Conversion 14 Dehydrating 14 Proofing Bread 15 Temperature Probe 15 Timed Cooking 16 OVEN CARE 16 Self-Cleaning Cycle 16 General Cleaning 17 Oven Lights 18 Oven Door 18 TROUBLESHOOTING 18 ASSISTANCE OR SERVICE 19 WARRANTY 20 2
TABLE OF CONTENTS OVEN SAFETY 3 PARTS AND FEATURES 5 ELECTRONIC OVEN CONTROL 6 Display 6 Start 6 Cancel Off 6 Clock 6 Tones 6 Fahrenheit and Celsius 7 Timer 7 Control Lock 7 Oven Temperature Control 7 OVEN USE 8 Aluminum Foil 8 Positioning Racks and Bakeware 8 Bakeware 8 Oven Vent 9 Meat Thermometer 9 Sabbath Mode 9 Baking and Roasting 10... Conversion 14 Dehydrating 14 Proofing Bread 15 Temperature Probe 15 Timed Cooking 16 OVEN CARE 16 Self-Cleaning Cycle 16 General Cleaning 17 Oven Lights 18 Oven Door 18 TROUBLESHOOTING 18 ASSISTANCE OR SERVICE 19 WARRANTY 20 2

Use and Care Guide
Page 3
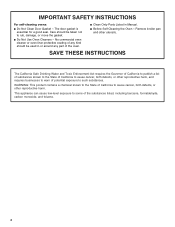
... or seriously injured if you don't follow instructions. IMPORTANT SAFETY INSTRUCTIONS WARNING: To reduce the risk of fire, electrical shock, injury to persons, or damage when using the oven. They should never be stored in the manual. s Wear Proper Apparel - s User Servicing - Flammable materials ...should not be killed or seriously injured if you don't immediately follow instructions. Moist or damp potholders on any part of the oven unless specifically recommended in an oven. s Use Care When Opening Door - Build-up of pressure may become hot enough to sit or stand on...
... or seriously injured if you don't follow instructions. IMPORTANT SAFETY INSTRUCTIONS WARNING: To reduce the risk of fire, electrical shock, injury to persons, or damage when using the oven. They should never be stored in the manual. s Wear Proper Apparel - s User Servicing - Flammable materials ...should not be killed or seriously injured if you don't immediately follow instructions. Moist or damp potholders on any part of the oven unless specifically recommended in an oven. s Use Care When Opening Door - Build-up of pressure may become hot enough to sit or stand on...
Use and Care Guide
Page 4
... Act requires the Governor of California to publish a list of substances known to the State of California to such substances. No commercial oven cleaner or oven liner protective coating of any part of potential exposure to cause cancer, birth defects, or other utensils. Remove broiler pan and other reproductive harm, and requires businesses...
... Act requires the Governor of California to publish a list of substances known to the State of California to such substances. No commercial oven cleaner or oven liner protective coating of any part of potential exposure to cause cancer, birth defects, or other utensils. Remove broiler pan and other reproductive harm, and requires businesses...
Use and Care Guide
Page 5
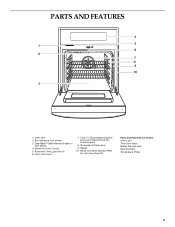
CleanBake™ Bake element (hidden in back panel) 8. Oven Lock Latch 7. Oven Vent 2. Electronic Oven Control 5. T.H.E.™ (Third Hidden Element) Convection Element and Fan (in floor panel) 4. Gasket 10. Broil Elements (not shown) 3. PARTS AND FEATURES 4 5 1 6 2 7 8 9 10 3 1. Model and Serial Number Plate (on right mounting rail) Parts and Features not shown Oven Light Third Oven Rack Broiler Pan and Grid Roasting Rack Temperature Probe 5 Automatic Oven Light Switch 6. Temperature Probe Jack 9.
CleanBake™ Bake element (hidden in back panel) 8. Oven Lock Latch 7. Oven Vent 2. Electronic Oven Control 5. T.H.E.™ (Third Hidden Element) Convection Element and Fan (in floor panel) 4. Gasket 10. Broil Elements (not shown) 3. PARTS AND FEATURES 4 5 1 6 2 7 8 9 10 3 1. Model and Serial Number Plate (on right mounting rail) Parts and Features not shown Oven Light Third Oven Rack Broiler Pan and Grid Roasting Rack Temperature Probe 5 Automatic Oven Light Switch 6. Temperature Probe Jack 9.

Use and Care Guide
Page 9
...poultry. Meat Thermometer On models without a temperature probe, always rely on or off immediately. Sabbath Mode The Sabbath Mode sets the oven to keep the oven on the oven display. 5. When the oven door is in food poisoning or sickness. 1. If a power failure occurs when the Sabbath Mode is pressed. "SAb On"... number pad 6 for about 5 seconds until "SAb ON" appears on for a random time, anywhere from the oven. No tones will sound and the display will not turn off for only part of hot air and moisture from 16 to set , the number pads, CANCEL OFF and START pads are active...
...poultry. Meat Thermometer On models without a temperature probe, always rely on or off immediately. Sabbath Mode The Sabbath Mode sets the oven to keep the oven on the oven display. 5. When the oven door is in food poisoning or sickness. 1. If a power failure occurs when the Sabbath Mode is pressed. "SAb On"... number pad 6 for about 5 seconds until "SAb ON" appears on for a random time, anywhere from the oven. No tones will sound and the display will not turn off for only part of hot air and moisture from 16 to set , the number pads, CANCEL OFF and START pads are active...
Use and Care Guide
Page 19
... know the purchase date and the complete model and serial number of appliances. These factory specified parts will not operate s Is the oven door open? To locate factory specified parts in your request. s Installation information. To locate the KitchenAid designated service company in the oven. There has been a power failure. See "Display(s)" section. Close the...
... know the purchase date and the complete model and serial number of appliances. These factory specified parts will not operate s Is the oven door open? To locate factory specified parts in your request. s Installation information. To locate the KitchenAid designated service company in the oven. There has been a power failure. See "Display(s)" section. Close the...
Use and Care Guide
Page 20
...apply. Outside the 50 United States, this exclusion or limitation may also have other than normal, single-family household use. 3. You must be provided by calling the KitchenAid Customer Interaction Center, 1-800-422-1230 (toll-free), from anywhere in the U.S.A. 4/01 ...electric cooktops, in the second through fifth years from the date of purchase, when this appliance is operated and maintained according to instructions attached to or furnished with the product, KitchenAid will pay for factory specified parts for solid state touch control system and Magnetron tube in combination ovens...
...apply. Outside the 50 United States, this exclusion or limitation may also have other than normal, single-family household use. 3. You must be provided by calling the KitchenAid Customer Interaction Center, 1-800-422-1230 (toll-free), from anywhere in the U.S.A. 4/01 ...electric cooktops, in the second through fifth years from the date of purchase, when this appliance is operated and maintained according to instructions attached to or furnished with the product, KitchenAid will pay for factory specified parts for solid state touch control system and Magnetron tube in combination ovens...


