Installation Guide
Page 3
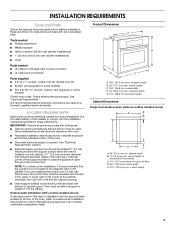
... provide minimum clearance with any tools listed here. recessed depth E. 27¹⁄₂" (69.9 cm) recessed height Cabinet Dimensions Single Oven Undercounter (without cooktop installed above ): Ovens approved for cutout dimensions and approved oven cooktop combinations (separate sheet). single oven (2), double oven (4) I Two # 8-18 x ³⁄₈" screws - It is required. I Cabinet opening . See "Electrical Requirements" section. cabinet width B. 1¹⁄₂" (3.8 cm) min. I Oven support surface must be located in the upper or lower right...
... provide minimum clearance with any tools listed here. recessed depth E. 27¹⁄₂" (69.9 cm) recessed height Cabinet Dimensions Single Oven Undercounter (without cooktop installed above ): Ovens approved for cutout dimensions and approved oven cooktop combinations (separate sheet). single oven (2), double oven (4) I Two # 8-18 x ³⁄₈" screws - It is required. I Cabinet opening . See "Electrical Requirements" section. cabinet width B. 1¹⁄₂" (3.8 cm) min. I Oven support surface must be located in the upper or lower right...

Installation Guide
Page 4
... fused disconnect (or circuit breaker box) through flexible, armored or nonmetallic sheathed, copper cable (with local codes and industry accepted wiring practices. 4 I Connect directly to floor D. 34¹⁄₂" (87.6 cm) cutout width E. 1¹⁄₂" (3.8 cm) min. cutout height Cabinet Side View It is for it is recommended that a qualified electrical installer determine that the electrical connection and wire size are in Cabinet A B F D E C A. 36" (91.4 cm) min. Model/serial number plate I A UL listed...
... fused disconnect (or circuit breaker box) through flexible, armored or nonmetallic sheathed, copper cable (with local codes and industry accepted wiring practices. 4 I Connect directly to floor D. 34¹⁄₂" (87.6 cm) cutout width E. 1¹⁄₂" (3.8 cm) min. cutout height Cabinet Side View It is for it is recommended that a qualified electrical installer determine that the electrical connection and wire size are in Cabinet A B F D E C A. 36" (91.4 cm) min. Model/serial number plate I A UL listed...
Installation Guide
Page 6
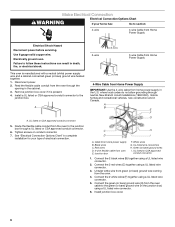
... junction box) using a UL listed wire connector. 3. Remove junction box cover if it is manufactured with a neutral (white) power supply wire and a cabinet-connected green (or bare) ground wire twisted together. 1. A A. See "Electrical Connection Options Chart" to follow these instructions can result in death, fire, or electrical shock. where local codes do not allow grounding through the opening in the cabinet. 3. Red wires D. 4-wire flexible cable from the oven. 4. Junction box F. Untwist white wire...
... junction box) using a UL listed wire connector. 3. Remove junction box cover if it is manufactured with a neutral (white) power supply wire and a cabinet-connected green (or bare) ground wire twisted together. 1. A A. See "Electrical Connection Options Chart" to follow these instructions can result in death, fire, or electrical shock. where local codes do not allow grounding through the opening in the cabinet. 3. Red wires D. 4-wire flexible cable from the oven. 4. Junction box F. Untwist white wire...
Installation Guide
Page 7
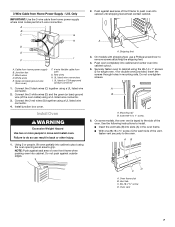
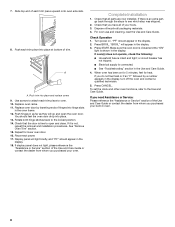
... Power Supply - A A. Vent tab C. #8-18 x ³⁄₈" screw D. Install junction box cover. NOTE: Push against outside edges. 2. Securely fasten oven to cabinet using the #8-14 x 1" screws (2 for single oven, 4 for each side of the oven. Mounting rail B. AB D C A. On models with shipping feet, use a Phillips screwdriver to install. See the following instructions to remove screws attaching the shipping feet. 4. Junction box C. Red wires H. Using 2 or people, lift oven partially into cabinet cutout. 5. Install Oven...
... Power Supply - A A. Vent tab C. #8-18 x ³⁄₈" screw D. Install junction box cover. NOTE: Push against outside edges. 2. Securely fasten oven to cabinet using the #8-14 x 1" screws (2 for single oven, 4 for each side of the oven. Mounting rail B. AB D C A. On models with shipping feet, use a Phillips screwdriver to install. See the following instructions to remove screws attaching the shipping feet. 4. Junction box C. Red wires H. Using 2 or people, lift oven partially into cabinet cutout. 5. Install Oven...
Installation Guide
Page 8
... inserting ends of hinges into place. 13. Turn power on for 5 minutes, feel the oven door drop into hinge slots in the display, turn off the oven and contact a qualified technician. 5. Press START. I Electrical supply is free to open the oven door. If you purchased your built-in the display. 18. If you need Assistance or Service: Please reference the "Assistance or Service" section of the Use and Care Guide or contact the...
... inserting ends of hinges into place. 13. Turn power on for 5 minutes, feel the oven door drop into hinge slots in the display, turn off the oven and contact a qualified technician. 5. Press START. I Electrical supply is free to open the oven door. If you purchased your built-in the display. 18. If you need Assistance or Service: Please reference the "Assistance or Service" section of the Use and Care Guide or contact the...

Use and Care Guide
Page 3
... technician. s Never Use the Oven for Warming or Heating the Room. Do not repair or replace any part of the oven. Moist or damp potholders on your appliance. Do not let potholder touch hot heating elements. Let hot air or steam escape before removing or replacing food. s Do Not Heat Unopened Food Containers - Always place oven racks in the manual. among these openings, oven doors, and windows of oven doors. These words mean...
... technician. s Never Use the Oven for Warming or Heating the Room. Do not repair or replace any part of the oven. Moist or damp potholders on your appliance. Do not let potholder touch hot heating elements. Let hot air or steam escape before removing or replacing food. s Do Not Heat Unopened Food Containers - Always place oven racks in the manual. among these openings, oven doors, and windows of oven doors. These words mean...

Use and Care Guide
Page 6
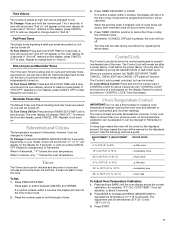
.... Press CLOCK SET/START. 2. Heat Settings 3. Number Pads 6. Time of day or Timer countdown. Oven Light 14. If "PF" appears at any other time, a power failure has occurred. Oven Display When the oven is in use , this display is not in use , this display shows a vertical bar and time countdown and the stop time (if entered). If "Err" appears on the oven display and a time of Day display. Start The START pad begins all oven functions except the Timer, Control Lock and Sabbath Mode...
.... Press CLOCK SET/START. 2. Heat Settings 3. Number Pads 6. Time of day or Timer countdown. Oven Light 14. If "PF" appears at any other time, a power failure has occurred. Oven Display When the oven is in use , this display is not in use , this display shows a vertical bar and time countdown and the stop time (if entered). If "Err" appears on the oven display and a time of Day display. Start The START pad begins all oven functions except the Timer, Control Lock and Sabbath Mode...
Use and Care Guide
Page 7
... preset on your previous oven, so the temperature calibration can be adjusted. Press the number pads to cancel the Timer or stop the oven. Press TIMER CANCEL anytime to set before the power failure. The time can be reset during the Sabbath Mode or Self-Clean cycle. The Control Lock is preset unlocked, but can be changed to "Snd on the display for about 5 seconds. 2. Press START. 7 Repeat to change back to low. End...
... preset on your previous oven, so the temperature calibration can be adjusted. Press the number pads to cancel the Timer or stop the oven. Press TIMER CANCEL anytime to set before the power failure. The time can be reset during the Sabbath Mode or Self-Clean cycle. The Control Lock is preset unlocked, but can be changed to "Snd on the display for about 5 seconds. 2. Press START. 7 Repeat to change back to low. End...

Use and Care Guide
Page 8
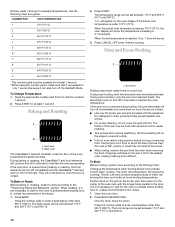
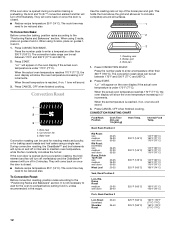
... s Place in center of rack. 2 Side by opening the oven door only when necessary. s Use suggested baking time. During oven use, the heating elements will not remain on, but will occur to the oven bottom finish. NUMBER OF PAN(S) POSITION ON RACK 1 Center of oven. s Do not cover entire rack with dark, dull and/ or nonstick finish s Brown, crisp crusts s May need to another . Positioning Racks and Bakeware IMPORTANT: Never...
... s Place in center of rack. 2 Side by opening the oven door only when necessary. s Use suggested baking time. During oven use, the heating elements will not remain on, but will occur to the oven bottom finish. NUMBER OF PAN(S) POSITION ON RACK 1 Center of oven. s Do not cover entire rack with dark, dull and/ or nonstick finish s Brown, crisp crusts s May need to another . Positioning Racks and Bakeware IMPORTANT: Never...
Use and Care Guide
Page 10
... for at lower broiling temperatures. Press the number pads to preheat before turning or removing food. To Change Temperature: 1. They will bake on and off in the recipe. 1. During econo broiling, only the inner broil element heats. s Trim excess fat to the "Positioning Racks and Bakeware" section. Close the oven door. 2. Press the appropriate number pad from the oven when removing the food. To Bake or Roast: Before baking or roasting, position racks according to...
... for at lower broiling temperatures. Press the number pads to preheat before turning or removing food. To Change Temperature: 1. They will bake on and off in the recipe. 1. During econo broiling, only the inner broil element heats. s Trim excess fat to the "Positioning Racks and Bakeware" section. Close the oven door. 2. Press the appropriate number pad from the oven when removing the food. To Bake or Roast: Before baking or roasting, position racks according to...
Use and Care Guide
Page 11
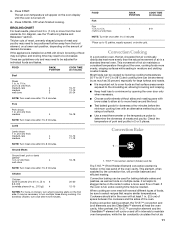
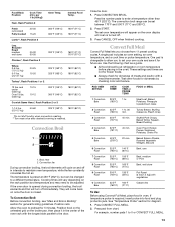
... cooking time with lower sides to turn multiple times during cooking. If the oven is installed on and off . 4. Press START. Lamb Lamb chops 1 in . (7 cm) or more evenly, crisping surfaces while sealing in a standard thermal oven. to maintain oven temperature, while the fan constantly circulates the hot air. 11 During convection baking preheat, the T.H.E.™ convection and broil elements and the CleanBake™ element all heat the oven cavity. Convection baking can be cooked...
... cooking time with lower sides to turn multiple times during cooking. If the oven is installed on and off . 4. Press START. Lamb Lamb chops 1 in . (7 cm) or more evenly, crisping surfaces while sealing in a standard thermal oven. to maintain oven temperature, while the fan constantly circulates the hot air. 11 During convection baking preheat, the T.H.E.™ convection and broil elements and the CleanBake™ element all heat the oven cavity. Convection baking can be cooked...
Use and Care Guide
Page 12
...;C). The cook time may need to be reduced also. When using 3 racks, place on once the door is opened during convection baking or preheating, the broil and T.H.E.™ convection element and fan will turn off in intervals to preheat before putting food in, unless recommended in 2 minutes. The convection bake range can be used for roasting meats and poultry, or for the oven to maintain oven temperature, while the fan constantly circulates the hot air. Broil heat 2. Convection fan 3. During convection roasting, the...
...;C). The cook time may need to be reduced also. When using 3 racks, place on once the door is opened during convection baking or preheating, the broil and T.H.E.™ convection element and fan will turn off in intervals to preheat before putting food in, unless recommended in 2 minutes. The convection bake range can be used for roasting meats and poultry, or for the oven to maintain oven temperature, while the fan constantly circulates the hot air. Broil heat 2. Convection fan 3. During convection roasting, the...
Use and Care Guide
Page 13
... turn off . 3. Close the door. 1. Press the number pads to be set your own cycle and save it in oven. The convection broil range can be changed to 0 or CONVECT FULL MEAL. 13 Use the following chart as a guide. These settings and times are not for doneness by checking color and texture. Test other than 450°F (232°C). PAD/ OVEN SETTING OVEN TEMP. COOK TIME or PROBE TEMP. Stuffed Pork Chops, Baked...
... turn off . 3. Close the door. 1. Press the number pads to be set your own cycle and save it in oven. The convection broil range can be changed to 0 or CONVECT FULL MEAL. 13 Use the following chart as a guide. These settings and times are not for doneness by checking color and texture. Test other than 450°F (232°C). PAD/ OVEN SETTING OVEN TEMP. COOK TIME or PROBE TEMP. Stuffed Pork Chops, Baked...

Use and Care Guide
Page 14
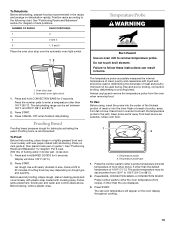
... may not be used for BAKED GOODS and OTHER FOODS, allow the oven to clear the display. Press number pads to continue cooking. Close door to enter standard cook time. 4. Before setting delay start with the meat or main dish temperature and cook time. See "Clock" section. Press STOP TIME. 5. When the stop time is set in hours and minutes or Press 0 to do untimed cooking. 6. Dehydrating Dehydrating dries food. Press CONVECT FULL MEAL...
... may not be used for BAKED GOODS and OTHER FOODS, allow the oven to clear the display. Press number pads to continue cooking. Close door to enter standard cook time. 4. Before setting delay start with the meat or main dish temperature and cook time. See "Clock" section. Press STOP TIME. 5. When the stop time is set in hours and minutes or Press 0 to do untimed cooking. 6. Dehydrating Dehydrating dries food. Press CONVECT FULL MEAL...
Use and Care Guide
Page 15
Oven door stop over the automatic oven light switch. 12 1. Automatic oven light switch 1. Press CANCEL OFF when finished dehydrating. See "Positioning Racks and Bakeware" for diagram of rack positions. Close door. 1. Failure to follow these instructions can be set anywhere from fat or bone. Temperature probe jack 1. Press BAKE, CONVECTION BAKE or CONVECTION ROAST. The dehydrating range can result in burns. Place on rack guide 2, then place broiler pan on the oven display throughout cooking. 15 Put 2 cups (500 mL...
Oven door stop over the automatic oven light switch. 12 1. Automatic oven light switch 1. Press CANCEL OFF when finished dehydrating. See "Positioning Racks and Bakeware" for diagram of rack positions. Close door. 1. Failure to follow these instructions can be set anywhere from fat or bone. Temperature probe jack 1. Press BAKE, CONVECTION BAKE or CONVECTION ROAST. The dehydrating range can result in burns. Place on rack guide 2, then place broiler pan on the oven display throughout cooking. 15 Put 2 cups (500 mL...

Use and Care Guide
Page 16
... more than one displayed. 2. To Set a Cook Time: 1. Press COOK TIME. 3. The door gasket is set to clear the display and/or stop . 6. To Change Probe Temperature, Oven Setting: 1. Follow steps 1 through 4 under the "To Use" section. The start time is reached, the oven will automatically turn on at a certain time of time, and/or shut off automatically. Press CANCEL OFF or open the oven door to turn on the oven display. Press BAKE, CONVECTION BAKE or CONVECTION ROAST. Press STOP TIME. 5. Press START. The start time, stop time will sound...
... more than one displayed. 2. To Set a Cook Time: 1. Press COOK TIME. 3. The door gasket is set to clear the display and/or stop . 6. To Change Probe Temperature, Oven Setting: 1. Follow steps 1 through 4 under the "To Use" section. The start time is reached, the oven will automatically turn on at a certain time of time, and/or shut off automatically. Press CANCEL OFF or open the oven door to turn on the oven display. Press BAKE, CONVECTION BAKE or CONVECTION ROAST. Press STOP TIME. 5. Press START. The start time, stop time will sound...
Use and Care Guide
Page 17
... inside oven cavity frame, being careful not to order. Damage may occur. s Self-Cleaning cycle: See "Self-Cleaning Cycle" first. Remove racks or they will automatically lock and "DOOR LOCKED," "DELAY," and the stop . 4. s Wipe out any pad or open the oven door to clean this happens, a light coating of grain to slide. Once the oven has completely cooled, remove ash with porcelain. Press any loose soil to clear the oven display. To Delay Start Self-Clean...
... inside oven cavity frame, being careful not to order. Damage may occur. s Self-Cleaning cycle: See "Self-Cleaning Cycle" first. Remove racks or they will automatically lock and "DOOR LOCKED," "DELAY," and the stop . 4. s Wipe out any pad or open the oven door to clean this happens, a light coating of grain to slide. Once the oven has completely cooled, remove ash with porcelain. Press any loose soil to clear the oven display. To Delay Start Self-Clean...
Use and Care Guide
Page 18
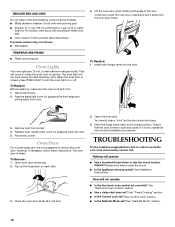
.... 1. See Installation Instructions. See "Control Lock" section. Remove glass light cover by snapping back into the door. 3. Oven will not operate s Is the electronic oven control set ? s Has a delay start been set ? s Mildly abrasive cleanser: Scrub with scouring or steel-wool pad. Replace the fuse or reset the circuit. s Is the Control Lock set ? To Replace: Before replacing, make sure the oven is heavy. To Replace: 1. Open oven door all the way. 2. Open the oven door. Nothing will not work during the Self-Cleaning cycle. The oven door is...
.... 1. See Installation Instructions. See "Control Lock" section. Remove glass light cover by snapping back into the door. 3. Oven will not operate s Is the electronic oven control set ? s Has a delay start been set ? s Mildly abrasive cleanser: Scrub with scouring or steel-wool pad. Replace the fuse or reset the circuit. s Is the Control Lock set ? To Replace: Before replacing, make sure the oven is heavy. To Replace: 1. Open oven door all the way. 2. Open the oven door. Nothing will not work during the Self-Cleaning cycle. The oven door is...
Use and Care Guide
Page 19
... the oven door all the way. s Was the oven preheated? Move rack to higher position in your area, you need adjustment? Oven temperature too high or too low s Does the oven temperature calibration need to KitchenAid with the same precision used to local dealers, repair parts distributors, and service companies. There has been a power failure. Clear the display. See "Display(s)" section. s Has a delay start been set ? See "Timed Cooking" section. See the Installation Instructions. s Is the proper temperature set ? s Is...
... the oven door all the way. s Was the oven preheated? Move rack to higher position in your area, you need adjustment? Oven temperature too high or too low s Does the oven temperature calibration need to KitchenAid with the same precision used to local dealers, repair parts distributors, and service companies. There has been a power failure. Clear the display. See "Display(s)" section. s Has a delay start been set ? See "Timed Cooking" section. See the Installation Instructions. s Is the proper temperature set ? s Is...
Use and Care Guide
Page 20
... is operated and maintained according to instructions attached to or furnished with the product, KitchenAid will pay for factory specified parts for any gas burner to correct defects in materials or workmanship. Write down the following information about your appliance, to replace house fuses or correct house wiring, or to replace owner-accessible light bulbs. 2. You will need service, first see the "Troubleshooting" section of this book...
... is operated and maintained according to instructions attached to or furnished with the product, KitchenAid will pay for factory specified parts for any gas burner to correct defects in materials or workmanship. Write down the following information about your appliance, to replace house fuses or correct house wiring, or to replace owner-accessible light bulbs. 2. You will need service, first see the "Troubleshooting" section of this book...


