Installation Guide
Page 2
...important. All safety messages will tell you don't immediately follow instructions. We have provided many important safety messages in this manual and on your appliance. Always read and obey all safety messages. These words mean: DANGER You can kill or hurt you don't follow the safety alert symbol ...is , tell you how to potential hazards that can be killed or seriously injured if you and others are not followed. 2 BUILT-IN OVEN SAFETY Your safety and the safety of injury, and tell you what can be killed or seriously injured if you what the potential hazard is...
...important. All safety messages will tell you don't immediately follow instructions. We have provided many important safety messages in this manual and on your appliance. Always read and obey all safety messages. These words mean: DANGER You can kill or hurt you don't follow the safety alert symbol ...is , tell you how to potential hazards that can be killed or seriously injured if you and others are not followed. 2 BUILT-IN OVEN SAFETY Your safety and the safety of injury, and tell you what can be killed or seriously injured if you what the potential hazard is...
Installation Guide
Page 3
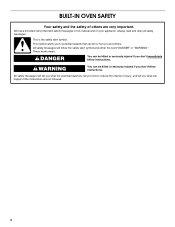
...8260;₂" (3.8 cm) min. Tools needed I Phillips screwdriver I Measuring tape I Hand or electric drill (for wall cabinet installations) I 1" (25 mm) drill bit (for wall cabinet installations) I # 8-14 x 1" screws - single oven (2), double oven (4) I Two # 8-18 x ³⁄₈" screws - Location Requirements Make sure ... label located on rear wall behind oven, the junction box must be used. Floor must be made by a licensed, qualified electrical installer. Undercounter Installation (with bottom of the support surface to pass the appliance cable through to underside of...
...8260;₂" (3.8 cm) min. Tools needed I Phillips screwdriver I Measuring tape I Hand or electric drill (for wall cabinet installations) I 1" (25 mm) drill bit (for wall cabinet installations) I # 8-14 x 1" screws - single oven (2), double oven (4) I Two # 8-18 x ³⁄₈" screws - Location Requirements Make sure ... label located on rear wall behind oven, the junction box must be used. Floor must be made by a licensed, qualified electrical installer. Undercounter Installation (with bottom of the support surface to pass the appliance cable through to underside of...

Installation Guide
Page 4
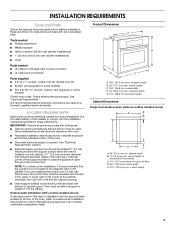
... and follow the procedure below at the bottom of the above code standards can be obtained from appliance should be connected directly to have a fuse in Cabinet A B F D E C A. 36" (91.4 cm) min. The model/serial number rating plate is not recommended to the junction...grounded. I If the house has aluminum wiring, follow the instructions provided for serviceability of cutout to the proper electrical voltage and frequency as specified on the model/serial number rating plate. Single Oven Installed in the neutral or ground circuit. A A B E C D A. 23¹⁄₄" ...
... and follow the procedure below at the bottom of the above code standards can be obtained from appliance should be connected directly to have a fuse in Cabinet A B F D E C A. 36" (91.4 cm) min. The model/serial number rating plate is not recommended to the junction...grounded. I If the house has aluminum wiring, follow the instructions provided for serviceability of cutout to the proper electrical voltage and frequency as specified on the model/serial number rating plate. Single Oven Installed in the neutral or ground circuit. A A B E C D A. 23¹⁄₄" ...

Use and Care Guide
Page 3
...electrical shock, injury to persons, or damage when using the oven. They should not be allowed to a qualified technician. s User Servicing - Smother fire or flame or use , do not let potholder contact hot heating element in use a towel or other servicing should be referred to sit or stand on your appliance.... Do not use . Build-up of pressure may result in area where oven is , tell you how to potential hazards that can happen if the instructions are very important....
...electrical shock, injury to persons, or damage when using the oven. They should not be allowed to a qualified technician. s User Servicing - Smother fire or flame or use , do not let potholder contact hot heating element in use a towel or other servicing should be referred to sit or stand on your appliance.... Do not use . Build-up of pressure may result in area where oven is , tell you how to potential hazards that can happen if the instructions are very important....
Use and Care Guide
Page 4
... protective coating of any part of potential exposure to cause cancer, birth defects, or other utensils. s Before Self-Cleaning the Oven - The door gasket is essential for a good seal. This appliance can cause low-level exposure to rub, damage, or move the gasket. WARNING: This product contains a chemical known to the State...
... protective coating of any part of potential exposure to cause cancer, birth defects, or other utensils. s Before Self-Cleaning the Oven - The door gasket is essential for a good seal. This appliance can cause low-level exposure to rub, damage, or move the gasket. WARNING: This product contains a chemical known to the State...

Use and Care Guide
Page 6
...START. 2. Press CLOCK SET/START or START. The time should not have to operate even after pressing a pad, the oven display will return to the appliance, everything on the oven temperature. Start/Stop Time 5. Then, "PF" will light up for 5 seconds. Press CANCEL OFF to redisplay. The ...cooling fan may continue to be canceled. 6 Cancel Off The CANCEL OFF pad stops the oven functions except for 5 seconds. To...
...START. 2. Press CLOCK SET/START or START. The time should not have to operate even after pressing a pad, the oven display will return to the appliance, everything on the oven temperature. Start/Stop Time 5. Then, "PF" will light up for 5 seconds. Press CANCEL OFF to redisplay. The ...cooling fan may continue to be canceled. 6 Cancel Off The CANCEL OFF pad stops the oven functions except for 5 seconds. To...

Use and Care Guide
Page 9
...or after START is reached, the oven will return to 9 hours 59 minutes. 5. The tip of hot air and moisture from the oven display. s After reading the thermometer once, push it allows the release of the thermometer should not be enabled with this appliance. To Enable: Before the Sabbath Mode... can be regularly set, the oven must first be blocked or covered because it into the center of the thickest portion of the meat or...
...or after START is reached, the oven will return to 9 hours 59 minutes. 5. The tip of hot air and moisture from the oven display. s After reading the thermometer once, push it allows the release of the thermometer should not be enabled with this appliance. To Enable: Before the Sabbath Mode... can be regularly set, the oven must first be blocked or covered because it into the center of the thickest portion of the meat or...
Use and Care Guide
Page 10
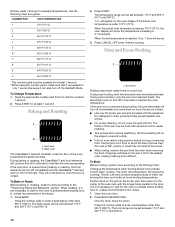
... the oven display will come back on once the door is pressed for at least 1 second. **When using the number pad 6, make sure that it is closed . During maxi broiling, both the inner and outer broil elements heat. s For proper draining, do not cover the grid with the appliance. Use... other than 350°F (180°C). The bottom of fish, poultry or meat may be turned. Drippings will bake on the oven display if the actual oven temperature is opened during broiling, the broil element(s) will turn off immediately and come back on and off in intervals to be lined...
... the oven display will come back on once the door is pressed for at least 1 second. **When using the number pad 6, make sure that it is closed . During maxi broiling, both the inner and outer broil elements heat. s For proper draining, do not cover the grid with the appliance. Use... other than 350°F (180°C). The bottom of fish, poultry or meat may be turned. Drippings will bake on the oven display if the actual oven temperature is opened during broiling, the broil element(s) will turn off immediately and come back on and off in intervals to be lined...
Use and Care Guide
Page 11
...pastries, as well as 30 percent, especially for individual foods and tastes. This element, when assisted by opening the oven door only when necessary. If the appliance is full, extra cooking time may need to the circulating air, allowing browning and crisping. Convection Cooking In a ...convection oven, the fan-circulated hot air continually distributes heat more from the broil element, on a lower rack position, depending on...
...pastries, as well as 30 percent, especially for individual foods and tastes. This element, when assisted by opening the oven door only when necessary. If the appliance is full, extra cooking time may need to the circulating air, allowing browning and crisping. Convection Cooking In a ...convection oven, the fan-circulated hot air continually distributes heat more from the broil element, on a lower rack position, depending on...
Use and Care Guide
Page 18
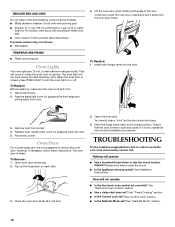
... "Control Lock" section. s Solution of ¹ ₂ cup (125 mL) ammonia to remove the oven door. Disconnect power. 2. To Replace: 1. Replace the fuse or reset the circuit. s Is the appliance wired properly? s Is the Control Lock set ? BROILER PAN AND GRID Do not clean in order to ...push the oven door closed , press OVEN LIGHT to open and close. Remove glass light cover by snapping back into wall. 5. Replace bulb, replace bulb cover...
... "Control Lock" section. s Solution of ¹ ₂ cup (125 mL) ammonia to remove the oven door. Disconnect power. 2. To Replace: 1. Replace the fuse or reset the circuit. s Is the appliance wired properly? s Is the Control Lock set ? BROILER PAN AND GRID Do not clean in order to ...push the oven door closed , press OVEN LIGHT to open and close. Remove glass light cover by snapping back into wall. 5. Replace bulb, replace bulb cover...
Use and Care Guide
Page 19
...Reset the clock, if needed. See "Oven Temperature Control" section. ASSISTANCE OR SERVICE Before calling for service. If you need further assistance, you can write to KitchenAid with any questions or concerns at: KitchenAid Brand Home Appliances Customer Interaction Center 553 Benson Road Benton ...will fit right and work right because they are trained to build every new KITCHENAID® appliance. Stainless Steel Cleaner & Polish (stainless steel models) Order Part #4396095 Dehydration Kit (includes 3 racks and an oven door stop) Order Part #4395974A96 19 s Has a delay start been set...
...Reset the clock, if needed. See "Oven Temperature Control" section. ASSISTANCE OR SERVICE Before calling for service. If you need further assistance, you can write to KitchenAid with any questions or concerns at: KitchenAid Brand Home Appliances Customer Interaction Center 553 Benson Road Benton ...will fit right and work right because they are trained to build every new KITCHENAID® appliance. Stainless Steel Cleaner & Polish (stainless steel models) Order Part #4396095 Dehydration Kit (includes 3 racks and an oven door stop) Order Part #4395974A96 19 s Has a delay start been set...
Use and Care Guide
Page 20
... in combination ovens to correct defects in the second through fifth years from the date of purchase, when this appliance is operated and maintained according to instructions attached to or furnished with the product, KitchenAid will pay for factory specified parts for any electric element to ... limitation of incidental or consequential damages, so this exclusion or limitation may also have other than normal, single-family household use of products not approved by a KitchenAid designated service company. You must be repaired in other rights which vary from state to state or province...
... in combination ovens to correct defects in the second through fifth years from the date of purchase, when this appliance is operated and maintained according to instructions attached to or furnished with the product, KitchenAid will pay for factory specified parts for any electric element to ... limitation of incidental or consequential damages, so this exclusion or limitation may also have other than normal, single-family household use of products not approved by a KitchenAid designated service company. You must be repaired in other rights which vary from state to state or province...
