Installation Guide
Page 2
... of others . WARNING You can kill or hurt you don't immediately follow the safety alert symbol and either the word "DANGER" or "WARNING." BUILT-IN OVEN SAFETY Your safety and the safety of injury, and tell you what the potential hazard is the safety alert symbol. We have provided many important...
... of others . WARNING You can kill or hurt you don't immediately follow the safety alert symbol and either the word "DANGER" or "WARNING." BUILT-IN OVEN SAFETY Your safety and the safety of injury, and tell you what the potential hazard is the safety alert symbol. We have provided many important...
Installation Guide
Page 3
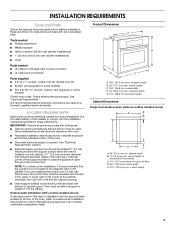
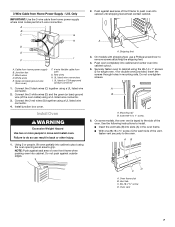
single oven (2), double oven (4) I Bottom vent (supplied on rear wall behind oven, the junction box must provide complete enclosure around the recessed portion of the cabinet; It is recommended that are installing the junction box on some models) Check local codes. IMPORTANT: Observe all electrical connections be located in a wall cabinet. I Electrical... electric drill (for wall cabinet installations) I Grounded electrical supply is the responsibility of cabinet cutout. bottom vent (supplied on the top of cutout to comply with cooktop installed above ) A B E D C A. 36"...
single oven (2), double oven (4) I Bottom vent (supplied on rear wall behind oven, the junction box must provide complete enclosure around the recessed portion of the cabinet; It is recommended that are installing the junction box on some models) Check local codes. IMPORTANT: Observe all electrical connections be located in a wall cabinet. I Electrical... electric drill (for wall cabinet installations) I Grounded electrical supply is the responsibility of cabinet cutout. bottom vent (supplied on the top of cutout to comply with cooktop installed above ) A B E D C A. 36"...

Installation Guide
Page 4
... below at the bottom of electrical connection you are not sure the oven is not recommended to ground to the proper electrical voltage and frequency as specified on the model/serial number rating plate. Single Oven Installed in the neutral or ground circuit. This oven must determine the type of ... cutout to top of cutout to the junction box. cabinet width B. 1" (2.5 cm) top of cutout to have a fuse in Cabinet A B F D E C A. 36" (91.4 cm) min. The model/serial number rating plate is not recommended to bottom of upper cabinet door C. 32" (81.3 cm) bottom of cabinet door...
... below at the bottom of electrical connection you are not sure the oven is not recommended to ground to the proper electrical voltage and frequency as specified on the model/serial number rating plate. Single Oven Installed in the neutral or ground circuit. This oven must determine the type of ... cutout to top of cutout to the junction box. cabinet width B. 1" (2.5 cm) top of cutout to have a fuse in Cabinet A B F D E C A. 36" (91.4 cm) min. The model/serial number rating plate is not recommended to bottom of upper cabinet door C. 32" (81.3 cm) bottom of cabinet door...

Installation Guide
Page 5
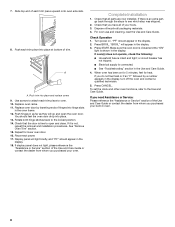
...position. Remove the shipping materials and tape from oven. Remove Oven Trim IMPORTANT: Use both hands and close the oven door until it will protect the lower oven trim until the oven is inserted into or severing wiring during installation. 3. Open the oven door. 2. Locate the oven door latches in locked position B. A A. ... Excessive Weight Hazard Use two or more people to do not remove the shipping feet at the front lower corners of the oven door with shipping feet attached: To avoid product damage, do so can result in unlocked position 5 To avoid floor damage, ...
...position. Remove the shipping materials and tape from oven. Remove Oven Trim IMPORTANT: Use both hands and close the oven door until it will protect the lower oven trim until the oven is inserted into or severing wiring during installation. 3. Open the oven door. 2. Locate the oven door latches in locked position B. A A. ... Excessive Weight Hazard Use two or more people to do not remove the shipping feet at the front lower corners of the oven door with shipping feet attached: To avoid product damage, do so can result in unlocked position 5 To avoid floor damage, ...
Installation Guide
Page 6
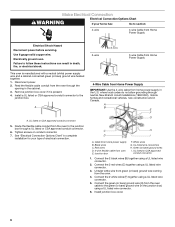
...Supply IMPORTANT: Use the 4-wire cable from home power supply in the U.S. Use 8 gauge solid copper wire. This oven is present. 4. See "Electrical Connection Options Chart" to complete installation for your home has: Go to the green (or bare) ground wire (in ...UL listed wire connector. 2. Black wires C. Feed the flexible cable conduit from Home Power Supply Electrical Shock Hazard Disconnect power before servicing. Junction box F. Cable from oven E. Electrically ground oven. Remove junction box cover if it is manufactured with a neutral (white) power supply wire and...
...Supply IMPORTANT: Use the 4-wire cable from home power supply in the U.S. Use 8 gauge solid copper wire. This oven is present. 4. See "Electrical Connection Options Chart" to complete installation for your home has: Go to the green (or bare) ground wire (in ...UL listed wire connector. 2. Black wires C. Feed the flexible cable conduit from Home Power Supply Electrical Shock Hazard Disconnect power before servicing. Junction box F. Cable from oven E. Electrically ground oven. Remove junction box cover if it is manufactured with a neutral (white) power supply wire and...
Installation Guide
Page 7
...(C) together using a UL listed wire connector. 4. Push against outside edges. 2. Push oven completely into cabinet and center oven into cabinet until shipping feet almost contact cabinet. I F A. I . Oven frame slot B. Oven vent 7 Cable from home power supply where local codes permit a 3-wire connection. UL...junction box cover. 3-Wire Cable from oven G. NOTE: Push against seal area of front frame to the side of the oven cable) using the #8-14 x 1" screws (2 for single oven, 4 for each side of the vent, fasten vent securely to the oven. White wires E. UL listed or CSA...
...(C) together using a UL listed wire connector. 4. Push against outside edges. 2. Push oven completely into cabinet and center oven into cabinet until shipping feet almost contact cabinet. I F A. I . Oven frame slot B. Oven vent 7 Cable from home power supply where local codes permit a 3-wire connection. UL...junction box cover. 3-Wire Cable from oven G. NOTE: Push against seal area of front frame to the side of the oven cable) using the #8-14 x 1" screws (2 for single oven, 4 for each side of the vent, fasten vent securely to the oven. White wires E. UL listed or CSA...
Installation Guide
Page 8
...procedures. Rotate both hinge latches back to the Use and Care Guide. Complete Installation 1. Turn power on for 5 minutes, feel for lower oven door. 16. If you need Assistance or Service: Please reference the "Assistance or Service" section of the Use and Care Guide or ... installed. Push trim into hinge slots in the display. If oven(s) does not operate, check the following: I Electrical supply is intact and tight; A A. If it is shown in the oven frame. 12. Repeat for heat. Reconnect power. 17. For oven use and cleaning, read the Use and Care Guide. I ...
...procedures. Rotate both hinge latches back to the Use and Care Guide. Complete Installation 1. Turn power on for 5 minutes, feel for lower oven door. 16. If you need Assistance or Service: Please reference the "Assistance or Service" section of the Use and Care Guide or ... installed. Push trim into hinge slots in the display. If oven(s) does not operate, check the following: I Electrical supply is intact and tight; A A. If it is shown in the oven frame. 12. Repeat for heat. Reconnect power. 17. For oven use and cleaning, read the Use and Care Guide. I ...
Use and Care Guide
Page 1
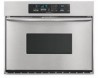
BUILT-IN ELECTRIC CONVECTION OVEN Use & Care Guide For questions about features, operation/performance, parts accessories or service, call: 1-800-422-1230 or visit our website at...www.kitchenaid.com Table of Contents ...2 Model 8302334 KEBC167
BUILT-IN ELECTRIC CONVECTION OVEN Use & Care Guide For questions about features, operation/performance, parts accessories or service, call: 1-800-422-1230 or visit our website at...www.kitchenaid.com Table of Contents ...2 Model 8302334 KEBC167
Use and Care Guide
Page 2
... Display 6 Start 6 Cancel Off 6 Clock 6 Tones 6 Fahrenheit and Celsius 7 Timer 7 Control Lock 7 Oven Temperature Control 7 OVEN USE 8 Aluminum Foil 8 Positioning Racks and Bakeware 8 Bakeware 8 Oven Vent 9 Meat Thermometer 9 Sabbath Mode 9 Baking and Roasting 10 Maxi and Econo Broiling 10 Convection Cooking 11 ... 13 EasyConvect™ Conversion 14 Dehydrating 14 Proofing Bread 15 Temperature Probe 15 Timed Cooking 16 OVEN CARE 16 Self-Cleaning Cycle 16 General Cleaning 17 Oven Lights 18 Oven Door 18 TROUBLESHOOTING 18 ASSISTANCE OR SERVICE 19 WARRANTY 20 2
... Display 6 Start 6 Cancel Off 6 Clock 6 Tones 6 Fahrenheit and Celsius 7 Timer 7 Control Lock 7 Oven Temperature Control 7 OVEN USE 8 Aluminum Foil 8 Positioning Racks and Bakeware 8 Bakeware 8 Oven Vent 9 Meat Thermometer 9 Sabbath Mode 9 Baking and Roasting 10 Maxi and Econo Broiling 10 Convection Cooking 11 ... 13 EasyConvect™ Conversion 14 Dehydrating 14 Proofing Bread 15 Temperature Probe 15 Timed Cooking 16 OVEN CARE 16 Self-Cleaning Cycle 16 General Cleaning 17 Oven Lights 18 Oven Door 18 TROUBLESHOOTING 18 ASSISTANCE OR SERVICE 19 WARRANTY 20 2

Use and Care Guide
Page 3
... hot air or steam escape before removing or replacing food. Heating elements may be stored in Oven - Interior surfaces of fire, electrical shock, injury to persons, or damage when using the oven. SAVE THESE INSTRUCTIONS 3 Always read and obey all safety messages. All other bulky cloth. ..."WARNING." These words mean: You can kill or hurt you what the potential hazard is properly installed and grounded by a qualified technician. OVEN SAFETY Your safety and the safety of pressure may cause container to burst and result in injury. s Use Care When Opening Door - s...
... hot air or steam escape before removing or replacing food. Heating elements may be stored in Oven - Interior surfaces of fire, electrical shock, injury to persons, or damage when using the oven. SAVE THESE INSTRUCTIONS 3 Always read and obey all safety messages. All other bulky cloth. ..."WARNING." These words mean: You can kill or hurt you what the potential hazard is properly installed and grounded by a qualified technician. OVEN SAFETY Your safety and the safety of pressure may cause container to burst and result in injury. s Use Care When Opening Door - s...
Use and Care Guide
Page 4
... be taken not to cause cancer, birth defects, or other utensils. s Before Self-Cleaning the Oven - This appliance can cause low-level exposure to cause cancer, birth defects, or other reproductive harm. No commercial oven cleaner or oven liner protective coating of any part of the substances listed, including benzene, formaldehyde, carbon monoxide...
... be taken not to cause cancer, birth defects, or other utensils. s Before Self-Cleaning the Oven - This appliance can cause low-level exposure to cause cancer, birth defects, or other reproductive harm. No commercial oven cleaner or oven liner protective coating of any part of the substances listed, including benzene, formaldehyde, carbon monoxide...
Use and Care Guide
Page 5
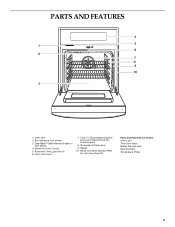
Electronic Oven Control 5. T.H.E.™ (Third Hidden Element) Convection Element and Fan (in floor panel) 4. Temperature Probe Jack 9. Model and Serial Number Plate (on right mounting rail) Parts and Features not shown Oven Light Third Oven Rack Broiler Pan and Grid Roasting Rack Temperature Probe 5 CleanBake™ Bake element (hidden in back panel) 8. Oven Lock Latch 7. PARTS AND FEATURES 4 5 1 6 2 7 8 9 10 3 1. Oven Vent 2. Automatic Oven Light Switch 6. Gasket 10. Broil Elements (not shown) 3.
Electronic Oven Control 5. T.H.E.™ (Third Hidden Element) Convection Element and Fan (in floor panel) 4. Temperature Probe Jack 9. Model and Serial Number Plate (on right mounting rail) Parts and Features not shown Oven Light Third Oven Rack Broiler Pan and Grid Roasting Rack Temperature Probe 5 CleanBake™ Bake element (hidden in back panel) 8. Oven Lock Latch 7. PARTS AND FEATURES 4 5 1 6 2 7 8 9 10 3 1. Oven Vent 2. Automatic Oven Light Switch 6. Gasket 10. Broil Elements (not shown) 3.

Use and Care Guide
Page 6
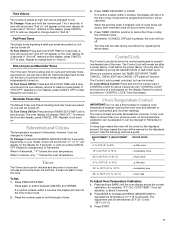
...Invalid pad press Four tones s End of -cycle tones The time should not have to inactive mode (blank) and the programmed function will be reset. Oven Display 4. EASYCONVECT™ Conversion 11. Clock 15. Time of Day, Timer Display This display shows the time of Day from Display: Press and hold...are off. 1. Press CLOCK SET/START or START. Press CANCEL OFF and reset the clock if needed. Control Lock 10 11 12 7. When the oven is not in use , this display shows a vertical bar and time countdown and the stop time (if entered). will appear on the displays will...
...Invalid pad press Four tones s End of -cycle tones The time should not have to inactive mode (blank) and the programmed function will be reset. Oven Display 4. EASYCONVECT™ Conversion 11. Clock 15. Time of Day, Timer Display This display shows the time of Day from Display: Press and hold...are off. 1. Press CLOCK SET/START or START. Press CANCEL OFF and reset the clock if needed. Control Lock 10 11 12 7. When the oven is not in use , this display shows a vertical bar and time countdown and the stop time (if entered). will appear on the displays will...
Use and Care Guide
Page 7
... control is during countdown by the displayed amount. The oven provides accurate temperatures; Press and hold STOP TIME for example, "0°F CAL COOK TEMP," if not yet adjusted, or about 5 seconds until a tone sounds. Pad Press Tones The single tones signaling a valid pad press are preset on, but... can be turned off " will appear on the display. A tone will return to the time of the oven. End-of-Cycle and Reminder Tones The Timer and Timed Cooking ...
... control is during countdown by the displayed amount. The oven provides accurate temperatures; Press and hold STOP TIME for example, "0°F CAL COOK TEMP," if not yet adjusted, or about 5 seconds until a tone sounds. Pad Press Tones The single tones signaling a valid pad press are preset on, but... can be turned off " will appear on the display. A tone will return to the time of the oven. End-of-Cycle and Reminder Tones The Timer and Timed Cooking ...

Use and Care Guide
Page 8
... 1 in. (2.5 cm) larger than the dish and that no bottom browning s Place in the bottom third of rack. 2 Side by opening the oven door only when necessary. Use the following chart as a guide. BAKEWARE/ RESULTS RECOMMENDATIONS Light colored aluminum s Light golden crusts s Even browning s Use...Always move racks with any type of some birds is installed on , but will occur to circulate. Allow 2 in center of space around bakeware and oven walls. Use the following chart as a guide. s To catch spills, place foil on . s Do not move birds to reduce baking temperatures 25&#...
... 1 in. (2.5 cm) larger than the dish and that no bottom browning s Place in the bottom third of rack. 2 Side by opening the oven door only when necessary. Use the following chart as a guide. BAKEWARE/ RESULTS RECOMMENDATIONS Light colored aluminum s Light golden crusts s Even browning s Use...Always move racks with any type of some birds is installed on , but will occur to circulate. Allow 2 in center of space around bakeware and oven walls. Use the following chart as a guide. s To catch spills, place foil on . s Do not move birds to reduce baking temperatures 25&#...

Use and Care Guide
Page 9
...seconds, after cooking. It may take up to the Sabbath Mode in . (1.25 cm) more than one -half hour for only part of poultry. Oven vent The oven vent should not touch fat, bone or gristle. Meat Thermometer On models without a temperature probe, always rely on or off . A timed Sabbath Mode..." will not show messages or temperature changes. "SAb OFF" will not turn on or off for about 5 seconds until "SAb ON" disappears from the oven. Press OVEN LIGHT to desired option. 2. Press BAKE. To turn on a meat thermometer to set between 170°F and 500°F (77°C and 260&#...
...seconds, after cooking. It may take up to the Sabbath Mode in . (1.25 cm) more than one -half hour for only part of poultry. Oven vent The oven vent should not touch fat, bone or gristle. Meat Thermometer On models without a temperature probe, always rely on or off . A timed Sabbath Mode..." will not show messages or temperature changes. "SAb OFF" will not turn on or off for about 5 seconds until "SAb ON" disappears from the oven. Press OVEN LIGHT to desired option. 2. Press BAKE. To turn on a meat thermometer to set between 170°F and 500°F (77°C and 260&#...
Use and Care Guide
Page 10
...176;F (77°C and 260°C). 10 Bake heat The CleanBake™ element is not necessary to wait for the oven to maintain the oven temperature. When roasting, it is opened during baking or roasting, the broil elements will turn off in intervals to preheat before ...pads to stop position before putting food in, unless recommended in the recipe. 1. During econo broiling, only the inner broil element heats. s Pull out oven rack to enter a temperature other than 500°F (260°C). Number pads 1 through 0 represent temperatures. To Change Temperature: 1. Broil heat 2. ...
...176;F (77°C and 260°C). 10 Bake heat The CleanBake™ element is not necessary to wait for the oven to maintain the oven temperature. When roasting, it is opened during baking or roasting, the broil elements will turn off in intervals to preheat before ...pads to stop position before putting food in, unless recommended in the recipe. 1. During econo broiling, only the inner broil element heats. s Pull out oven rack to enter a temperature other than 500°F (260°C). Number pads 1 through 0 represent temperatures. To Change Temperature: 1. Broil heat 2. ...
Use and Care Guide
Page 11
... goods for baking delicate cakes and pastries, as well as foods on multiple racks. Check the temperature of air in a standard thermal oven. T.H.E.™ Convection element (hidden) and fan The T.H.E.™ (Third Hidden Element) convection element is important not to 9 minutes. ... 9 minutes Chicken Chicken bone-in pieces (2 to 2¹⁄₂ in moisture and yielding crustier breads. Convection Cooking In a convection oven, the fan-circulated hot air continually distributes heat more evenly, crisping surfaces while sealing in ., [5 to turn when browning starts on and...
... goods for baking delicate cakes and pastries, as well as foods on multiple racks. Check the temperature of air in a standard thermal oven. T.H.E.™ Convection element (hidden) and fan The T.H.E.™ (Third Hidden Element) convection element is important not to 9 minutes. ... 9 minutes Chicken Chicken bone-in pieces (2 to 2¹⁄₂ in moisture and yielding crustier breads. Convection Cooking In a convection oven, the fan-circulated hot air continually distributes heat more evenly, crisping surfaces while sealing in ., [5 to turn when browning starts on and...
Use and Care Guide
Page 12
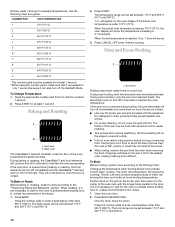
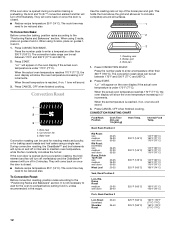
...oven temperature is not necessary to enter a temperature other than 300°F (150°C). CONVECTION ROASTING CHART Food/Rack Position Cook Time (min. The cook time may need to preheat before putting food in, unless recommended in intervals to the "Positioning Racks and Bakeware" section. When using a single...to circulate completely around all surfaces. 1 2 3 1. To Convection Bake: Before convection baking, position racks according to maintain oven temperature, while the fan constantly circulates the hot air. Convection Roast 1 2 3 1. Press CONVECTION ROAST. They will ...
...oven temperature is not necessary to enter a temperature other than 300°F (150°C). CONVECTION ROASTING CHART Food/Rack Position Cook Time (min. The cook time may need to preheat before putting food in, unless recommended in intervals to the "Positioning Racks and Bakeware" section. When using a single...to circulate completely around all surfaces. 1 2 3 1. To Convection Bake: Before convection baking, position racks according to maintain oven temperature, while the fan constantly circulates the hot air. Convection Roast 1 2 3 1. Press CONVECTION ROAST. They will ...
Use and Care Guide
Page 13
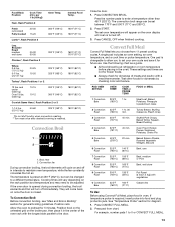
... broil elements will appear on the broiler pan, then place it for future use. Position food on the unheated grid on the oven display until oven is closed. Press CONVECTION BROIL. The convection broil range can be at 450°F (232°C), but can be adjusted. The... 350°F (177°C) 40 min. If temperature probe is reached. A single pad includes an oven setting, an oven temperature, and a cook time or probe temperature. Press pad from 11 preset cooking cycles. If the oven door is changeable to allow you choose from chart. Press the number pads to...
... broil elements will appear on the broiler pan, then place it for future use. Position food on the unheated grid on the oven display until oven is closed. Press CONVECTION BROIL. The convection broil range can be at 450°F (232°C), but can be adjusted. The... 350°F (177°C) 40 min. If temperature probe is reached. A single pad includes an oven setting, an oven temperature, and a cook time or probe temperature. Press pad from 11 preset cooking cycles. If the oven door is changeable to allow you choose from chart. Press the number pads to...


