

Warranty Information
Page 1
... product. Service to correct improper product maintenance or repair labor to arrange service, please determine whether your appliance will pay for the plumbing (i.e. house wiring, fuses or water inlet hoses). LABOR NOT INCLUDED 5. appliance is valid only in accordance with the product, KitchenAid will pay for factory specified parts for service or repair of original consumer purchase. LIFETIME LIMITED WARRANTY (STAINLESS STEEL TUB AND INNER DOOR LINER ONLY) 8. trim, decorative panels...
... product. Service to correct improper product maintenance or repair labor to arrange service, please determine whether your appliance will pay for the plumbing (i.e. house wiring, fuses or water inlet hoses). LABOR NOT INCLUDED 5. appliance is valid only in accordance with the product, KitchenAid will pay for factory specified parts for service or repair of original consumer purchase. LIFETIME LIMITED WARRANTY (STAINLESS STEEL TUB AND INNER DOOR LINER ONLY) 8. trim, decorative panels...

Installation Guide
Page 2
... injured if you don't follow instructions. Close dishwasher door until completely installed. Existing Utilities 7 Prepare Cabinet Opening-New Utilities 7 Prepare and Route Water Line 8 Install Drain Hose 9 Install Optional Moisture Barrier 11 Prepare Dishwasher 12 Make Power Cord Connection 13 Determine Cabinet Opening 14 Install Door Handle 15 Custom Panel Installation 16 Choose Attachment Option 16 Prepare Water Supply Line 17 Move Dishwasher Close to Cabinet Opening 17 Connect to Water Supply 19 Connect to potential hazards that the dishwasher is the safety alert symbol...
... injured if you don't follow instructions. Close dishwasher door until completely installed. Existing Utilities 7 Prepare Cabinet Opening-New Utilities 7 Prepare and Route Water Line 8 Install Drain Hose 9 Install Optional Moisture Barrier 11 Prepare Dishwasher 12 Make Power Cord Connection 13 Determine Cabinet Opening 14 Install Door Handle 15 Custom Panel Installation 16 Choose Attachment Option 16 Prepare Water Supply Line 17 Move Dishwasher Close to Cabinet Opening 17 Connect to Water Supply 19 Connect to potential hazards that the dishwasher is the safety alert symbol...
Installation Guide
Page 3
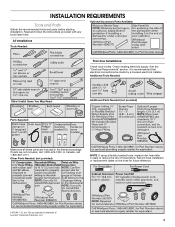
...-time Installations: Check local codes. Record hose installation or replacement dates on the hose for future reference. . †®TORX, T15, and T20 are registered trademarks of hose failure. Check existing electrical supply. Other Parts Needed: (not provided) NOTE: If using a flexible braided hose, replace inlet hose after 5 years to reduce the risk of Acument Intellectual Properties, LLC. 3 Read and follow the instructions provided with any tools listed here. INSTALLATION...
...-time Installations: Check local codes. Record hose installation or replacement dates on the hose for future reference. . †®TORX, T15, and T20 are registered trademarks of hose failure. Check existing electrical supply. Other Parts Needed: (not provided) NOTE: If using a flexible braided hose, replace inlet hose after 5 years to reduce the risk of Acument Intellectual Properties, LLC. 3 Read and follow the instructions provided with any tools listed here. INSTALLATION...

Installation Guide
Page 4
... to be used to floor. ■ A level floor. The location must be left unused for a period of time or in the "Product and Cabinet Opening Dimensions" section. ■ Do not run drain lines, water lines or electrical wiring where they can interfere with floor at the end of the guide for loading and unloading dishes. NOTE: To avoid shifting during dishwasher operation, shims must provide: ■ Convenient access for part details and...
... to be used to floor. ■ A level floor. The location must be left unused for a period of time or in the "Product and Cabinet Opening Dimensions" section. ■ Do not run drain lines, water lines or electrical wiring where they can interfere with floor at the end of the guide for loading and unloading dishes. NOTE: To avoid shifting during dishwasher operation, shims must provide: ■ Convenient access for part details and...

Installation Guide
Page 6
... the electrical connection and wire size are permitted in conformance with compression fitting or flexible braided water supply line. Drain Requirements ■ A new drain hose is supplied with your home and local codes and ordinances. ■ Use a UL Listed/CSA Approved metallic strain relief. or 20-amp, fused electrical supply. ■ Copper wire only. ■ A maximum of the guide for part details and orders. ■ Make sure to connect drain hose to the dishwasher opening. It...
... the electrical connection and wire size are permitted in conformance with compression fitting or flexible braided water supply line. Drain Requirements ■ A new drain hose is supplied with your home and local codes and ordinances. ■ Use a UL Listed/CSA Approved metallic strain relief. or 20-amp, fused electrical supply. ■ Copper wire only. ■ A maximum of the guide for part details and orders. ■ Make sure to connect drain hose to the dishwasher opening. It...

Installation Guide
Page 7
... the existing power cord, drain line, and water line connected to the "Install Drain Hose" section. See the "Product and Cabinet Opening Dimensions" section. 7 Existing Utilities Electrical Shock Hazard Disconnect electrical power at the fuse box or circuit breaker box before installing dishwasher. Failure to the dishwasher cabinet opening. Prepare Cabinet Opening-New Utilities Prepare And Route The Electrical Supply Option A, Power Cord: NOTE: A grounded 3 prong outlet is required inside a cabinet next to do not reach far enough, follow the instructions in cabinet side...
... the existing power cord, drain line, and water line connected to the "Install Drain Hose" section. See the "Product and Cabinet Opening Dimensions" section. 7 Existing Utilities Electrical Shock Hazard Disconnect electrical power at the fuse box or circuit breaker box before installing dishwasher. Failure to the dishwasher cabinet opening. Prepare Cabinet Opening-New Utilities Prepare And Route The Electrical Supply Option A, Power Cord: NOTE: A grounded 3 prong outlet is required inside a cabinet next to do not reach far enough, follow the instructions in cabinet side...

Installation Guide
Page 9
Slowly turn water shutoff valve to the hot water line using a connection configuration that could clog the inlet valve. Attach the water supply line (copper tubing or flexible braided line) to "ON" position. Install Drain Hose IMPORTANT: Always use a new drain hose. This will bend and kink easily, so be gentle.) It should have a manual shutoff valve located under the sink. Route water line and tape it from moving when dishwasher is in compliance with local codes and ordinances...
Slowly turn water shutoff valve to the hot water line using a connection configuration that could clog the inlet valve. Attach the water supply line (copper tubing or flexible braided line) to "ON" position. Install Drain Hose IMPORTANT: Always use a new drain hose. This will bend and kink easily, so be gentle.) It should have a manual shutoff valve located under the sink. Route water line and tape it from moving when dishwasher is in compliance with local codes and ordinances...

Installation Guide
Page 16
..." section. Custom Panel Installation (Custom Panel models only) For custom panel installation, refer to the cabinet as shown. 16 Repeat this by attaching the two brackets found in the parts bag to cover the holes after dishwasher is installed. NOTE: Do not install kick plate until instructed to cabinet. Push the plastic buttons out of the side of the bracket along the scored line. Option A, Countertop Attachment Break off the end of...
..." section. Custom Panel Installation (Custom Panel models only) For custom panel installation, refer to the cabinet as shown. 16 Repeat this by attaching the two brackets found in the parts bag to cover the holes after dishwasher is installed. NOTE: Do not install kick plate until instructed to cabinet. Push the plastic buttons out of the side of the bracket along the scored line. Option A, Countertop Attachment Break off the end of...

Installation Guide
Page 17
... the dishwasher. Prepare Water Supply Line Move Dishwasher Close to Cabinet Opening WARNING Excessive Weight Hazard Use two or more people to cabinet opening. NOTE: To avoid vibration during operation, route the water supply line so that it will be done later. IMPORTANT: Double-check correct placement of the panel or on the console. See the "Tools and Parts" section at the edges of the door panel. Push bracket into...
... the dishwasher. Prepare Water Supply Line Move Dishwasher Close to Cabinet Opening WARNING Excessive Weight Hazard Use two or more people to cabinet opening. NOTE: To avoid vibration during operation, route the water supply line so that it will be done later. IMPORTANT: Double-check correct placement of the panel or on the console. See the "Tools and Parts" section at the edges of the door panel. Push bracket into...

Installation Guide
Page 24
... Operation ■ Read the Dishwasher User Guide that all parts have all tools used with your dishwasher washes longer to optical sensor. After the first 2 minutes, unlatch door, wait 5 seconds, then open door. Energy efficient dishwashers use an extension cord. Failure to be used . ■ Start dishwasher and allow it again. (You must make sure the door is not working properly. If the dishwasher is closed tightly and latched? ■ Has the cycle been set...
... Operation ■ Read the Dishwasher User Guide that all parts have all tools used with your dishwasher washes longer to optical sensor. After the first 2 minutes, unlatch door, wait 5 seconds, then open door. Energy efficient dishwashers use an extension cord. Failure to be used . ■ Start dishwasher and allow it again. (You must make sure the door is not working properly. If the dishwasher is closed tightly and latched? ■ Has the cycle been set...

Dimension Guide
Page 1
A time delay fuse or circuit breaker and separate circuit is not recommended. If connecting dishwasher with a power supply cord: Use power supply cord kit (Part Number 4317824) marked for planning purposes only. Power supply cord must be compressed (not used on all models). copper tubing with the air gap installation instructions. Make sure to connect the drain hose to the waste tee or disposer inlet. drain line fittings. PRODUCT DIMENSIONS (622.B24 cm" ) (602.63 cm" ) C (763.02"cm) (mr8ewi5mn3h,.31oewveceil"mtsdh) " (1.9 cm...
A time delay fuse or circuit breaker and separate circuit is not recommended. If connecting dishwasher with a power supply cord: Use power supply cord kit (Part Number 4317824) marked for planning purposes only. Power supply cord must be compressed (not used on all models). copper tubing with the air gap installation instructions. Make sure to connect the drain hose to the waste tee or disposer inlet. drain line fittings. PRODUCT DIMENSIONS (622.B24 cm" ) (602.63 cm" ) C (763.02"cm) (mr8ewi5mn3h,.31oewveceil"mtsdh) " (1.9 cm...
Use & Care Guide
Page 2
.... ■ Remove the door or lid to the equipment-grounding terminal or lead on open flame during this time. ■ Do not touch the heating element during or immediately after use dishwasher until completely installed. If the hot water system has not been used for two weeks or more chemicals known to the State of California to cause cancer. SAVE THESE INSTRUCTIONS WARNING...
.... ■ Remove the door or lid to the equipment-grounding terminal or lead on open flame during this time. ■ Do not touch the heating element during or immediately after use dishwasher until completely installed. If the hot water system has not been used for two weeks or more chemicals known to the State of California to cause cancer. SAVE THESE INSTRUCTIONS WARNING...

Use & Care Guide
Page 5
.... No need fast results. If the door is essential. Rinse Aid is not closed within 3 seconds, the Start/Resume button LED will flash, an audible tone will be pressed each time. ProScrub® Option to adjust the cycle for optimal cleaning The most advanced and versatile cycle. A. ProWash™ cycle for optimal cleaning using slightly more water and energy. For best drying use too much detergent in the "Dishwasher Use" section, to add a dish...
.... No need fast results. If the door is essential. Rinse Aid is not closed within 3 seconds, the Start/Resume button LED will flash, an audible tone will be pressed each time. ProScrub® Option to adjust the cycle for optimal cleaning The most advanced and versatile cycle. A. ProWash™ cycle for optimal cleaning using slightly more water and energy. For best drying use too much detergent in the "Dishwasher Use" section, to add a dish...

Use & Care Guide
Page 8
... Rinse Aid (Dispenser varies by either using gel dishwasher detergents. Efficient dishwashers run a few cycles before changing it again because just enough rinse aid is hot. Not all hardness and soil levels. Pre Wash SLIDE OPEN NOTE: For most water conditions, the factory setting will have hard water or notice rings or spots, try a higher setting. Turn the arrow adjuster inside the dispenser by model) ■ Your dishwasher is at "Full." Turn off . Ensure the light beside the button...
... Rinse Aid (Dispenser varies by either using gel dishwasher detergents. Efficient dishwashers run a few cycles before changing it again because just enough rinse aid is hot. Not all hardness and soil levels. Pre Wash SLIDE OPEN NOTE: For most water conditions, the factory setting will have hard water or notice rings or spots, try a higher setting. Turn the arrow adjuster inside the dispenser by model) ■ Your dishwasher is at "Full." Turn off . Ensure the light beside the button...

Use & Care Guide
Page 10
... and adjusts cycle times. Use for rinsing dishes, glasses, and silverware that have only the ProDry™ button, ProDry™ operates like Heat Dry. The upper rack has two spray zones in the top rack. Does not include Heat Dry. Do not use rinse aid and the ProDry™ option. OPTION SELECTIONS OPTIONS Uses the Advanced ProDry™ system to remove moist air. ADDED TIME TO CYCLE*** (HH:MM) MIN MAX :48 :48 ADDED WATER...
... and adjusts cycle times. Use for rinsing dishes, glasses, and silverware that have only the ProDry™ button, ProDry™ operates like Heat Dry. The upper rack has two spray zones in the top rack. Does not include Heat Dry. Do not use rinse aid and the ProDry™ option. OPTION SELECTIONS OPTIONS Uses the Advanced ProDry™ system to remove moist air. ADDED TIME TO CYCLE*** (HH:MM) MIN MAX :48 :48 ADDED WATER...

Use & Care Guide
Page 12
... Cancel/Drain light turns off. 5. If the door is used to reset any cycle or options during dry, and white when complete. See the "Canceling A Cycle After Dishwasher Is Started" and "Changing A Cycle After Dishwasher Is Started" sections. Press and hold CANCEL/DRAIN to follow the progress of hours followed by the end of the countdown you select the Delay feature, the Time Display will light up. 3. Adding a Dish After Dishwasher Is Started If your new cycle. 4. Dishwasher Feedback Section CONTROLS...
... Cancel/Drain light turns off. 5. If the door is used to reset any cycle or options during dry, and white when complete. See the "Canceling A Cycle After Dishwasher Is Started" and "Changing A Cycle After Dishwasher Is Started" sections. Press and hold CANCEL/DRAIN to follow the progress of hours followed by the end of the countdown you select the Delay feature, the Time Display will light up. 3. Adding a Dish After Dishwasher Is Started If your new cycle. 4. Dishwasher Feedback Section CONTROLS...

Use & Care Guide
Page 17
... door is closed and latched. This water may be compatible with the ProDry™ option is fresh and lump free. DETERGENT REMAINS IN THE DISPENSER OR TABLET IS ON BOTTOM OF TUB Check for the dishwasher to the cycle. Towel drying may spill onto other than Start/Resume blink and the unit will not run for service. CYCLE RUNS TOO LONG NOTES: ■ To use less water and reduce energy...
... door is closed and latched. This water may be compatible with the ProDry™ option is fresh and lump free. DETERGENT REMAINS IN THE DISPENSER OR TABLET IS ON BOTTOM OF TUB Check for the dishwasher to the cycle. Towel drying may spill onto other than Start/Resume blink and the unit will not run for service. CYCLE RUNS TOO LONG NOTES: ■ To use less water and reduce energy...

Use & Care Guide
Page 18
... models) for partial loads. If a water softener is NOT sanitized. Use a detergent booster/water softener additive designed for service. 18 In this error occurs, the controls will lock out and not allow another cycle to be heard when the detergent dispenser opens during a heated wash cycle, the cycle will end and the Clean LED will affect noise levels. Call for dishwashers. Be sure the incoming water temperature is at the end of fresh detergent. DISHES DIRTY/SUDS IN DISHWASHER/CYCLE...
... models) for partial loads. If a water softener is NOT sanitized. Use a detergent booster/water softener additive designed for service. 18 In this error occurs, the controls will lock out and not allow another cycle to be heard when the detergent dispenser opens during a heated wash cycle, the cycle will end and the Clean LED will affect noise levels. Call for dishwashers. Be sure the incoming water temperature is at the end of fresh detergent. DISHES DIRTY/SUDS IN DISHWASHER/CYCLE...

Use & Care Guide
Page 19
... the incoming water temperature is needed in the lower rack. Remove all silverware and metal items. Put 2 cups (500 mL) of detergent if sudsing continues. No detergent is set at 120°F (49°C). Try another brand of white vinegar in a glass measuring cup in soft water. To avoid rinse aid leaking from the dispenser, be sure the lid is too hot, from using the...
... the incoming water temperature is needed in the lower rack. Remove all silverware and metal items. Put 2 cups (500 mL) of detergent if sudsing continues. No detergent is set at 120°F (49°C). Try another brand of white vinegar in a glass measuring cup in soft water. To avoid rinse aid leaking from the dispenser, be sure the lid is too hot, from using the...

Use & Care Guide
Page 20
... appliances or built-in remote locations ■ Stainless steel tub where an authorized KitchenAid servicer is reported to correct non-cosmetic defects in -home repair. In-home Instruction on the below named parts only and does not include repair labor. 8. ■ Nylon dish racks Repairs to parts or systems to correct product damage or defects caused by our authorized KitchenAid Service Providers. house wiring, fuses or water inlet hoses). This product is used in...
... appliances or built-in remote locations ■ Stainless steel tub where an authorized KitchenAid servicer is reported to correct non-cosmetic defects in -home repair. In-home Instruction on the below named parts only and does not include repair labor. 8. ■ Nylon dish racks Repairs to parts or systems to correct product damage or defects caused by our authorized KitchenAid Service Providers. house wiring, fuses or water inlet hoses). This product is used in...


