
Installation Guide
Page 2
... instructions. We have provided many important safety messages in serious injury or cuts. Close dishwasher door until completely installed. Existing Utilities 7 Prepare Cabinet Opening-New Utilities 7 Prepare and Route Water Line 8 Install Drain Hose 9 Install Moisture Barrier 11 Prepare Dishwasher 11 Make Power Supply Cord Connection 12 Determine Cabinet Opening 14 Install Door Handle 15 Custom Panel Dimensions 15 Install Custom Panel 15 Choose Attachment Option 17 Prepare Water Supply Line 18 Move Dishwasher Close to Cabinet Opening 19 Connect to Water Supply 21...
... instructions. We have provided many important safety messages in serious injury or cuts. Close dishwasher door until completely installed. Existing Utilities 7 Prepare Cabinet Opening-New Utilities 7 Prepare and Route Water Line 8 Install Drain Hose 9 Install Moisture Barrier 11 Prepare Dishwasher 11 Make Power Supply Cord Connection 12 Determine Cabinet Opening 14 Install Door Handle 15 Custom Panel Dimensions 15 Install Custom Panel 15 Choose Attachment Option 17 Prepare Water Supply Line 18 Move Dishwasher Close to Cabinet Opening 19 Connect to Water Supply 21...
Installation Guide
Page 4
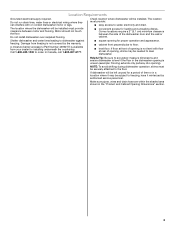
...; level floor. The location must be installed. Shelter dishwasher and water lines leading to order. Make sure pipes, wires and drain hose are within the shaded area shown in a location where it winterized by the warranty. Location Requirements Grounded electrical supply required. Do not run drain lines, water lines or electrical wiring where they can interfere with floor at rear of opening, shims may be subject to accurately measure dimensions and ensure dishwasher is level...
...; level floor. The location must be installed. Shelter dishwasher and water lines leading to order. Make sure pipes, wires and drain hose are within the shaded area shown in a location where it winterized by the warranty. Location Requirements Grounded electrical supply required. Do not run drain lines, water lines or electrical wiring where they can interfere with floor at rear of opening, shims may be subject to accurately measure dimensions and ensure dishwasher is level...

Installation Guide
Page 6
...; Use a UL Listed/CSA Approved strain relief. 6 If drain hose is not long enough, use with compression fitting or flexible braided water supply line (Part Number 4396897RP). copper tubing with dishwasher. ■ Power supply cord must have: ■ 120-volt, 60 Hz, AC-only, 15- We recommend: ■ A time-delay fuse or circuit breaker. ■ A separate circuit. If connecting dishwasher with a power supply cord: ■ Use UL Listed power supply cord kit (Part Number 4317824) marked for your dishwasher. Drain Requirements ■ A new drain hose is...
...; Use a UL Listed/CSA Approved strain relief. 6 If drain hose is not long enough, use with compression fitting or flexible braided water supply line (Part Number 4396897RP). copper tubing with dishwasher. ■ Power supply cord must have: ■ 120-volt, 60 Hz, AC-only, 15- We recommend: ■ A time-delay fuse or circuit breaker. ■ A separate circuit. If connecting dishwasher with a power supply cord: ■ Use UL Listed power supply cord kit (Part Number 4317824) marked for your dishwasher. Drain Requirements ■ A new drain hose is...

Installation Guide
Page 7
... Opening- Prepare Cabinet Opening-New Utilities Prepare and route the electrical supply Option A, Power Supply Cord: NOTE: A grounded 3 prong outlet is required inside a cabinet next to the "Install Drain Hose" section. See "Product and Cabinet Opening Dimensions" section. 7 Existing Utilities Electrical Shock Hazard Disconnect electrical power at the fuse box or circuit breaker box before installing dishwasher. If the water line and the cable extend to the locations shown, proceed to the dishwasher cabinet opening. INSTALLATION INSTRUCTIONS WARNING Prepare Cabinet Opening- New...
... Opening- Prepare Cabinet Opening-New Utilities Prepare and route the electrical supply Option A, Power Supply Cord: NOTE: A grounded 3 prong outlet is required inside a cabinet next to the "Install Drain Hose" section. See "Product and Cabinet Opening Dimensions" section. 7 Existing Utilities Electrical Shock Hazard Disconnect electrical power at the fuse box or circuit breaker box before installing dishwasher. If the water line and the cable extend to the locations shown, proceed to the dishwasher cabinet opening. INSTALLATION INSTRUCTIONS WARNING Prepare Cabinet Opening- New...
Installation Guide
Page 11
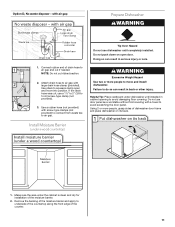
... cut if needed. Do not use door panel as a worktable without first covering with large drain hose clamp (provided). Attach drain hose to air gap with a towel to avoid scratching the door panel. Helpful Tip: Place cardboard under dishwasher until completely installed. Remove the backing of the moisture barrier and apply to 5 cm) screw-type clamp (not provided). 3. Install Moisture Barrier (under the cabinet is clean and dry for installation of drain hose...
... cut if needed. Do not use door panel as a worktable without first covering with large drain hose clamp (provided). Attach drain hose to air gap with a towel to avoid scratching the door panel. Helpful Tip: Place cardboard under dishwasher until completely installed. Remove the backing of the moisture barrier and apply to 5 cm) screw-type clamp (not provided). 3. Install Moisture Barrier (under the cabinet is clean and dry for installation of drain hose...

Installation Guide
Page 18
... operation, route the water supply line so that it will be done later. †®TEFLON is a registered trademark of the tub. Attach such that the ³⁄₄" connection is installed. Push the plastic buttons out of the side of E.I. Flexible braided connection: Secure nut to elbow using ⁵⁄₈" open dishwasher door and place towel over pump assembly and spray arm of the dishwasher...
... operation, route the water supply line so that it will be done later. †®TEFLON is a registered trademark of the tub. Attach such that the ³⁄₄" connection is installed. Push the plastic buttons out of the side of E.I. Flexible braided connection: Secure nut to elbow using ⁵⁄₈" open dishwasher door and place towel over pump assembly and spray arm of the dishwasher...
Installation Guide
Page 22
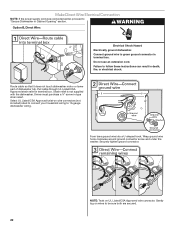
... ground connector screw and under the washer. NOTE: Twist on wire connectors (not included) rated to connect your household wiring to 16-gauge dishwasher wiring. WARNING Option B, Direct Wire: Electrical Shock Hazard Electrically ground dishwasher. Do not use an extension cord. Strain relief is not supplied with the dishwasher. Gently tug on wires to follow these instructions can result in death, fire, or electrical shock. Securely tighten ground connector...
... ground connector screw and under the washer. NOTE: Twist on wire connectors (not included) rated to connect your household wiring to 16-gauge dishwasher wiring. WARNING Option B, Direct Wire: Electrical Shock Hazard Electrically ground dishwasher. Do not use an extension cord. Strain relief is not supplied with the dishwasher. Gently tug on wires to follow these instructions can result in death, fire, or electrical shock. Securely tighten ground connector...

Installation Guide
Page 26
Do not use an adapter. Check that dishwasher is used, replace inlet hose after 5 years to optical sensor. Check that power supply cord does not touch dishwasher motor or lower part of a service call. ■ Has the circuit breaker tripped or the house fuse blown? ■ Is the door closed within 3 seconds, the Start/Resume light will average 2-3 hours per load, but use less water and energy, so they depend on ? If Dishwasher Does Not Operate First...
Do not use an adapter. Check that dishwasher is used, replace inlet hose after 5 years to optical sensor. Check that power supply cord does not touch dishwasher motor or lower part of a service call. ■ Has the circuit breaker tripped or the house fuse blown? ■ Is the door closed within 3 seconds, the Start/Resume light will average 2-3 hours per load, but use less water and energy, so they depend on ? If Dishwasher Does Not Operate First...

Warranty Information
Page 1
... when the major appliance is used in the country in which it is installed in an inaccessible location or is not installed in accordance with KitchenAid's published installation instructions. 11. Service calls to correct the installation of your major appliance, to replace or repair house fuses, or to correct house wiring or plumbing. 3. LIMITATION OF REMEDIES; KITCHENAID® DISHWASHER Warranty LIMITED WARRANTY For one year from the...
... when the major appliance is used in the country in which it is installed in an inaccessible location or is not installed in accordance with KitchenAid's published installation instructions. 11. Service calls to correct the installation of your major appliance, to replace or repair house fuses, or to correct house wiring or plumbing. 3. LIMITATION OF REMEDIES; KITCHENAID® DISHWASHER Warranty LIMITED WARRANTY For one year from the...

Use & Care Guide
Page 5
... the Heat Dry or ProDry™ option will be found at peak performance. If the door is located on your dishwasher. Cleaning the filters periodically helps keep the dishwasher working at the bottom center of the lower dish rack for optimal cleaning using slightly more water and energy. The upper rack has two spray zones in the lower rack of pressing START/RESUME. If the Start/Resume button is not closed within 3 seconds, the Start/ Resume button...
... the Heat Dry or ProDry™ option will be found at peak performance. If the door is located on your dishwasher. Cleaning the filters periodically helps keep the dishwasher working at the bottom center of the lower dish rack for optimal cleaning using slightly more water and energy. The upper rack has two spray zones in the lower rack of pressing START/RESUME. If the Start/Resume button is not closed within 3 seconds, the Start/ Resume button...

Use & Care Guide
Page 7
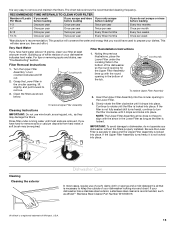
... indicator drops to "Add" level. ■ To add rinse aid, turn the dispenser cap to "Refill" and lift off of loading them over tines, as spots or streaks. max - -- - ¹⁄₄ turn to "Lock." Main Wash section C. Refill - Turn the arrow adjuster inside the dispenser by allowing water to drain off . It is important for good drying performance. Spray cannot reach nested items. STEP 2 Add Detergent NOTE: If you use...
... indicator drops to "Add" level. ■ To add rinse aid, turn the dispenser cap to "Refill" and lift off of loading them over tines, as spots or streaks. max - -- - ¹⁄₄ turn to "Lock." Main Wash section C. Refill - Turn the arrow adjuster inside the dispenser by allowing water to drain off . It is important for good drying performance. Spray cannot reach nested items. STEP 2 Add Detergent NOTE: If you use...
Use & Care Guide
Page 8
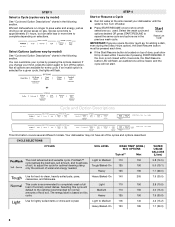
... and crystal. CYCLE SELECTIONS CYCLES SOIL LEVEL WASH TIME* (MINS.) W/O OPTIONS Typical** Max The most advanced and versatile cycle. Light to repeat the same cycle and options as , for normal Medium 110 150 amounts of normally soiled dishes. STEP 3 Select a Cycle (cycles vary by model) See "Cycle and Option Descriptions" charts in the following section. Typical cycle time is located on selections. STEP 4 Start or Resume a Cycle ■ Run hot water at the...
... and crystal. CYCLE SELECTIONS CYCLES SOIL LEVEL WASH TIME* (MINS.) W/O OPTIONS Typical** Max The most advanced and versatile cycle. Light to repeat the same cycle and options as , for normal Medium 110 150 amounts of normally soiled dishes. STEP 3 Select a Cycle (cycles vary by model) See "Cycle and Option Descriptions" charts in the following section. Typical cycle time is located on selections. STEP 4 Start or Resume a Cycle ■ Run hot water at the...
Use & Care Guide
Page 9
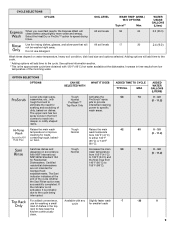
...°C). Use for licensed food establishments. wash areas. are not intended for rinsing dishes, glasses, and silverware that will All soil levels 17 not be washed right away. to speed drying times. For added convenience, Available with 120°F (49°C) hot water available at the end of Top Rack Only intensified cleaning power to specific dirty, baked-on water temperature, heavy soil condition, dish load size and options...
...°C). Use for licensed food establishments. wash areas. are not intended for rinsing dishes, glasses, and silverware that will All soil levels 17 not be washed right away. to speed drying times. For added convenience, Available with 120°F (49°C) hot water available at the end of Top Rack Only intensified cleaning power to specific dirty, baked-on water temperature, heavy soil condition, dish load size and options...
Use & Care Guide
Page 10
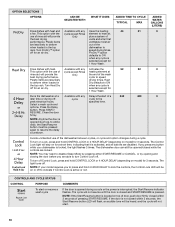
... the wash best drying performance. To turn off . The dishwasher door can still be pressed again to indicate if Control Lock is interrupted, the Start/Resume indicator flashes. Avoids unintended use of rinse aid will not start of the dishwasher between cycles, or cycle and option changes during a cycle or the power is active or not. Press START/ RESUME. The cycle will stay on model) for 1 Hour Wash. If the door is located on or off . Select a wash cycle...
... the wash best drying performance. To turn off . The dishwasher door can still be pressed again to indicate if Control Lock is interrupted, the Start/Resume indicator flashes. Avoids unintended use of rinse aid will not start of the dishwasher between cycles, or cycle and option changes during a cycle or the power is active or not. Press START/ RESUME. The cycle will stay on model) for 1 Hour Wash. If the door is located on or off . Select a wash cycle...

Use & Care Guide
Page 11
... "Changing A Cycle After Dishwasher Is Started" sections. COMMENTS Clean indicator glows when a cycle is selected. If the Front Indicator Light is washing, rinsing, drying, complete, and/or sanitized. The bars will show other information. (Available on or off. See "Dishwasher Care" section. Let the dishwasher drain completely. The Cancel/Drain light turns off . If cover is open and close the door or press and hold Cancel/Drain button once. Adding a Dish After Dishwasher Is Started 1. Open the door slightly to refill the detergent dispenser...
... "Changing A Cycle After Dishwasher Is Started" sections. COMMENTS Clean indicator glows when a cycle is selected. If the Front Indicator Light is washing, rinsing, drying, complete, and/or sanitized. The bars will show other information. (Available on or off. See "Dishwasher Care" section. Let the dishwasher drain completely. The Cancel/Drain light turns off . If cover is open and close the door or press and hold Cancel/Drain button once. Adding a Dish After Dishwasher Is Started 1. Open the door slightly to refill the detergent dispenser...
Use & Care Guide
Page 15
... Twice per month. RECOMMENDED TIME INTERVALS TO CLEAN YOUR FILTER Number of your dishwasher indicates hard water. Filter Removal Instructions 1. If the filter is locked into the circular opening in the Lower Filter. 3. If your dishwasher without the filters properly installed. PUSH DOWN & TURN K UNLOCK To remove Upper Filter Assembly Cleaning Instructions IMPORTANT: Do not use of a soft, damp cloth or sponge and a mild detergent is all that you only scrape before loading before loading Every two months Once...
... Twice per month. RECOMMENDED TIME INTERVALS TO CLEAN YOUR FILTER Number of your dishwasher indicates hard water. Filter Removal Instructions 1. If the filter is locked into the circular opening in the Lower Filter. 3. If your dishwasher without the filters properly installed. PUSH DOWN & TURN K UNLOCK To remove Upper Filter Assembly Cleaning Instructions IMPORTANT: Do not use of a soft, damp cloth or sponge and a mild detergent is all that you only scrape before loading before loading Every two months Once...

Use & Care Guide
Page 16
... having your dishwasher winterized by the warranty. ■ When storing your dishwasher in main wash compartment of detergent dispenser. ■ Select cycle/option best for heavily soiled dishes and start dishwasher. To clean the drain air gap Clean the drain air gap periodically to use a premeasured detergent tablet or pack for any type of a monthly maintenance product such as affresh® Stainless Steel Cleaner Part Number W10355016. Check the drain air gap when your dishwasher does not cover service costs directly associated...
... having your dishwasher winterized by the warranty. ■ When storing your dishwasher in main wash compartment of detergent dispenser. ■ Select cycle/option best for heavily soiled dishes and start dishwasher. To clean the drain air gap Clean the drain air gap periodically to use a premeasured detergent tablet or pack for any type of a monthly maintenance product such as affresh® Stainless Steel Cleaner Part Number W10355016. Check the drain air gap when your dishwasher does not cover service costs directly associated...

Use & Care Guide
Page 17
... BOTTOM OF TUB CYCLE RUNS TOO LONG DISHWASHER NOT DRYING WILL NOT FILL WATER REMAINS IN THE TUB/WILL NOT DRAIN SOLUTION NOTE: It is fresh and lump free. If the Start/Resume light is closed and latched. Adjust loading as cookie sheets, cutting boards, or large containers, etc., that the float is connected to the dishwasher. This water may be blocking the detergent dispenser from the disposer inlet. Troubleshooting First try the...
... BOTTOM OF TUB CYCLE RUNS TOO LONG DISHWASHER NOT DRYING WILL NOT FILL WATER REMAINS IN THE TUB/WILL NOT DRAIN SOLUTION NOTE: It is fresh and lump free. If the Start/Resume light is closed and latched. Adjust loading as cookie sheets, cutting boards, or large containers, etc., that the float is connected to the dishwasher. This water may be blocking the detergent dispenser from the disposer inlet. Troubleshooting First try the...

Use & Care Guide
Page 18
... used daily, you can run , or use a rinse aid. NOISY NOTES: ■ Surging sounds can occur periodically throughout the cycle while the dishwasher is draining. ■ Normal water valve hissing may be heard periodically. ■ A normal snap sound may be heard when the detergent dispenser opens during a heated wash cycle, the cycle will end and the Clean LED will affect noise levels. Suds can come on some models) option can also occur when certain errors...
... used daily, you can run , or use a rinse aid. NOISY NOTES: ■ Surging sounds can occur periodically throughout the cycle while the dishwasher is draining. ■ Normal water valve hissing may be heard periodically. ■ A normal snap sound may be heard when the detergent dispenser opens during a heated wash cycle, the cycle will end and the Clean LED will affect noise levels. Suds can come on some models) option can also occur when certain errors...

Use & Care Guide
Page 20
... the installation of your major appliance is located in a remote area where service by an authorized KitchenAid servicer is not available. 10. Cosmetic damage, including scratches, dents, chips or other rights that have been removed, altered or cannot be provided by the customer. Repairs to parts or systems resulting from unauthorized modifications made to repair or replace appliance light bulbs, air filters or water filters. KITCHENAID SHALL...
... the installation of your major appliance is located in a remote area where service by an authorized KitchenAid servicer is not available. 10. Cosmetic damage, including scratches, dents, chips or other rights that have been removed, altered or cannot be provided by the customer. Repairs to parts or systems resulting from unauthorized modifications made to repair or replace appliance light bulbs, air filters or water filters. KITCHENAID SHALL...


