KitchenAid KDTE204DSS Support Question
KitchenAid KDTE204DSS Support Question
Find answers below for this question about KitchenAid KDTE204DSS.Need a KitchenAid KDTE204DSS manual? We have 4 online manuals for this item!
Question posted by justwantanswers on January 15th, 2016
Brewing And Warming Temperature
how can i increase the brewing temperature and warming of the 14 cup Kitchenaide coffeemaker
Current Answers
Answer #1: Posted by TommyKervz on January 16th, 2016 4:14 AM
TommyKervz

Member since:
January 10th, 2013 Points: 17,776,813

Member since:
January 10th, 2013 Points: 17,776,813
Please refer on the Use & Care Guide on the link below for a possible option.
https://www.helpowl.com/manuals/KitchenAid/KDTE204DSS/216068
Related KitchenAid KDTE204DSS Manual Pages
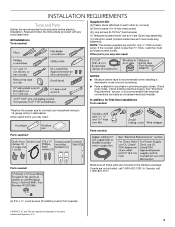
Installation Guide - Page 2

....
Existing Utilities 7 Prepare Cabinet Opening-New Utilities 7 Prepare and Route Water Line 8 Install Drain Hose 9 Install Moisture Barrier 11 Prepare Dishwasher 11 Make Power Supply Cord Connection 12
Determine Cabinet Opening 14 Install Door Handle 15 Custom Panel Dimensions 15 Install Custom Panel 15 Choose Attachment Option 17 Prepare Water Supply Line...
Installation Guide - Page 3
...-time installations Tools needed:
Parts supplied:
Parts needed:
Parts needed :
Supplied in dishwasher.
If the wooden panel is recommended that electrical connections be the proper size to ... you may also need :
NOTES: ■ Moisture barrier tape is recommended when installing a
dishwasher under a wood countertop.
■ Parts available for only ³⁄₄" thick wooden ...
Installation Guide - Page 4
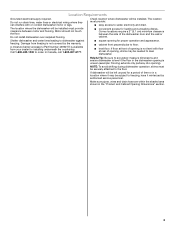
...lines or electrical wiring where they can interfere with floor at rear of opening ). Shelter dishwasher and water lines leading to the floor.
Damage from your dealer for proper operation and...in a location where it winterized by the warranty. Check location where dishwasher will be securely attached to dishwasher against freezing. Helpful Tip: Be sure to water, electricity and drain...
Installation Guide - Page 5

...(61 cm)
24" (61 cm)
E
Check that all surfaces have no protrusions that would prohibit dishwasher installation. D.
E. May be installed. Product and Cabinet Opening Dimensions
24¹⁄₂" (62.2 ...8324;" (15.9 cm)
2" (5.1 cm)
1³⁄₄" (4.4 cm)
5 For panel ready models, dishwasher depth is 28" (70 cm).
30" (76.2 cm)
33¹⁄₂" (85.1 cm) min....
Installation Guide - Page 6

...■ A time-delay fuse or circuit breaker.
■ A separate circuit. If connecting dishwasher with direct wiring: ■ Use flexible, armored or nonmetallic
sheathed, copper wire with grounding ... provided) will be verified by a licensed plumber.
■ 120°F (49°C) water at dishwasher O.D. Water Supply Requirements
■ A hot water line with a maximum length of 12 ft (3.7 m)...
Installation Guide - Page 7

...death or electrical shock. New Utilities" section. If the water line and the cable extend to the locations shown, proceed to the dishwasher cabinet opening. Drill a 1¹⁄₂" (3.8 cm) hole in the "Prepare Cabinet Opening- Prepare Cabinet Opening-New Utilities
... Shock Hazard Disconnect electrical power at the fuse box or circuit breaker box before installing dishwasher.
Installation Guide - Page 8

...in the cabinet side or rear.
Measure overall length of cabinet opening . Route cable from moving when dishwasher is moved into the cabinet opening ).
Drill a ¹⁄₂" (1.3 cm) hole in ...cabinet: Sand the hole until smooth. Option B, Direct Wire:
Helpful Tip: Wiring the dishwasher will prohibit cable from power supply through the left side of copper tubing for the water ...
Installation Guide - Page 9

... line through hole in area shown. Flush water into cabinet opening closest to connect it from moving when dishwasher is in area shown. If needed, drill a 1¹⁄₂" (3.8 cm) diameter hole in... into a shallow pan until clear to the floor in cabinet to the front center of the dishwasher. Slowly turn water shutoff valve to "OFF" position.
9 This will keep it to get ...
Installation Guide - Page 10
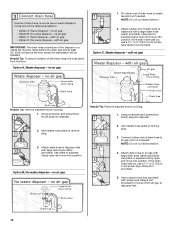
... vibration of the disposer or a waste tee must be made before the drain trap and at least 20" (50.8 cm) above the floor where the dishwasher will be installed. Using a hammer and screwdriver, knock plug into disposer.
2. NOTE: Do not cut ribbed section.
2.
with screw-type clamps (not provided) to connect...
Installation Guide - Page 11
... provided) to connect from waste tee to avoid scratching the door panel. NOTE: Do not cut if needed. If the drain hose was cut, use dishwasher until installed in back or other injury.
Failure to do so can result in serious injury or cuts. Make sure the area under a wood countertop...
Installation Guide - Page 12

...the plastic fasteners ¹⁄₄ turn counterclockwise to dishwasher. Option B, Remove Access Panel - Strain relief is provided with the installation of dishwasher tub. Do not remove tech sheet from access panel.... Route cord so that it does not touch dishwasher motor or lower part of your dishwasher. Make sure screw heads are facing to continue with the power...
Installation Guide - Page 13

... terminal of cover. Close cover ensuring wires are secured. Electrical Shock Hazard
Electrically ground dishwasher. NOTE: Do not pre-twist stranded wire.
Reattach and tighten the ground connector screw...to do so.
13 Twist on wire connector. Place wires inside box.
Visit www.kitchenaid.com/electrical under FAQ tab. Gently tug on wires to secure cover.
Insert tabs on...
Installation Guide - Page 14
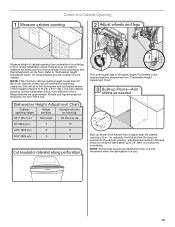
..." (86.4 cm), the rear wheels can be securely attached to floor to avoid movement when the dishwasher is in use.
14
Wheels and legs are approximate. Determine Cabinet Opening
Measure height of cabinet opening from "Dishwasher Height Adjustment Chart." Measurements are preset at the factory for example, the kitchen floor tile does not...
Installation Guide - Page 15

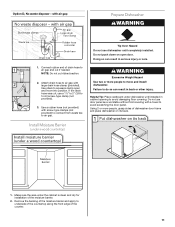
...8260;₄ turn past snug. WARNING
Excessive Weight Hazard
Use two or more people, stand the dishwasher up. Failure to do so can result in the handle. NOTE: Do not install kick plate... panel inside dotted line. It is for the screws heads to be made to move and install dishwasher.
Using 2 or more people to specific dimensions. NOTES: ■ The handle for the custom ...
Installation Guide - Page 26

... Guide for service contact information. Selecting certain options could increase cycle time past 3.5 hours. If you do this when adding a dish during the middle of the dishwasher tub.
Failure to reduce the risk of dishwasher tub. Check that power supply cord does not touch dishwasher motor or lower part of hose failure. Certain models...
Use & Care Guide - Page 9
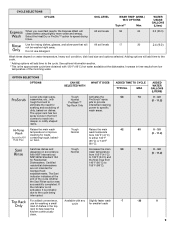
... continuously
clean. See options information section. **This is probably
due to
residential dishwashers
155°F (68°C). Increase in the top
rack to speed drying
times. are not intended for smaller loads
load of dishes in time results from low
temperature of the cycle whether
the Sani Rinse option was
successfully completed.
For...
Use & Care Guide - Page 11

...is not recommended.
4. Dishwasher Feedback Section
CONTROLS AND CYCLE STATUS
CONTROL
PURPOSE
The Cycle Status Indicator
Lights are able to add a dish to the required temperature. The light will ...count down the delay feature from the beginning using the following procedure.
2. Let the dishwasher drain completely. The Cancel/Drain light turns off .
If cover is selected.
To ...
Use & Care Guide - Page 16

... after cleaning the interior. NOTE: Recommended to ensure proper drainage of cleanser other than dishwasher detergent because it has cooled. Unscrew the plastic cap. Cleaning the interior
Hard water minerals can increase water pressure and damage your dishwasher is not draining well. OR See the vinegar rinse procedure in "Cloudy or spotted dishware...
Use & Care Guide - Page 18

... dishwashers once per month. (See "Cleaning Instructions" in the final rinse, or the temperature for your water heater is needed.
More detergent is loaded correctly. DISHES DIRTY/SUDS IN DISHWASHER/CYCLE... when the cycle has been interrupted by putting 2 cups (500 mL) of white vinegar in an upright glass measuring cup in the "Filtration System" section for details.)
Select...
Use & Care Guide - Page 19

...of detergent. See "Hard Water (White Residue On Dishwasher Interior Or Glassware)" in soft water. Be sure the incoming water temperature is level. Be sure dishwasher has been installed properly and is set at 120&#...detergent with the Heat Dry option turned off. Remove all silverware and metal
items. Put 2 cups (500 mL) of detergent if sudsing continues. This is an erosion of the surface of ...
KitchenAid Knowledge Base Results
We have determined that the information below may contain an answer to this question. If you find an answer, please remember to return to this page and add it here using the "I KNOW THE ANSWER!" button above. It's that easy to earn points!-
The water temperature is not correct - Top-load washer
... or just recently installed? Check that there are not any leaks. Turn the water back on some models) A warm/warm temperature selection provides a warm-water wash, a cold-water rinse and warm final sprays. To ensure a warm wash, run the water at dissolving detergent and washing clothes. Washing many loads in a short amount of time? You... -
Dispensing hot water from the espresso machine.
... take several seconds for water to turn the espresso machine on. Residual frothing steam may exit the nozzle before brewing. This provides a convenient way to dispense water. With the frothing arm pointed into a cup or pitcher containing other ingredients may take about 6 minutes. When the dessired amount of water has been dispensed... -
Coffee maker is showing an Error Code
...Maker. The electronic control of descaling KitchenAid coffeemaker. Press the On/Off button to descale a KitchenAid JavaStudio Coffeemaker. Try these recommendations if the brew timer display shows Err1, Err2, or Err3...Coffee Maker has been stored or used in a cool environment, warm the Coffee Maker to normal room temperature before doing this code cannot be a problem with the Coffee Maker...
Similar Questions

I Am Looking For The Thermal Fuse Location On My Kitchenaid Kdte204dss1
I am looking for the thermal fuse location on my KitchenAid KDTE204DSS. I haveremoved the front cove...
I am looking for the thermal fuse location on my KitchenAid KDTE204DSS. I haveremoved the front cove...
(Posted by larryhuck 4 years ago)

Cup Shelf Issues With Kdte204dss
The Cup Shelf Appears And Or Feels Like It Is Unstable On The Right Hand Side.is There A Way To Stab...
The Cup Shelf Appears And Or Feels Like It Is Unstable On The Right Hand Side.is There A Way To Stab...
(Posted by LYNNADAMS 9 years ago)

Connecting Drain Hose To My New Kitchenaid Dishwasher (w10579129a)
Instruction do not show diagram of the connection of drainage hose to the dishwasher. Just intereste...
Instruction do not show diagram of the connection of drainage hose to the dishwasher. Just intereste...
(Posted by jefftiemann 9 years ago)

Dishwasher Won't Restart After Opening.
I opened my dishwasher mid cycle and shut the door. It beeps and won't start. I reopened the door an...
I opened my dishwasher mid cycle and shut the door. It beeps and won't start. I reopened the door an...
(Posted by stellageorgoulis 10 years ago)

Cutting Insulation From Top Of A Kitchenaid Dishwasher
We are installing a KA dishwasher and it says to cut around the preforations of the insulation on th...
We are installing a KA dishwasher and it says to cut around the preforations of the insulation on th...
(Posted by bvoerg 10 years ago)