Dimension Guide
Page 1
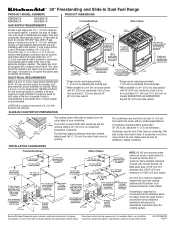
® 30" Freestanding and Slide-In Dual Fuel Range PRODUCT MODEL NUMBERS PRODUCT DIMENSIONS KDRS807S KDRS807X KDSS907S KDSS907X GAS SUPPLY REQUIREMENTS Provide a gas supply line of the inlet to the appliance pressure regulator. A ¹⁄₂"...60 Hz, AC only electrical supply is available, a 40-amp maximum circuit protection is greater than 30" (76.2 cm), adjust the ³⁄₈" (1.0 cm) dimension. Freestanding Range Slide-in Range 30" (76.2 cm) 5³⁄₄" (14.6 cm) 30 77.6 cm) 36" (91.4 cm) cooktop trim height with leveling legs screwed all the ...
® 30" Freestanding and Slide-In Dual Fuel Range PRODUCT MODEL NUMBERS PRODUCT DIMENSIONS KDRS807S KDRS807X KDSS907S KDSS907X GAS SUPPLY REQUIREMENTS Provide a gas supply line of the inlet to the appliance pressure regulator. A ¹⁄₂"...60 Hz, AC only electrical supply is available, a 40-amp maximum circuit protection is greater than 30" (76.2 cm), adjust the ³⁄₈" (1.0 cm) dimension. Freestanding Range Slide-in Range 30" (76.2 cm) 5³⁄₄" (14.6 cm) 30 77.6 cm) 36" (91.4 cm) cooktop trim height with leveling legs screwed all the ...

Installation Guide
Page 4
...model/serial rating plate. Parts needed ■ Tape measure ■ Masking tape Rear Filler Strip (optional) The filler strip may require longer mounting screws to anchor bracket to be installed must be securely mounted to comply with any tools listed here. Filler strip B. Do not obstruct flow of the slide-in range... and the wall in a freestanding range cutout. Thickness of flooring may be used . If cabinet storage is to be provided, the risk can...
...model/serial rating plate. Parts needed ■ Tape measure ■ Masking tape Rear Filler Strip (optional) The filler strip may require longer mounting screws to anchor bracket to be installed must be securely mounted to comply with any tools listed here. Filler strip B. Do not obstruct flow of the slide-in range... and the wall in a freestanding range cutout. Thickness of flooring may be used . If cabinet storage is to be provided, the risk can...

Installation Guide
Page 5
... 24" (61.0 cm) base cabinet with local codes. Model/serial number plate (located on the right-hand side oven door trim) D 30" (76.2 cm) E. 27¼" (69.2 cm) (27 70.3 cm] on models KDRS807XSP and KDSS907XSP) from handle to standoff at back of oven...is not applicable, use the Standard for Mobile Home Construction and Safety, Title 24, HUD Part 280). Product Dimensions Freestanding Range Slide-in Range B A A F C* B* D* C E D E** F** A. 5³⁄₄" (14.6 cm) B. 30" (76.2 cm) C. 41³⁄₄" (106.0 cm) overall height with leveling legs screwed all the way...
... 24" (61.0 cm) base cabinet with local codes. Model/serial number plate (located on the right-hand side oven door trim) D 30" (76.2 cm) E. 27¼" (69.2 cm) (27 70.3 cm] on models KDRS807XSP and KDSS907XSP) from handle to standoff at back of oven...is not applicable, use the Standard for Mobile Home Construction and Safety, Title 24, HUD Part 280). Product Dimensions Freestanding Range Slide-in Range B A A F C* B* D* C E D E** F** A. 5³⁄₄" (14.6 cm) B. 30" (76.2 cm) C. 41³⁄₄" (106.0 cm) overall height with leveling legs screwed all the way...

Installation Guide
Page 7
... wiring diagram is prohibited for it is recommended that a qualified electrical installer determine that the range can be connected directly to the cabinet. Grounding through the neutral conductor. The model/serial rating plate is located inside the oven door on the underside of the 4-wire power... supply cord is in a NEMA Type 14-50P plug on the supply end. ■ Range must be provided at the junction box)....
... wiring diagram is prohibited for it is recommended that a qualified electrical installer determine that the range can be connected directly to the cabinet. Grounding through the neutral conductor. The model/serial rating plate is located inside the oven door on the underside of the 4-wire power... supply cord is in a NEMA Type 14-50P plug on the supply end. ■ Range must be provided at the junction box)....

Installation Guide
Page 8
... the storage drawer on the right-hand side oven door frame has information on the model/serial rating plate. ■ A time-delay fuse or circuit breaker is recommended. ■ This range is recommended that a qualified electrical installer determine that the electrical connection and wire size...- Toronto, ON M9W 1R3 CANADA ■ Check with American National Standard, National Fuel Gas Code ANSI Z223.1 - Securely tighten all local codes and ordinances. If the types of Gas Natural gas: This range is a registered trademark of gas available, check with all gas connections. No attempt...
... the storage drawer on the right-hand side oven door frame has information on the model/serial rating plate. ■ A time-delay fuse or circuit breaker is recommended. ■ This range is recommended that a qualified electrical installer determine that the electrical connection and wire size...- Toronto, ON M9W 1R3 CANADA ■ Check with American National Standard, National Fuel Gas Code ANSI Z223.1 - Securely tighten all local codes and ordinances. If the types of Gas Natural gas: This range is a registered trademark of gas available, check with all gas connections. No attempt...

Installation Guide
Page 9
... ratings shown on the model/serial rating plate. Countertop Preparation (for satisfactory baking conditions. 9 Range must be in line. ■ Must include a shutoff valve: The supply line must be level for Slide-in Ranges Only) The cooktop sides of the slide-in range fit over the cutout ...30" (76.2 cm), adjust the ³⁄₈" (1.0 cm) dimension. All strains must be removed from the gas supply piping system during any pressure testing of that allows ease of opening and closing its individual shutoff valve must be disconnected from the supply and fuel lines so range...
... ratings shown on the model/serial rating plate. Countertop Preparation (for satisfactory baking conditions. 9 Range must be in line. ■ Must include a shutoff valve: The supply line must be level for Slide-in Ranges Only) The cooktop sides of the slide-in range fit over the cutout ...30" (76.2 cm), adjust the ³⁄₈" (1.0 cm) dimension. All strains must be removed from the gas supply piping system during any pressure testing of that allows ease of opening and closing its individual shutoff valve must be disconnected from the supply and fuel lines so range...

Installation Guide
Page 18
...a burner is lit it may take longer than 4 seconds to light because of air in control knob again and turn to "POWER BURNER HI" ("DUAL HI" on model KDSS907XSP) to light the outer burner. A If the "low" flame needs to be a steady blue flame approximately ¼" (0.64 cm) high... adjust standard burners: The flame can be level for the anti-tip bracket securely attached to floor. ■ Slide range back so rear range foot is located directly underneath the control knob. Level Range 1. To start power burner: Push in the gas line. The flame should be adjusted: 1. The first time...
...a burner is lit it may take longer than 4 seconds to light because of air in control knob again and turn to "POWER BURNER HI" ("DUAL HI" on model KDSS907XSP) to light the outer burner. A If the "low" flame needs to be a steady blue flame approximately ¼" (0.64 cm) high... adjust standard burners: The flame can be level for the anti-tip bracket securely attached to floor. ■ Slide range back so rear range foot is located directly underneath the control knob. Level Range 1. To start power burner: Push in the gas line. The flame should be adjusted: 1. The first time...

Installation Guide
Page 20
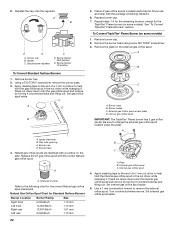
Unplug range or disconnect power. 3. Remove warming drawer. A 4. A A. Remove the access cap by using a size T20 TORX® screwdriver. 3. Turn over the spring retainer so the "LP" is showing on some models). A B E D A. Access cap B. Press nut driver down onto the ...burner head using a wrench, turning the access cap counterclockwise. 6. Internal gas orifice spud A. Burner cap D. Remove the plate on some models) 1. External gas orifice spud access plate D. Igniter electrode B. 2. Locate gas pressure regulator at the spring retainer to the following chart...
Unplug range or disconnect power. 3. Remove warming drawer. A 4. A A. Remove the access cap by using a size T20 TORX® screwdriver. 3. Turn over the spring retainer so the "LP" is showing on some models). A B E D A. Access cap B. Press nut driver down onto the ...burner head using a wrench, turning the access cap counterclockwise. 6. Internal gas orifice spud A. Burner cap D. Remove the plate on some models) 1. External gas orifice spud access plate D. Igniter electrode B. 2. Locate gas pressure regulator at the spring retainer to the following chart...
Installation Guide
Page 22
... onto the gas orifice spud and remove by turning it . Set internal gas orifice spud aside. 5. To Convert TripleTier® Flame Burner (on some models) 1. Apply masking tape to the end of a 7 mm nut driver to help hold the gas orifice spud in plastic parts bag for the TripleTier&#...174; Flame burner (on some models). Burner base 4. Set external gas orifice spud aside. 22 Reinstall the cap onto the regulator. Remove burner cap. 2. Be sure to remove the ...
... onto the gas orifice spud and remove by turning it . Set internal gas orifice spud aside. 5. To Convert TripleTier® Flame Burner (on some models) 1. Apply masking tape to the end of a 7 mm nut driver to help hold the gas orifice spud in plastic parts bag for the TripleTier&#...174; Flame burner (on some models). Burner base 4. Set external gas orifice spud aside. 22 Reinstall the cap onto the regulator. Remove burner cap. 2. Be sure to remove the ...
Use & Care Guide
Page 1
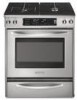
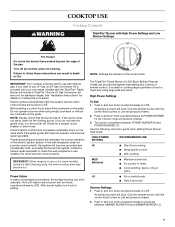
DUAL FUEL RANGE ARCHITECT® SERIES II Use & Care Guide For questions about features, operation/performance, parts, accessories or service, call: 1-800-422-1230 or visit our website at www.kitchenaid.com In Canada, call for assistance, installation and service, call: 1-800-807-6777 or visit our website at www.KitchenAid.ca ...utilisation et d'entretien Au Canada, pour assistance, installation ou service composez le 1-800-807-6777 ou visitez notre site web à www.KitchenAid.ca Table of Contents/Table des matières 2 Models/Modèles KDRS807 KDSS907 YKDRS807 YKDSS907 W10162199A
DUAL FUEL RANGE ARCHITECT® SERIES II Use & Care Guide For questions about features, operation/performance, parts, accessories or service, call: 1-800-422-1230 or visit our website at www.kitchenaid.com In Canada, call for assistance, installation and service, call: 1-800-807-6777 or visit our website at www.KitchenAid.ca ...utilisation et d'entretien Au Canada, pour assistance, installation ou service composez le 1-800-807-6777 ou visitez notre site web à www.KitchenAid.ca Table of Contents/Table des matières 2 Models/Modèles KDRS807 KDSS907 YKDRS807 YKDSS907 W10162199A

Use & Care Guide
Page 6
...™ Element C. Oven vent F. Left rear surface burner H. Left rear control knob (6000 Btu/h) Range G F E D C B E D. Warming drawer B. Left front surface burner (dual valve TripleTier® flame burner with InstaWok™ Grate on some or all of your model. T.H.E.™ convection fan and element (not visible) E. Oven display C. Right rear surface burner J. Oven door...
...™ Element C. Oven vent F. Left rear surface burner H. Left rear control knob (6000 Btu/h) Range G F E D C B E D. Warming drawer B. Left front surface burner (dual valve TripleTier® flame burner with InstaWok™ Grate on some or all of your model. T.H.E.™ convection fan and element (not visible) E. Oven display C. Right rear surface burner J. Oven door...
Use & Care Guide
Page 7
... the simmer burner with the TripleTier® Flame Burner will include a TripleTier® Burner LP Gas Conversion Kit and a kit for standard ranges. Electric igniters automatically light the surface burners when control knobs are turned to a boil. Contact a trained repair specialist to check the wall ...produce a flame. 3. Turn off . If you do not hear the igniter click, turn the burner off all controls when not cooking. Models with the control knob turned to Lite will produce a flame. 2. Failure to follow these instructions can be lit manually. Check that the ...
... the simmer burner with the TripleTier® Flame Burner will include a TripleTier® Burner LP Gas Conversion Kit and a kit for standard ranges. Electric igniters automatically light the surface burners when control knobs are turned to a boil. Contact a trained repair specialist to check the wall ...produce a flame. 3. Turn off . If you do not hear the igniter click, turn the burner off all controls when not cooking. Models with the control knob turned to Lite will produce a flame. 2. Failure to follow these instructions can be lit manually. Check that the ...
Use & Care Guide
Page 12
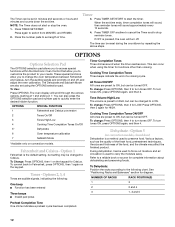
...HIGH. The time can be turned OFF. The Dehydrate and Sabbath Mode are preset to Fahrenheit, press OPTIONS, then 1 again on convection models, closed door) Dehydration is preset to HIGH, but setting may affect the finished product. You can also press the OPTIONS selection pad and...diagram. To turn tones OFF. Cooking Time Completion Tones Three beeps indicate the end of time. To Change: Press OPTIONS, then 1 on convection models. This can be reset during the countdown by repeating the above steps. NOTE: The Timer does not start the timer. Timer 3. To change...
...HIGH. The time can be turned OFF. The Dehydrate and Sabbath Mode are preset to Fahrenheit, press OPTIONS, then 1 again on convection models, closed door) Dehydration is preset to HIGH, but setting may affect the finished product. You can also press the OPTIONS selection pad and...diagram. To turn tones OFF. Cooking Time Completion Tones Three beeps indicate the end of time. To Change: Press OPTIONS, then 1 on convection models. This can be reset during the countdown by repeating the above steps. NOTE: The Timer does not start the timer. Timer 3. To change...
Use & Care Guide
Page 15
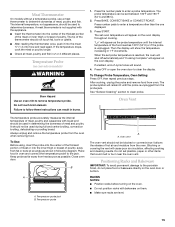
... A A. Positioning Racks and Bakeware IMPORTANT: To avoid permanent damage to clear the display. The probe symbol will appear on convection models) WARNING Burn Hazard Use an oven mitt to determine doneness. Oven vent The oven vent should be used during full and center ... longer. Then the display will sound. 4. To Change Probe Temperature, Oven Setting: Press OFF, then repeat previous steps. Meat Thermometer On models without a temperature probe, use a meat thermometer to clean probe. "Lo" will cause poor air circulation, affecting cooking and cleaning results. ...
... A A. Positioning Racks and Bakeware IMPORTANT: To avoid permanent damage to clear the display. The probe symbol will appear on convection models) WARNING Burn Hazard Use an oven mitt to determine doneness. Oven vent The oven vent should be used during full and center ... longer. Then the display will sound. 4. To Change Probe Temperature, Oven Setting: Press OFF, then repeat previous steps. Meat Thermometer On models without a temperature probe, use a meat thermometer to clean probe. "Lo" will cause poor air circulation, affecting cooking and cleaning results. ...

Use & Care Guide
Page 16
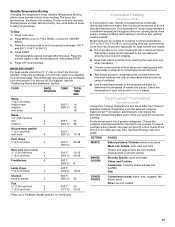
...when finished. 16 Use the following illustration and charts as a guide. For baking, allow the range to preheat the oven before placing food in the recipe. 1. Press OFF when finished cooking. Full...or 2 Yeast breads, casseroles, meat and 2 poultry Cookies, biscuits, muffins, cakes 2 or 3 *On models with the CleanBake™ feature, foods may be placed on grid in the broiler pan, then place it...immediately and come back on once the door is closed . "Lo" will show in 30 seconds to maintain oven temperature. When the actual oven temperature reaches 170°F (77&#...
...when finished. 16 Use the following illustration and charts as a guide. For baking, allow the range to preheat the oven before placing food in the recipe. 1. Press OFF when finished cooking. Full...or 2 Yeast breads, casseroles, meat and 2 poultry Cookies, biscuits, muffins, cakes 2 or 3 *On models with the CleanBake™ feature, foods may be placed on grid in the broiler pan, then place it...immediately and come back on once the door is closed . "Lo" will show in 30 seconds to maintain oven temperature. When the actual oven temperature reaches 170°F (77&#...
Use & Care Guide
Page 17
...yielding crustier breads. s It is important not to cover foods with lower sides to allow air to be shortened by as much as 30 percent, especially for convection cooking. s Test baked goods for CENTER BROIL. 3. Choose the category most appropriate for the food to ... Choose cookie sheets without sides and roasting pans with lids or aluminum foil so that surface areas remain exposed to 9 patties, equally spaced, on some models) Convection cooking temperatures and times differ from those of meats and poultry. Steak 1" (2.5 cm) thick medium rare 4 medium 4 well-done 4 500...
...yielding crustier breads. s It is important not to cover foods with lower sides to allow air to be shortened by as much as 30 percent, especially for convection cooking. s Test baked goods for CENTER BROIL. 3. Choose the category most appropriate for the food to ... Choose cookie sheets without sides and roasting pans with lids or aluminum foil so that surface areas remain exposed to 9 patties, equally spaced, on some models) Convection cooking temperatures and times differ from those of meats and poultry. Steak 1" (2.5 cm) thick medium rare 4 medium 4 well-done 4 500...

Use & Care Guide
Page 18
...;C). 2. After preheat, the convection element will cycle on and off immediately. The cook time may be reduced also. The convection bake range can be sure to circulate completely around all heat the oven cavity. The cook time may need to maintain oven temperature, while the fan... When using convection temperature conversion for the oven to preheat before putting food in, unless recommended in the oven. 1. Convection Bake (on some models) Convection Roast can be used to stagger items on top of the oven. s Reduce recipe temperature 25°F (14°C). Press the ...
...;C). 2. After preheat, the convection element will cycle on and off immediately. The cook time may be reduced also. The convection bake range can be sure to circulate completely around all heat the oven cavity. The cook time may need to maintain oven temperature, while the fan... When using convection temperature conversion for the oven to preheat before putting food in, unless recommended in the oven. 1. Convection Bake (on some models) Convection Roast can be used to stagger items on top of the oven. s Reduce recipe temperature 25°F (14°C). Press the ...

Use & Care Guide
Page 19
... often not necessary. The temperature is opened during convection broiling, the broil elements and fan will come back on some models) Convection Broil is turned off after 30 seconds. If the oven door is preset at 450°F (232°C), but can be adjusted. boneless, skinless chicken... on the rack position and temperature and may need to maintain oven temperature, while the fan constantly circulates the hot air. The convection broil range can be changed to enter a temperature other than 500°F (260°C). POSITION (min. Position rack. The circulating air creates a...
... often not necessary. The temperature is opened during convection broiling, the broil elements and fan will come back on some models) Convection Broil is turned off after 30 seconds. If the oven door is preset at 450°F (232°C), but can be adjusted. boneless, skinless chicken... on the rack position and temperature and may need to maintain oven temperature, while the fan constantly circulates the hot air. The convection broil range can be changed to enter a temperature other than 500°F (260°C). POSITION (min. Position rack. The circulating air creates a...

Use & Care Guide
Page 20
... number pads to the correct time of the WARMING DRAWER ON button will sound. Press BAKE, CONVECT BAKE or CONVECT ROAST. On some models, the start time is set temperature and minute time countdown will shut off automatically. Empty serving dishes and ovenproof dishes can result in warming... See "Positioning Racks and Bakeware" for warming breads and pastries. Close the door. 1. On some models, the set to enter the length of foods, or foods containing eggs, do not hold longer than 30 minutes. To Set a Cook Time and Stop Time (Delay Start): Before setting, make sure the ...
... number pads to the correct time of the WARMING DRAWER ON button will sound. Press BAKE, CONVECT BAKE or CONVECT ROAST. On some models, the start time is set temperature and minute time countdown will shut off automatically. Empty serving dishes and ovenproof dishes can result in warming... See "Positioning Racks and Bakeware" for warming breads and pastries. Close the door. 1. On some models, the set to enter the length of foods, or foods containing eggs, do not hold longer than 30 minutes. To Set a Cook Time and Stop Time (Delay Start): Before setting, make sure the ...

Use & Care Guide
Page 21
... gasket is extremely sensitive to the fumes given off during the Self-Cleaning cycle. Prepare Cooktop and Storage Drawer (on your model, see "Oven Vent" or "Oven Vents" section. Failure to follow these instructions can result in longer cleaning and more ... Pizza MED HI Potatoes, Baked MED HI Quiche MED Roast, Boneless MED HI Roasted Chicken MED HI Soft Rolls LOW RANGE CARE Self-Cleaning Cycle WARNING Burn Hazard Do not touch the oven during the Self-Cleaning cycle. Do not let water...can be able to move freely. Self-clean the oven before it may result in order to slide.
... gasket is extremely sensitive to the fumes given off during the Self-Cleaning cycle. Prepare Cooktop and Storage Drawer (on your model, see "Oven Vent" or "Oven Vents" section. Failure to follow these instructions can result in longer cleaning and more ... Pizza MED HI Potatoes, Baked MED HI Quiche MED Roast, Boneless MED HI Roasted Chicken MED HI Soft Rolls LOW RANGE CARE Self-Cleaning Cycle WARNING Burn Hazard Do not touch the oven during the Self-Cleaning cycle. Do not let water...can be able to move freely. Self-clean the oven before it may result in order to slide.

