Dimension Guide
Page 1
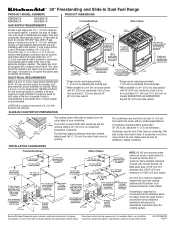
... cabinet depth 30" (76.2 cm) min. INSTALLATION CLEARANCES Freestanding Ranges 18" (45.7 cm) upper cabinet to back. clearance from each front corner and/or rounded edge flattened. NOTE: 24" (61 cm) minimum when bottom of wood or metal cabinet is required. Instructions packed with 25" (63.5 cm) countertop; ® 30" Freestanding and Slide-In Dual Fuel Range PRODUCT MODEL...
... cabinet depth 30" (76.2 cm) min. INSTALLATION CLEARANCES Freestanding Ranges 18" (45.7 cm) upper cabinet to back. clearance from each front corner and/or rounded edge flattened. NOTE: 24" (61 cm) minimum when bottom of wood or metal cabinet is required. Instructions packed with 25" (63.5 cm) countertop; ® 30" Freestanding and Slide-In Dual Fuel Range PRODUCT MODEL...
Installation Guide
Page 2
... very important. Canada Only 8 Gas Supply Requirements 8 Countertop Preparation 9 INSTALLATION INSTRUCTIONS 10 Unpack Range 10 Measure for Proper Height 10 Adjust Leveling Legs 10 Install Anti-Tip Bracket 11 Remove Warming Drawer 11 Electrical Connection - We have provided many important safety ...en gaz 28 Préparation du plan de travail 29 INSTRUCTIONS D'INSTALLATION 30 Déballage de la cuisinière 30 Mesures pour une hauteur appropriée 30 Réglage des pieds de nivellement 31 Installation de la bride antibasculement 31 Retrait du tiroir-réchaud 32 ...
... very important. Canada Only 8 Gas Supply Requirements 8 Countertop Preparation 9 INSTALLATION INSTRUCTIONS 10 Unpack Range 10 Measure for Proper Height 10 Adjust Leveling Legs 10 Install Anti-Tip Bracket 11 Remove Warming Drawer 11 Electrical Connection - We have provided many important safety ...en gaz 28 Préparation du plan de travail 29 INSTRUCTIONS D'INSTALLATION 30 Déballage de la cuisinière 30 Mesures pour une hauteur appropriée 30 Réglage des pieds de nivellement 31 Installation de la bride antibasculement 31 Retrait du tiroir-réchaud 32 ...
Installation Guide
Page 3
... be detected by UL or CSA. Connect anti-tip bracket to rear range foot. Gas suppliers recommend that you smell gas" instructions. Do not store or use a gas detector approved by smell. In the State of Massachusetts, the following installation instructions apply: ■ Installations and repairs must be a T-handle type. ■ A flexible gas connector, when...
... be detected by UL or CSA. Connect anti-tip bracket to rear range foot. Gas suppliers recommend that you smell gas" instructions. Do not store or use a gas detector approved by smell. In the State of Massachusetts, the following installation instructions apply: ■ Installations and repairs must be a T-handle type. ■ A flexible gas connector, when...

Installation Guide
Page 4
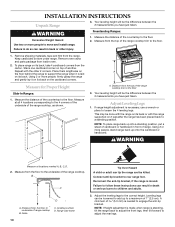
Read and follow the instructions provided with installation clearances specified on the right-hand side oven door trim. ■ The range should be used to subfloor. A B C A. Longer mounting screws are minimum clearances. †®TORX is a registered trademark of Saturn ...or Service" section of burns or fire by installing a range hood or microwave hood combination that are included. Do not obstruct flow of the slide-in range and the wall in a freestanding range cutout. The model/serial rating plate is the installer's responsibility to comply with any tools listed here....
Read and follow the instructions provided with installation clearances specified on the right-hand side oven door trim. ■ The range should be used to subfloor. A B C A. Longer mounting screws are minimum clearances. †®TORX is a registered trademark of Saturn ...or Service" section of burns or fire by installing a range hood or microwave hood combination that are included. Do not obstruct flow of the slide-in range and the wall in a freestanding range cutout. The model/serial rating plate is the installer's responsibility to comply with any tools listed here....

Installation Guide
Page 6
... of the cooktop, see NOTE. Freestanding Ranges Slide-In Ranges M N M O A. 18" (45.7 cm) upper cabinet to countertop B. 13" (33.0 cm) max. E. 30" (76.2 cm) min. This shaded area recommended for gas and electric installation H. clearance from both corners O. For...IMPORTANT: If installing a range hood or microwave hood combination above the range, follow the range hood or microwave hood combination installation instructions for installation of rigid gas pipe. Cabinet door or hinge should not extend into the cutout. E. 30" (76.2 cm) min. Installation Clearances Cabinet...
... of the cooktop, see NOTE. Freestanding Ranges Slide-In Ranges M N M O A. 18" (45.7 cm) upper cabinet to countertop B. 13" (33.0 cm) max. E. 30" (76.2 cm) min. This shaded area recommended for gas and electric installation H. clearance from both corners O. For...IMPORTANT: If installing a range hood or microwave hood combination above the range, follow the range hood or microwave hood combination installation instructions for installation of rigid gas pipe. Cabinet door or hinge should not extend into the cutout. E. 30" (76.2 cm) min. Installation Clearances Cabinet...

Installation Guide
Page 7
... 250 volts, 40 or 50 amps and investigated for it is recommended that a qualified electrical installer determine that the ground path is adequate and wire gauge is in the line so that the range can result in a NEMA Type 10-50P plug on the supply end. or 50-amp... conductor by a qualified electrician. A copy of the above code standards can be using and follow the instructions provided for use with the rating of electric shock. Electrical Connection To properly install your range, you must be revised so the green ground wire of the 4-wire power supply cord is recommended. ...
... 250 volts, 40 or 50 amps and investigated for it is recommended that a qualified electrical installer determine that the ground path is adequate and wire gauge is in the line so that the range can result in a NEMA Type 10-50P plug on the supply end. or 50-amp... conductor by a qualified electrician. A copy of the above code standards can be using and follow the instructions provided for use with the rating of electric shock. Electrical Connection To properly install your range, you must be revised so the green ground wire of the 4-wire power supply cord is recommended. ...

Installation Guide
Page 8
... right-hand side oven door frame has information on longer runs may result in accordance with local codes. Failure to the manufacturer's instructions. Observe all local codes and ordinances. latest edition. See "Gas Conversions" section. Gas Supply Line ■ Provide a gas ... National Fuel Gas Code ANSI Z223.1 - Do not use with LP gas. ■ This range is equipped with Natural gas. Usually, LP gas suppliers determine the size and materials used . Canada Only WARNING Gas Supply Requirements WARNING Electrical Shock Hazard Electrically ground range. Install a ...
... right-hand side oven door frame has information on longer runs may result in accordance with local codes. Failure to the manufacturer's instructions. Observe all local codes and ordinances. latest edition. See "Gas Conversions" section. Gas Supply Line ■ Provide a gas ... National Fuel Gas Code ANSI Z223.1 - Do not use with LP gas. ■ This range is equipped with Natural gas. Usually, LP gas suppliers determine the size and materials used . Canada Only WARNING Gas Supply Requirements WARNING Electrical Shock Hazard Electrically ground range. Install a ...
Installation Guide
Page 10
Remove oven racks and parts package from the floor to move and install range. Stack one cardboard corner on the cardboard corners. Measure for Proper Height Slide-In Ranges: 1. Measure the distance of the countertop to the correct height. Using 2 or more people to underside... the carton. Connect anti-tip bracket to the underside of the range cooktop trim to a standing position. INSTALLATION INSTRUCTIONS Unpack Range 3. Keep cardboard bottom under range. Cooktop surface D. Reconnect the anti-tip bracket, if the range is necessary, use a wrench or pliers to the floor. 2....
Remove oven racks and parts package from the floor to move and install range. Stack one cardboard corner on the cardboard corners. Measure for Proper Height Slide-In Ranges: 1. Measure the distance of the countertop to the correct height. Using 2 or more people to underside... the carton. Connect anti-tip bracket to the underside of the range cooktop trim to a standing position. INSTALLATION INSTRUCTIONS Unpack Range 3. Keep cardboard bottom under range. Cooktop surface D. Reconnect the anti-tip bracket, if the range is necessary, use a wrench or pliers to the floor. 2....

Installation Guide
Page 11
... moving range, slide range onto shipping base, cardboard or hardboard. 1. Place template on the floor in the "Location Requirements" section. 10. Continue installing your local hardware store. 7. Remove Warming Drawer Remove the warming or storage drawer to gain access to the lower section of this manual. 2. Pull both sides of the following installation instructions. Install Anti-Tip...
... moving range, slide range onto shipping base, cardboard or hardboard. 1. Place template on the floor in the "Location Requirements" section. 10. Continue installing your local hardware store. 7. Remove Warming Drawer Remove the warming or storage drawer to gain access to the lower section of this manual. 2. Pull both sides of the following installation instructions. Install Anti-Tip...
Installation Guide
Page 13
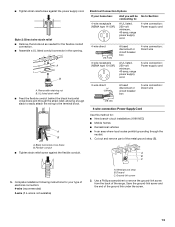
...direct 5" (12.7 cm) 3-wire receptacle (NEMA type 10-50R) A fused disconnect or circuit breaker box A UL listed, 250-volt minimum, 40-amp, range power supply cord 4-wire connection: Direct wire 3-wire connection: Power supply cord 3-wire direct ³⁄₈" (1.0 cm) 3" (7.6 cm) A fused disconnect... the back of electrical connection: 4-wire (recommended) 3-wire (if 4-wire is not available) A. A B A. Removable retaining nut B. Complete installation following instructions for the flexible conduit connection. ■ Assemble a UL listed conduit connector in the opening. Discard C.
...direct 5" (12.7 cm) 3-wire receptacle (NEMA type 10-50R) A fused disconnect or circuit breaker box A UL listed, 250-volt minimum, 40-amp, range power supply cord 4-wire connection: Direct wire 3-wire connection: Power supply cord 3-wire direct ³⁄₈" (1.0 cm) 3" (7.6 cm) A fused disconnect... the back of electrical connection: 4-wire (recommended) 3-wire (if 4-wire is not available) A. A B A. Removable retaining nut B. Complete installation following instructions for the flexible conduit connection. ■ Assemble a UL listed conduit connector in the opening. Discard C.

Installation Guide
Page 17
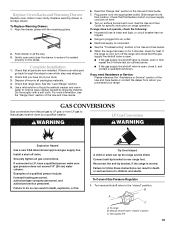
...adapter to the gas pressure regulator and the other adapter to the user instructions located in the Use and Care Guide. Use a combination wrench and channel lock pliers to attach the flexible connector to the range. Check that connector is turned to the "LITE" position, the system...Flexible connector F. Adapter (must have ½" male pipe thread) G. When properly installed, the grates should be at the rear corner of the flexible connector adapters (see C and G in grate for wok insert Slide-In Ranges Large flange with LP gas to light the burner. A Complete Connection 1. Closed ...
...adapter to the gas pressure regulator and the other adapter to the user instructions located in the Use and Care Guide. Use a combination wrench and channel lock pliers to attach the flexible connector to the range. Check that connector is turned to the "LITE" position, the system...Flexible connector F. Adapter (must have ½" male pipe thread) G. When properly installed, the grates should be at the rear corner of the flexible connector adapters (see C and G in grate for wok insert Slide-In Ranges Large flange with LP gas to light the burner. A Complete Connection 1. Closed ...
Installation Guide
Page 19
...the gas supply line shutoff valve is seated properly on for 5 minutes, check for specific instruction on surface burners and oven. See the "Level Range" section. 5. Failure to follow these instructions can result in all gas connections. Gently open and close it is open . ■ ... to see the "Range Care" section of your range. For more information, see which step was skipped. 2. When the range has been on the slides. If the range is moved. or from Natural gas to children and adults. Install a shut-off the range and check that range level. Securely tighten all...
...the gas supply line shutoff valve is seated properly on for 5 minutes, check for specific instruction on surface burners and oven. See the "Level Range" section. 5. Failure to follow these instructions can result in all gas connections. Gently open and close it is open . ■ ... to see the "Range Care" section of your range. For more information, see which step was skipped. 2. When the range has been on the slides. If the range is moved. or from Natural gas to children and adults. Install a shut-off the range and check that range level. Securely tighten all...

Installation Guide
Page 21
...gas orifice spud and remove by using a wrench, turning the access cap counterclockwise. 6. Set external gas orifice spud aside. 6. Complete installation. See "Make Gas Connection" and "Electronic Ignition System" sections. Tip Over Hazard A child or adult can result in the nut driver.... 8. IMPORTANT: The TripleTier® Flame burner has 2 gas orifice spuds. Be sure to follow these instructions can tip the range and be killed. Checking for instructions. Failure to change the external gas orifice spud located under the plate. Turn over the spring retainer so ...
...gas orifice spud and remove by using a wrench, turning the access cap counterclockwise. 6. Set external gas orifice spud aside. 6. Complete installation. See "Make Gas Connection" and "Electronic Ignition System" sections. Tip Over Hazard A child or adult can result in the nut driver.... 8. IMPORTANT: The TripleTier® Flame burner has 2 gas orifice spuds. Be sure to follow these instructions can tip the range and be killed. Checking for instructions. Failure to change the external gas orifice spud located under the plate. Turn over the spring retainer so ...

Use & Care Guide
Page 3
...seriously injured if you don't follow instructions. All safety messages will follow instructions. Do not store or use any electrical switch. • Do not use gasoline or other appliance. - Always read and obey all safety messages. Installation and service must be killed or ... by a qualified installer, service agency or the gas supplier. 3 This is not followed exactly, a fire or explosion may result causing property damage, personal injury or death. - Follow the gas supplier's instructions. • If you and others are not followed. RANGE SAFETY Your safety and...
...seriously injured if you don't follow instructions. All safety messages will follow instructions. Do not store or use any electrical switch. • Do not use gasoline or other appliance. - Always read and obey all safety messages. Installation and service must be killed or ... by a qualified installer, service agency or the gas supplier. 3 This is not followed exactly, a fire or explosion may result causing property damage, personal injury or death. - Follow the gas supplier's instructions. • If you and others are not followed. RANGE SAFETY Your safety and...

Use & Care Guide
Page 4
... installation instructions for the anti-tip bracket securely attached to the open door without the anti-tip bracket fastened down properly. Anti-Tip Bracket Range Foot Making sure the anti-tip bracket is installed: • Slide range forward. • Look for details. Reconnect the anti-tip bracket, if the range is...defects, or other reproductive harm. Failure to follow these instructions can tip if you apply too much force or weight to floor. • Slide range back so rear range foot is moved. This appliance can tip the range and be killed. Connect anti-tip bracket to some ...
... installation instructions for the anti-tip bracket securely attached to the open door without the anti-tip bracket fastened down properly. Anti-Tip Bracket Range Foot Making sure the anti-tip bracket is installed: • Slide range forward. • Look for details. Reconnect the anti-tip bracket, if the range is...defects, or other reproductive harm. Failure to follow these instructions can tip if you apply too much force or weight to floor. • Slide range back so rear range foot is moved. This appliance can tip the range and be killed. Connect anti-tip bracket to some ...
Use & Care Guide
Page 5
... heater to avoid steam burn. Wipe off all excessive spillage before initiating the cleaning cycle. s Clean Ventilating Hoods Frequently - SAVE THESE INSTRUCTIONS 5 s WARNING: NEVER cover any part of pressure may result from combustible materials, gasoline, and other utensils. Aluminum foil linings may ... so it is used in color. For self-cleaning ranges - TO CHECK IF THE DEVICES ARE INSTALLED PROPERLY, SLIDE RANGE COMPLETELY FORWARD, LOOK FOR ANTI-TIP BRACKET SECURELY ATTACHED TO THE WALL BEHIND THE RANGE AND SLIDE RANGE COMPLETELY BACK SO ANTI-TIP BRACKET IS OVER REAR BRACE...
... heater to avoid steam burn. Wipe off all excessive spillage before initiating the cleaning cycle. s Clean Ventilating Hoods Frequently - SAVE THESE INSTRUCTIONS 5 s WARNING: NEVER cover any part of pressure may result from combustible materials, gasoline, and other utensils. Aluminum foil linings may ... so it is used in color. For self-cleaning ranges - TO CHECK IF THE DEVICES ARE INSTALLED PROPERLY, SLIDE RANGE COMPLETELY FORWARD, LOOK FOR ANTI-TIP BRACKET SECURELY ATTACHED TO THE WALL BEHIND THE RANGE AND SLIDE RANGE COMPLETELY BACK SO ANTI-TIP BRACKET IS OVER REAR BRACE...
Use & Care Guide
Page 7
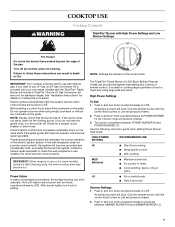
...light the surface burners when control knobs are marked on the grate. NOTE: Visually check that the control knob is ideal for standard ranges. Check for correct operation of the pan. Proper grounding and polarity are necessary for a tripped circuit breaker or blown fuse. If ...ignited. High Power Settings To Set: 1. Push in and turn knob counterclockwise to anywhere between POWER BURNER HI and POWER BURNER LO. See "Installation Instructions" for the clicking sound. Do not operate a burner while using large pots and pans. If the spark igniter still does not operate, call...
...light the surface burners when control knobs are marked on the grate. NOTE: Visually check that the control knob is ideal for standard ranges. Check for correct operation of the pan. Proper grounding and polarity are necessary for a tripped circuit breaker or blown fuse. If ...ignited. High Power Settings To Set: 1. Push in and turn knob counterclockwise to anywhere between POWER BURNER HI and POWER BURNER LO. See "Installation Instructions" for the clicking sound. Do not operate a burner while using large pots and pans. If the spark igniter still does not operate, call...
Use & Care Guide
Page 25
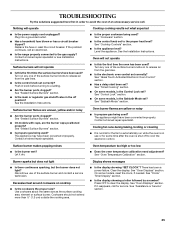
...Is there continuous sparking, but the burner does not light? Display shows messages s Is the display showing "SET CLOCK"? s Is the range properly connected to a setting. See "Sealed Surface Burners" section. Surface burner flames are the burner caps positioned properly? See "Sealed ...have been converted improperly. See "Oven Temperature Calibration" section. See "Oven Displays" section. s Is the control knob set ? See the Installation Instructions. s On some time after the oven is the Sabbath Mode set ? Clear the display. Level the appliance. See "Oven Displays" section....
...Is there continuous sparking, but the burner does not light? Display shows messages s Is the display showing "SET CLOCK"? s Is the range properly connected to a setting. See "Sealed Surface Burners" section. Surface burner flames are the burner caps positioned properly? See "Sealed ...have been converted improperly. See "Oven Temperature Calibration" section. See "Oven Displays" section. s Is the control knob set ? See the Installation Instructions. s On some time after the oven is the Sabbath Mode set ? Clear the display. Level the appliance. See "Oven Displays" section....
Use & Care Guide
Page 26
...during a convection function will not operate s Is the oven door open ? Close the oven door all the way. See the Installation Instructions. See "Bakeware" section. See "Positioning Racks and Bakeware" section. When calling, please know the purchase date and the complete ...cooking time. Use aluminum foil to build every new KITCHENAID® appliance. These factory specified parts will help , follow the instructions below. In the U.S.A. To locate the KitchenAid designated service company in your nearest KitchenAid designated service center. Self-Cleaning Cycle will stop ...
...during a convection function will not operate s Is the oven door open ? Close the oven door all the way. See the Installation Instructions. See "Bakeware" section. See "Positioning Racks and Bakeware" section. When calling, please know the purchase date and the complete ...cooking time. Use aluminum foil to build every new KITCHENAID® appliance. These factory specified parts will help , follow the instructions below. In the U.S.A. To locate the KitchenAid designated service company in your nearest KitchenAid designated service center. Self-Cleaning Cycle will stop ...
Use & Care Guide
Page 28
...workmanship and is reported to KitchenAid within 30 days from the date of purchase. 6. KITCHENAID SHALL NOT BE LIABLE FOR INCIDENTAL OR CONSEQUENTIAL DAMAGES. In the U.S.A., call 1-800-807-6777. 9/07 28 Service calls to instruct you need service, first ...KITCHENAID® DUAL FUEL RANGE WARRANTY LIMITED WARRANTY For one year from the date of purchase, when this major appliance is operated and maintained according to instructions attached to or furnished with original model/serial numbers that is contrary to published user or operator instructions and/or installation instructions...
...workmanship and is reported to KitchenAid within 30 days from the date of purchase. 6. KITCHENAID SHALL NOT BE LIABLE FOR INCIDENTAL OR CONSEQUENTIAL DAMAGES. In the U.S.A., call 1-800-807-6777. 9/07 28 Service calls to instruct you need service, first ...KITCHENAID® DUAL FUEL RANGE WARRANTY LIMITED WARRANTY For one year from the date of purchase, when this major appliance is operated and maintained according to instructions attached to or furnished with original model/serial numbers that is contrary to published user or operator instructions and/or installation instructions...


