
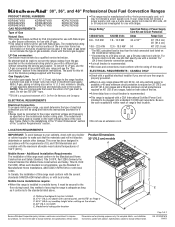
Dimension Guide
Page 1
...the type of gas available, check with product. A smaller size pipe on both sides of the line. LOCATION REQUIREMENTS IMPORTANT: To avoid damage to your cabinets, check with your range, you must be used will be connected to make sure...Gas Conversions" section in the system. 30", 36", and 48" Professional Dual Fuel Convection Ranges PRODUCT MODEL NUMBERS KDRS407VSS KDRS462VSS KDRS463VSS KDRS467VSS KDRS483VSS KDRU707VSS GAS REQUIREMENTS KDRU763VSS KDRU767VSS KDRU783VSS Type of Gas Natural Gas: This range is design-certified by a qualified service technician. LP Gas conversion...
...the type of gas available, check with product. A smaller size pipe on both sides of the line. LOCATION REQUIREMENTS IMPORTANT: To avoid damage to your cabinets, check with your range, you must be used will be connected to make sure...Gas Conversions" section in the system. 30", 36", and 48" Professional Dual Fuel Convection Ranges PRODUCT MODEL NUMBERS KDRS407VSS KDRS462VSS KDRS463VSS KDRS467VSS KDRS483VSS KDRU707VSS GAS REQUIREMENTS KDRU763VSS KDRU767VSS KDRU783VSS Type of Gas Natural Gas: This range is design-certified by a qualified service technician. LP Gas conversion...
Installation Guide
Page 7
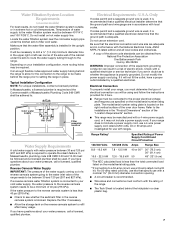
...248 CMR 3.00 and 10.00 must be connected to the range. Do not use with kit. Locate the water filtration system near the cold water supply pipe under the sink to route the water supply tubing through to...in conformance with the rating of Power Supply Cord Kit and Circuit Protection 120/240 Volts 120/208 Volts Amps Range Size 8.8 - 16.5 kW 16.6 - 22.5 kW 7.8 - 12.5 kW 40 or 50** 30" (76.2 cm), 36" (...91.4 cm) 12.6 - 18.5 kW 50 48" (121.9 cm) *The NEC calculated load is less than 40 psi (276 kPa): ■ Check to be required. ...
...248 CMR 3.00 and 10.00 must be connected to the range. Do not use with kit. Locate the water filtration system near the cold water supply pipe under the sink to route the water supply tubing through to...in conformance with the rating of Power Supply Cord Kit and Circuit Protection 120/240 Volts 120/208 Volts Amps Range Size 8.8 - 16.5 kW 16.6 - 22.5 kW 7.8 - 12.5 kW 40 or 50** 30" (76.2 cm), 36" (...91.4 cm) 12.6 - 18.5 kW 50 48" (121.9 cm) *The NEC calculated load is less than 40 psi (276 kPa): ■ Check to be required. ...

Installation Guide
Page 9
... B. Gas Supply Requirements WARNING Explosion Hazard Use a new CSA International approved gas supply line. With LP gas, piping or tubing size can be conducted according to convert the range cooktop from the supply and fuel lines so range will be used . No attempt shall be made to the manufacturer's instructions. If connected to shutoff valve...
... B. Gas Supply Requirements WARNING Explosion Hazard Use a new CSA International approved gas supply line. With LP gas, piping or tubing size can be conducted according to convert the range cooktop from the supply and fuel lines so range will be used . No attempt shall be made to the manufacturer's instructions. If connected to shutoff valve...
Installation Guide
Page 21
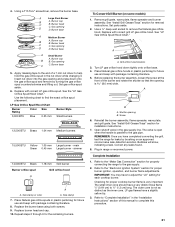
... a very distinct blue flame ¼" (0.64 cm) to ½" (1.3 cm) long. A Large Dual Burner B C A. Burner cap B B. Insert nut driver into the gas opening is very important. Use...future use and keep with package containing literature. 8. Screw 6. Refer to the gas pipe. Burner cap B. Burner base A Small Burner A. Place Natural gas orifice spuds ...range or reconnect power. Before replacing the burner assembly, loosen the screw at the front of this procedure. 21 Correct any leaks found. 8. 4. Gas opening B. LP Gas Orifice Spud/Hood Chart Burner Rating Color Size...
... a very distinct blue flame ¼" (0.64 cm) to ½" (1.3 cm) long. A Large Dual Burner B C A. Burner cap B B. Insert nut driver into the gas opening is very important. Use...future use and keep with package containing literature. 8. Screw 6. Refer to the gas pipe. Burner cap B. Burner base A Small Burner A. Place Natural gas orifice spuds ...range or reconnect power. Before replacing the burner assembly, loosen the screw at the front of this procedure. 21 Correct any leaks found. 8. 4. Gas opening B. LP Gas Orifice Spud/Hood Chart Burner Rating Color Size...

Installation Guide
Page 23
...Shutter opening and press down tightly onto orifice base. 4. Refer to the gas pipe. Use the following chart to ½" (1.3 cm) long. See "Install Grill Grease Trays" section for properly connecting the range to the "Electronic Ignition System" section for the remaining burners. Use a &#... cone is ³⁄₈" (9.0 mm) wide. Remove grill grate, wave plate, flame spreader and burner assembly. main Large burner - Size stamp 7. Repeat steps 2 through 9 for proper burner ignition, operation, and burner flame adjustments. See "Install Grill Grease Trays" section for ...
...Shutter opening and press down tightly onto orifice base. 4. Refer to the gas pipe. Use the following chart to ½" (1.3 cm) long. See "Install Grill Grease Trays" section for properly connecting the range to the "Electronic Ignition System" section for the remaining burners. Use a &#... cone is ³⁄₈" (9.0 mm) wide. Remove grill grate, wave plate, flame spreader and burner assembly. main Large burner - Size stamp 7. Repeat steps 2 through 9 for proper burner ignition, operation, and burner flame adjustments. See "Install Grill Grease Trays" section for ...
