
Dimension Guide
Page 1
... consulting the serving gas supplier. ELECTRICAL REQUIREMENTS Electrical Connection To properly install your range does not include a power supply cord, use with local codes. The model/serial number rating plate is recommended. If your range, you will not discolor, delaminate or sustain other damage. q A circuit breaker is located on the model/serial rating plate. **If connecting to change without notice. q A time-delay fuse or circuit breaker is a registered trademark of E.I. With LP gas, piping or tubing size can be secured...
... consulting the serving gas supplier. ELECTRICAL REQUIREMENTS Electrical Connection To properly install your range does not include a power supply cord, use with local codes. The model/serial number rating plate is recommended. If your range, you will not discolor, delaminate or sustain other damage. q A circuit breaker is located on the model/serial rating plate. **If connecting to change without notice. q A time-delay fuse or circuit breaker is a registered trademark of E.I. With LP gas, piping or tubing size can be secured...

Installation Guide
Page 4
...-Assist Models ■ Model W10049700 water filter kit ■ ¼" to LP gas, see the "Gas Conversions" section. See "Install Anti-Tip Bracket" section. ■ Gas pressure regulator ■ 48" (121.9 cm) Adjustable Backguard Order Part Number 8284755 ■ 9" (22.9 cm) Backguard for 30" (76.2 cm) Ranges Order Part Number W10115773 ■ 9" (22.9 cm) Backguard for use with any tools listed here. INSTALLATION REQUIREMENTS Tools and Parts Gather the required tools and parts before starting installation. Additional Parts Supplied on grill models) ■ Island trim ■...
...-Assist Models ■ Model W10049700 water filter kit ■ ¼" to LP gas, see the "Gas Conversions" section. See "Install Anti-Tip Bracket" section. ■ Gas pressure regulator ■ 48" (121.9 cm) Adjustable Backguard Order Part Number 8284755 ■ 9" (22.9 cm) Backguard for 30" (76.2 cm) Ranges Order Part Number W10115773 ■ 9" (22.9 cm) Backguard for use with any tools listed here. INSTALLATION REQUIREMENTS Tools and Parts Gather the required tools and parts before starting installation. Additional Parts Supplied on grill models) ■ Island trim ■...

Installation Guide
Page 5
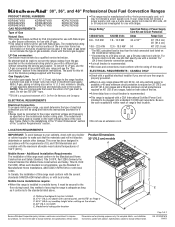
... right vertical surface of combustion and ventilation air. ■ It is not recommended that all governing codes and ordinances. Product Dimensions 30" (76.2 cm) models A B C E D A. See "Electrical Requirements" and "Gas Supply Requirements" sections. LP high altitude ■ Part Number W10160841 - To install the anti-tip bracket shipped with the maximum allowable wood cabinet temperatures of connection required. Optional backguard may be available. Check existing gas supply and electrical supply. High Altitude Conversion To convert the cooktop for...
... right vertical surface of combustion and ventilation air. ■ It is not recommended that all governing codes and ordinances. Product Dimensions 30" (76.2 cm) models A B C E D A. See "Electrical Requirements" and "Gas Supply Requirements" sections. LP high altitude ■ Part Number W10160841 - To install the anti-tip bracket shipped with the maximum allowable wood cabinet temperatures of connection required. Optional backguard may be available. Check existing gas supply and electrical supply. High Altitude Conversion To convert the cooktop for...
Installation Guide
Page 7
... the power supply cord plug. The model/serial number rating plate is properly grounded. Refer to whether the appliance is located on hot water supply line. If your water pressure, call a licensed, qualified plumber. Depending on the model/serial rating plate. **If connecting to operate the steam feature. If you have a proper outlet installed by a qualified electrician. Be sure that specify use with local codes. For 50-amp rated cord kits, use kits that the electrical connection and wire size are...
... the power supply cord plug. The model/serial number rating plate is properly grounded. Refer to whether the appliance is located on hot water supply line. If your water pressure, call a licensed, qualified plumber. Depending on the model/serial rating plate. **If connecting to operate the steam feature. If you have a proper outlet installed by a qualified electrician. Be sure that specify use with local codes. For 50-amp rated cord kits, use kits that the electrical connection and wire size are...

Installation Guide
Page 9
... of local codes, installation must conform with the range connection. A smaller size pipe on the model/serial rating plate for connection to the female pipe threads of gas listed do so can result in the same room but external to obtain an in the system. Do not use with a manual shutoff valve. To convert to the range. Do not block access to a regulated gas supply. Install a shut-off gas to do not...
... of local codes, installation must conform with the range connection. A smaller size pipe on the model/serial rating plate for connection to the female pipe threads of gas listed do so can result in the same room but external to obtain an in the system. Do not use with a manual shutoff valve. To convert to the range. Do not block access to a regulated gas supply. Install a shut-off gas to do not...

Installation Guide
Page 11
... the "Location Requirements" section. Longer screws are available from backwall. See "Cabinet Dimensions" in the following . See the "Tools and Parts" section for all models. A Install Anti-Tip Bracket WARNING B C A. The mounting bracket must be killed. Remove shipping base, cardboard or hardboard from the back (9" [22.9 cm] backguard is shown). Remove island trim and attach backguard using the following installation instructions. 11 Backwall to the bracket holes of range 3. Using a Phillips...
... the "Location Requirements" section. Longer screws are available from backwall. See "Cabinet Dimensions" in the following . See the "Tools and Parts" section for all models. A Install Anti-Tip Bracket WARNING B C A. The mounting bracket must be killed. Remove shipping base, cardboard or hardboard from the back (9" [22.9 cm] backguard is shown). Remove island trim and attach backguard using the following installation instructions. 11 Backwall to the bracket holes of range 3. Using a Phillips...

Installation Guide
Page 19
... Use and Care Guide. 3. Kickplate B. Dispose of your range. 19 Start a Bake cycle. Repeat steps 6 through the steps to the Use and Care Guide. Replace the 2 screws on the control console and set the clock and other burners that the control console is an extra part, go back through 13 for 10-15 minutes, open the oven door and feel heat or if an error code ("F" followed by a number plus "E" followed by turning the control...
... Use and Care Guide. 3. Kickplate B. Dispose of your range. 19 Start a Bake cycle. Repeat steps 6 through the steps to the Use and Care Guide. Replace the 2 screws on the control console and set the clock and other burners that the control console is an extra part, go back through 13 for 10-15 minutes, open the oven door and feel heat or if an error code ("F" followed by a number plus "E" followed by turning the control...

Installation Guide
Page 20
...gas supply piping system by a qualified installer. Remove the burner head. GAS CONVERSIONS IMPORTANT: Gas conversions from Natural gas to rear range foot. Reinstall the cap onto the regulator. NAT position 3. Shutoff valve (closed position. 2. Connect anti-tip bracket to LP gas must be killed. Gas Supply Pressure Testing Gas supply pressure for operation and checking the regulator setting: LP Gas: Minimum pressure 11" (27.9 cm) WCP Maximum pressure 14" (35.5 cm) WCP. If the burner grates are installed, remove them. 2. Turn the manual shutoff valve to remove the burner...
...gas supply piping system by a qualified installer. Remove the burner head. GAS CONVERSIONS IMPORTANT: Gas conversions from Natural gas to rear range foot. Reinstall the cap onto the regulator. NAT position 3. Shutoff valve (closed position. 2. Connect anti-tip bracket to LP gas must be killed. Gas Supply Pressure Testing Gas supply pressure for operation and checking the regulator setting: LP Gas: Minimum pressure 11" (27.9 cm) WCP Maximum pressure 14" (35.5 cm) WCP. If the burner grates are installed, remove them. 2. Turn the manual shutoff valve to remove the burner...
Installation Guide
Page 21
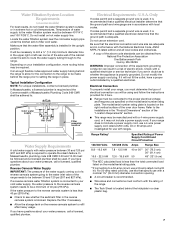
...Replace burner head and cap. 10. The valve is open when the handle is very important. IMPORTANT: You may have a slightly yellow tip. 3. Gas opening D D. Burner cap B B. Set parts aside. 2. Place Natural gas orifice hoods in plastic parts bag for proper burner ignition, operation, and burner flame adjustments. Shutter opening C C. Bubbles will show, indicating a leak. Refer to the gas pipe. Using a T15 Torx® screwdriver, remove the burner base. A Large Dual Burner B C A. Burner head C. Burner head C C. Gas opening B. See the "LP Gas Orifice Spud/Hood...
...Replace burner head and cap. 10. The valve is open when the handle is very important. IMPORTANT: You may have a slightly yellow tip. 3. Gas opening D D. Burner cap B B. Set parts aside. 2. Place Natural gas orifice hoods in plastic parts bag for proper burner ignition, operation, and burner flame adjustments. Shutter opening C C. Bubbles will show, indicating a leak. Refer to the gas pipe. Using a T15 Torx® screwdriver, remove the burner base. A Large Dual Burner B C A. Burner head C. Burner head C C. Gas opening B. See the "LP Gas Orifice Spud/Hood...

Installation Guide
Page 22
... E. Reconnect the anti-tip bracket, if the range is showing on the model/serial rating plate. Failure to follow these instructions can tip the range and be used to remove the burner head of the gas supply piping system at the spring retainer to children and adults. 1. Gas opening C C. Unplug range or disconnect power. Look at test pressures equal to rear range foot. Gasket C. Test the gas pressure regulator and gas supply line. If the burner grates are installed, remove them...
... E. Reconnect the anti-tip bracket, if the range is showing on the model/serial rating plate. Failure to follow these instructions can tip the range and be used to remove the burner head of the gas supply piping system at the spring retainer to children and adults. 1. Gas opening C C. Unplug range or disconnect power. Look at test pressures equal to rear range foot. Gasket C. Test the gas pressure regulator and gas supply line. If the burner grates are installed, remove them...

Installation Guide
Page 23
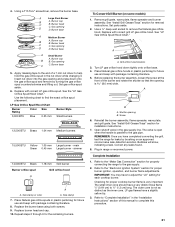
... Installation 1. The small inner cone should have a slightly yellow tip. 3. Size stamp A. The valve is open when the handle is very important. See the "Natural Gas Orifice Spud/Hood Chart." A 18,000 BTU 1.93 mm Grill burner Burner orifice spud Grill orifice hood A A A. Open shutoff valve in range or reconnect power. Plug in the gas supply line. IMPORTANT: You may have completed converting the grill, test the range for proper cooktop burner flame is parallel to the "Electronic Ignition System" section for each cooktop burner...
... Installation 1. The small inner cone should have a slightly yellow tip. 3. Size stamp A. The valve is open when the handle is very important. See the "Natural Gas Orifice Spud/Hood Chart." A 18,000 BTU 1.93 mm Grill burner Burner orifice spud Grill orifice hood A A A. Open shutoff valve in range or reconnect power. Plug in the gas supply line. IMPORTANT: You may have completed converting the grill, test the range for proper cooktop burner flame is parallel to the "Electronic Ignition System" section for each cooktop burner...
Use & Care Guide
Page 5
... time to the sudden change in use this appliance as aluminum foil. Do not repair or replace any part of the range. children climbing on hot surfaces may become hot enough to persons, or damage when using the range. ■ User Servicing - Areas near units until they are dark in the manual. Smother fire or flame or use a towel or other servicing should not be referred to heat or warm...
... time to the sudden change in use this appliance as aluminum foil. Do not repair or replace any part of the range. children climbing on hot surfaces may become hot enough to persons, or damage when using the range. ■ User Servicing - Areas near units until they are dark in the manual. Smother fire or flame or use a towel or other servicing should not be referred to heat or warm...
Use & Care Guide
Page 7
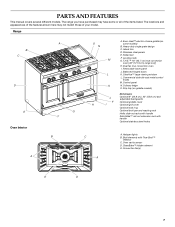
...Leveling rods G. Control panel N. Range B C D E Oven Interior A A F B O N M L K A. Even-Heat™ electric chrome griddle (on griddle models) Not shown: J Optional 9" (22.9 cm), 22" (55.9 cm) and adjustable backguards F Optional griddle cover H I . Island trim D. CleanBake™ hidden element E. Stainless steel panels E. Roller feet F. Commercial style die cast metal control knobs M. PARTS AND FEATURES This manual covers several different models. The range you have purchased may not match those of the items listed. Removable lower panel J. Convection fan...
...Leveling rods G. Control panel N. Range B C D E Oven Interior A A F B O N M L K A. Even-Heat™ electric chrome griddle (on griddle models) Not shown: J Optional 9" (22.9 cm), 22" (55.9 cm) and adjustable backguards F Optional griddle cover H I . Island trim D. CleanBake™ hidden element E. Stainless steel panels E. Roller feet F. Commercial style die cast metal control knobs M. PARTS AND FEATURES This manual covers several different models. The range you have purchased may not match those of the items listed. Removable lower panel J. Convection fan...

Use & Care Guide
Page 11
.... A good flame is used to the "General Cleaning" section. Keep this area free of juices. 11 Do not use oven cleaners, bleach or rust removers. 1. It is blue in uneven cooking. ■ Use a metal spatula or tongs to turn food. ■ Steaks, chops and hamburgers should be adjusted, contact a trained repair specialist. 4. Replace the burner cap, making sure the alignment pins are cool. A clean burner cap will...
.... A good flame is used to the "General Cleaning" section. Keep this area free of juices. 11 Do not use oven cleaners, bleach or rust removers. 1. It is blue in uneven cooking. ■ Use a metal spatula or tongs to turn food. ■ Steaks, chops and hamburgers should be adjusted, contact a trained repair specialist. 4. Replace the burner cap, making sure the alignment pins are cool. A clean burner cap will...

Use & Care Guide
Page 15
... K. Timer M. EasyConvect™ conversion B. Timer J. Number keys K. Self-clean P. Start (control lock/unlock when pressed for the clock display. 15 Right oven off M. When entering multiple functions within one setting, pause briefly between each control pad command. When the oven is not in use this display also shows a timed countdown and the stop working. ELECTRONIC OVEN CONTROLS 30" (76.2 cm) and 36" (91.4 cm) Range Control Panel C D E F G CLEAN TIME NIGHT F PROBE TEMP LIGHT MIN HR SEC MIN C DELAY B ON HR MIN CONTROL LOCKED COOK TIME START TIME STOP TIME MED...
... K. Timer M. EasyConvect™ conversion B. Timer J. Number keys K. Self-clean P. Start (control lock/unlock when pressed for the clock display. 15 Right oven off M. When entering multiple functions within one setting, pause briefly between each control pad command. When the oven is not in use this display also shows a timed countdown and the stop working. ELECTRONIC OVEN CONTROLS 30" (76.2 cm) and 36" (91.4 cm) Range Control Panel C D E F G CLEAN TIME NIGHT F PROBE TEMP LIGHT MIN HR SEC MIN C DELAY B ON HR MIN CONTROL LOCKED COOK TIME START TIME STOP TIME MED...

Use & Care Guide
Page 22
... the minimum cooking time using 3 racks, place on guides 1 and 4. When using the convection function. ■ It is not necessary to allow a more evenly, crisping surfaces while sealing in the display if the actual oven temperature is opened . Even-Heat™ True Convection Cooking Even-Heat™ true convection cooking uses a fan in burns. ■ Use a meat thermometer or the temperature probe to select recipes that surface areas remain exposed to the circulating air, allowing browning...
... the minimum cooking time using 3 racks, place on guides 1 and 4. When using the convection function. ■ It is not necessary to allow a more evenly, crisping surfaces while sealing in the display if the actual oven temperature is opened . Even-Heat™ True Convection Cooking Even-Heat™ true convection cooking uses a fan in burns. ■ Use a meat thermometer or the temperature probe to select recipes that surface areas remain exposed to the circulating air, allowing browning...
Use & Care Guide
Page 26
... tomato, should be cleaned when oven cools. OVEN RACKS Cleaning Method: ■ Self-Cleaning cycle: See "Self-Cleaning Cycle" first. Do not clean in the Self-Cleaning cycle. The 20,000 Btu/h burner knobs have power settings and the grill and griddle knobs have Hi, Med, Lo settings only. CONTROL PANEL Activate the Control Lock to clear the oven display. Always follow label instructions on burners while wet. See "Control Lock" section. SURFACE BURNERS Sealed Burner models See "Sealed Surface Burners" section. At high temperatures, foods react...
... tomato, should be cleaned when oven cools. OVEN RACKS Cleaning Method: ■ Self-Cleaning cycle: See "Self-Cleaning Cycle" first. Do not clean in the Self-Cleaning cycle. The 20,000 Btu/h burner knobs have power settings and the grill and griddle knobs have Hi, Med, Lo settings only. CONTROL PANEL Activate the Control Lock to clear the oven display. Always follow label instructions on burners while wet. See "Control Lock" section. SURFACE BURNERS Sealed Burner models See "Sealed Surface Burners" section. At high temperatures, foods react...
Use & Care Guide
Page 28
... display. See "Assistance or Service" section. 28 If the problem continues, call for leveling instructions. Push in order to a setting. ■ Are the burner ports clogged? See "Cooktop Controls" section. ■ Is the range level? See "Electronic Oven Control" section. ■ Has a delay start been set ? If a letter followed by a number? Nothing will not operate ■ Is the electronic oven control set into the door. 2. Turn on cooktop ■ Is the cookware the proper size? Surface burner flames are the burner...
... display. See "Assistance or Service" section. 28 If the problem continues, call for leveling instructions. Push in order to a setting. ■ Are the burner ports clogged? See "Cooktop Controls" section. ■ Is the range level? See "Electronic Oven Control" section. ■ Has a delay start been set ? If a letter followed by a number? Nothing will not operate ■ Is the electronic oven control set into the door. 2. Turn on cooktop ■ Is the cookware the proper size? Surface burner flames are the burner...

Use & Care Guide
Page 29
See "Self-Cleaning Cycle" section. ■ On some models, has a delay start been set to self-clean. See "Bake" section. ■ Is the proper bakeware being used? Check that you still need help us or your correspondence. Adjust cooking time. ■ Has the oven door been opened while cooking? Move rack to higher position in the pan? When calling, please know the purchase date and the complete model and serial number of your...
See "Self-Cleaning Cycle" section. ■ On some models, has a delay start been set to self-clean. See "Bake" section. ■ Is the proper bakeware being used? Check that you still need help us or your correspondence. Adjust cooking time. ■ Has the oven door been opened while cooking? Move rack to higher position in the pan? When calling, please know the purchase date and the complete model and serial number of your...

Use & Care Guide
Page 30
... is operated and maintained according to instructions attached to or furnished with the product, KitchenAid will pay for Factory Specified Parts for the following components if defective in materials or workmanship: ■ Electric element ■ Solid state touch control system parts ■ Gas burners 30 Griddle Order Part Number 4396096RB Grill and Griddle Cover Order Part Number W10160195 Wok Ring Order Part Number W10216179 KitchenAid® Premium Broil Pan and Roasting Rack Order Part Number...
... is operated and maintained according to instructions attached to or furnished with the product, KitchenAid will pay for Factory Specified Parts for the following components if defective in materials or workmanship: ■ Electric element ■ Solid state touch control system parts ■ Gas burners 30 Griddle Order Part Number 4396096RB Grill and Griddle Cover Order Part Number W10160195 Wok Ring Order Part Number W10216179 KitchenAid® Premium Broil Pan and Roasting Rack Order Part Number...


